Linux mint share wifi
Hallo, today we will make from our Linux Mint 17 machine a Wi-Fi access point, for this we do not need any additional software, just easy as 1-2-3:
1. Go to Main Menu -> Preferences -> Network Connections click on Add and choose Wi-Fi. Choose a network name (SSID), Infrastructure mode. Go to to Wi-Fi Security and choose a WPA/WPA2 Personal and create a password. Go to IPv4 settings and check that it is shared with other computers.
2. Do sudo vi /etc/NetworkManager/system-connections/YOUR_CONNECTION_NAME and change mode=infrastructure to mode=ap and save it.
3. Click on Network Manager near clocks and choose connect to hidden wireless network —> choose your connection —> enjoy.
P.S. If it does not work, run iw list and check in Supported interface modes: * AP, if you do not have AP there, probably your Wi-Fi card does not support this mode.
Comments
Thank you very much! Worked perfectly on Linux Mint 18.1 MATE
Instructions do not work for me, Mint 17:
a) «click on network manager near clocks» -> there is only an icon called «connect to the wired network» in the bottom right corner.
b) when i click on that icon i see a list of wired/wireless connections plus «network settings», «network connections»
c) when i click on «network settings» a window called «networking» (part of settings» pops up.
d) On that window there is a button «connect to a hidden network»
e) when i click on that button, i can select my connection and then click «connect»
f) Unfortunately, it does not work then: My linux mint system itself only says «connecting». On another system where i try to connect to the SSID, it does not work — it asks for password, but then it does not work.
In my experience, every time Ubuntu Network Manager gets involved, stuff does not work. I hope i can find a pure CLI based tutorial instead.
thanks, very easy with Mint 18.1
The idea is: if you have a wired connexion to the PC, how to create a Hotspot with Linux Mint? The wifi connexion that you get from this hotspot works well with Android phones and tablets.
Further explanation of Point 3: Click on Network Manager near clocks and choose under «Network Preferences» («Preferencias de Red in Spanish) the button that says: «Connect to hidden wireless network», then choose your connection.
I find the problem and get the solution. It’s working. Thank you
Hi. I’m not so good in terminal. Can somebody give me a step by step explanation about the second part?
Can’t find hidden network option?
left click the wifi icon in systray -> Network Settings -> wireless
Below the selection of wifi networks is a button ‘connect to hidden network’. Click it, scroll through the list to YOUR_CONNECTION_NAME and select. Done.
sudo gedit
instead of sudo vi for a notepad like gui text editor
THIS IS BRILLIANT FOR ANDROID i.e. PC -> ANDROID SHARED INTERNET.
Because — the built in hotspot mode in linux mint does not work with android; android does not support ad hoc wifi natively. Even with root and editing wpa_supplicant.conf I was unable to connect to the ad hoc hotspot built in to linux mint.
However this does work. And it uses WPA2 not WEP so it’s probably more secure too.
This is quite useful, but alas. WiFi drops after sometime.
Works like Charm on my LM17.2!! Thanks alot man.
nice one man, i so wonder why the network manager doesn’t(yet) give an option for ap. now my brother will stop bugging me.
This is one of the reasons that I switched to Linux, and Linux Mint in particular. My nice Dell XPS 8700 came with Windows 8 (upgraded to 7 later down the road) and the Dell drivers DVD came with a «HotSpot» program.
It sucked. It would disconnect all the time. The drivers for my wireless card SUCKED under Windows and are ROCK SOLID under Linux. I backed up all of my prized pix and vidz one day and ran a Boot and Nuke program to wipe all traces of filesystems and data off my hard drive. In short, my disk drive was factory fresh.
Then I inserted my Linux Mint install DVD and rebooted. I installed Linux Mint 17.1 back in December 2014. It is July 2015 and I still run Linux. Version 17.2 was released about a week ago and I’ve just seamlessly upgraded to that with the upgrade manager, which is another amazing feature of Linux Mint.
Anyways, I love having my Linux PC do everything I want it to in addition to acting as a rock solid WiFi hotspot.
If they started charging $200 a copy of Linux Mint I’d pay it. I love my Mint. I love it a lot!
You need to check VI tutorial, shortly it is goes with you pointer till «infrastructure», press «x» till you delete it and and then press «i» to insert «ap» instead. Then ESC, «:» and print «wq». But BETTER CHECK VI MANUALs.
«Parameters on my system is Preferences. WI-FI Protection is WI-FI Security on my system» can be, I did translation, because I’m using Russion Mint:)
I did not catch your point about HP and USB wifi. Did you setup AP on one system and than use HP with an USB wifi? If yes, than it is ok if you can connect to the network.
I am running newly installed mint-17
I went thru step 1. Parameters on my system is Preferences. WI-FI Protection is WI-FI Security on my system. I have a wireless network up so I used it’s name, but I did not have to. I changed it to something else without affecting the connection. I selected infrastructure mode. In security, I chose WPA & WPA2 personal and entered a password (assigned to the network previously). Again, the password could have been anything and I changed it. Save became available so I did so.
I am running an HP Desktop system with no built in wifi. My wifi is actually a USB 2.0 plugin I got on Ebay. In my case I did not have to do step 2 or 3, I was able to click the Icon in the taskbar where my local net was listed. When I clicked on that, I was asked for the password for the network (not the password I assigned in step 1) and connected right into the web.
The WI-FI icon appeared in the taskbar after the save, clicking on it showed my local net and a couple of outside networks. I did not have to go thru step 2 or 3. Rebooting the system found the wifi still working. On my laptop, clicking the icon in the taskbar shows all networks the system sees including hotspots. Clicking on a hotspot will take you to it and you can access it if you pass local restrictions.
remoulders method won’t do the job, but this tutorial might. I am gonna check it. The option «Use as Hotspot» creates an hotspot with ad-hoc network not access point.
That was a problem — no «Use as Hotspot» in my system. I checked everything, all other tutorial satrting with a «lets install hostapd. «
Or just click «Use as Hotspot» in network settings.
How to Create a WiFi Hotspot in Linux Mint 20
![]()
The WiFi Hotspot allows us to connect the same and heterogeneous devices wirelessly to the Internet. Using the WiFi Hotspot, files can be easily shared with other devices. In this guide, you will learn how to create a WiFi Hotspot in Linux Mint 20.
Creating WiFi Hotspot in Linux Mint 20
Before creating the WiFi Hotspot in Linux Mint 20, make sure that your system is connected to the internet.
Perform the below-given steps to create a WiFi Hotspot on Linux Mint 20:
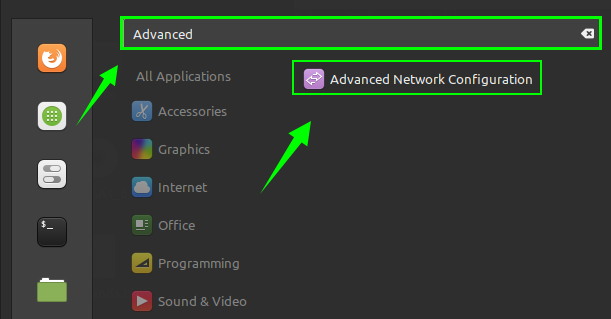
1. Open the Application Menu and search for ‘Advanced Network Configuration’.
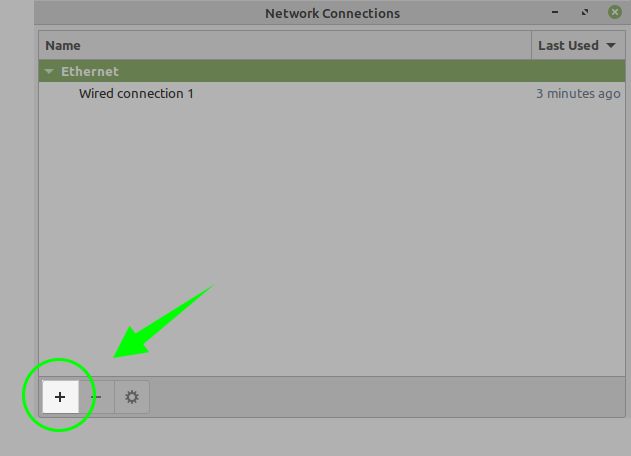
2. Open the ‘Advanced Network Configuration’ application. Click on the ‘+’ button to create a WiFi Hotspot.
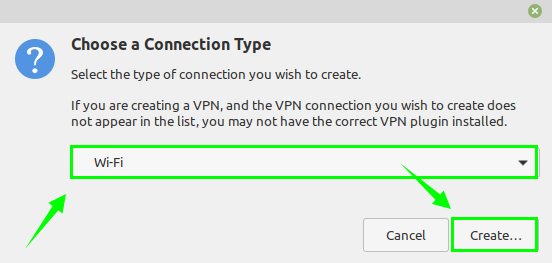
3. Choose WiFi from the given list of Connection Types and click ‘Create’.

4. Next, we need to configure the WiFi Hotspot. Enter the Connection Name in the ‘Connection Name’ and ‘SSID’ fields you wish to set. Moreover, in the mode section, select ‘WiFi’. You will see the option that displays your network card’s physical address in the’ Device’ menu. Choose the wireless network card, and the initial configuration is performed.

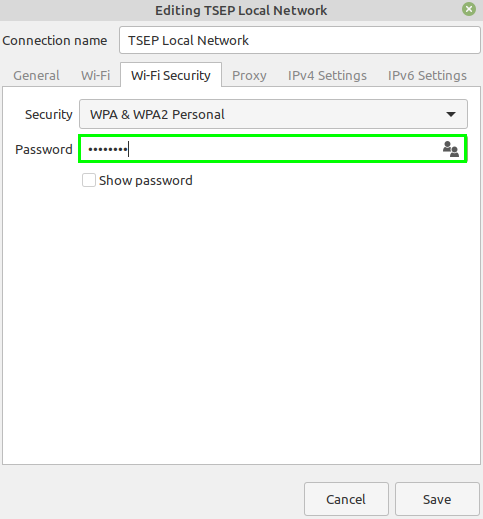
5. Next, click the ‘WiFi-Security’ tab, and from the given list of security options, choose ‘WPA & WPA2 Personal’. Enter the password key for your Hotspot.

6. Further, click on ‘IPV4 Settings’ and ensure that the method is set to ‘Shared to other computers.’

Click on ‘Save,’ and the WiFi Hotspot configuration will be saved.
The WiFi Hotspot is created successfully.
Conclusion
Creating the WiFi Hotspot is a very easy and straightforward process on Linux Mint 20. By creating the WiFi Hotspot, we can easily share the files with the other system connected to the same network. This guide explains the WiFi Hotspot creation on Linux Mint 20.
About the author
Kamran Sattar Awaisi
I am a software engineer and a research scholar. I like to write article and make tutorial on various IT topics including Python, Cloud Computing, Fog Computing and Deep Learning. I love to use Linux based operating systems.
Как создать точку доступа Wi-Fi в Linux Mint 20
Точка доступа Wi-Fi позволяет нам подключать одинаковые и разнородные устройства с беспроводным подключением к Интернету. Используя точку доступа Wi-Fi, можно легко обмениваться файлами с другими устройствами. В этом руководстве вы узнаете, как создать точку доступа Wi-Fi в Linux Mint 20.
Создание точки доступа Wi-Fi в Linux Mint 20
Перед созданием точки доступа Wi-Fi в Linux Mint 20 выполните следующие действия: убедитесь, что ваша система подключена к Интернету.
Выполните следующие шаги, чтобы создать точку доступа Wi-Fi на Linux Mint 20:
1 . Откройте меню приложения и найдите «Расширенная конфигурация сети».

2. Откройте приложение «Расширенная конфигурация сети». Нажмите кнопку «+», чтобы создать точку доступа Wi-Fi.

3. Выберите WiFi из данного списка типов подключения и нажмите «Создать».


4. Далее нам нужно настроить точку доступа Wi-Fi. Введите имя подключения в поля «Имя подключения» и «SSID», которые вы хотите установить. Кроме того, в разделе режима выберите «WiFi». В меню «Устройство» вы увидите параметр, отображающий физический адрес вашей сетевой карты. Выберите беспроводную сетевую карту, и начальная настройка будет выполнена.

5. Затем щелкните вкладку «WiFi-Security» и из данного списка параметров безопасности выберите «WPA & WPA2 Personal». Введите ключ пароля для своей точки доступа.


6. Затем нажмите «Настройки IPV4» и убедитесь, что для метода установлено значение «Общий для других компьютеров».

Нажмите« Сохранить », и конфигурация точки доступа Wi-Fi будет сохранена.
Точка доступа Wi-Fi создана успешно.
Заключение
Создание точки доступа Wi-Fi — это очень простой и понятный процесс в Linux Mint 20. Создав точку доступа Wi-Fi, мы можем легко обмениваться файлами с другой системой, подключенной к та же сеть. В этом руководстве объясняется создание точки доступа Wi-Fi в Linux Mint 20.