- Linux Mint Forums
- Install Samba on Linux Mint to share files with Windows
- Install and Configure Samba Server on Linux Mint 20
- 1. Run system update
- 2. Install Samba on Linux Mint
- 3. Allow samba in Linux Mint Firewall
- 4. Add your user to the Samba group
- 5. Share some Linux Mint folder
- 6. Access the shared folder on Windows or Linux
- Extra tip- Linux Mint SambaShare User
- 8 thoughts on “Install Samba on Linux Mint to share files with Windows”
Linux Mint Forums
There are two different ways to create Samba shares in Linux:
UserShares — Created from the file manager
ClassicShares — Created by adding share definitions to smb.conf either directly or using an application.
This HowTo is about Samba Usershares as it has become the default method to create shares on Mint and Ubuntu. UserShare definitions are located in /var/lib/samba/usershares as opposed to /etc/samba/smb.conf in «Classic Samba».
This method is invoked by opening your file manager ( Nemo, Nautilus, Caja ) > right clicking on the directory you want to share > Sharing Options or Properties. Please note that you can only share folders that you own ( i.e., folders in your own home directory or mount points to partitions where you are the owner, for example ) although there are ways around this limitation by open a file manager as root ( gksu nemo ).
This method relies on the following package:
nautilus-share ( on Ubuntu )
nemo-share ( on Mint Cinnamon )
caja-share ( on Mint MATE )
Note: There is no implementation of this in XFCE’s file manager but you can create a set of «Thunar Custom Actions» to approximate it using this HowTo: Create Samba Shares Directly from Thunar
(1) Create a Shared Directory — using Mint Cinnamons Nemo file manager as an example
Open Nemo
Right click on the directory you own that you wish to share
Select «Sharing Options»
Select «Share this Folder»
Now you have some decisions to make.
(1a) If you want your users ( or guests ) to have write access then:
Select «Allow other people to write in this folder»
(1b) If you want everyone in your home network to have access to that shared folder:
Select «Guest Access»
(1c) When you click on Create Share a dialog box pops up and asks you if you want it to add permissions automatically — you do.
NOTE 1: If you allow «guest access» you’re done. You can skip the rest of
this document ( except for note B mentioned at the end ). Everyone on the
network will be able to Read and/or Write from/to that folder. If you don’t
want guest access then you will have to create users with passwords
( explained later )
NOTE 2: If you allow guest access and you are connected directly to the internet
everyone will have access. If you have a home network and are behind a Router
you should be OK since the outside world can’t see your individual machine
(1d) If you want username and password authentication before anyone accesses your share then proceed to step (2)
(2) Accessing Shares with Authentication
I will show 2 of the more common scenarios of how that can be done and use the following keys:
altair = Your Mint login name on the machine whose folders you want to share on the network.
agnes = The login name of a remote user who wants access to that share.
File sharing in linux with authentication requires two completely different sets of usernames and passwords.
[] Scenario 1: Accessing the share using the Share Owner’s User Name.
Even though the Share Owner already has a login name and password it must also have a «Samba» user name and password:
On the Mint Box with the share:
Open a terminal and run:
It will ask you for sudo’s password and then ask you for the password you want to use for samba. The two do not have to match.
[] Scenario 2: Accessing the share using the Remote User’s Name
This is more complicated since you can’t create a samba user without first creating a new user.
Create a Remote User Name account on the Mint Box with the share:
On the Mint Box with the share:
Menu > Administration > Users and Groups > Add User >
Username: agnes
Password: Can be anything.
NOTE: There is another way to add a new user to the Mint Box with the share if the only reason you’re adding it is for share access:
Open Terminal
Type sudo useradd -s /bin/true agnes
This will create a linux user on the server that has no server logon capability and no server home directory.
Then add that user to the samba password database:
Your machine should show up under Network in the client machines file manager. If it does not I would suggest one of these HowTo’s to rectify:
Samba Browsing Problems Checklist
All Linux or Linux / OSX Only Network Browsing
(A) «Guest Access» will not be available unless the line:
usershare allow guests = yes is somewhere in etc/samba/smb.conf. It’s included in the default smb.conf as part of the install but if you have written your own it may not be there so you will have to add it back.
Note : On Mint Debian that line is not present in smb.conf by default so it will have to be added and samba ( note in Debian it’s samba not smbd ) will have to be restarted:
sudo service samba restart(B) If the remote user has write access to a share it comes across as either the user «nobody» ( for guest access ) or as that user ( agnes for example ). This makes it impossible for you to write to that file. Here is a workaround: add the following line to the [global] section of etc/samba/smb.conf :
sudo service smbd restart(C) In classic samba you can add parameters such as «hosts allow», «hosts deny», «valid users, etc.. to the «share» portion of smb.conf. There is no «share portion» in smb.conf using usershares. You can still use these parameters in smb.conf and they will control access but only globally for all shares.
(D) The biggest difference between usershares and classic samba is the control of Samba User access. In usershares all Samba Users will have access to all shared directories that require authentication. In classic shares you can dictate exactly what user has access to what share.
Please add a [SOLVED] at the end of your original subject header if your question has been answered and solved.
Install Samba on Linux Mint to share files with Windows
Samba is a popular, open-source networking software that computers with a Unix or Linux – operating system allow the sharing of network resources from Windows -networks, such as files and printers. However, it is not limited to Windows only, we can install and use on Unix / Linux- based servers pr Desktop to share resources over the network. The common protocols Server Message Block (SMB) and Common Internet File System (CIFS, an open version of SMB) are the basis on which Samba is based. The name ” Samba ” is just a name given to represent “SMB”.
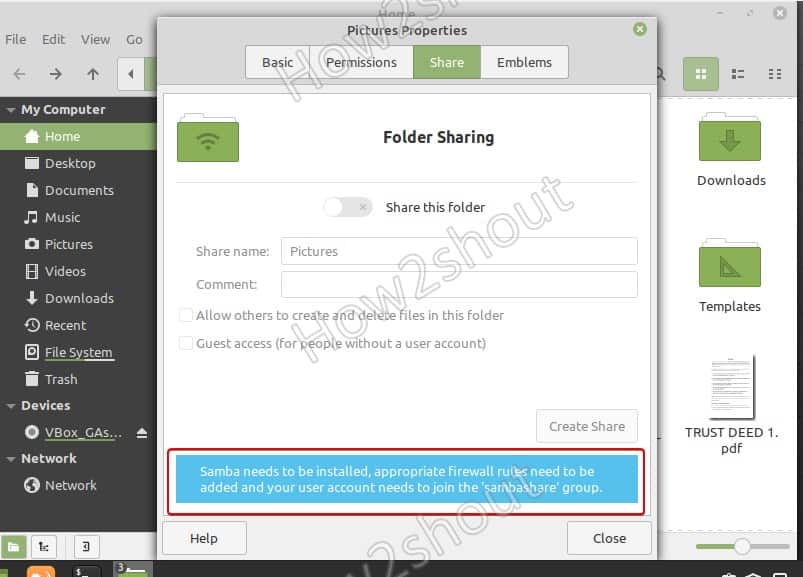
If you are using Linux Mint and want to share some folder, then right-click on it and select properties. And then the Share Tab. However, you will not able to enable this option because samba is not there yet. To confirm, you can see a message given at the bottom “Samba needs to be installed, appropriate firewall rules need to be added and your user account needs to join the ‘samba share group“.
To solve this let’s follow the given steps in this article…
Install and Configure Samba Server on Linux Mint 20
1. Run system update
Well, it is not a necessary step, however, run the system update command to rebuild the repo cache and make sure all the system installed packages are up to date.
2. Install Samba on Linux Mint
Next, in your command terminal use the APT package manager to install Samba on your Linux Mint. The packages to set it up are already there in the system repository, thus we don’t need to add anything extra.
Check its service is active and running:
sudo systemctl status smbd
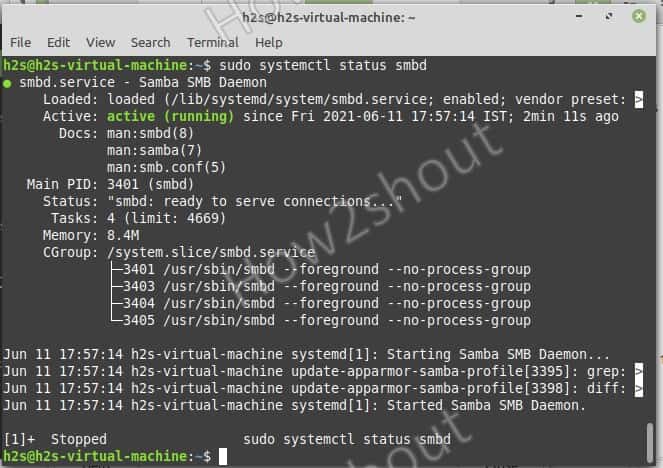
If it is not active then run:
sudo systemctl --enable now smbd
3. Allow samba in Linux Mint Firewall
To connect and access the shared files over SMB protocol, we have to first whitelist and allow its service to get accessed from the outside of the computer. Thus, allow it in the firewall
4. Add your user to the Samba group
Let’s add the current System user to the SambaShare group, so it can access all files and folders shared under it.
sudo usermod -aG sambashare $USER
set the password for share: This will be different from your system password.
Note: $USER means your current user, if you want to set some other user then change $USER with the particular user name. Also, the file or folder you want to share must be accessible to that particular user.
Alternatively, if you want to add some other users to the SAMBA group use:
sudo usermod -aG sambashare your-user
sudo smbpasswd -a your-user
5. Share some Linux Mint folder
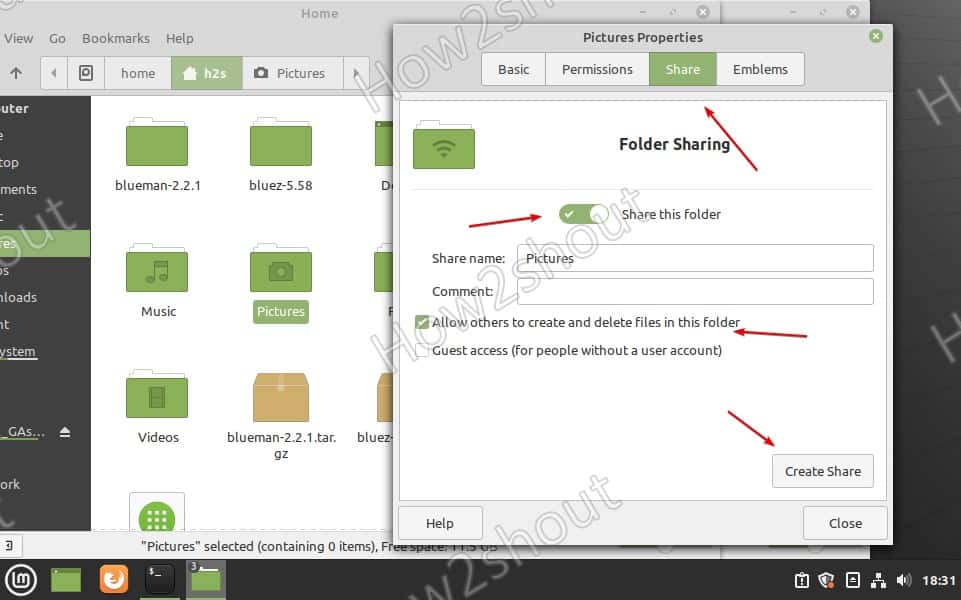
Lets’ say I want to share the Pictures folder or any other on my Linux Mint that is owned by my current user. So, for that simply go to that folder, right-click on it and select the Share tab.
6. Access the shared folder on Windows or Linux
Now, we can mount the Linux Mint shared folder on other Windows or Linux systems available in the same network or domain.
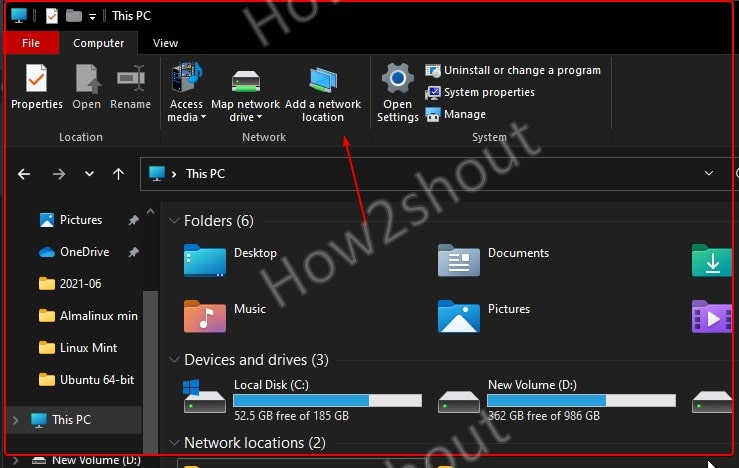
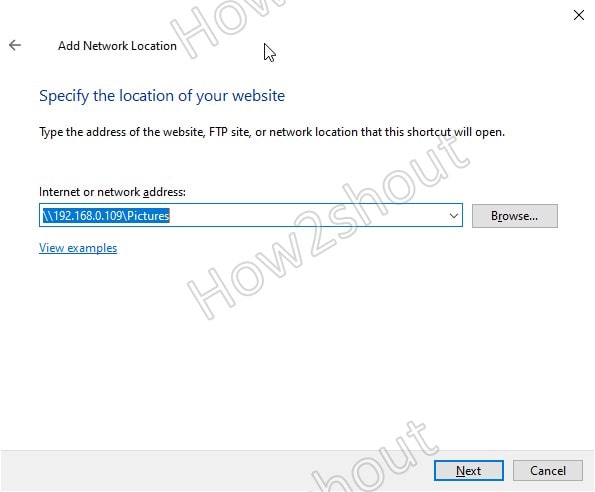
On Windows 10/8/7
- Open My Computer or This PC
- Select Add network location icon given in the top menu.

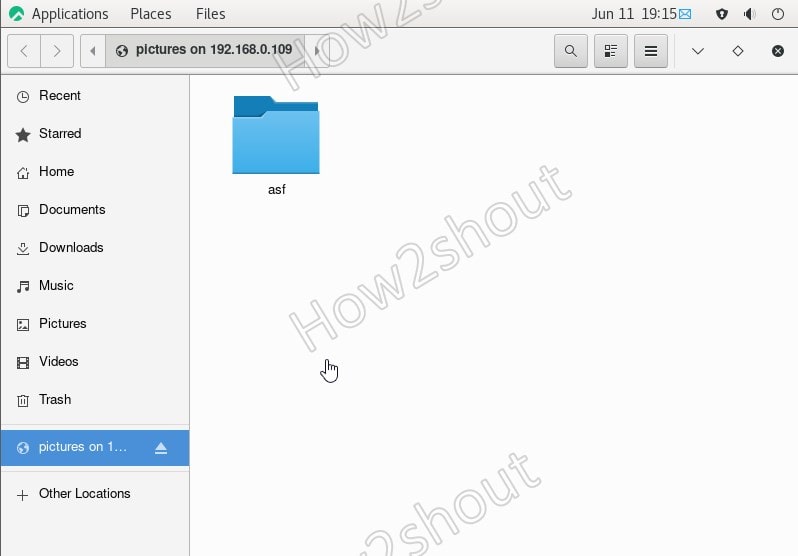
- Add your Linux Mint \\server-ipaddress\shared -folder-path– For example, here we have shared the Pictures folder, the path will be like this- \\192.168.0.109\Pictures

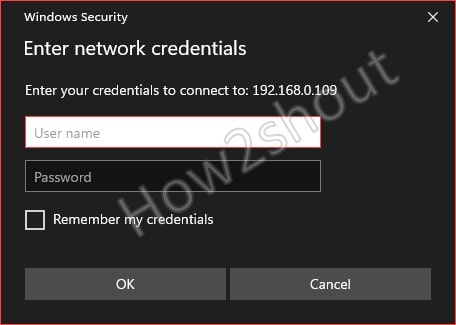
- Enter Samba User and password

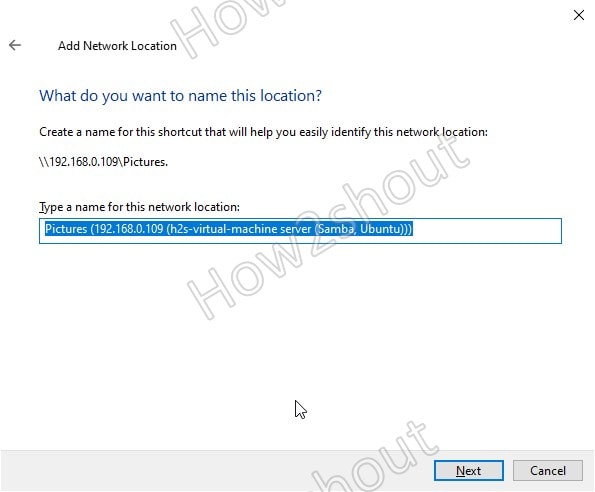
- The system will set a random name for your shared folder, however, you change to something easy to remember.
- Finally, you have the shared folder with read and write access.


On Linux systems such as Ubuntu, CentOS, and others…
The place to connect the samba server can be different from Linux to Linux, depending upon the desktop environment.
Here we are showing an example for Ubuntu and CentOS using GNOME.
- Open File Manager
- Select Other Locations from the right side given panel.
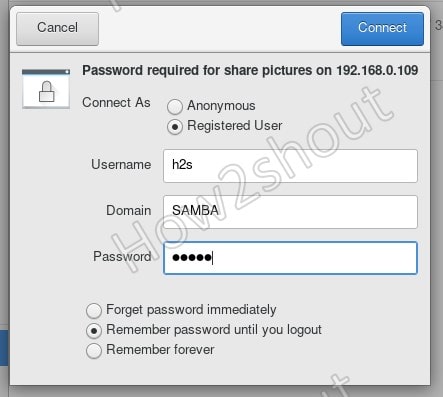
- At the bottom, in the “Connect Server” box type- smb://server-ip/shared-folder-path

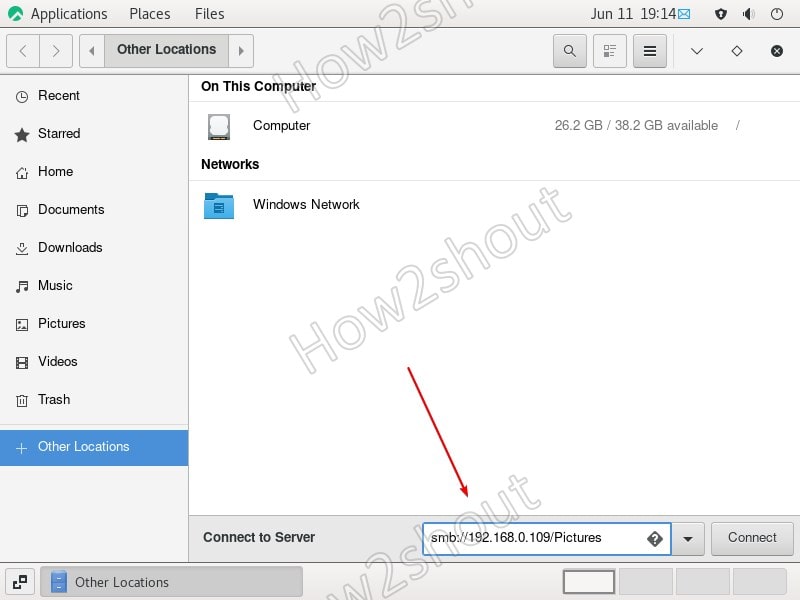
- Click on Connect.
- Select Registered User and enter that username and password


Extra tip- Linux Mint SambaShare User
If you want to create a new user to access the folder you want to share except it cannot access anything else then follow the below steps:
Create users:
Add user to Sambashare group
sudo usermode -aG new-user sambshare
Change the folder rights of a folder that you want to share to read and write for all users. So, that our new user can access that.
sudo chmod 777 folder-path
Now, you can access the shared folder using the new user and its password.
8 thoughts on “Install Samba on Linux Mint to share files with Windows”
I had to use “sudo smbpasswd -a $USER” otherwise I got the error “Failed to find the entry for user …”
Otherwise, a very straightforward setup. Many thanks. Reply
Awesome walkthrough, thank you!| One minor typo in the “Add user to Sambashare group” step:
Command should be `sudo usermod -aG sambashare new-user` …and then it might be good to set the password for that new user immediately following: `sudo smbpasswd -a new-user` Reply
For the command line “sudo systemctl –enable now smbd”
in my version – Linux Mint 17.3 “Rosa” Cinnamon – I had to shorton to “sudo enable now smbd” to work. Reply
Everything working fast, I have an old gateway DX4200 with 8 GB, and a tablet with Windows 10. Your tutorial was accurate and worked for me. Thanks so much, would please provide a xfer link and send you $ufficient grace. Reply
step 4 is missing instructions on how to create the user in the first place.
step 5 is bad. nemo sharing is terrible. it won’t let you specify who you share what with, it just shares it with everyone Reply