- How to Install and Configure Samba on Linux Mint 20
- To Install and Configure Samba Server on Linux Mint 20
- Introduction:
- Linux mint system config samba
- system config samba
- system config samba
- system config samba
- system config samba
- system config samba
- system config samba
- system config samba
- Linux mint system config samba
How to Install and Configure Samba on Linux Mint 20
To Install and Configure Samba Server on Linux Mint 20
Introduction:
Samba is an open-source software suite that runs on Unix/Linux. It is mainly used for communicating with Windows clients like a native application. This is done by SAMBA since it employs the Common Internet File System (CIFS). This tutorial covers the installation process and configuration of Samba proxy on Linux Mint 20.
PORT Number of samba server is
1. UDP(User Datagram Protocol) — 137,138
2. TCP(Transfer Control Protocol) – 139,445
Samba Server have TWO Protocols
1. SMB – Server Message Protocol
2. NMB – Network Message Protocol
Let’s check the version of OS by using following command.
[email protected]:~# cat /etc/os-release NAME="Linux Mint" VERSION="20 (Ulyana)" ID=linuxmint ID_LIKE=ubuntu PRETTY_NAME="Linux Mint 20" VERSION_ID="20" HOME_URL="https://www.linuxmint.com/" SUPPORT_URL="https://forums.ubuntu.com/" BUG_REPORT_URL="http://linuxmint-troubleshooting-guide.readthedocs.io/en/latest/" PRIVACY_POLICY_URL="https://www.linuxmint.com/" VERSION_CODENAME=ulyana UBUNTU_CODENAME=focal Once the version is checked, let’s proceed with the installation of the samba service by using following command
[email protected]:~# apt install samba -y Reading package lists. Done Building dependency tree Reading state information. Done The following additional packages will be installed: ibverbs-providers libcephfs2 libibverbs1 libldb2 librados2 librdmacm1 libsmbclient libwbclient0 Processing triggers for systemd (245.4-4ubuntu3) . . . . Processing triggers for man-db (2.9.1-1) . Processing triggers for libc-bin (2.31-0ubuntu9) . Once the installation is completed, start with the smbd service by using following command
[email protected]:~# systemctl start smbd And then, check the status of smbd service by using following command [email protected]:~# systemctl status smbd ● smbd.service - Samba SMB Daemon Loaded: loaded (/lib/systemd/system/smbd.service; enabled; vendor preset: enabled) Active: active (running) since Mon 2020-11-02 10:49:19 IST; 40s ago Docs: man:smbd(8) man:samba(7) man:smb.conf(5) Main PID: 2896 (smbd) Status: "smbd: ready to serve connections. " Tasks: 4 (limit: 2244) Memory: 9.6M CGroup: /system.slice/smbd.service ├─2896 /usr/sbin/smbd --foreground --no-process-group ├─2898 /usr/sbin/smbd --foreground --no-process-group ├─2899 /usr/sbin/smbd --foreground --no-process-group └─2902 /usr/sbin/smbd --foreground --no-process-group Nov 02 10:49:18 linuxhelp systemd[1]: Starting Samba SMB Daemon. Nov 02 10:49:18 linuxhelp update-apparmor-samba-profile[2890]: grep: /etc/apparmor.d/samba/smbd-shares: No such fil> Nov 02 10:49:18 linuxhelp update-apparmor-samba-profile[2893]: diff: /etc/apparmor.d/samba/smbd-shares: No such fil> Nov 02 10:49:19 linuxhelp systemd[1]: Started Samba SMB Daemon. After that, create the required directories by using the following command
[email protected]:~# mkdir /home/user [email protected]:~# mkdir /home/user/share1 [email protected]:~# mkdir /home/user/share2 Now that the directories are created, let’s give permissions to those directories by using the following command
[email protected]:~# chmod 777 /home/user/share1 [email protected]:~# chmod 777 /home/user/share2 Next add the users to the smbd service by using the following command
[email protected]:~# useradd user1 [email protected]:~# useradd user2 Once the users are added, Create credentials on users by using the following command
[email protected]:~# smbpasswd -a user1 New SMB password: Retype new SMB password: Added user user1. [email protected]:~# smbpasswd -a user2 New SMB password: Retype new SMB password: Added user user2. Once the credentials are created, Configure some rules to the smb.conf file by using the following command
[email protected]:~# vi /etc/samba/smb.conf [share1] path = /home/user/share1 valid users = user1, user2 read list = user2 write list = user1 browseable = yes [share2] path = home/user/share2 valid users = user1, user2 read list = user1 write list = user2 browseable = yes Once the configuration is completed, check the parameters by using the following command
[email protected]:~# testparm Load smb config files from /etc/samba/smb.conf Loaded services file OK. Server role: ROLE_STANDALONE Press enter to see a dump of your service definitions #Global parameters [global] log file = /var/log/samba/log.%m logging = file map to guest = Bad User max log size = 1000 obey pam restrictions = Yes pam password change = Yes panic action = /usr/share/samba/panic-action %d passwd chat = *Enter\snew\s*\spassword:* %n\n *Retype\snew\s*\spassword:* %n\n *password\supdated\ssuccessfully* . passwd program = /usr/bin/passwd %u server role = standalone server server string = %h server (Samba, Ubuntu) unix password sync = Yes usershare allow guests = Yes idmap config * : backend = tdb [printers] browseable = No comment = All Printers create mask = 0700 path = /var/spool/samba printable = Yes [print$] comment = Printer Drivers path = /var/lib/samba/printers [share1] path = /home/user/share1 read list = user2 valid users = user1 user2 write list = user1 [share2] path = home/user/share2 read list = user1 valid users = user1 user2 write list = user2 Once the parameter is checked, restart the smbd service by using the following command
Let check my ip by using the following command
[email protected]:~# ip a 1: lo: mtu 65536 qdisc noqueue state UNKNOWN group default qlen 1000 link/loopback 00:00:00:00:00:00 brd 00:00:00:00:00:00 inet 127.0.0.1/8 scope host lo valid_lft forever preferred_lft forever inet6 ::1/128 scope host valid_lft forever preferred_lft forever 2: ens33: mtu 1500 qdisc fq_codel state UP group default qlen 1000 link/ether 00:0c:29:be:4b:b2 brd ff:ff:ff:ff:ff:ff inet 192.168.7.236/24 brd 192.168.7.255 scope global noprefixroute ens33 valid_lft forever preferred_lft forever inet6 fe80::960a:2495:896e:6cd1/64 scope link noprefixroute valid_lft forever preferred_lft forever 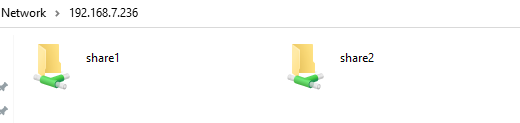
Open the windows explorer & search your IP. Then Open share1 directory and enter the credential of user1.

Create a new folder to share one directory

Create a new document file to the folder
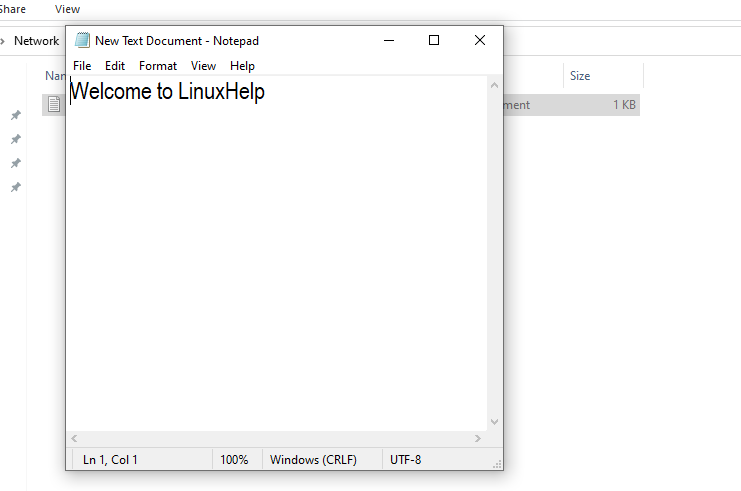
Edit the file.
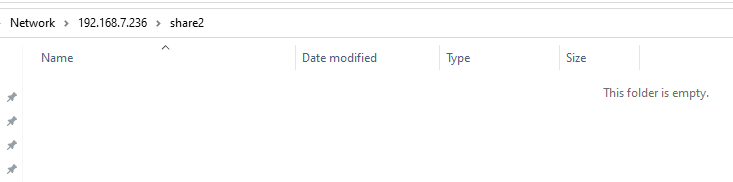
Open share2 directory as shown in the following image.
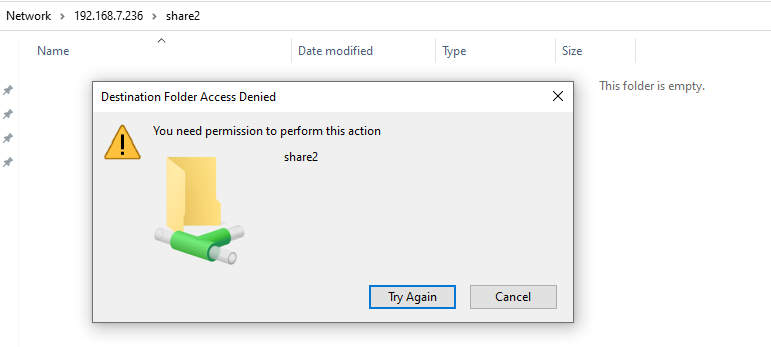
Try to create a new folder, you will notice an issue with it. This explains the user1 cannot access the share2 directory.
The installation and configuration process of SAMBA server on Linux Mint 20 comes to an end.
Linux mint system config samba
sudo apt install system-config-samba
Чтение списков пакетов… Готово
Построение дерева зависимостей
Чтение информации о состоянии… Готово
E: Невозможно найти пакет system-config-samba
madesta Сообщения: 1738 Зарегистрирован: 11 июн 2017, 21:47 Решено: 21 Откуда: BY Благодарил (а): 73 раза Поблагодарили: 370 раз Контактная информация:
system config samba
system-config-samba — это, вроде как, только в GNOME присутствует. По крайней мере у себя такого пакета не нашёл. В сети deb пакет только для Ubuntu 1804 — https://pkgs.org/download/system-config-samba
Попробуйте Менеджер программ — Gadmin-samba
А вообще, правильно пишут на askubuntu.com : «I recommend learning to just edit the smb.conf file; it’s not that hard«.
WWolf Сообщения: 3589 Зарегистрирован: 14 фев 2018, 00:51 Решено: 25 Откуда: Краснодар Благодарил (а): 1594 раза Поблагодарили: 1131 раз Контактная информация:
system config samba
seregka Сообщения: 90 Зарегистрирован: 22 сен 2019, 21:05 Решено: 1 Благодарил (а): 2 раза Поблагодарили: 1 раз Контактная информация:
system config samba
Да дорогой вы мой
Ну конечно же я так попробовал сделать в первую очередь но не видет телефон его в сети а когда пробуешь ручками адрес пропасать не пускает хоть аноним хоть нет
seregka Сообщения: 90 Зарегистрирован: 22 сен 2019, 21:05 Решено: 1 Благодарил (а): 2 раза Поблагодарили: 1 раз Контактная информация:
system config samba
Вот вы мне скажите почему в линоксе все через жопу чтобы что сделать надопросто прочитать херову тонну всякой херни которая нужно тебе сдалать то один раз в жизни, WIFI Direct так он вообще не отдупляет что такое
seregka Сообщения: 90 Зарегистрирован: 22 сен 2019, 21:05 Решено: 1 Благодарил (а): 2 раза Поблагодарили: 1 раз Контактная информация:
system config samba
seregka Сообщения: 90 Зарегистрирован: 22 сен 2019, 21:05 Решено: 1 Благодарил (а): 2 раза Поблагодарили: 1 раз Контактная информация:
system config samba
system-config-samba — это, вроде как, только в GNOME присутствует. По крайней мере у себя такого пакета не нашёл. В сети deb пакет только для Ubuntu 1804 — https://pkgs.org/download/system-config-samba
Попробуйте Менеджер программ — Gadmin-samba
А вообще, правильно пишут на askubuntu.com : «I recommend learning to just edit the smb.conf file; it’s not that hard«.
А вообще, правильно пишут на askubuntu.com: «I recommend learning to just edit the smb.conf file; it’s not that hard».
Да вот ну они дебильные да вот мне нахер трать день что бы разобрать как расшарить папку, потом через мне опять надо будет я уже забуду опять они перекурили что чето?
Нельзя сделать все интуитивоно понятно что ли?
Была прекрасная программа два ткнул и все работает
WWolf Сообщения: 3589 Зарегистрирован: 14 фев 2018, 00:51 Решено: 25 Откуда: Краснодар Благодарил (а): 1594 раза Поблагодарили: 1131 раз Контактная информация:
system config samba
так и сейчас проще некуда. кто ж тебе виноват что ты не читаешь что пишется
с начала надо было поставить samba, почему не стоит по дефолту? потому что дырявая виндовая херня, но если пользователь ССЗБ то его никто не может оставить, чай не винда и всё разрешено
поставить ты поставил, но надо было перелогиниться, потому что при установке пользователь добавляется в группу sambashare (если не добавилось автоматом, то сделать руками)
и дальше всё в два клика быстрее чем на винде делается
а по твоему скрину где у тебя не получается — там же чётко написано — права ни алё
разбирайся что ты там с правами намутил я так подозреваю пытаешься расшарить какую-то монтируемую папку, а прав то не хватает
Вот вы мне скажите почему в линоксе все через жопу чтобы что сделать надопросто прочитать херову тонну всякой херни которая нужно тебе сдалать то один раз в жизни
ты в винде то давно расшаривал папки? где надо три раза в разных местах сказать что ты хочешь что б тебя видели, что б ты видел других и что б папки/принтеры шарились. Явно давно 😉
Linux mint system config samba
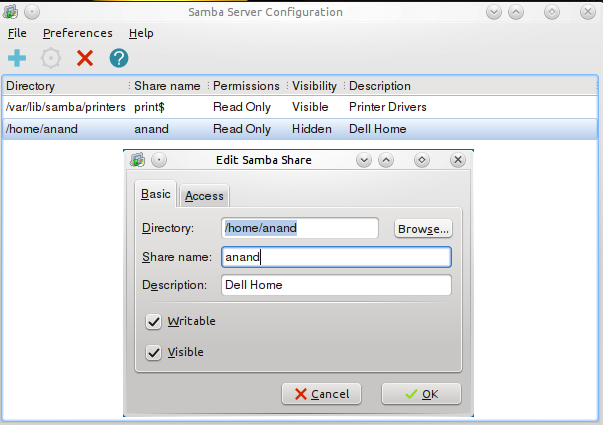
System-config-samba is a graphical user interface for creating, modifying, and deleting samba shares and users.
Latest reviews
Con mate 20 mi dice «impossibile trovare il pacchetto system-config-samba
(Linux Mint 19.3) Смог запустить только из терминала под правами суперпользователя sudo su затем Ваш пароль затем system-config-samba
Linux Mint 19.3 — | 1º Create Desktop » New Empty File > Samba.sh > #! / Bin / bash sudo system-config-samba | 2º Permission File » Properties > Permissions > Others: Reading and Writing > Execute (Enable) | 3º Terminal: » sudo touch /etc/libuser.conf
It’s now deprecated. Beware: If you select authentication mode as ‘share’, Sambashare will fail to start on next boot and you’ll be trying to figure out why.
Note that in version 19.1 this has to be run as root, and if invoked from the Menu will produce no output. From a command prompt, type sudo system-config-samba
The 1. sudo touch Works. The 2. sudo -h system-config-samba GIVES Error
How to fix the launch : 1) sudo touch /etc/libuser.conf 2)sudo -H system-config-samba
I love this to manage my windows shares.
Works great after running the command other reviewers are giving: sudo touch /etc/libuser.conf
In Linux Mint 18.3 Sylvia 64bit works well. I needed to run the command: sudo touch /etc/libuser.conf. Caution . Between «touch» and «/etc/libuser.consider», there is a blank space. We do not all know the terminal well.
IF NOT WORK USE: sudo touch /etc/libuser.conf
Ne fonctionne pas sous linux mint 18 64bits
Quote Terpe «the ‘fix’ is to enable samba on mint 18 by using ‘sudo touch /etc/libuser.conf’ in the terminal.»
Solo hay que leer como arreglarlo, está en las reseñas.
If not launch — fix: sudo touch /etc/libuser.conf
The Real shame is people give this a low rating for not working whenen the ‘fix’ is to enable samba on Mint 18 by using ‘sudo touch /etc/libuser.conf’ in the terminal. If they would have actually read previous comments it is listed 4 or 5 times.
Real shame it won’t even load in Sarah 64bit
can’t run on Linux Mint 18 Cinnamon 64-bit
neither on Serena. Not even the windows gets opened
Same for me, won’t run on Linux Mint 18 64-bit