- How to increase the swap partition in Linux Mint and Ubuntu. How to create a Swap file in Linux
- How to delete swap file in Linux Mint and Ubuntu
- Error “fallocate: fallocate failed: Text file busy”
- Managing Swap files on other Linuxes
- How to create a swap partition on another drive
- How to check swap file usage in Linux
- Related articles:
- Увеличить SWAP на Ubuntu/Debian/Mint
- How to Add Swap Space on Linux Mint 21
- Adding swap space on Linux Mint 21
- Removing Swap Space Linux Mint 21
- Conclusion
- About the author
- Aaliyan Javaid
How to increase the swap partition in Linux Mint and Ubuntu. How to create a Swap file in Linux
In this article, using Linux Mint and Ubuntu as an example, we will learn how to view information on the swap partition, create a swap file, and also increase the space available for swap.
The swap file is a specific place on permanent storage (for example, on a hard disk), where data that does not fit in RAM is temporarily dumped. That is, it is an opportunity to increase the amount of RAM without buying RAM modules. But such a “virtual” RAM is slower.
You can view the current size of the swap partition with the command:
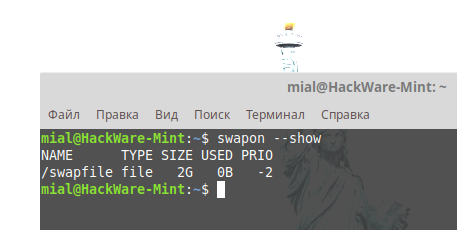
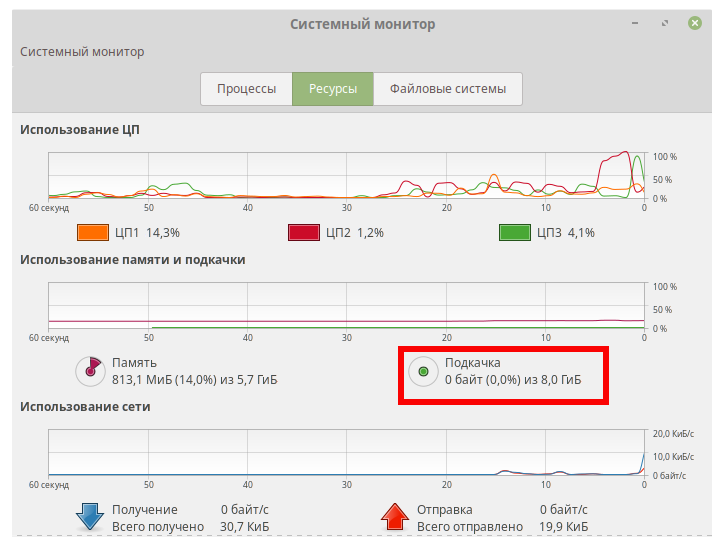
As you can see, there is a 2 GB swap file on the system, which, let’s say, is not enough.
Disable and delete this paging file with the following commands:
sudo swapoff -a sudo rm -f /swapfile
There must be enough space on the disk to fit the swap file of the size you specified.
To create an 8G swap file (change the value as you wish) run the command:
sudo fallocate -l 8G /swapfile
sudo chmod 600 /swapfile sudo mkswap /swapfile sudo swapon /swapfile
Open System Monitor to make sure the system uses the swap file:
Or you can do it with the command:
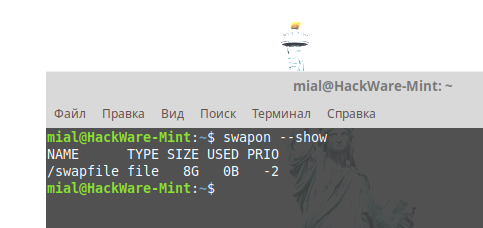
That’s all! You don’t even need to reboot your system for the changes to take effect.
By the way, if you go again to change the size of the paging file (up or down – it doesn’t matter), then exactly follow the same instructions again, but specify a different size when creating the paging file.
How to delete swap file in Linux Mint and Ubuntu
To completely remove the paging file, run the commands:
sudo swapoff -a sudo rm -f /swapfile
Then open the /etc/fstab file:
And remove the line from it:
/swapfile none swap defaults 0 0
Error “fallocate: fallocate failed: Text file busy”
If you encounter an error:
fallocate: fallocate failed: Text file busy
This means that you want to create a swap file, but a file with the same name already exists and is still in use.
To disable and remove it, run the commands:
sudo swapoff -a sudo rm -f /swapfile
Managing Swap files on other Linuxes
To increase or create a swap file on other distributions, see the articles:
How to create a swap partition on another drive
You don’t have to use the system disk for the swap, which can be low on space. You can create a partition on any drive in the system. For details, see the instruction “How to create a swap partition not on the system drive. How to move the swap partition to another disk”.
How to check swap file usage in Linux
Stress testing the system in a out of RAM scenario: How to check Swap file usage in Linux
Related articles:
Увеличить SWAP на Ubuntu/Debian/Mint
Была проблема, у меня на Debian была создана подкачка (swap) в 1Гб, но как оказалось, мне этого мало и нужно увеличить хотя бы до 3-хГб. Данная тема «Увеличить SWAP на Ubuntu/Debian/Mint», как раз затронет этот вопрос.
Раздел подкачки является независимым разделом жесткого диска, используемого исключительно для подкачки. Swap представляет собой специальный файл в файловой системе, которая находится среди вашей системы и файлов данных.
1. Проверим сколько у нас выделено Swap-а:
Если не установлен, то установите или используйте аналог программы, под названием top. Чтобы установить используйте команду:
И смотрим сколько у нас выделено памяти:
используем утилиту htop для вывода swap
Собственно, у меня ~1Гб, и как сказал ранее, я хочу его увеличить.
Так же, можно заюзать утилиту free и узнать какой swap используется:
root@debian:~# free -m total used free shared buffers cached Mem: 986 893 93 15 24 312 -/+ buffers/cache: 556 430 Swap: 879 19 860 root@debian:~#
Как видно по утилитам, данные совпадают.
Если знаете что на сервере имеется свап, но не помните какой размер, так же имеется утилита которая покажет эти данные:
root@debian:~# swapon -s Filename Type Size Used Priority /dev/sda5 partition 901116 19664 -1 root@debian:~#
Выбираем какой способ подойдет вам лучше и используем.
2. Создание раздела подкачки.
Проверяем где и сколько имеется свободного места, можно выполнить команду:
Расскажу несколько способов создать данный файл. Создадим папку в которую попозже мы примонтируем файл подкачки:
— СПОСОБ-1: Использовать утилиту dd.
В созданной папке будет храниться файл подкачки. Следующим действием, создаем файл:
# sudo dd if=/dev/zero of=/media/swap/swapfile.img bs=2048 count=1M
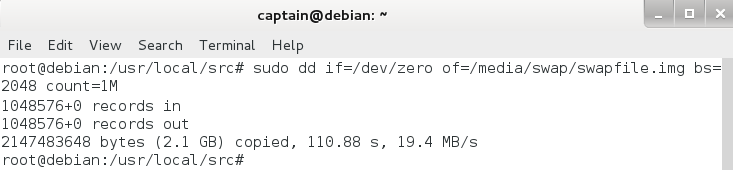
увеличиваем раздел подкачки командой dd
Ждем определенное время, пока оно выполнится.
PS: Возможно прийдется создать сам файл:
# touch /media/swap/swapfile.img
Если запускаете от суперпользователя, то не нужно ничего создавать, утилита dd сделает все за вас.
— СПОСОБ-2: Использовать утилиту fallocate.
Данная утилита создаст файл мгновенно и тем самым экономит ваше время:
# fallocate -l 2G /media/swap/swapfile.img
Мне больше по душе — 2-й способ с использованием утилиты fallocate.a
3. Создание swap-а
Для начала, выставляем нужные права на файл:
$ chmod 600 /media/swap/swapfile.img
$ sudo mkswap /media/swap/swapfile.img

Создание образа swap командой mkswap
4. Добавление swap в fstab.
Это нужно сделать чтобы каждый раз при старте мой ОС, автоматически монтировался наш фал подкачки, который мы создали, для этого нужно выполнить команду:
И добавляем следующую строчку:
[. ] # mount swap image for my Debian /media/swap/swapfile.img swap swap sw 0 0 [. ]
/media/swap/swapfile.img none swap sw 0 0
5. Активируем (включаем) нас swap.
Чтобы это сделать, стоит выполнить команду:
# swapon /media/swap/swapfile.img
Необходимо убедится что у нас все нормально работает, сейчас мы это и проверим:

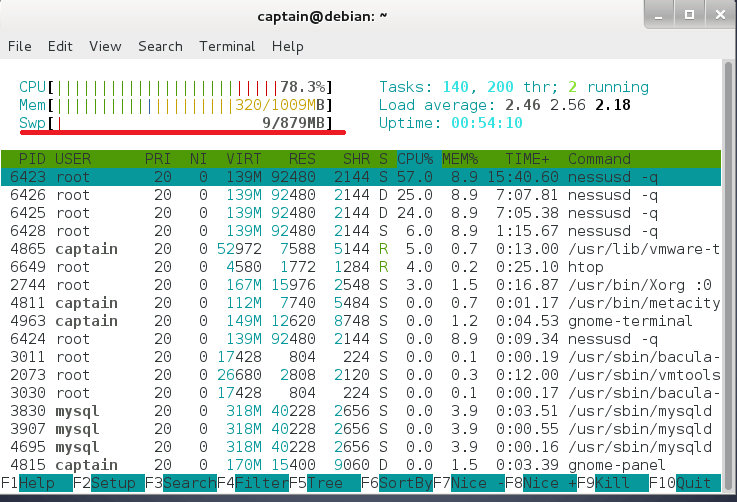
Собственно, видно что все работает нормально, но еще сейчас запустим утилиту htop и посмотрим что показывает она:

вывод количества swap с помощью программы htop
7. Взаимодействие SWAP с ОС. Проверика и настройка.
Есть несколько вариантов, которые вы можете настроить для более лучшей производительности вашей системы при работе со свопом.
Параметр swappiness определяет, как часто ваша система обменивается данными из оперативной памяти в подкачку. Этот параметр имеет диапазон от 0-100 и представляет собой процент.
При значениях, близких к нулю, ядро не обменяется данными на диск, если это абсолютно необходимо. Помните, что взаимодействие с файлом подкачки являются «дорогими» в том плане, что такие операции занимают гораздо больше времени, чем взаимодействие с оперативной памятью и тем самым могут привести к значительному снижению производительности.
Значения, которые находятся ближе к 100%, ядро будет пытаться поместить больше данных в своп и освободить RAM.
Чтобы проверить текущее значение swappiness, выполните:
root@debian:~# cat /proc/sys/vm/swappiness 60 root@debian:~#
Т.к я использую виртуальную машину для тестов — установка swappiness в 60 — дает не плохое значение, но для VPS желательно приблизить данный параметр в 0. И чтобы изменить swappiness используйте команду SYSCTL.
Например, чтобы установить swappiness в 10, выполним:
root@debian:~# sysctl vm.swappiness=10 vm.swappiness = 10 root@debian:~#
Этот параметр не сохранится до следующей перезагрузки и чтобы он применялся при каждом запуски ОС автоматически, нужно изменить (добавив строку в) файл /etc/sysctl.conf:
В самом низу файла, прописываем:
Сохраняем и закрываем файл.
Другой связанной с этим значением параметр которое вы можете захотеть изменить — vfs_cache_pressure, который настраивает, как много система будет выбирать кэш иноде и dentry по сравнению с другими данными.В основном, это доступ к данным о файловой системе и чтобы посмотреть текущее значение, выполните:
root@debian:~# cat /proc/sys/vm/vfs_cache_pressure 100 root@debian:~#
Параметр установлен в 100 и тем самым система удаляет информацию инодам из кэша очень быстро. Но если захотите уменьшить, выполните:
root@debian:~# sysctl vm.vfs_cache_pressure=50 vm.vfs_cache_pressure = 50 root@debian:~#
Это будет работать только до завершения вашей сессии и вы можем изменить его в файле ( как и ранее):
В самом низу происываем строку, которая определяет ваше новое значение:
How to Add Swap Space on Linux Mint 21
![]()
Swap space is free physical memory in Linux systems that comes in handy when the system RAM is full and unable to store the data for current programs and needs storage temporarily. Swap space can be increased or decreased depending upon the user preferences. So, if you are planning to increase the swap space on Linux Mint to get rid of storage full errors then read this guide.
Adding swap space on Linux Mint 21
There are few steps that are compulsory to follow to add some swap space to Linux Mint 21 and those are:
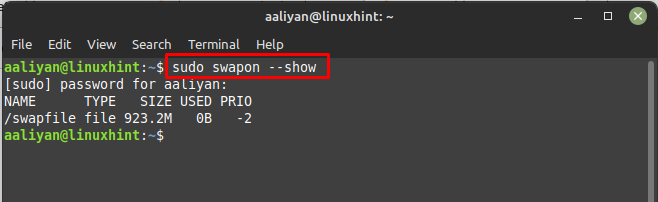
Step 1: First check if the swap system is already configured on your Linux Mint or not by executing:
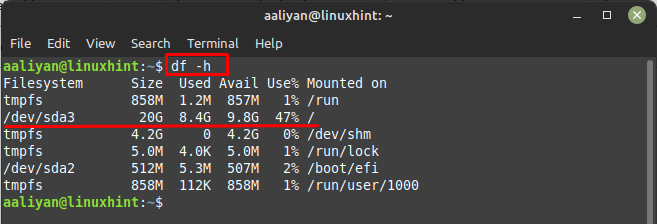
Step 2: Next, check the available space on your system to get an idea of how much swap space can be allocated and for that execute:

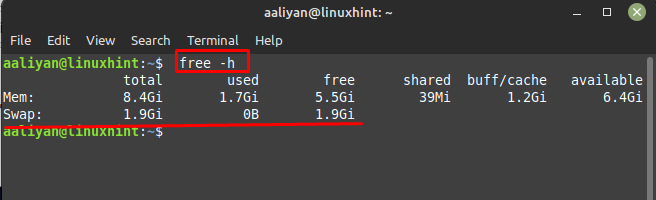
Step 3: Next, check the status of memory on hard disk of your Linux Mint by executing:
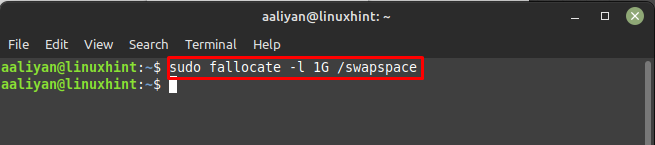
Step 4: Now allocate the swap space according to your preference and free space available on hard disk, for that use the below syntax:
Here, I have allocated 1GB of the space as a swap space by using the above-mentioned syntax:
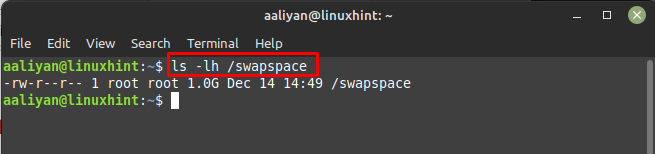
Step 5: Now, check if the swap space is created or not along with the permissions of the space by executing:
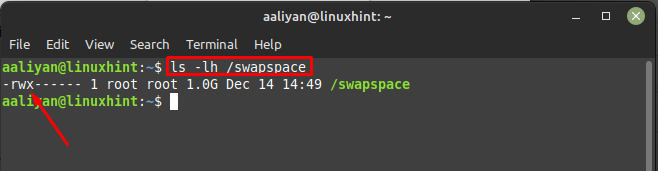
Step 6: Now, give the permissions to the created swap space using the chmod commands, here I have given the permission only to the owner of the system other can’t access it, for permissions execute:

Now verify the permissions by executing:
Step 7: Once the swap space is created then it’s time to mark its as swap space and for that execute:

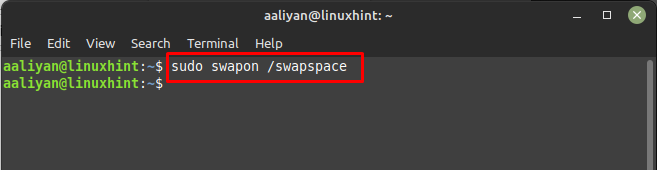
Step 8: Next, enable the swap space to start its functioning and for that use:
Next, check the availability of the swap space we created to be sure that the swap space is created and working correctly by executing:
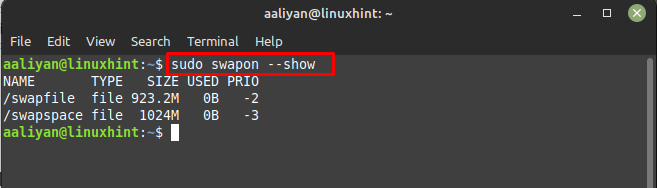
There is another way of doing it and for that use below given command:
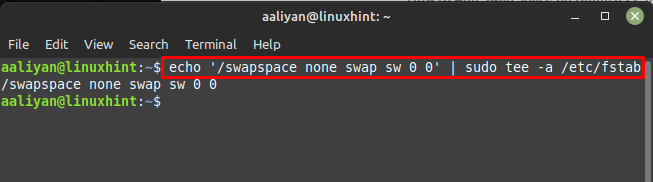
Step 9: Now to make the changes permanent add “/swapspace none swap sw 0 0” in the fstab file, for that first copy the file as a backup using:

Next, write the fstab file with the line that is stated above buy using:
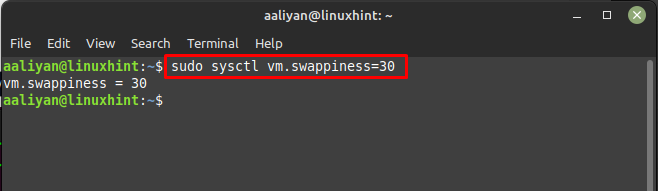
Step 10: Now swap space is all set and it’s time to make some minor tweaks to soup-up the performance of Linux Mint 21. First adjust the value of swappiness which shows how often your system will use the swap space and for that first read the value using cat command:

Here the value for it is 60 so let’s change it to 30 by using:
Next add the same value to the configuration file of swap space to make the changes permanent using:
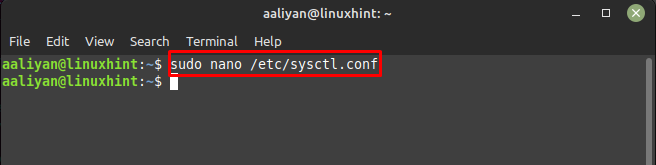
Once the file is open write:

Step 11: Next, first read the default value of the cache pressure using the cat command:
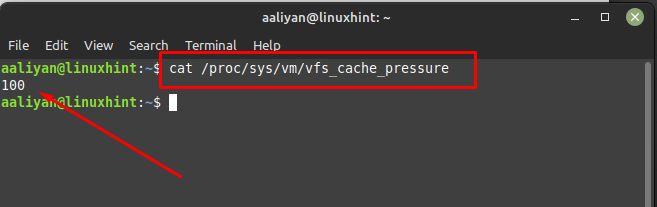
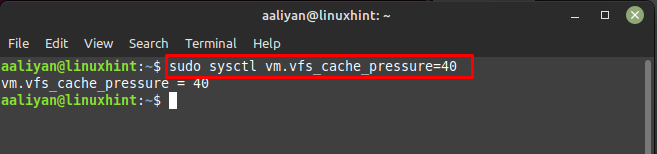
Here the value is 100 by default so change it to 40 by using:
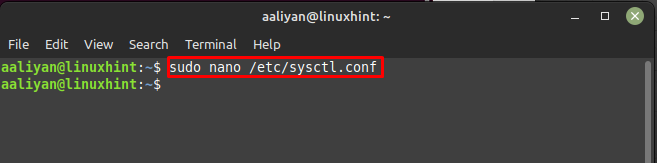
Next to keep the change permanent add the same value in the configuration file, so open the configuration file using:
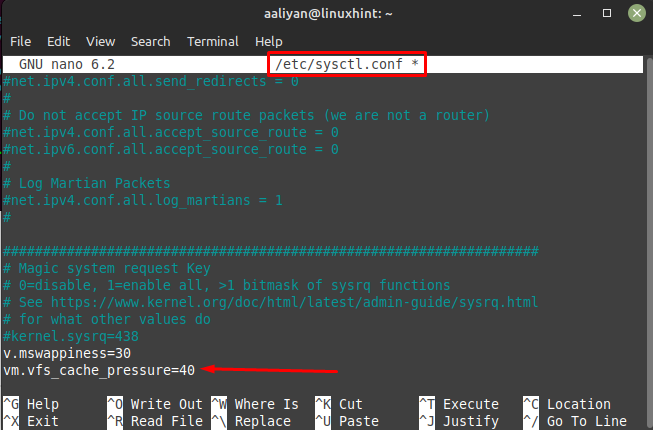
Next give the value of 40 to cache_pressure by writing the given below line in the configuration file:
Now save the configuration file and close it, so this way one can add swap space in Linux Mint.
Removing Swap Space Linux Mint 21
To completely remove the swap space from Linux Mint there are some steps given below that one should follow:
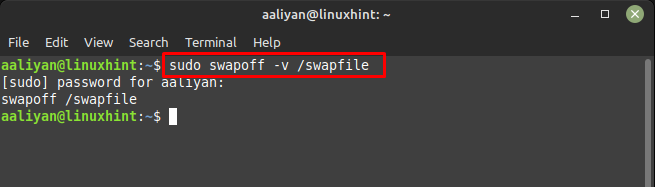
Step 1: First you need to deactivate the swap space and for that execute:
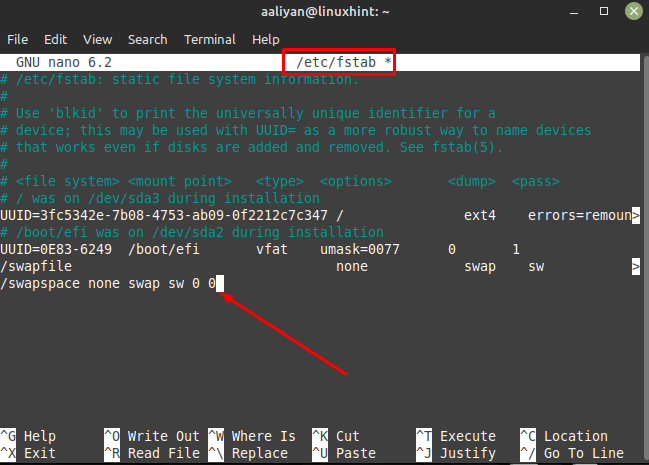
Step 2: Now remove the line we added for swap space in the fstab file and to do that open the file using nano like this:

Now simply remove the entry we did that was “/swapspace none swap sw 0 0” from the file:
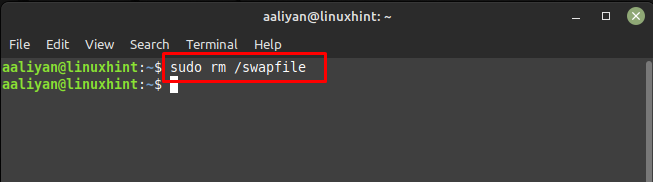
Step 3: Now lastly remove the swap space file from Linux Mint 21 by executing:
Conclusion
Adding swap space is one of the best ways to get rid of memory full errors as the system RAM can use it to store data temporarily. Adding swap space in Linux Mint 21 is quite just following the steps mentioned in this guide.
About the author
Aaliyan Javaid
I am an electrical engineer and a technical blogger. My keen interest in embedded systems has led me to write and share my knowledge about them.