- Install VirtualBox Guest Additions in Linux Mint Step by Step
- What is VirtualBox Guest Additions?
- How to Install Virtualbox Guest Additions in Linux Mint
- If VirtualBox Can’t Find the Guest Additions CD Image
- Enable Copy and Paste Clipboard Between Host and Guest
- Enable Shared Folder
- Wrapping Up
- Как установить гостевые дополнения VirtualBox (Guest Additions) в Linux LMDE
- Как установить гостевые дополнения VirtualBox (Guest Additions) в Linux Mint Cinnamon, MATE, Xfce
- Обновление системы перед установкой гостевых дополнений
- Установка гостевых дополнений VirtualBox из стандартных репозиториев
- Установка Дополнение гостевой ОС с Образа диска Дополнений гостевой ОС
- При любом способе установки гостевых дополнений, включите функции, которые их используют
- How to Install VirtualBox Guest Additions on Linux Mint
- How to Build Guest Additions for Linux Mint 17, 18, 19, 20, or 21 on the VirtualBox Virtualization Software
- What Are the Benefits of Guest Additions?
- How to Install Guest Additions for Linux Mint Virtual Machine
- Related Articles
Install VirtualBox Guest Additions in Linux Mint Step by Step
In this tutorial I will show you how to install VirtualBox guest additions in Linux Mint virtual machine. To follow this tutorial, you need to have Linux Mint installed inside VirtualBox as a guest OS. I’m using Debian 10 Buster as the host OS, but the following method works for any host OS (including MacOS and Windows).
What is VirtualBox Guest Additions?
VirtualBox guest additions provide the following capabilities:
- Enable users to seamlessly move mouse pointer between host and guest OS.
- Allow guest OS to have read and write access to hard drives on the host OS, so you can transfer files between them.
- Power up the graphics/video ability of the guest OS. The screen resolution of guest OS can be automatically adjusted and 3D graphics can be accelerated.
- Enable bidirectional shared clipboard between host and guest OS, so you can copy and paste stuff between them.
How to Install Virtualbox Guest Additions in Linux Mint
Log into Linux Mint (guest OS) and run the following command in a terminal window to update software packages.
sudo apt update sudo apt upgrade
Please note that if a new Linux kernel is installed in the upgrade process, then you need to reboot Linux Mint virtual machine. After that, run the following command to install required packages for building kernel modules.
sudo apt install build-essential module-assistant
Next, prepare Linux Mint for building kernel module with the following command.
Then in the VirtualBox window menu bar, select Devices > Insert Guest Additions CD image.
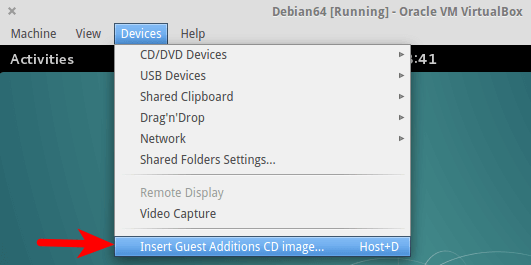
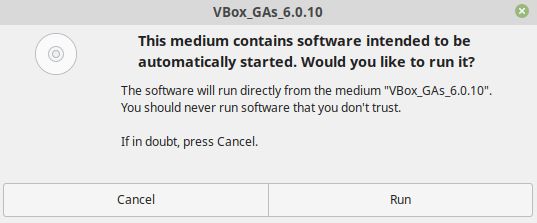
If your host OS already has the CD image, then you will be asked if you want to run the software. Select Run.
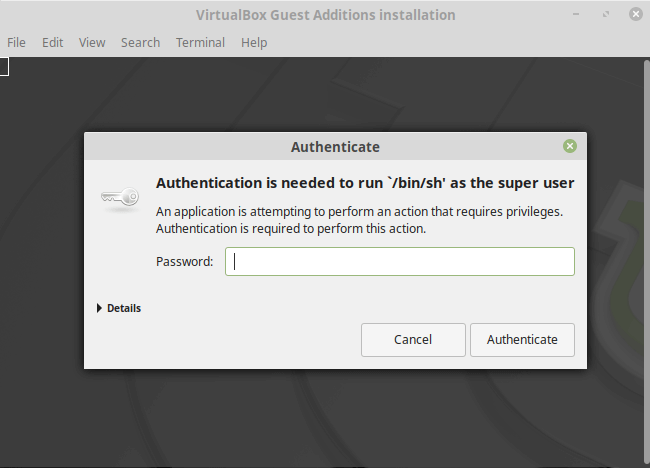
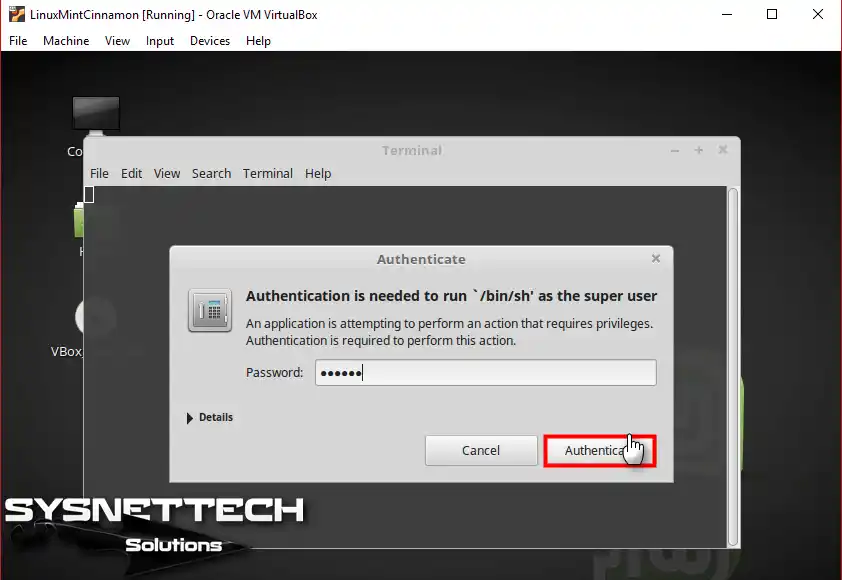
Then you will need to enter your password in order to install the guest additions.
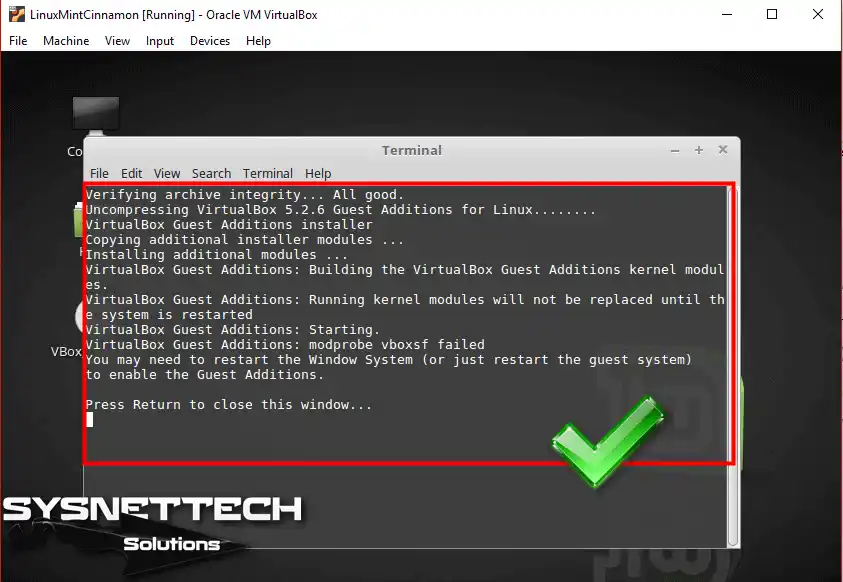
Output in terminal window.
Verifying archive integrity. All good. Uncompressing VirtualBox 6.0.10 Guest Additions for Linux. VirtualBox Guest Additions installer Copying additional installer modules . Installing additional modules . VirtualBox Guest Additions: Starting. VirtualBox Guest Additions: Building the VirtualBox Guest Additions kernel modules. This may take a while. VirtualBox Guest Additions: To build modules for other installed kernels, run VirtualBox Guest Additions: /sbin/rcvboxadd quicksetup VirtualBox Guest Additions: or VirtualBox Guest Additions: /sbin/rcvboxadd quicksetup all VirtualBox Guest Additions: Building the modules for kernel 4.15.0-55-generic. update-initramfs: Generating /boot/initrd.img-4.15.0-55-generic VirtualBox Guest Additions: Running kernel modules will not be replaced until the system is restarted Press Return to close this window.
Once the guest additions is installed, press Enter to close the terminal window and restart your Linux Mint virtual machine. Now the resizeable display should be working. The screen resolution of Linux Mint VM will adjust with the size of VirtualBox window. You can press right Ctrl and F keyboard shortcut to enter full-screen mode. You can now also configure shared folder and bidirectional shared clipboard.
If VirtualBox Can’t Find the Guest Additions CD Image
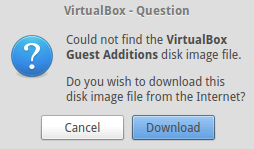
If your host OS doesn’t have the guest additions CD image, then it will ask you to click a button to download the CD image onto the host OS. Click Download.
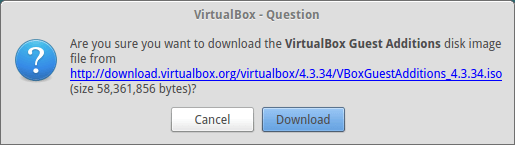
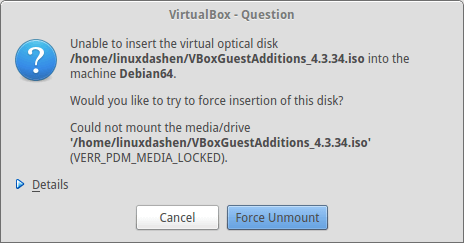
If you can’t download it from the above window, then go to http://download.virtualbox.org/virtualbox/. Select a version and download VBoxGuestAdditions ISO to your home directory. Once downloaded, insert the ISO image. If you see the following error, click Force Umount.
Enable Copy and Paste Clipboard Between Host and Guest
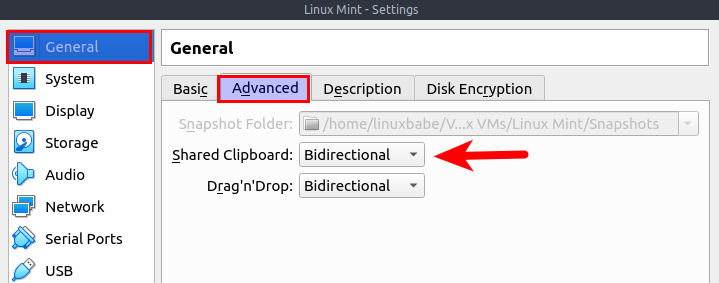
After installing guest additions, you can go to the virtual machine settings -> General -> Advanced and enable bidirectional clipboard.
Enable Shared Folder
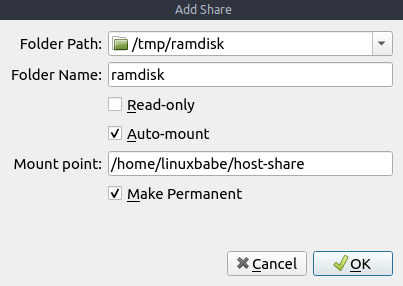
Now you can also share files between host and guest OS via the shared folder feature. Go to the virtual machine settings. In the left pane, select Shared Folders . Then click on the add button to add a shared folder.
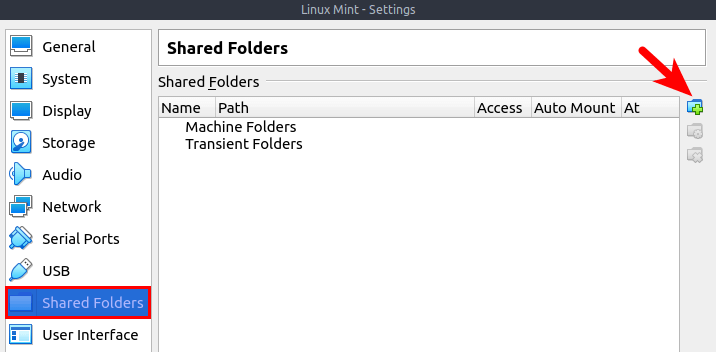
- In the Folder Path field, select a folder on your host OS.
- Tick on the Auto-mount checkbox so that the shared folder will be automatically mounted to the guest OS when virtual machine boots up.
- In the Mount-point field, enter a path on the guest OS, such as a sub-directory in your user’s home directory.
- Tick on the Make Permanent checkbox.
After saving the settings, you will find the shared folder appears in your home directory in the Linux Mint virtual machine, but only the root user and members of the vboxsf group have read and write access to this shared folder. So what we need to now is add your user to vboxsf group. Open up a terminal in Linux Mint and run the following command. Replace username with your real username.
sudo adduser username vboxsf Log out of the current session and log back in. Now you should be able to access the shared folder.
Wrapping Up
I hope this tutorial helped you install VirtualBox guest additions in Linux Mint. You may also want to read:
As always, if you found this post useful, then subscribe to our free newsletter to get more tips and tricks. Take care 🙂
Как установить гостевые дополнения VirtualBox (Guest Additions) в Linux LMDE
LMDE — это Linux Mint Debian Edition, то есть Linux Mint на основе Debian.
Гостевые дополнения VirtualBox (Guest Additions) — это модули ядра (драйверы), которые нужны в том случае, если вы запустили Linux LMDE в виртуальной машине VirtualBox.
Благодаря гостевым дополнениям возможно:
- включить общий буфер обмена между реальной операционной системой и гостевой ОС
- включить функцию перетаскивания с гостевой ОС
- развернуть экран гостевой ОС до большего размера или использовать гостевую ОС в полноэкранном режиме, а также включить интеграцию дисплея.
Гостевые дополнения отсутствуют в стандартных репозиториях Linux LMDE (Linux Mint Debian Edition).
Есть два варианта установки:
- установить Guest Additions с диска, поставляемого с VirtualBox
- подключить сторонний репозиторий
Я предпочитаю первый вариант, поэтому рассмотрим его.
Начните с полного обновления и перезагрузки системы:
sudo apt update && sudo apt full-upgrade -y reboot
Установите зависимости, необходимые для компиляции модуля ядра:
sudo apt install build-essential module-assistant dkms
Настройте систему для сборки модулей ядра:
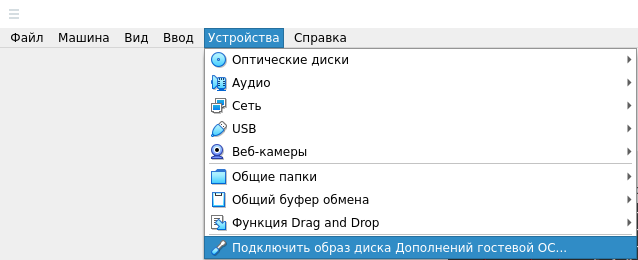
Подключите диск с Гостевыми дополнениями, для этого в меню VirtualBox виртуальной машины выберите «Устройства» → «Подключить образ диска Дополнений гостевой ОС…»:
Вновь вернитесь в систему и выполните там:
cd /media/*/VBox* sudo sh VBoxLinuxAdditions.run
Дождитесь завершения работы программы, обратите внимание, чтобы всё прошло без ошибок.
После окончания установки вновь перезагрузитесь, чтобы изменения вступили в силу:
В меню VirtualBox включите «Общий буфер обмена» и другие функции, которые вам нужны:
Как установить гостевые дополнения VirtualBox (Guest Additions) в Linux Mint Cinnamon, MATE, Xfce
Обновление системы перед установкой гостевых дополнений
Убедитесь, что у вас последняя версия VirtualBox.
Рекомендуется обновить гостевую ОС до последних версий пакетов:
sudo apt update sudo apt full-upgrade
После завершения обновления перезагрузите компьютер.
Установка гостевых дополнений VirtualBox из стандартных репозиториев
В стандартных репозиториях присутствует пакет с гостевыми дополнениями. Он может быть установлен следующим образом:
sudo apt update sudo apt install virtualbox-guest-dkms
Тем не менее, пользователями замечено, что он работает не совсем корректно (по крайней мере ранее наблюдались такие проблемы). Например, может не работать общий буфер обмена с гостевой ОС.
Если установка из стандартных репозиториев вас не удовлетворяет, то используйте встроенный установщик, с которым поставляется VirtualBox.
Установка Дополнение гостевой ОС с Образа диска Дополнений гостевой ОС
Удалите пакет virtualbox-guest-dkms если он был установлен ранее:
sudo apt install virtualbox-guest-dkms
Установите зависимости, необходимые для компиляции модуля ядра:
sudo apt install build-essential module-assistant dkms
Настройте систему для сборки модулей ядра:
Подключите диск с Гостевыми дополнениями, для этого в меню VirtualBox виртуальной машины выберите «Устройства» → «Подключить образ диска Дополнений гостевой ОС…»:

Вновь вернитесь в систему и выполните там:
cd /media/*/VBox* sudo sh VBoxLinuxAdditions.run
Дождитесь завершения работы программы, обратите внимание, чтобы всё прошло без ошибок.
После окончания установки вновь перезагрузитесь, чтобы изменения вступили в силу:
При любом способе установки гостевых дополнений, включите функции, которые их используют
Устройство -> Общий буфер обмена -> Двунаправленный

Устройство -> Функция Drag’n’Drop -> Двунаправленный
Вид -> Подгонять размер экрана гостевой ОС
How to Install VirtualBox Guest Additions on Linux Mint
![]()

Last Updated: May 27, 2023 | Oracle VM VirtualBox | Tolga Bagci
This article will examine installing Guest Additions to use Linux Mint 19, 20, or 21 virtual machines running on Oracle VM VirtualBox on a Windows 10 or 11 computer more efficiently.
How to Build Guest Additions for Linux Mint 17, 18, 19, 20, or 21 on the VirtualBox Virtualization Software
To use the virtual machines you have installed on VirtualBox with better performance and to exchange files with your physical computer, you need to install Guest Additions.
When you install Windows or Linux operating systems with VirtualBox, after enabling Guest Additions, you can use USB 3.0 devices properly, and you can also use your virtual machine as Full Screen.
What Are the Benefits of Guest Additions?
Thanks to this software, which is required for Linux or Windows VMs, you can use host devices such as USB in your virtual systems and increase the VM’s stability. We can consider more advantages in the list below;
- You can automatically change your VM’s screen resolution settings.
- You can facilitate transitions between the host and your virtual system with enhanced mouse pointer performance.
- You can enable copy-paste and drag-drop features for faster file or data transfer.
- With improved graphics performance, you can use applications or games in your virtual system faster by turning on 2D and 3D acceleration.
- You can automatically install drivers for sound, network, and other devices.
- You can enable your virtual operating system’s health and performance counters and monitor them more professionally.
How to Install Guest Additions for Linux Mint Virtual Machine
You can install guest plugins without any problem by following the steps below on any Linux Mint version running on Oracle virtualization software.
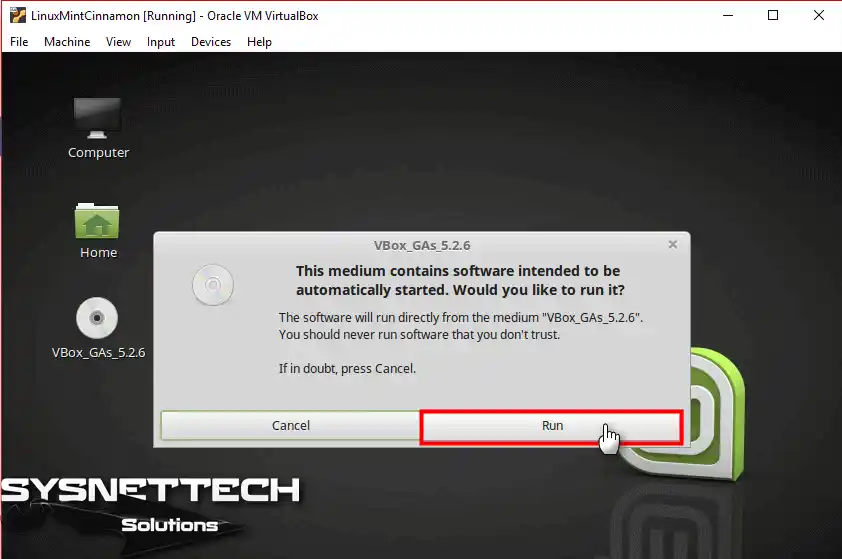
Run the Mint virtual machine and click Devices / Insert Guest Additions CD image from the tool menu of the Oracle program.

As soon as the Guest Additions CD image is mounted on your virtual system, a warning window will pop up, and if you trust the software, click the Run button.
To confirm the ability to run GA software with Root authority, type your Root password in the pop-up window and click Authenticate.
Wait while the drivers of the Mint guest machine, namely the Guest Additions package, are installed.
After configuring Linux Mint with GA, you can change your VM’s screen resolution to whatever you want.


Related Articles

TolgaBagci
Hello, I’m Tolga! I am a computer specialist who has been specializing in computer technologies for about 20 years. I provide solutions to problems encountered in many areas such as hardware, system, network, virtualization, server systems, and operating systems, and create relevant content on my website by explaining how to solve these problems. My goal is to be a reliable source of expert, quality, and trustworthy solutions for your computer problems. By following innovations and using the latest technologies, I aim to be successful in my job and provide you with the best service. Don’t hesitate to contact me for any questions or curiosity about technology. Have a nice day, stay up to date 🙂