- How To Install Linux Mint in VMware
- Install Linux Mint in VMware
- Linux Mint 20.3 Linux VM Images for VirtualBox and VMware
- Introduction
- Download Links
- Linux Mint 20.3
- Linux Mint 20.2
- Linux Mint 20.1
- Linux Mint 20.1
- FASTER DOWNLOAD AD SUPPORTED — Read Why?
- REGULAR DOWNLOAD
- Linux Mint 20
- Linux Mint 20
- FASTER DOWNLOAD AD SUPPORTED — Read Why?
- REGULAR DOWNLOAD
- System Details & Password
- How To Use
- Conclusion
- 10 Easy Steps To Install Linux Mint On VMware Workstation.
- How to install Linux mint on windows 10?
- Virtualize windows on Linux mint.
- Virtualize Linux mint on windows 10
- Prerequisite.
- How To Install Linux Mint On VMware Workstation?
- 1. Define the Virtual machine.
- 2. Verify the Virtual machine properties.
- 3. Access the Linux mint Live View.
- 4. Choose the language and keyboard layout.
- 5. Installation of Multimedia codecs.
- 6. Setup the hard disk.
- 7. Choose the Time zone and create the local account.
- 8. Restart the machine and disconnect the CDROM.
- 9. Confirm the installation.
- 10. Verify the internet.
How To Install Linux Mint in VMware
Linux Mint is one of the most simple, beautiful and beginner friendly Linux-based OS. Linux Mint basically evolved from Ubuntu and provides the same functionality and security just as Ubuntu. Moreover, if you are a Windows user and want to try out the new Linux ecosystem, Linux Mint would be a good choice. In fact, Linux Mint closely resembles the Windows user interface. That being said, if you are new to Linux environment or if you just want to test out the new operating system then installing it virtually will give you ample space and opportunities. In case you are wondering, here is how you can easily install Linux Mint in VMware Player or Workstation.
Using VirtualBox for virtual machines? Step by step guide on how to install Linux Mint in VirtualBox.
Install Linux Mint in VMware
First off, head to the Linux Mint official website and download the ISO file. Depending on your preference, you can either download 32-bit version or 64-bit version.
1. To make things clear, I’ve already downloaded the 32-bit version of Linux Mint 16 featuring Cinnamon desktop. If you want you can download other flavors like XFCE or KDE.
2. Now, open up the VMware player or workstation from the start menu and click File and select the option “New Virtual Machine.” This action opens the New Virtual Machine wizard. Here select the radio button “Typical” and click on the button “Next” to continue.

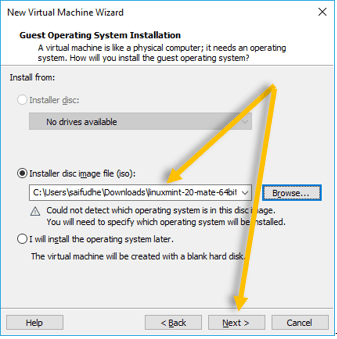
3. As you have already downloaded the Linux Mint ISO, select the radio button “Installer disk image file,” browse for the downloaded ISO file and click the “Next” button.

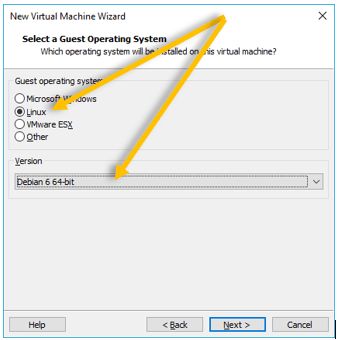
4. Here, select your guest operating system as “Linux” and the kernel version as “Other Linux 3.x kernel” from the drop-down menu.

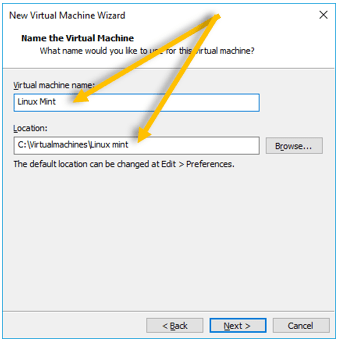
5. Now, name your virtual machine and click on the button “Next” to continue. If you want to change the location where the virtual machine is stored, you can do that by clicking on the “Browse” button. For instance, I’ve selected my location as G:\ drive.

6. Here in this screen, enter the space you want to allot of the new virtual machine and click “Next” button. But do remember that the minimum space required is 8GB.

7. Here in this area you can easily review and customize your hardware requirements. To do that, click on “Customize Hardware” button. Once you are done with the changes, click on the “Finish” button to complete your setup process.

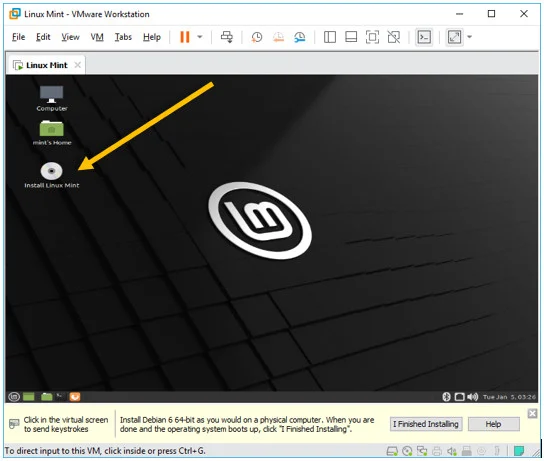
8. Now, click on “Power on this virtual machine” on the main screen of VMware to boot into your new Linux Mint OS. Now wait a few seconds and you will be in the OS installation screen. Here, click on the button “Install Linux Mint” to start the installation process.

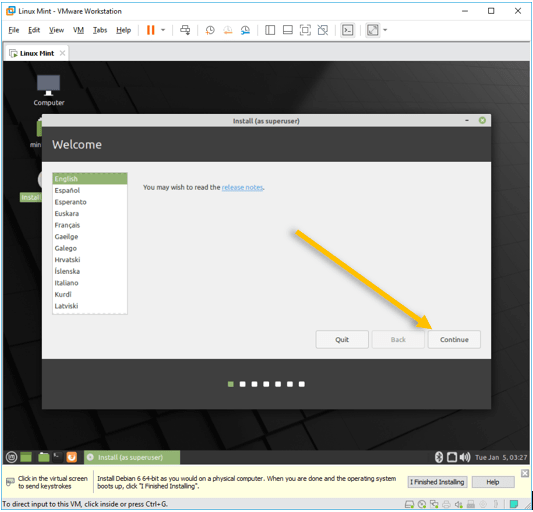
9. Now the OS screen will show minimum space required and other stuff, just review them once and click “Continue” button.
Note: If you are connected to the internet, Linux Mint will automatically download and install all the required updates and other restricted software, which is good. But, if you want to make the installation faster or if you have a slow internet connection then I would recommend that you disconnect from the internet by right-clicking on that little monitor icon on your VMware taskbar and selecting the option “Disconnect.”

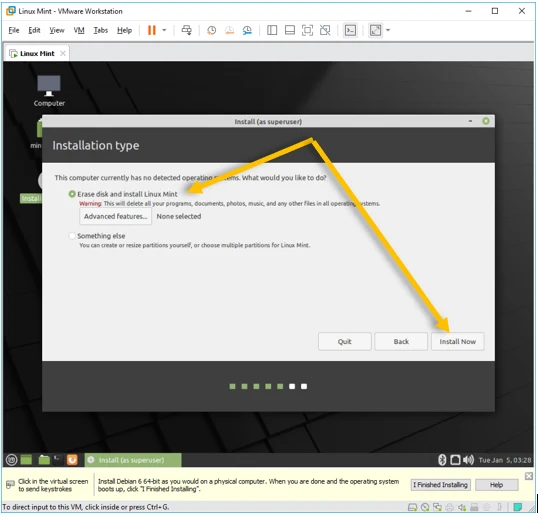
10. Here select the radio button “Erase disk and install Linux Mint” and click on “Install Now” button.

11. Now, just select your time zone, keyboard layout, username and password and click on the “Continue” button.

12. After completing the installation, just restart your VM and you are ready to experience the new Linux Mint OS.

As this is a virtual machine, you can do whatever you want without any worries about breaking your system. But, before you do that just take a snapshot of the current state so that you can roll back when things are out of your hands.
That’s all there is to do and it is that simple to install Linux Mint in VMware Player or Workstation.
Do comment below sharing your thoughts and experiences about installing Linux Mint in VMware Player or Workstation
Linux Mint 20.3 Linux VM Images for VirtualBox and VMware
Thank you for supporting LinuxVMImages.COM . As a token of gratitude for the LOVE you have shown to this site, you can now download VirtualBox or VMware images at HIGHEST SPEED via EXCLUSIVE CDN.
CONTENTS
Introduction
Here, we provide ready to use Linux Mint 20.3 VirtualBox and VMware images for urgent requirements. The VirtualBox and VMware images are created in such a way that they are less in size but contains all the standard packages required for instant run.
Download Links
Linux Mint 20.3
FASTER DOWNLOAD . AD SUPPORTED
 VirtualBox Image (1.9 GB)
  VMware Image (1.9 GB)
REGULAR DOWNLOAD .
VirtualBox Image (1.9 GB) VMware Image (1.9 GB)
VirtualBox
VMware
Linux Mint 20.2
FASTER DOWNLOAD . AD SUPPORTED
VirtualBox Image (1.8 GB) VMware Image (1.8 GB)
REGULAR DOWNLOAD .
VirtualBox Image (1.8 GB) VMware Image (1.8 GB)
VirtualBox
VMware
Linux Mint 20.1
Linux Mint 20.1
FASTER DOWNLOAD AD SUPPORTED — Read Why?
REGULAR DOWNLOAD
VM image comes pre-installed with Open VM Tools for better performance. NO UPDATES INSTALLED.
MD5 — f48b129a6d3873ea63edfaf8e3a1f857
SHA-1 — 621be85358658ae612d43e8d33f15a3c58469562
MD5 — 5608550fb28950db8864fb5561b3e267
SHA-1 — 9e40098185a3bd85f82cce2ca35619169a7dc97e
Linux Mint 20
Linux Mint 20
FASTER DOWNLOAD AD SUPPORTED — Read Why?
REGULAR DOWNLOAD
VM image comes pre-installed with Open VM Tools for better performance.
System Details & Password
(to become root, use sudo su -)
How To Use
Linux Mint 20/20.1 — You can visit our dedicated section on how to import virtual machine images on VirtualBox and VMware Workstation.
Linux Mint 20.3/20.3 — You can visit our dedicated section on how to import virtual machine images on VirtualBox and VMware Workstation.
Conclusion
Thank you for downloading ready to use Linux Mint 20.3 VM images. Please feel free to share your feedback in the comments section.
10 Easy Steps To Install Linux Mint On VMware Workstation.

Linux mint is one of the best Linux distribution out there. There are some users who use it as the main operating system on their machines. The performance-wise as well it is very solid. For those who wanted to switch from Windows to Linux, the Linux Mint is the best choice as its UI is similar to the Windows operating systems.
But what if you don’t want to use Linux mint as the primary OS, instead virtualize them? Let’s look at that in this blog.
How to install Linux mint on windows 10?
You can either install the Linux mint alongside windows 10 by doing the dual boot, however, the issue with this method is that you can only use one operating system at a time, either Windows or Linux mint. And you cannot switch from one operating system to another without shutting down the primary operating system.
So, if you cannot use the Linux mint as your main operating system, then the alternate option is to virtualize them. You can use either virtualize windows on Linux mint or use Linux mint on windows 10.
Virtualize windows on Linux mint.
For those who wanted to use Linux mint as the primary OS and virtualize windows inside it, below are the options you have.
- The recommended and the best method is to use KVM on Linux mint and install windows operating system in it.
- The alternate option is to use different hypervisors such as VMware workstation or VirtualBox and install windows in it.
Virtualize Linux mint on windows 10
However, we wanted to take a look on this blog on how you can virtualize Linux mint on windows 10.
The options you have is to use,
In this blog, we are going to install the Linux mint operating system on a VMware workstation 16.
The steps performed here are identical to VMware workstation 15 and other older versions as well.
Prerequisite.
There are different editions of Linux mint available to download, we are going to use the version MATE. However, it’s up to you what edition you wanted to use. And the steps mentioned here are the same irrespective of the editions.
How To Install Linux Mint On VMware Workstation?
1. Define the Virtual machine.
Open VMware workstation pro and click on File and new virtual machine.
In the new virtual machine window choose Typical and click on Next.
You will be presented with a screen where you need to attach the Linux mint ISO file that you have download and click on Next.
You will now have to choose the Guest operating system,
Since the Linux mint is based on Debian, choose Linux and from the list of versions choose Debian 6 64bit and click on Next.
Name the virtual machine and choose the installation location, you may leave the default location if you want to and click on Next.
2. Verify the Virtual machine properties.
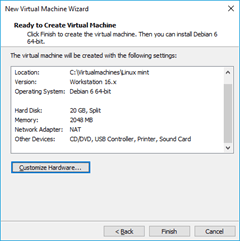
You will be presented with the VM properties, you may customize if required by clicking customize hardware.
If you notice below, you can see the network adapter as NAT which means the host machine which is windows 10 in our case would share the internet access with the Linux mint guest operating system, which is important if your VM requires internet access. And the NAT is the default network adapter in VMware workstation.
I am happy with the configuration below hence I clicked on Finish.
3. Access the Linux mint Live View.
Once done after few seconds you will be presented with the Linux Mint desktop like below.
It is looking like everything is done, is our installation done?
No, it is not. What you are seeing on the screen right now is the Linux mint live view without installing the software. Similar to Ubuntu you can use Linux mint without installing the operating system, that is only if you wanted to get the Linux mint experience.
To install the Linux mint on the VMware workstation you can double click on the CD drive on the Desktop that says install Linux mint.
4. Choose the language and keyboard layout.
The installation is like any other Linux distro, you may choose the language.
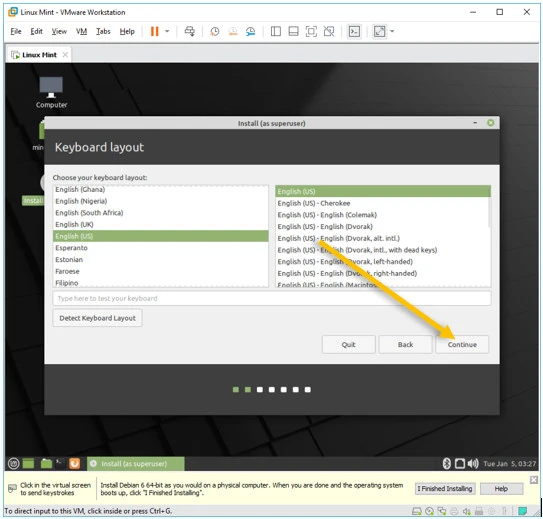
And the keyboard layout of your choice.
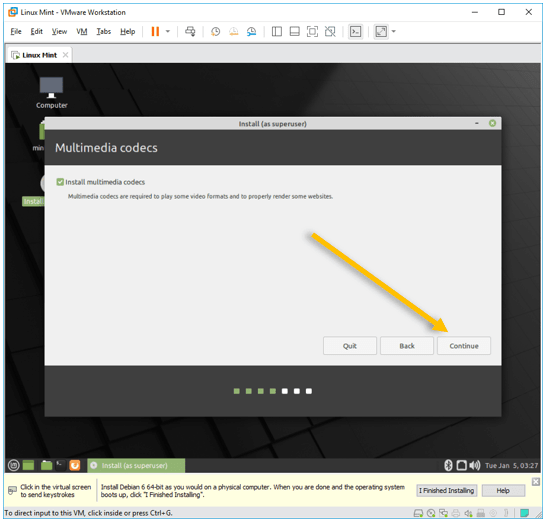
5. Installation of Multimedia codecs.
In the install multimedia window, you can leave the default as unchecked and continue.
Since I may require playing videos on this VM, I am checking the option install multimedia codecs in my setup.
Note: This will require more time for the installation. And during the installation, as it requires to download and install the codecs.
6. Setup the hard disk.
We are going to setup the hard disk for the VM now.
Check the box, ‘Erase disk and install Linux mint’ and click on Install now.
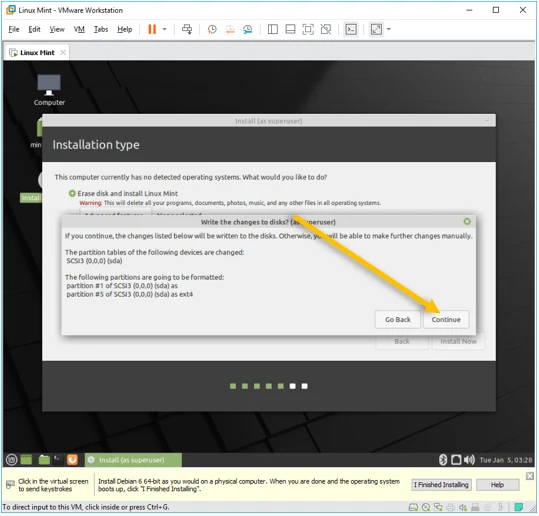
On the security prompt you may click on continue. It basically says the assigned hard disk will be formatted.
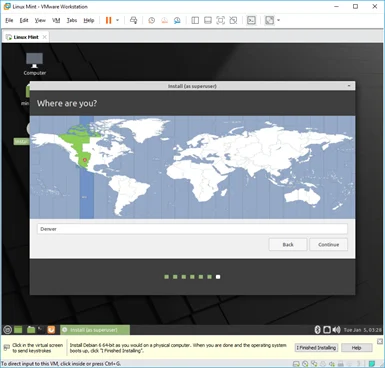
7. Choose the Time zone and create the local account.
Based on your location, you may choose the time zone and click on continue.
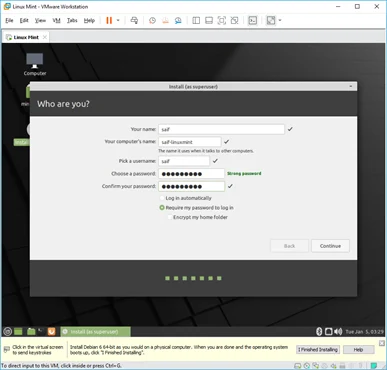
The next step is to configure the user account in the Linux mint. Enter the username and password that you are going to use with the machine. Click on Continue here.
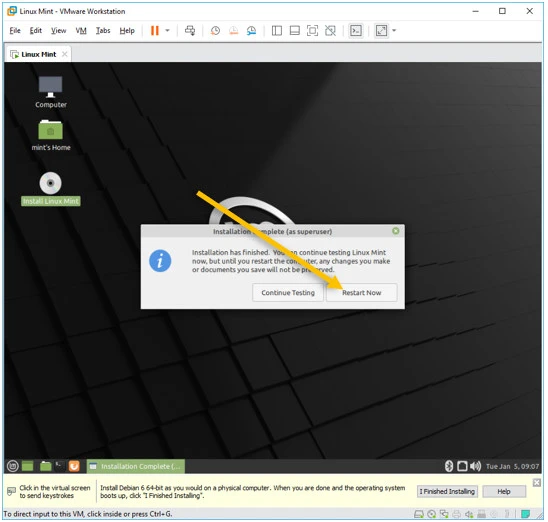
8. Restart the machine and disconnect the CDROM.
After a few minutes the installation will be completed, and you can now go ahead and restart the machine by clicking Restart Now.
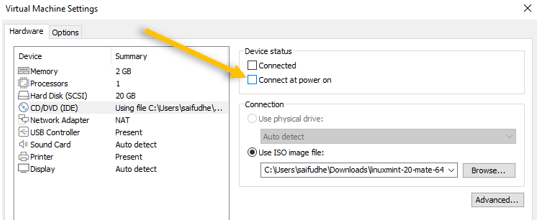
While it is rebooting, you will have to disconnect the CD drive that you had attached earlier.
Right click on the VM and click on settings and click on CD drive uncheck the option, connect at power on and click on Ok.
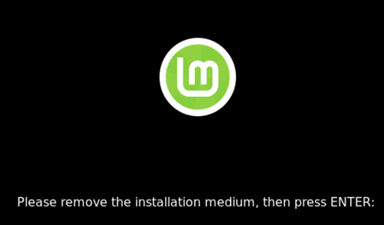
After you did the previous steps, you can click on Enter here.
9. Confirm the installation.
That’s it you have now successfully installed the Linux mint operating system on your VMware workstation pro. You may now click on I finished installing.

Do I require the VMware tools installed on the Linux mint?
During the installation, the VMware tools also installed automatically, so if you try to install the VMware tools you should be able to see that its grade out.
10. Verify the internet.
As you have chosen the NAT as the interface you should be able to access the internet as well, you can open the Firefox and try to open any website and you should be able to access it now.