- Как установить OpenVPN на Linux Mint 20
- Способ установки OpenVPN в Linux Mint 20:
- Шаг 1: Установите OpenVPN на Linux Mint 20:
- Шаг 2: Запустите службу OpenVPN:
- Шаг 3: Включите службу OpenVPN:
- Шаг 4: Проверьте статус службы OpenVPN:
- Способ удаления OpenVPN из Linux Mint 20:
- Вывод:
- Рекомендуемый контент
- Privacy Overview
- How to install a VPN on Linux Mint
- Linux system tray icon (optional)
- Notes
- 1. How to uninstall the official app
- 2. How to disable Kill Switch if you have uninstalled the app
- 3. Required dependencies
- 4. Help us fix bugs with the early release version of this app
Как установить OpenVPN на Linux Mint 20

OpenVPN — это инструмент, с помощью которого вы можете создавать виртуальные частные сети для защиты ваших сетевых коммуникаций. Этот инструмент также предоставляет возможность удаленного доступа к системе. Более того, его можно очень легко использовать как с операционными системами Linux, так и с Windows. Однако в этой статье мы просто поговорим о методе установки OpenVPN на машине с Linux Mint 20.
Способ установки OpenVPN в Linux Mint 20:
Чтобы установить клиент OpenVPN в Linux Mint 20, вам необходимо выполнить следующие шаги:
Шаг 1: Установите OpenVPN на Linux Mint 20:
Во-первых, вам необходимо установить клиент OpenVPN в обновленной системе с помощью команды, показанной ниже:
$ sudo apt-get install network-manager-openvpn
Шаг 2: Запустите службу OpenVPN:
После установки клиента OpenVPN в вашей системе вам необходимо запустить эту службу с помощью следующей команды:
$ sudo systemctl start openvpn
Шаг 3: Включите службу OpenVPN:
Теперь вы можете включить клиент OpenVPN в своей системе, выполнив команду, указанную ниже:
$ sudo systemctl enable openvpn
Шаг 4: Проверьте статус службы OpenVPN:
Наконец, активный статус клиента OpenVPN можно проверить, выполнив следующую команду:
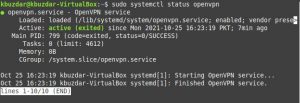
$ sudo systemctl status openvpn
Активный статус клиента OpenVPN, установленного в нашей системе Linux Mint 20, показан на изображении ниже:
Способ удаления OpenVPN из Linux Mint 20:
Вы можете легко удалить клиент OpenVPN из своей системы, когда захотите, выполнив следующую команду:
$ sudo apt-get purge --autoremove network-manager-openvpn
Вывод:
В этой статье подробно описан метод установки клиента OpenVPN в системе Linux Mint 20. После установки этого инструмента в вашей системе его можно эффективно использовать для обеспечения безопасной связи посредством создания виртуальных частных сетей.
Рекомендуемый контент
Мы используем файлы cookie на нашем веб-сайте, чтобы предоставить вам наиболее релевантный опыт, запоминая ваши предпочтения и повторные посещения. Нажимая «Принять все», вы соглашаетесь на использование ВСЕХ файлов cookie. Однако вы можете посетить «Настройки файлов cookie», чтобы предоставить контролируемое согласие.
Privacy Overview
Этот веб-сайт использует файлы cookie, чтобы улучшить вашу работу во время навигации по веб-сайту. Из них файлы cookie, которые классифицируются как необходимые, хранятся в вашем браузере, поскольку они необходимы для работы основных функций веб-сайта. Мы также используем сторонние файлы cookie, которые помогают нам анализировать и понимать, как вы используете этот веб-сайт. Эти файлы cookie будут храниться в вашем браузере только с вашего согласия. У вас также есть возможность отказаться от этих файлов cookie. Но отказ от некоторых из этих файлов cookie может повлиять на ваш опыт просмотра.
Necessary cookies are absolutely essential for the website to function properly. These cookies ensure basic functionalities and security features of the website, anonymously.
| Cookie | Duration | Description |
|---|---|---|
| cookielawinfo-checkbox-analytics | 11 months | This cookie is set by GDPR Cookie Consent plugin. The cookie is used to store the user consent for the cookies in the category «Analytics». |
| cookielawinfo-checkbox-functional | 11 months | The cookie is set by GDPR cookie consent to record the user consent for the cookies in the category «Functional». |
| cookielawinfo-checkbox-necessary | 11 months | This cookie is set by GDPR Cookie Consent plugin. The cookies is used to store the user consent for the cookies in the category «Necessary». |
| cookielawinfo-checkbox-others | 11 months | This cookie is set by GDPR Cookie Consent plugin. The cookie is used to store the user consent for the cookies in the category «Other. |
| cookielawinfo-checkbox-performance | 11 months | This cookie is set by GDPR Cookie Consent plugin. The cookie is used to store the user consent for the cookies in the category «Performance». |
| viewed_cookie_policy | 11 months | Этот файл cookie устанавливается подключаемым модулем GDPR Cookie Consent. Файлы cookie используются для хранения согласия пользователя на файлы cookie в категории «Необходимые». |
Functional cookies help to perform certain functionalities like sharing the content of the website on social media platforms, collect feedbacks, and other third-party features.
Performance cookies are used to understand and analyze the key performance indexes of the website which helps in delivering a better user experience for the visitors.
Analytical cookies are used to understand how visitors interact with the website. These cookies help provide information on metrics the number of visitors, bounce rate, traffic source, etc.
Advertisement cookies are used to provide visitors with relevant ads and marketing campaigns. These cookies track visitors across websites and collect information to provide customized ads.
Other uncategorized cookies are those that are being analyzed and have not been classified into a category as yet.
How to install a VPN on Linux Mint
The Proton VPN Linux app officially supports Mint 20+.

1. Download our repository setup package
This package contains the repository configuration and keys that are required to install the Proton VPN app.
2. Install the Proton VPN repository
Double-click the downloaded DEB file. Your default package manager will now install our repository.

Please don’t try to check the GPG signature of this release package (dpkg-sig –verify). Our internal release process is split into several part and the release package is signed with a GPG key, and the repo is signed with another GPG key. So the keys don’t match.
If you want to check the repo package integrity, you can check its checksum with the following command:
echo "c68a0b8dad58ab75080eed7cb989e5634fc88fca051703139c025352a6ee19ad protonvpn-stable-release_1.0.3-2_all.deb" | sha256sum --check -
3. Update the apt-get package list
The following command updates the list of available packages and their versions. Doing this allows you to install the Proton VPN App. Open Terminal and enter:
4. Install the Proton VPN Linux app
sudo apt-get install protonvpn The Proton VPN Linux app is now installed and can be run from your application launcher menu.
Linux system tray icon (optional)
If you wish, you can install the Linux app system tray icon. This shows your connection status and allows you to easily Quick Connect or Disconnect without opening the main Proton VPN window.
To install the system tray icon, open Terminal and run:
sudo apt install gir1.2-appindicator3-0.1
If asked to select your default displays manager , you can find out what it is by running:
grep '/usr/s\?bin' /etc/systemd/system/display-manager.service Once everything is installed, restart your PC and sign in using your Proton Account login details. If you do not have a Proton VPN account, now is the time to sign up for a Free Proton VPN plan for Linux .
The Proton VPN Linux app is now ready to secure your internet browsing and allow you to access the internet without censorship blocks.
Notes
1. How to uninstall the official app
sudo apt-get autoremove protonvpn Remove any leftover files:
2. How to disable Kill Switch if you have uninstalled the app
If the app is still installed, you can disable the kill switch from within the app. If you have uninstalled the app with the kill switch still enabled, then this won’t be possible and you may not be able to access the internet. To fix this:
a) Identify the name of the Proton VPN connection. To do this, run:
nmcli connection show --active You will now see a list of active connections.
b) Look for any connections with names that start pvpn- This usually includes pvpn-killswitch and pvpn-ipv6leak-protection , and may include pvpn-routed-killswitch . Delete all these connections using the following command:
nmcli connection delete [connection name] nmcli connection delete pvpn-killswitch c) Once you’ve done this, run the following command again to make sure that all Proton VPN connections have been deleted:
nmcli connection show --active If any remain, delete them as described above.
3. Required dependencies
You will need one (not both, which can cause problems) of the following dependencies installed on your Mint system for the Proton VPN app to work:
Most versions of Mint come pre-installed with one of these dependencies , anyway, so it’s unlikely you’ll need to do anything else. Our app also requires:
4. Help us fix bugs with the early release version of this app
You can access new features before they are released publicly by downloading and testing the early access version of the app. By doing so, you can help us find bugs and fix them before we officially release a new version of the app.
Most people should use the stable release version of our app . We only recommend the early access app if you:
- Are an experienced Linux user
- Do not have serious concerns about your threat model
- Are happy to help us test our beta software
To install the early access version of the Proton VPN Linux app:
a) Uninstall the release version of the app (if it is installed). If you later want to replace the early access version of our app with the release version, you will need to uninstall it first.
b) Download the following package instead of the one linked to in step 1.
To check the integrity of the package, use the following command:
echo "74b37593b4e9d49842c11cd921635eb29e0a190ab16f56c53d3f41f9e1bc5707 protonvpn-beta-release_1.0.3-2_all.deb" | sha256sum --check -
Everything is otherwise the same as described above.