- Join Linux Mint 19/20 to an Active Directory Domain
- The Rest of the Story
- Steps Toward Awesome
- Step 0: Install the Needed Packages
- Step 1: Edit Your krb5.conf File
- Step 2: Edit Your realmd.conf File
- Step 3: Edit Your timesyncd.conf File
- Step 4: Test Your Credentials
- Step 5: Join the Active Directory Domain
- Step 6: Edit Your sssd.conf File
Join Linux Mint 19/20 to an Active Directory Domain
Here are all the steps needed to add your Linux Mint computer to a Windows Active Directory Domain. For more detail, and explanation, please read The Rest of the Story.
sudo apt install realmd sssd sssd-tools libnss-sss libpam-sss krb5-user adcli samba-common-bin oddjob oddjob-mkhomedir packagekit samba python-dnspython Restart your computer, then edit krb5.conf .
1 2 3 4 5 6 7 8 9 10 11 12 13 14 15 16 17 18 19 20 [libdefaults] default_realm = AWESOME.COM dns_lookup_kdc = true dns_lookup_realm = true [realms] AWESOME.COM = kdc = awesome.com admin_server = awesome.com master_kdc = awesome.com default_domain = awesome.com > [domain_realm] .awesome.com = AWESOME.COM awesome.com = AWESOME.COM [logging] kdc = SYSLOG:INFO admin_server = FILE=/var/kadm5.log 1 2 3 4 5 6 7 8 9 10 11 12 13 14 15 16 17 [users] default-home = /home/%U default-shell = /bin/bash [active-directory] default-client = sssd os-name = Linux Mint os-version = 20 [service] automatic-install = no [awesome.com] fully-qualified-names = yes automatic-id-mapping = no user-principal = yes manage-system = yes sudo xed /etc/systemd/timesyncd.conf [Time] NTP=asmdc7.awesome.com #FallbackNTP=ntp.ubuntu.com #RootDistanceMaxSec=5 #PollIntervalMinSec=32 #PollIntervalMaxSec=2048 sudo timedatectl set-ntp true sudo systemctl restart systemd-timesyncd.service sudo timedatectl --adjust-system-clock timedatectl status Discover the realm you want to join.
realm discover awesome.com kinit avawesome klist kdestroy Join the Active Directory Domain.
sudo realm join --verbose --user=aawesome-a --computer-ou=OU=Computers,OU="ASM Headquarters",DC=awesome,DC=com awesome.com 1 2 3 4 5 6 7 8 9 10 11 12 13 14 15 16 17 18 19 20 21 22 23 [sssd] domains = awesome.com config_file_version = 2 services = nss, pam [domain/awesome.com] ad_domain = awesome.com krb5_realm = AWESOME.COM realmd_tags = manages-system joined-with-adcli cache_credentials = True id_provider = ad krb5_store_password_if_offline = True default_shell = /bin/bash ldap_id_mapping = True use_fully_qualified_names = True fallback_homedir = /home/%u access_provider = ad ad_hostname = [[computer_name.my-domain]].com dyndns_update = True dyndns_refresh_interval = 43200 dyndns_update_ptr = True dyndns_ttl = 3600 dyndns_auth = GSS-TSIG sudo systemctl restart sssd.service Restart your computer, and you should able to log in using your Active Directory Credentials.
Update 8/30/2019: Click here to see some optional, final steps you could take.
The Rest of the Story
I work for a “Windows Shop”, or “.Net Shop”. Call it what you like, but it boils down to no Linux to be found. Fortunately, my work environment is flexible, so I decided to take on the challenge to put Linux only on my work laptop, and get it up and running.
Things like snaps have been extremely helpful in getting the software I need on my machine, and LibreOffice has come a long way. Everything else, like Office 365 for email, just needs a web browser. And in case I run into any edge cases, I do have Windows 10 on a VirtualBox image, but all that is outside of the scope of this article.
My very first step to tackle was Windows Active Directory Integration with a Linux machine; I needed to be able to use my Active Directory credentials to log into my Linux laptop.
Spoiler alert. I got it to work! 🙂 And I’m very excited to be able to use Linux at home and now at work!
Read on to see how I did it.
Steps Toward Awesome
First, I would like to give credit where credit is due. This article was extremely helpful in guiding me in getting everything set up.
Step 0: Install the Needed Packages
Open up your terminal, and enter the text below to get the needed packages installed.
sudo apt install realmd sssd sssd-tools libnss-sss libpam-sss krb5-user adcli samba-common-bin oddjob oddjob-mkhomedir packagekit samba python-dnspython The krb5-user package will prompt for the Active Directory “realm”, and you’ll want to enter your realm in all CAPS.

After I installed the packages, I went ahead and restarted my machine.
Step 1: Edit Your krb5.conf File
Start by opening krb5.conf :
You can replace the contents of the current file with the text below.
Note: Values inside the double brackets (i.e. — [[value]]), need to be replaced with the correct values for your environment. Replace the value, and additionally, remove the double brackets. (i.e. — domain = [[my-domain.com]] –> domain = awesome.com)
1 2 3 4 5 6 7 8 9 10 11 12 13 14 15 16 17 18 19 20 [libdefaults] default_realm = [[YOUR-REALM.COM]] #YOUR-REALM.COM should be in CAPS dns_lookup_kdc = true dns_lookup_realm = true [realms] [[YOUR-REALM.COM]] = < #replace value, remove double brackets kdc = [[your-realm.com]] admin_server = [[your-realm.com]] master_kdc = [[your-realm.com]] default_domain = [[your-domain.com]] #my domain and realm were the same > [domain_realm] .[[your-domain.com]] = [[YOUR-REALM.COM]] #YOUR-REALM.COM should be in CAPS [[your-domain.com]] = [[YOUR-REALM.COM]] [logging] kdc = SYSLOG:INFO admin_server = FILE=/var/kadm5.log To finish up this step, run:
Step 2: Edit Your realmd.conf File
Now open up your realmd.conf file.
Copy and paste the text below into the file. You can of course replace the values for “os-name” and “os-version”.
1 2 3 4 5 6 7 8 9 10 11 12 13 14 15 16 17 [users] default-home = /home/%U default-shell = /bin/bash [active-directory] default-client = sssd os-name = [[Linux Mint]] #you can put your Linux Distribution Name os-version = [[20]] #you can put your Distribution Version [service] automatic-install = no [my-domain.com] #replace my-domain.com, but KEEP the brackets on this one fully-qualified-names = yes automatic-id-mapping = no user-principal = yes manage-system = yes Step 3: Edit Your timesyncd.conf File
You should be used to editing files by now in this tutorial, so here we go again. Open up your terminal, and enter the text below.
sudo xed /etc/systemd/timesyncd.conf All you need to do is change the “NTP” value to the address of your local Network Time Protocol (NTP) Server. You may have to ask your Network Administrator for the server address, and if you are the Network Administrator, I hope you know the address of your NTP Server 😉
[Time] NTP=[[my-ntp-server.my-domain.com]] #replace value, remove double brackets #FallbackNTP=ntp.ubuntu.com #RootDistanceMaxSec=5 #PollIntervalMinSec=32 #PollIntervalMaxSec=2048 Now you’ll need to update your local network time. Your local computer time needs to be within five minutes of the Kerberos (authentication) Server. So the clock times need to match, or you won’t be able to log in.
You’ll need to run the following commands in order to make sure your date and time are up-to-date.
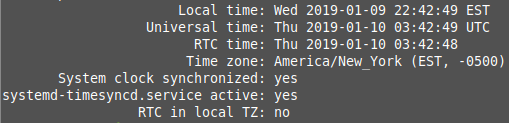
sudo timedatectl set-ntp true sudo systemctl restart systemd-timesyncd.service sudo timedatectl --adjust-system-clock Now you can check the status of your local date and time synchronization.
And your results should be similar to the screenshot below.
Step 4: Test Your Credentials
Even though your computer may not be bound to the Active Directory yet, you can now test your login credentials to make sure everything is set up correctly so far.
realm discover [[my-domain.com]] Successful results should look similar to the output below.
1 2 3 4 5 6 7 8 9 10 11 12 13 14 15 my-domain.com type: kerberos realm-name: MY-REALM.COM domain-name: my-domain.com configured: kerberos-member server-software: active-directory client-software: sssd required-package: sssd-tools required-package: sssd required-package: libnss-sss required-package: libpam-sss required-package: adcli required-package: samba-common-bin login-formats: %U@my-domain.com login-policy: allow-realm-logins You can now try to “test” your login credentials. Do that by running the commands below, and enter your Active Directory password when prompted.
You can verify that your login attempt worked by running this next command.
If that worked, your results should look similar to the screenshot below.

Be sure to destroy your Kerberos token when you’re done.
Step 5: Join the Active Directory Domain
Time to join your Active Directory. You’ll need a Network Administrator, or someone with a Network Admin username/password in order to get your computer joined to the Active Directory realm.
Enter the text below into your terminal, and don’t forget to replace the values in the double brackets (along with the brackets).
sudo realm join --verbose --user=[[network-admin-username]] --computer-ou=OU=[[Computers]],OU="[[Active-Directory-OU-Value]]",DC=[[my-domain-without-the-com]],DC=com [[my-domain.com]] You’ll enter the Network Administrator username, and you’ll be prompted for the password.
* Resolving: _ldap._tcp.my-domain.com * Performing LDAP DSE lookup on: 10.1.1.14 * Performing LDAP DSE lookup on: 10.1.1.15 * Performing LDAP DSE lookup on: 10.1.1.28 * Successfully discovered: my-domain.com Password for awesome-admin: After the Network Administrator password has been entered, the rest of the output should look similar to this:
1 2 3 4 5 6 7 8 9 10 11 12 13 14 15 16 17 18 19 20 21 22 23 24 25 26 27 28 29 30 31 32 33 34 35 36 * Unconditionally checking packages * Resolving required packages * LANG=C /usr/sbin/adcli join --verbose --domain my-domain.com --domain-realm MY-REALM.COM --domain-controller 10.1.1.14 --computer-ou OU=Computers,OU=SHORT-DOMAIN-NAME Headquarters,DC=domain-controller,DC=com --os-name Linux Mint --os-version 19.1 --login-type user --login-user network-admin-username --stdin-password --user-principal * Using domain name: my-domain.com * Calculated computer account name from fqdn: COMPUTER-NAME * Using domain realm: my-domain.com * Sending netlogon pings to domain controller: cldap://10.1.1.14 * Received NetLogon info from: SERVER.my-domain.com * Wrote out krb5.conf snippet to /var/cache/realmd/adcli-xyzab-oFOwIT/krb5.d/adcli-krb5-conf-wCGqIO * Authenticated as user: network-admin-username@MY-REALM.COM * Looked up short domain name: SHORT-DOMAIN-NAME * Using fully qualified name: computer-name * Using domain name: my-domain.com * Using computer account name: COMPUTER-NAME * Using domain realm: my-domain.com * Calculated computer account name from fqdn: COMPUTER-NAME * With user principal: host/computer-name@MY-REALM.COM * Generated 120 character computer password * Using keytab: FILE:/etc/krb5.keytab * Found computer account for COMPUTER-NAME$ at: CN=COMPUTER-NAME,OU=Computers,OU=SHORT-DOMAIN-NAME Headquarters,DC=my-domain,DC=com * Set computer password * Retrieved kvno '7' for computer account in directory: CN=COMPUTER-NAME,OU=Computers,OU=SHORT-DOMAIN-NAME Headquarters,DC=my-domain,DC=com * Modifying computer account: userAccountControl * Modifying computer account: operatingSystemVersion, operatingSystemServicePack * Modifying computer account: userPrincipalName * Discovered which keytab salt to use * Added the entries to the keytab: COMPUTER-NAME$@MY-REALM.COM: FILE:/etc/krb5.keytab * Added the entries to the keytab: host/COMPUTER-NAME@MY-REALM.COM: FILE:/etc/krb5.keytab * Added the entries to the keytab: host/COMPUTER-NAME@MY-REALM.COM: FILE:/etc/krb5.keytab * Cleared old entries from keytab: FILE:/etc/krb5.keytab * Added the entries to the keytab: host/computer-name@MY-REALM.COM: FILE:/etc/krb5.keytab * Added the entries to the keytab: RestrictedKrbHost/COMPUTER-NAME@MY-REALM.COM: FILE:/etc/krb5.keytab * Added the entries to the keytab: RestrictedKrbHost/computer-name@MY-REALM.COM: FILE:/etc/krb5.keytab * /usr/sbin/update-rc.d sssd enable * /usr/sbin/service sssd restart * Successfully enrolled machine in realm Step 6: Edit Your sssd.conf File
Open up sssd.conf for editing