Linux Mint Forums
How to install compiz stable on Linux Mint MATE 16, 17
Forum rules
Don’t add support questions to tutorials please; start your own topic in the appropriate sub-forum instead. Before you post please read forum rules
How to install compiz stable on Linux Mint MATE 16, 17
Post by Odd0002 » Sun Feb 09, 2014 2:26 am
Hello, and welcome to my first (public) tutorial! Today we will be installing compiz stable, with instructions based off of the official installation instructions (http://wiki.compiz.org/Installation/Stable) and my own experiences with compiz. Why compiz stable? It’s stable, 0.9.x is pretty buggy sometimes, and the newest version of compiz is missing a few plugins that are available in compiz 0.8.x and have not been ported to compiz 0.9.x.
I have split this tutorial up into 5 major steps: installing compiz, installing Emerald, applying correct settings, replacing the current window manager with compiz, and setting compiz to start on login.
These instructions have been tested on and made for Linux Mint 16 MATE (64 bit), and preliminary tests on Linux Mint 17 MATE (64 bit), but it should work on xfce and older versions of Linux Mint as well (except for step 5), and probably on many other distributions.
These instructions will NOT work on Gnome3 and its derivatives (including Cinnamon) due to its complete integration and dependence on its own window manager, Mutter.
These instructions are meant to be executed by the user that will be using compiz, NOT as the root user. If your distribution/installation does not let you use sudo, replace all instances of
EDIT: SOME PREVIOUS STEPS HAVE BEEN REMOVED AS A MAINTAINER HAS FIXED THESE PROBLEMS.
Step 1: Compiz Installation
Step 1.1: Install compiz dependencies:
As with all other programs, you need dependencies to compile it, so let’s get started!
sudo apt-get install build-essential libxcomposite-dev libpng12-dev libjpeg-dev libsm-dev libxrandr-dev libxdamage-dev libxinerama-dev libstartup-notification0-dev libgconf2-dev libgl1-mesa-dev libglu1-mesa-dev libmetacity-dev librsvg2-dev libdbus-1-dev libdbus-glib-1-dev git autoconf automake automake1.9 libtool intltool libxslt1-dev xsltproc libwnck-dev python-dev python-pyrex libprotobuf-dev Step 1.2: Download all files needed:
Now that you have all the dependencies, it’s time to download the code we’ll be compiling!
mkdir compiz && cd compiz git clone git://anongit.compiz.org/compiz/core/ -b compiz-0.8 git clone git://anongit.compiz.org/fusion/libraries/bcop git clone git://anongit.compiz.org/compiz/compizconfig/libcompizconfig -b compiz-0.8 git clone git://anongit.compiz.org/compiz/compizconfig/compizconfig-python -b compiz-0.8 git clone git://anongit.compiz.org/compiz/compizconfig/ccsm -b compiz-0.8 git clone git://anongit.compiz.org/fusion/plugins-main git clone git://anongit.compiz.org/fusion/plugins-extra git clone git://anongit.compiz.org/fusion/plugins-unsupported With everything ready, it’s time to compile compiz so we can run it.
cd core ./autogen.sh --prefix=/usr/local && ./configure --prefix=/usr/local make -j `nproc` sudo make install cd ../ cd bcop ./autogen.sh --prefix=/usr/local && ./configure --prefix=/usr/local make -j `nproc` sudo make install cd ../ cd libcompizconfig ./autogen.sh --prefix=/usr/local && ./configure --prefix=/usr/local make -j `nproc` sudo make install cd ../ cd compizconfig-python ./autogen.sh --prefix=/usr/local && ./configure --prefix=/usr/local make -j `nproc` sudo make install cd ../ cd ccsm sudo ./setup.py install --prefix=/usr/local cd ../ cd plugins-main ./autogen.sh --prefix=/usr/local && ./configure --prefix=/usr/local make -j `nproc` sudo make install cd ../ cd plugins-extra ./autogen.sh --prefix=/usr/local && ./configure --prefix=/usr/local make -j `nproc` sudo make install cd ../ cd plugins-unsupported ./autogen.sh --prefix=/usr/local && ./configure --prefix=/usr/local make -j `nproc` sudo make install cd ../ Step 1.4: Add compiz library paths
As you could see in the commands above, we have compiled compiz in a different place than default, because that is what the instructions said to do. Therefore, now we have to add the locations of the libraries to our path so that compiz can see and use the libraries it depends on.
sudo su -c "echo /usr/local/lib > /etc/ld.so.conf.d/compiz.conf" sudo ldconfig You now have compiz installed! Congratulations! You can go ahead and skip to step 3 or 4 now, but you’ll probably want to have a titlebar for your windows, right? Unless you know how to get gtk-window-decorator to work with compiz (I don’t), you have to install Emerald to have titlebars. Emerald is a «window decorator» (titlebar and window border generator, see http://en.wikipedia.org/wiki/Window_decoration for more information).
Step 2: Installing Emerald
Step 2.1: Downloading dependencies:
You already have all the dependencies if you installed compiz!
Step 2.2: Downloading needed files:
Time to download the files we’re going to compile.
mkdir emerald && cd emerald git clone git://anongit.compiz.org/fusion/decorators/emerald git clone git://anongit.compiz.org/fusion/decorators/emerald-themes That was easy! Time to finish up and compile emerald!
cd emerald ./autogen.sh --prefix=/usr/local && ./configure --prefix=/usr/local make -j `nproc` sudo make install cd ../ cd emerald-themes ./autogen.sh --prefix=/usr/local && ./configure --prefix=/usr/local make -j `nproc` sudo make install cd ../ Step 2.4: Add emerald library paths
Like with compiz, emerald was compiled in a different place than default, so now we have to add the locations of the libraries to our path so that emerald can see and use the libraries it depends on.
sudo su -c "echo /usr/local/lib > /etc/ld.so.conf.d/emerald-theme-manager.conf" sudo su -c "echo /usr/local/lib > /etc/ld.so.conf.d/emerald.conf" sudo ldconfig Step 3: Setting configuration
We’re more than halfway there! Now we have to set up compiz so that it works like it should.
Run ccsm in terminal and enable «Window Decorations», «Move Windows», and «Resize Windows».
Click on the icon for «Window Decorations», and where it says command, type «emerald».
(Optional) enable any other features you might want: «Application Switcher», «Desktop Wall»/»Desktop Cube», and any other ones you want
Step 3.2: (Optional) Emerald theme settings
If you want to change how emerald looks, do this step.
Run emerald-theme-manager in terminal and choose an emerald theme you might want to use.
Step 4: Replace your current window manager with compiz
This step makes sure that compiz is running correctly, by temporarily replacing your current window manager with compiz.
To make sure your install works correctly, run «compiz —replace ccp» in a terminal to replace your current window manager with compiz!
LINUX MINT MATE ONLY: Run «marco —replace» to return to your current window manager.
This is an optional step, only use if you want to autostart compiz on login.
So now that you’ve confirmed that compiz works how you want it to (you HAVE tested it in step 4, right?), it’s time to make it autostart when you log in.
CAUTION: THIS STEP HAS ONLY BEEN CONFIRMED TO WORK ON LINUX MINT 16 MATE. IT MIGHT WORK ON OTHER DISTRIBUTIONS, BUT IT IS UP TO YOU TO SET THE CORRECT AUTOSTART SETTINGS IF IT DOES NOT.
gsettings set org.mate.session.required-components windowmanager compiz echo -e "[Desktop Entry]\nType=Application\nExec=compiz --replace ccp\nName=Compiz" > ~/.config/autostart/compiz.desktop Congratulations! You now have compiz stable installed and running! If you encounter any errors while testing compiz or setting up emerald, try restarting your computer and continuing where you left off. If for some reason your window decorations stop working, you can just run the command in step 4 again.
Wpilot
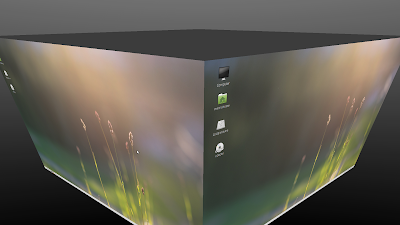
Для того чтобы настроить визуальные эффекты в Linux такие как прозрачные окна, анимация при перемещении окон и особенно 3D куб рабочего стола чем не может похвастаться windows без дополнительной программы и многие другие эффекты нужно установить оконный менеджер Compiz.
Если вы скачали Linux Mint 18.1 с графической оболочкой MATE то можете увидеть что Compiz установлен и в Control Center вы найдете CompizConfig Settings Manager (Менеджер настройки CompizConfig). Но поиграв с настройками вы обнаружите что эффекты Compiz не работают.

У кого не установлен Compiz выполняем команды в терминале
sudo apt-get install compiz compiz-plugins compizconfig-settings-manager
Далее установим Редактор конфигурации системы и поменяем оконный менеджер
sudo apt-get install dconf-tools
Откройте редактор dconf Editor поочередно открывая вкладки org > mate > desktop > session > required-components в имени windowmanager замените marco на compiz

Настраиваем автоматический запуск Compiz при входе в систему. Открываем Control Center > Startup Applications. В поле Name пишем Compiz а в Command команду compiz —replace
Останется только перезагрузить систему. И после перезагрузки настроить различные эффекты Compiz как пожелаете.
compizomania
Для установки оконного менеджера Compiz в рабочее окружение MATE Linux Mint 15 необходимо прежде всего установить пакет Compiz и Менеджер настройки CompizConfig, а также compiz-plugins-extra, если вы захотите в дальнейшем задействовать дополнительные эффекты.
Все эти пакеты есть по умолчанию в Менеджере программ, откуда их можно установить или выполните следующую команду в терминале, которая сделает установку перечисленных пакетов:
apt install compiz compiz-plugins-extra compiz compizconfig-settings-manager
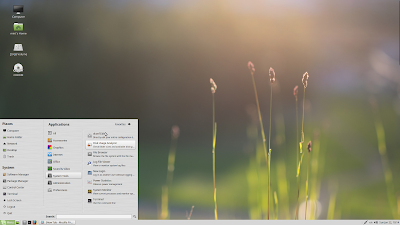
По окончании установки откройте Менеджер настройки CompizConfig: Меню ->Параметры ->Менеджер настройки CompizConfig, где нужно активировать необходимые плагины для корректной работы оконного менеджера, как отмечено на снимках:
Далее необходимо заменить оконный менеджер Marco, который установлен в окружении MATE по умолчанию на Compiz. Для этого нужно установить (если ещё не установлен) Редактор конфигурации системы — dconf-tools, который также имеется по умолчанию в Менеджере программ или выполните команду в терминале:
apt install dconf-tools
Откройте Редактор dconf и прейдите по следующему адресу: org/mate/desktop/session/required-components и в имени windowmanager измените значение с marco на compiz, как показано на снимке:
Или выполните команду в терминале, которая делает то же самое, только быстрее:
gsettings set org.mate.session.required-components windowmanager compiz
Следующим шагом будет запуск Compiz. Откройте окно Выпонить команду Alt+F2, введите и выполните команду:
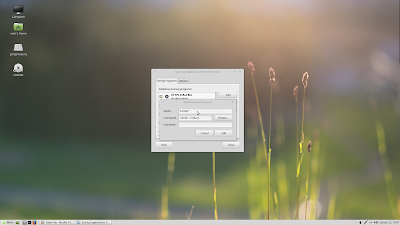
Чтобы Compiz запускался при входе в систему, данную команду необходимо ввести в Автоматически запускаемые приложения: Меню ->Центр управления ->Запускаемые приложения. В открывшемся окне нажмите кнопку Добавить, в поле Имя введите Compiz, а в поле Команда — compiz —replace:
Чтобы полностью завершить установку Compiz и задействовать его работу, необходимо перезагрузить систему.
Закройте все приложения и выполните команду в терминале:
После очередного входа в систему, вы можете задействовать эффекты Compiz, такие как Куб рабочего стола, Вязкие окна и многие другие. Инструкции по их настройке вы можете посмотреть во вкладке сайта под названием Compiz.