- How to Install and Use i3 Window Manager on Linux
- Benefits of i3 Windows Manager
- 1. Resource Friendly
- 2. Flexibility
- 3. Easy to Navigate Between Workspaces
- Installing i3 Window Manager on Linux
- How to Use i3 Window Manager in Linux
- Manipulating Windows
- i3 Status Bar
- i3 Basic Configurations
- Base System and i3wm Installation
- Basic Configuration
- Frequently Used Commands
- Startup Configurations
- MDM
- xinit
- Input Method
- Power Management
- Config System Font
- How to Install i3 on Linux Mint 21
- How to Install i3 on Linux Mint 21
- Conclusion
- About the author
- Aaliyan Javaid
How to Install and Use i3 Window Manager on Linux
Written in C language, the i3wm ( i3 Windows Manager ) is a lightweight, easy-to-configure, and hugely popular tiling windows manager. Unlike the conventional desktop environment, a tiling manager provides just sufficient functionality to arrange windows on your screen in an easy and appealing manner suited for your workflow.
i3 is a minimalist tiling manager that intelligently arranges the windows on your screen in a seamless non-overlapping manner. Other tiling managers include xmonad and wmii.
In this guide, we will explain how to install and use the i3 Windows manager on Linux desktop systems.
Benefits of i3 Windows Manager
Unlike X windows managers such as Fluxbox, KWin, and enlightenment, i3 comes with a bag of goodies that we have listed below for a smooth desktop experience.
1. Resource Friendly
Unlike the fully-featured desktop environments such as GNOME, i3 windows manager is quite minimalistic and is designed for simplicity and efficiency. With low resource utilization, it makes up for a fast tiling Windows manager and leaves your system with plenty of RAM and CPU for other applications.
2. Flexibility
Apart from having the ability to automatically arrange windows in a neat and organized manner, i3 is fully configurable and you can tweak a few settings to match your preferred screen layout. Using external tools, you can enhance the appearance by selecting the background image, adjusting the transparency and window fading effect, and enabling desktop notifications.
3. Easy to Navigate Between Workspaces
The i3 tiling manager provides an easy and quick way to switch between workspaces thanks to a wide array of keyboard shortcuts that you can easily configure. You can seamlessly group Windows to suit your workflow, which enhances your productivity.
Installing i3 Window Manager on Linux
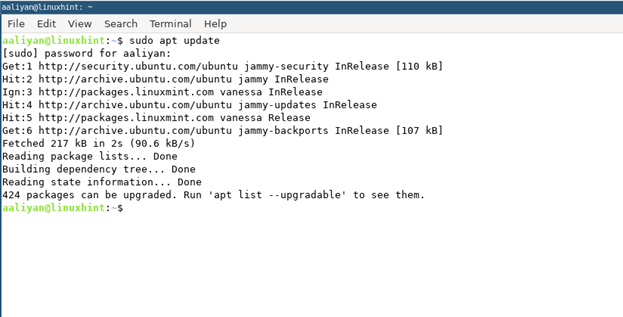
The i3 tiling manager is available in Debian, Ubuntu, and Linux Mint repositories and can be installed using the apt package manager as follows.
$ sudo apt update $ sudo apt install i3
On Fedora distribution, you can install i3 using dnf package manager as shown.
$ sudo apt update $ sudo dnf install i3
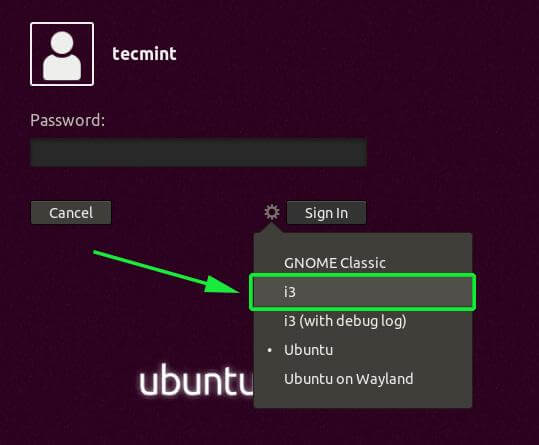
Once installed, you will need to restart your system and click on the small gear wheel at the login window and select the ‘i3’ option as shown.
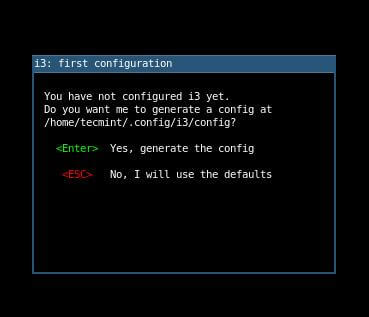
Once logged in, you will be prompted to either generate the config file which will be saved in your home directory ~/.config/i3/config, or use the defaults which will save the file in the /etc/i3 directory.
In this guide, we will go with the first option so we are going to hit ENTER to place the configuration file in our home directory.
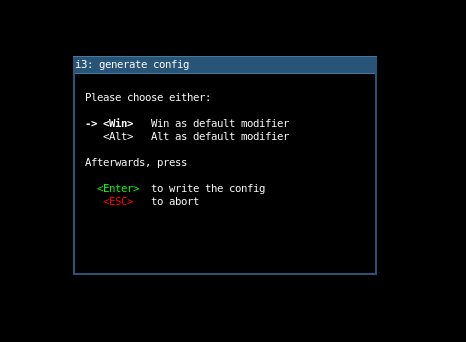
Next, you will be required to define the i3 wm modifier key also known as the $mod key which can either be the Windows Logo key or the Alt Key. Use the arrow up or down keys to select your preferred modifier key.
Once you are done with the initial setup. There isn’t much to do with the default i3 window, it saves as a blank screen with a status bar at the very bottom of the screen.
![]()
How to Use i3 Window Manager in Linux
Having installed the i3 tiling manager, here are a few keyboard combinations that you can use to get off the ground and use the tiling manager with ease.
Launch a terminal: $mod + ENTER .
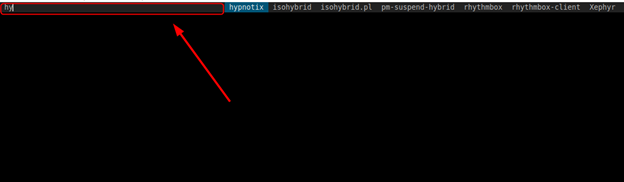
Launching application using the menu: $mod + d – This opens up a menu at the top of your screen that allows you to search a specific application by typing a keyword at the text field provided.

- Enter a fullscreen mode – on and off: $mod + f .
- Exiting an application window; $mod + Shift + q .
- Restarting i3: $mod + Shift + r .
- Exiting i3 windows manager: $mod + Shift + e .
Manipulating Windows
When launching applications, they are usually tiles as shown below. Obviously, the workspace looks so cramped with multiple tiled windows and makes you feel overwhelmed.
For a better experience, you can detach a window and bring it into the foreground to have a ‘floating’ experience. This can be achieved by pressing the $mod + Shift + Space combination.
In the example below, the terminal window is seen in the foreground instead of being tiled.
Additionally, you can make the window go fullscreen by hitting the $mod + f combination and repeating the same to revert to the tiling mode.
i3 Status Bar
This is one of the most important yet overlooked section of the i3 tiling manager. It displays information such as the available disk space, IP address & bandwidth rate, Battery level, date, and time.
![]()
i3 Basic Configurations
If you didn’t generate the configuration file in your home directory, you can find it in the /etc/i3/config path. To copy it to your home directory
$ sudo cp /etc/i3/config ~/.config/i3
Then change the ownership to your user
$ sudo chown user:group ~/.config/i3
The configuration file comes with numerous settings that you can tweak to your preference to alter the look and feel of the tiling manager. You can change the colors of workspaces, change the layout of windows, as well as resize windows. We will not dwell so much on that or now. The aim of this guide was to give you a decent introduction to the i3 tiling manager and the basic functionalities to get you started.
Base System and i3wm Installation
Install Linux Mint 19.3 Cinnamon with Live DVD (USB key created by YUMI 2.0.5) on Dell E7450 laptop.
No need to install any hardware drivers. It simply works!
Install i3wm with sudo apt install i3 i3lock suckless-tools i3status dunst libanyevent-i3-perl .
Basic Configuration
cp /etc/i3status.conf ~/.config/i3status/config and modify the ethernet and wireless NIC name from _first_ to the actual name, for example the default ethernet name of Linux Mint 18.3 is eno1, and the default wireless card name is wlp2s0. Both the order line and the command line need to be modified.
Frequently Used Commands
Reload i3 configuration: i3-msg reload ;
Restart i3 environment (preserves current layout/session, opened apps): i3-msg restart ;
Startup Configurations
MDM
Mint’s default graphical login manager is MDM, see New features in Linux Mint 17 Xfce. Logout of Xfce desktop. In login manager, you can find «i3», choose it, and login i3 environment. Its user level auto startup script is ~/.xsessionrc. It should be the same with .xinitrc. So make a link from it with ln -s ~/.xinitrc ~/.xsessionrc . See /etc/mdm/Xsession for variable definitions, such as USERXSESSION, USERXSESSIONRC, etc. See CustomXSession for more.
export XMODIFIERS="@im=fcitx" export GTK_IM_MODULE=fcitx export QT_IM_MODULE=fcitx export LC_CTYPE=en_US.UTF-8 export EDITOR=nvim setxkbmap -option caps:swapescape -option ctrl:swap_lwin_lctl -option ctrl:swap_rwin_rctl fcitx & /usr/bin/flatpak run --branch=stable --arch=x86_64 --command=copyq com.github.hluk.copyq & goldendict & /home/leo/warez/Shadowsocks-Qt5-3.0.0-x86_64.AppImage & devmon & xmodmap -e "poiniter = 3 2 1" xbindkeys xrandr --output HDMI-1 --auto --right-of eDP-1 Here the copyq line is start the CopyQ installed by flatpak , which has newer version than installed by apt .
xbindkeys is used for keyboard shortcuts for hardware. For example, volume up/down, screen brightness up/down, etc. See dsnote Define Key Binding with xbindkeys on Linux for details.
devmon for USB key management, see dsnote Automount USB Disk on Linux for details.
xrandr for dual-monitors setup.
No need to add exec i3 (like in .xinitrc ) at the end of this file.
xinit
Modify the system runlevel to 3 (see note «Run Linux Without Desktop Environment») and make a copy named .xinitrc from .xsessionrc. Add exec i3 at the end of the file.
Now you can start i3wm with startx (or startx /home/leo/.xinitrc.i3 ) in text mode.
Input Method
Add the following lines into .xsessionrc or .xinitrc before «exec i3»:
export XMODIFIERS="@im=fcitx" export GTK_IM_MODULE=fcitx export QT_IM_MODULE=fcitx fcitx & If the IM does not work properly in terminal emulator or browser, search fcitx in dsnote «» for suggestions.
Power Management
To bind Alt-Ctrl-L to lock, and Alt-Insert to suspend, add the following lines into ~/.i3/config:
bindsym $mod+Control+l exec i3lock -c 000000 bindsym $mod+Insert exec systemctl suspend For system reboot and shutdown, run command sudo reboot and sudo shutdown now in a console.
Config System Font
- List all available fonts installed: fc-list . For example, when run fc-list|grep wqy , we got the name of this pre-installed Chinese font: «WenQuanYi Micro Hei».
- Edit config file ~/.i3/config: replace «font -misc-fixed-medium-r-normal—13-120-75-75-C-70-iso10646-1» with «font pango:WenQuanYi Micro Hei 11».
How to Install i3 on Linux Mint 21
![]()
The default desktop environment in Linux Mint can be somewhat limiting for power users. In this article, we will discuss how to install i3, a lightweight and highly customizable window manager, on Linux Mint.
How to Install i3 on Linux Mint 21
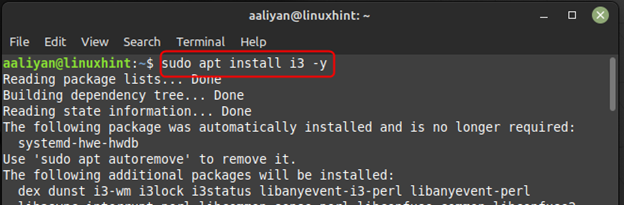
The i3 is a tiling window manager designed for Unix-like operating systems such as Linux and BSD. It is known for its minimalist design and focus on keyboard shortcuts, making it a popular choice among power users who value productivity and customization, to install it on Linux Mint just execute:
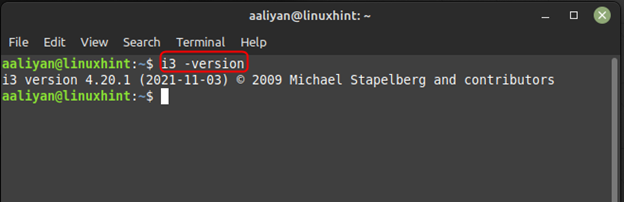
Once the installation is completed check the version if the installation was successful and for that execute:
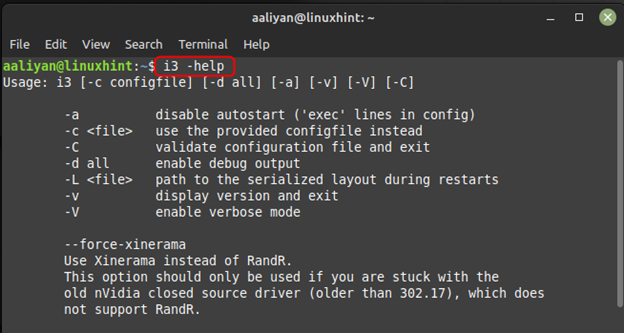
Further if you are new to this tool and don’t know much on how to use it then for that purpose execute the given command to get help regarding the use of it:
Now to switch to the window manager just click on the Logout session button from the application menu and afterwards click on “Log Out”:

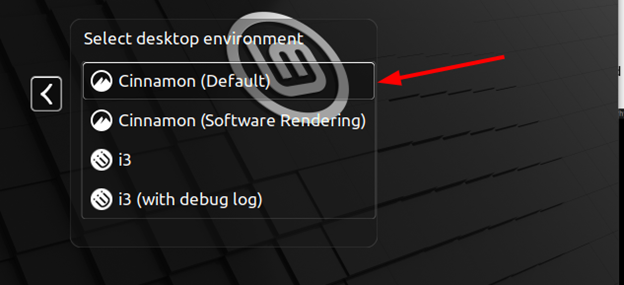
Once you are in the log in window of Linux Mint click on the login options and select the i3 from the menu:
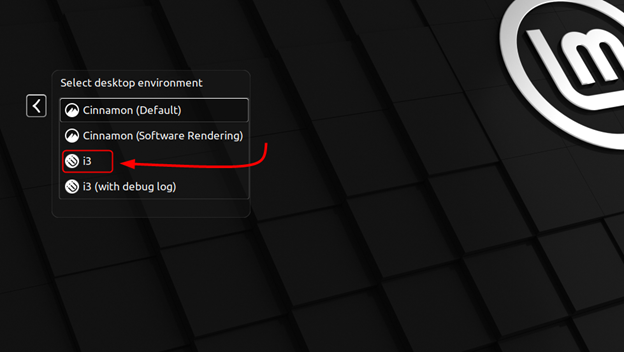
After you have selected the i3 from the menu just enter you login password and afterwards system will ask you to create a configuration file, so prompt the creation:
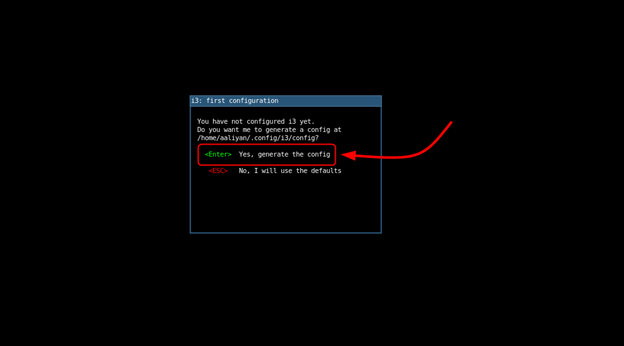
Now system will ask you to set a modifier key so just go with win option and press Enter:

Now you are all set, to open applications like terminal just press the win key with enter:
Now to close any application just press win key + shift + q from the keyboard and to search for any installed applications press win+d:
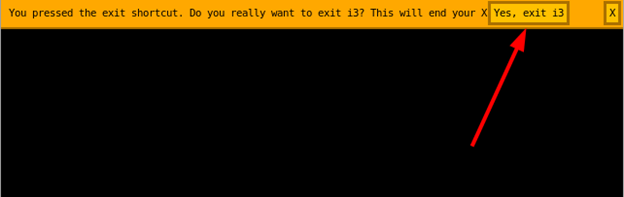
Now to exit the i3 windows manager just press win key + shift key + e key from the keyboard and press Enter to prompt the exit:
Next select the default option from the login menu and log back to Linux Mint desktop:
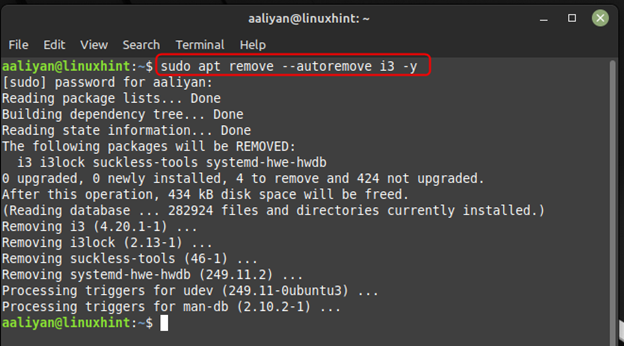
To remove this application from Linux Mint in case you no longer going to use it then for that purpose just execute:
Conclusion
The i3 is a lightweight and highly customizable window manager that can be installed on Linux Mint to enhance the user experience for power users. By repeating all the steps mentioned in guide, you can easily install and configure i3 on your Linux Mint system. Once installed, you can further customize i3 to suit your preferences and increase your productivity.
About the author
Aaliyan Javaid
I am an electrical engineer and a technical blogger. My keen interest in embedded systems has led me to write and share my knowledge about them.