- Bridging Ethernet Connections (as of Ubuntu 16.04)
- Why bridge?
- How to bridge? (short version)
- Bridging Ethernet Connections from the GUI
- Bridging Ethernet Connections (Step by step)
- Installing bridge-utils
- Automatically Create the Bridge at Start-up
- Manually Setting up the Bridge
- Manually creating the routing
- Contributors
- Websites
- Users
- Additions
- Installing bridge utilities
- Setting up bridge utilities
- Additional Resources
- Как настроить сетевой мост (br0) на Ubuntu Linux 14.04 и 16.04 LTS
- Установка bridge-utils
- Создаем сетевой мост на сервере с Ubuntu
Bridging Ethernet Connections (as of Ubuntu 16.04)
These instructions work for current Ubuntu versions as of this writing.
- KVM Networking — Network configuration for the KVM virtual machines server.
- Network Connection Bridge — This page.
- Installing bridge utilities — A similar page from a Bridge-Utils point of view.
- Network Monitoring Bridge — An in-line sniffer page.
Please visit these sites if you need a more in-depth discussion of network bridges and the commands used here.
Why bridge?
It is possible to «bridge» two Ethernet adapters together (for example, eth0 and eth1). When you bridge two Ethernet networks, the two networks become one single (larger) Ethernet network.
One reason you would bridge Ethernet connections is to monitor traffic flowing across an Ethernet cable. For example, an inline sniffer to monitor the traffic flowing between these two devices, such as a router and the switch. (Using tools like ntop, Wireshark, and tcpdump.)
How to bridge? (short version)
The Debian wiki provides a good overview of how to use brctl and the /etc/network/interfaces file to create and set up bridges. Typing man bridge-utils-interfaces at a command prompt provides additional detail.
You can set up a simple Ethernet bridge by installing bridge-utils placing this text into /etc/network/interfaces file:
auto lo iface lo inet loopback auto br0 iface br0 inet dhcp bridge_ports eth0 eth1
Using auto br0 ensures that the bridge starts when the computer reboots, and using iface br0 inet dhcp provides the computer with its own IP address on the single (larger) Ethernet network.
You will note that auto eth0 and iface eth0 inet manual are not in the file. This is because br0 will bring up the components assigned to it.
Once you have edited the /etc/network/interfaces file, it may be easiest to reboot your computer to turn on the bridging. (It is possible to start the bridge without rebooting or logging out, but you may have some problems with the Network Connection Manager interfering with your settings.)
Bridging Ethernet Connections from the GUI
As of Ubuntu 15.04 you can bridge from the desktop using network manager. This is covered in a website at ask.xmodulo.com/configure-linux-bridge-network-manager-ubuntu.html.
Bridging Ethernet Connections (Step by step)
- Your interface name. This used to be eth0 or eth1, but now we have Predictable Network Interface Names which means they could be eth0, p3p1, p2p1, enp9s0, wlp9s0, or eno16777728. (Yes, those are all real examples. Do an ifconfig from the cli to find out what Ubuntu is actually calling your nics.
- Your IP address, subnet mask, gateway and DNS. (If not using dhcp)
- Information about your network. (Specifically if a loop could ever be formed.)
Installing bridge-utils
sudo apt-get update sudo apt-get install bridge-utils
If you use sudo -i and enter your password, then you will not have to use sudo before each command. It may also save you some typing in the future.
Automatically Create the Bridge at Start-up
The above setup demonstrated how to create a bridge using the command line, however when you restart your computer you will lose it. To prevent this from happening, we need to edit the /etc/network/interfaces file. This file shows an example of a bridge configure via dhcp.
Sample /etc/network/interfaces file
# This file describes the network interfaces available on your system # and how to activate them. For more information, see interfaces(5). # The loopback network interface auto lo iface lo inet loopback # Bridge between eth0 and eth1 auto br0 iface br0 inet dhcp # For static configuration delete or comment out the above line and uncomment the following: # iface br0 inet static # address 192.168.1.10 # netmask 255.255.255.0 # gateway 192.168.1.1 # dns-nameservers 192.168.1.5 # dns-search example.com bridge_ports eth0 eth1 bridge_stp off bridge_fd 0 bridge_maxwait 0
sudo /etc/init.d/networking restart
- bridge_stp off is a setting for spanning tree. If you have a possibility for network looks, you may want to turn this on.
- bridge_fd 0 turns off all forwarding delay. If you do not know what this is, you probably do not need it.
- bridge_maxwait 0 is how long the system will wait for the Ethernet ports to come up. Zero is no wait.
Manually Setting up the Bridge
If you do not want to use your bridge all the time (or if you do not want to break Network Manager for the times when you are not bridging) you can build a bridge by hand. Or you can script it to bring up your bridge on demand.
Ensure that both (or all) of your interfaces are installed and enabled. If they are then you may proceed at this point. For a few moments, if your computer is connected to the Internet then it will be disconnected temporarily.
Open a terminal and use the following commands. Note that when interfaces are referenced, they refer to device names assigned by Linux such as «eth0» and «eth1». A bridge can be anything, but a simple name like bridge0 or br0 is suggested.
ip addr flush dev ip addr flush dev brctl addbr brctl addif ip link set dev up
In lines 1-2 we simply prepared the devices to be bridged. In line 3, we added a new bridge named myBridge (whatever you named your bridge). In lines 4-5, we added interface1 and interface2 to myBridge. In line 6, we made the bridge operational. For more information on commands: use the Konsole command brctl
Manually creating the routing
If you manually created the bridge above, you will also need to manually give it IP address information. If you are using DHCP, running sudo dhclient br0 will get your interface up and running. If not, it is all manual.
At this point you may also want to see http://linux-net.osdl.org/index.php/Bridge at this point for a more in depth explanation of bridges and other commands within brctl.
Contributors
Websites
Editors can add any website they find that are related to this article or that they used to add to this article.
Users
Editors post their name/username and some form of contact.
Jonte Craighead, JonTec on #(K)ubuntu IRC Channel
[JonTec’s reference]: sethk on #ubuntu IRC Channel
Additions
13.Aug.06: JonTec: There was an error inside my bridge setup commands that would prevent you from adding interfaces to the bridge. I have fixed this error.
2.Nov.06 JackWasey: Is this possible between ethernet and Firewire connections? If not, what is the appropriate method?
4.Sep.12 griffin2: Added section on Ubuntu 12.04.
14.Apr.16 Lee Sharp: A lot of cleanup and realignment with other pages.
NetworkConnectionBridge (последним исправлял пользователь c-73-136-18-217 2016-04-15 03:40:47)
The material on this wiki is available under a free license, see Copyright / License for details
You can contribute to this wiki, see Wiki Guide for details
Installing bridge utilities
You will need the bridge utilities for that, which all you need to do is install the bridge-utils package.
apt-get install bridge-utils
Setting up bridge utilities
With no further ado, this is my /etc/network/interfaces file:
# This file describes the network interfaces available on your system # and how to activate them. For more information, see interfaces(5). # The loopback network interface auto lo iface lo inet loopback address 127.0.0.1 netmask 255.0.0.0 # This is a list of hotpluggable network interfaces. # They will be activated automatically by the hotplug subsystem. auto eth0 auto ath0 auto br0 # The internet network interface iface eth0 inet dhcp # The wireless side of the bridge iface ath0 inet manual wireless-essid MY_ESSID wireless-key ********** wireless-mode master # The local network bridge iface br0 inet static bridge_ports ath0 eth1 address 192.168.0.2 netmask 255.255.255.0
The explanation is as simple as this file: the system is going to start eth0 (the internet side network interface), ath0 (the wireless network interface) and br0 (the bridge). ath0 being ‘manual’ and not ‘static’ or ‘dhcp’, no IP will be assigned to it, but I need the ‘auto’ to set the wireless parameters. eth1 is set up automatically as part of the bridge setup.
Note: the bridge takes time to come up. Be patient!
Before you start complaining, you should know that in fact, this does not work for me. For some reason, the atheros wireless interface goes back down in the process. I tried very hard to find a way to bring it back up, and the only one I could rely on was to add this in /etc/rc.local, just before the line containing ‘exit 0’:
This is an ugly hack, but at least it does bring ath0 up.
Note for Edgy users: the madwifi driver does not support setting the mode this way, and even using the required tool did not provide me a working access point.
UPDATE [27/05/2011] — by RoastingHosting. Aside from the above ‘ugly hack’ (which works fine). It is also possible to bring the interface up with no IP from the /etc/network/interfaces file — this is very handy for building virtual platforms where you simply want to connect a NIC to a physical port on a VLAN but assign no IP. The following worked for me on Ubuntu 10.04LTS
######### # Start # ######### auto eth1 iface eth1 inet manual up ip link set eth1 up auto br1 iface br1 inet manual bridge_ports eth1 bridge_fd 0 bridge_hello 2 bridge_maxage 12 bridge_stp off ####### # End # #######
The trick is setting both the physical NIC and the bridge to ‘manual’ mode then using the ‘up ip link set ethX up’ parameter. I hope this saves someone else some time!
Additional Resources
I struggled to find the right information, so I think this might be useful! If you want to write to me directly, my e-mail is on my wiki page at HervéFache.
BridgingNetworkInterfaces (последним исправлял пользователь c-73-136-18-217 2016-04-15 18:00:44)
The material on this wiki is available under a free license, see Copyright / License for details
You can contribute to this wiki, see Wiki Guide for details
Как настроить сетевой мост (br0) на Ubuntu Linux 14.04 и 16.04 LTS
В данном посте пойдет речь о том, как настроить сетевой мост на сервере с ОС Ubuntu 14.04 LTS или 16.04 LTS.
Сетевой мост — это ничто иное, как простой технический способ соединения с внешней сетью через физический интерфейс. Это полезно при использовании виртуализации LXC/KVM/Xen/Containers и других виртуальных интерфейсов. В этом туториале будет рассказано как можно настроить мост Linux используя bridge-utils (brctl) на сервер с Ubuntu.
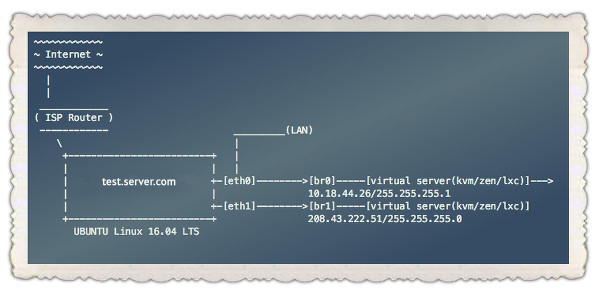
В этом примере eth0 и eth1 — это физический сетевой интерфейс. eth0 соединяется с LAN и eth1 соединен непосредственно с оборудованием провайдера.
Установка bridge-utils
Введите команду apt-get для установки bridge-utils:
$ sudo apt-get install bridge-utils $ sudo apt install bridge-utils 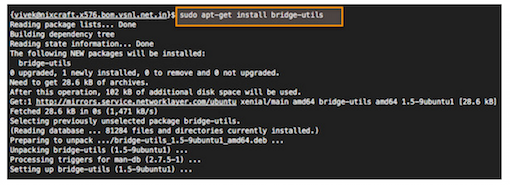
Создаем сетевой мост на сервере с Ubuntu
Редактируем /etc/network/interfaces используя текстовый редактор такой как nano, vi или любой другой любимый Вами редактор, и вводим:
$ sudo cp /etc/network/interfaces /etc/network/interfaces.bakup-1-july-2016 $ sudo vi /etc/network/interfaces Далее установим eth1 и метим его как br1, вводим:
# br1 имеет статический IPv4 адрес, шлюз для него - роутер провайдера auto br1 iface br1 inet static address 208.43.222.51 network 255.255.255.248 netmask 255.255.255.0 broadcast 208.43.222.55 gateway 208.43.222.49 bridge_ports eth1 bridge_stp off bridge_fd 0 bridge_maxwait 0 Устанавливаем eth0 и метим его как br0, вводим:
auto br0 iface br0 inet static address 10.18.44.26 netmask 255.255.255.192 broadcast 10.18.44.63 dns-nameservers 10.0.80.11 10.0.80.12 # set static route for LAN post-up route add -net 10.0.0.0 netmask 255.0.0.0 gw 10.18.44.1 post-up route add -net 161.26.0.0 netmask 255.255.0.0 gw 10.18.44.1 bridge_ports eth0 bridge_stp off bridge_fd 0 bridge_maxwait 0 Заметка про br0 и DHCP
auto br0 iface br0 inet dhcp bridge_ports eth0 bridge_stp off bridge_fd 0 bridge_maxwait 0 Сохраните и закройте файл.
Перезапускаем сервер или сетевой сервис
Теперь нужно перезагрузить сервер или ввести команду для перезапуска сетевого сервиса:
$ sudo systemctl restart networking Если используется Ubuntu 14.04 LTS или более старая версия дистрибутива, введите:
$ sudo /etc/init.d/restart networking Команда проверки связности
Используем команду ping/ip для того, чтобы убедиться в доступности интерфейсов LAN и WAN:
# смотрим состояние br0 и br1 ip a show # проверяем маршрутизацию ip r # проверяем доступность внешних ресурсов ping -c 2 8.8.8.8 # проверяем доступность внутренней сети ping -c 2 10.0.80.12 
Теперь можно сконфигурировать XEN/KVM/LXC контейнеры, чтобы использовать br0 и br1 и получить доступ непосредственно к Интернету или внутренней LAN. Таким образом отпадает потребность в установке специальной таблицы маршрутизации или создания iptables, SNAT правил.