- Mounting Partitions Using UUID and LABEL on Linux
- Finding the UUID and LABEL of Partitions:
- Mounting Partitions Using UUID:
- Mounting Partitions Using LABEL:
- About the author
- Shahriar Shovon
- Как монтировать разделы с помощью UUID в Linux
- Как монтировать разделы с помощью UUID в Linux
- Заключение
- Can I mount a drive using UUID from the command-line (Not fstab?)
- 3 Answers 3
Mounting Partitions Using UUID and LABEL on Linux
![]()
Here, /dev/sdb1 is set to mount at the path /storage/disk2p1. This is alright and it works. But there is a problem. /dev/sdb1 is the first partition of the second hard drive of your computer. Similarly, /dev/sda1 is the first partition of the first hard drive. There is no guarantee that /dev/sdb1 will always be /dev/sdb1. Depending on the order of how you connected the hard drives to your motherboard, it may change. If that happens, your hard drives may be mounted in the wrong mount points resulting data loss or data corruption.
To solve this, we can use UUID or LABEL. UUID is a better choice as it is unique throughout the system. Even if it’s different computer system, the probability of duplicate UUID is almost zero.
LABEL on the other hand is a short name that you can put it when you format a partition to identify the disk. Many people can use the same LABEL. So, the uniqueness of LABEL depends on how creative you are at naming your partitions.
In this article, I will show you how to mount partitions using UUID and LABEL using the /etc/fstab file on Linux. So, let’s get started.
Finding the UUID and LABEL of Partitions:
There are a couple of ways to find the UUID and LABEL of a partition. In this section, I will show you some of them.
You can find the UUID and LABEL of all the partitions from the command line as follows:
As you can see, the LABEL and UUID of all the partitions in your system is listed. There is one more parameter that you will need in order to mount a partition, the filesystem TYPE. For example, /dev/sdb1 in my case has the LABEL www, UUUID 7a75296d-412a-467c-a659-283298910746 and TYPE (filesystem type) ext4.

You can also find the UUID and LABEL of a partition from GNOME Disk Utility as you can see in the screenshot below.

Mounting Partitions Using UUID:
In this section, I am going to show you how to permanently mount partitions using UUIDs.
First, find the UUID of the partition that you want to mount using one of the methods stated above.
Let’s say, you want to mount the partition /dev/sdb1 using it’s UUID 7a75296d-412a-467c-a659-283298910746 to the path /var/www.
Then, make a new directory (in my case /var/www) where you want to mount the partition if it does not exist already with the following command:

Now, open the /etc/fstab configuration file with your favorite text editor. I am going to use nano.

Now, add the following line at the end of the file.
NOTE: Replace the 7a75296d-412a-467c-a659-283298910746 with the UUID of your partition, /var/www with the directory path where you want to mount the partition and ext4 with the filesystem type if yours is not of the type ext4.

Now, press + x followed by y and then press to save the changes you made to the /etc/fstab file.
Finally, restart your computer with the following command:

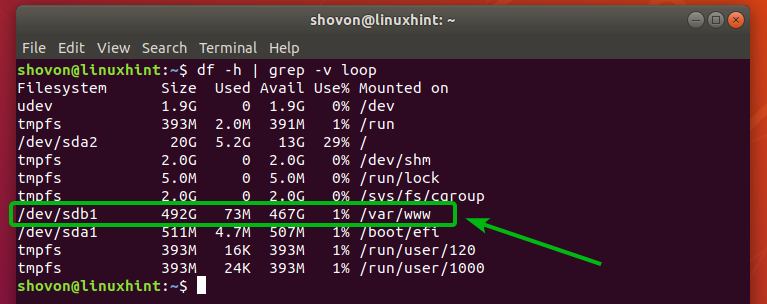
Once your computer starts, check whether the partition is mounted correctly with the following command:
Here, you can see /dev/sdb1 is mounted in /var/www. So, it worked.
Mounting Partitions Using LABEL:
In this section, I am going to show you how to mount partitions permanently using partition LABEL.
Here, I have a partition /dev/sdc1 with the LABEL Data.

Let’s say, I want to mount /dev/sdc1 using the LABEL Data in the directory path /data.
To do that, first, make sure the directory path /data exists. If it does not, create it with the following command:

Now, open the /etc/fstab configuration file with your favorite text editor. Again, I am going to use nano.

Now, add the following line at the end of the file.
NOTE: Replace Data with the LABEL of your partition, /data with the directory path where you want to mount the partition and vfat with the filesystem type if yours is not of the type vfat.’

Now, press + x followed by y and then press to save the changes you made to the /etc/fstab file.
Finally, restart your computer with the following command:

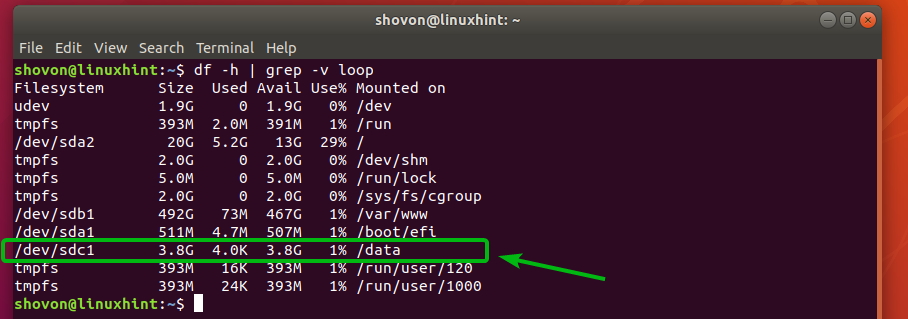
Once your computer starts, check whether the partition is mounted correctly with the following command:
As you can see /dev/sdc1 is mounted in the directory path /data. Great!
So, that’s how you mount partitions using UUID and LABEL. Thanks for reading this article.
About the author
Shahriar Shovon
Freelancer & Linux System Administrator. Also loves Web API development with Node.js and JavaScript. I was born in Bangladesh. I am currently studying Electronics and Communication Engineering at Khulna University of Engineering & Technology (KUET), one of the demanding public engineering universities of Bangladesh.
Как монтировать разделы с помощью UUID в Linux
Если вы используете много дисков, которые регулярно изменяются или перемещаются, предпочтительнее монтировать раздел с помощью UUID. Это связано с тем, что ОС Linux может изменять имена устройств в некоторых ситуациях, например при добавлении другого диска. Это может закончиться проблемами с загрузкой диска или разделом. UUID уникален и не зависит от реальных имен устройств.
В этой статье мы покажем, как монтировать разделы с помощью UUID в системе Linux.
Как монтировать разделы с помощью UUID в Linux
Первое, найдите UUID раздела устройства, который будет смонтирован. Вы можете использовать следующую команду, чтобы найти UUID разделов.

Или введите команду для показа UUID определенного раздела:
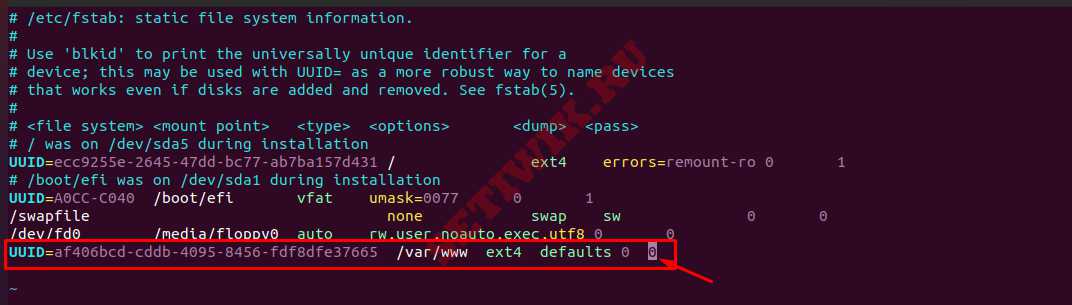
af406bcd-cddb-4095-8456-fdf8dfe37665После того, как UUID найден в системе Linux, смонтируйте раздел в fstab-файле.
В этом примере я использовал раздел /dev/sdb с его UUID af406bcd-cddb-4095-8456-fdf8dfe37665 для монтирования в /var/www.
Если установочный каталог есть, то используйте его. А если его нет, то создайте новый каталог (/var/www используется в данном примере) для монтирования раздела.
Откройте файл /etc/fstab с помощью вашего любимого текстового редактора. Я использую текстовый редактор Vi.
Затем добавьте следующую строку в конце файла.
UUID=af406bcd-cddb-4095-8456-fdf8dfe37665 /var/www ext4 defaults 0 0
Запустите mount -a, для того чтоб смонтировать всю файловую систему. Или выполните команду перезагрузки, чтобы отразить изменения.
После монтирования выполните следующую команду, чтобы проверить, правильно ли смонтирован раздел.
Вывод показывает, что раздел /dev/sdb был смонтирован в /var/www.

Заключение
В этой статье мы показали, как смонтировать раздел в Linux с помощью UUID. Кроме того, рассказали почему лучше использовать UUID и как найти UUID разделов.
Can I mount a drive using UUID from the command-line (Not fstab?)
Is it possible to use UUIDs to mount drives, rather than using these values in fstab? I have a script which mounts devices, however there is no way to guarantee that the drive labels such as /dev/sda2 will always be the same. I’m aware I can mount the drive at boot time using this method with fstab , however in the case of external disks, they may not always be present at boot time.
FYI having an entry in fstab does not mean you need the drive connected at boot time. mount will use the data in fstab when called.
3 Answers 3
Yes it’s possible, you just use the UUID option:
lsblk -o NAME,UUID NAME UUID sdc ├─sdc1 A190-92D5 └─sdc2 A198-A7BC sudo mount -U A198-A7BC /mnt sudo mount UUID=A198-A7BC /mnt sudo mount --uuid A198-A7BC /mnt Source: -L, --label synonym for LABEL= -U, --uuid synonym for UUID= LABEL= specifies device by filesystem label UUID= specifies device by filesystem UUID PARTLABEL= specifies device by partition label PARTUUID= specifies device by partition UUID specifies device by path mountpoint for bind mounts (see --bind/rbind) regular file for loopdev setup
If you’re interested in having an fstab entry for a drive which may not be present at boot time, you have two options which can help: noauto and nofail :
noauto : do not mount when «mount -a» is given (e.g., at boot time)
nofail : do not report errors for this device if it does not exist.
Imagine you have an fstab entry
UUID= /mnt/data ext4 defaults If you add noauto to the options, the system will not attempt to mount the drive at boot time. You’ll be able to mount it manually with mount /mnt/data .
If you add nofail , the system will try to mount the drive at boot time, but if the drive is not present the boot sequence will not be interrupted. You’ll be able to mount the drive if you plug it later using mount /mnt/data .