- How to mount a disk image from the command line?
- 4 Answers 4
- Как монтировать образы дисков для просмотра и редактирования файлов (РЕШЕНО)
- Как просмотреть информации об образах для монтирования. Как определить файловую систему образа
- Как смонтировать файл образа диска (раздела)
- Пример просмотра содержимого образов с помощью монтирования
- Связанные статьи:
- Possible to mount an ext4 partition image via FUSE? [closed]
- 3 Answers 3
How to mount a disk image from the command line?
I know how to mount a drive that has a corresponding device file in /dev, but I don’t know how to do this for a disk image that does not represent a physical device and does not have an analogue in /dev (e.g. an ISO file or a floppy image). I know I can do this in Mac OS X by double-clicking on the disk image’s icon in Finder, which will mount the drive automatically, but I would like to be able to do this from the terminal. I’m not sure if there is a general Unix way of doing this, or if this is platform-specific.
Do you mean you want to do it on the command line on OS X? You mention it, but it might be better to be explicit if the question is specific to a certain os. Also, what type of a disk image do you mean? .iso?
4 Answers 4
If it was a hard-drive image with a MBR partition table, I would fdisk the image to find the offset for the partition I need to mount.
Then I would mount it passing the offset.
mount -o loop,offset=xxxx /path/disk.img /mnt/disk.img.partition The offset value is in bytes, whereas fdisk shows a block count, so you should multiply the value from the «Begin» or «Start» column of the fdisk output by 512 (or whatever the block size is) to obtain the offset to mount at.
+1 This is the solution that worked for me. Thank you for including details on how to calculate the offset as well.
On most modern GNU system the mount command can handle that:
mount -o loop file.iso /mnt/dir to unmount you can just use the umount command
If your OS doesn’t have this option you can create a loop device:
losetup -f # this will print the first available loop device ex:/dev/loop0 losetup /dev/loop0 /path/file.iso #associate loop0 with the specified file mount /dev/loop0 /mnt/dir #It may be necessary specify the type (-t iso9660) umount /mnt/dir losetup -d /dev/loop0 If the file have partitions, example a HD image, you can use the -P parameter (depending on you OS), it will map the partitions in the file content:
losetup -P /dev/loop0 /path/file.iso # will create /dev/loop0 ls /dev/loop0p* #the partitions in the format /dev/loop0pX losetup and mount -o loop are Linux specific. It won’t work on GNU distributions using a different kernel (like hurd, illumos or kFreeBSD though illumos and FreeBSD will have the equivalent with a different syntax)
I don’t understand the meaning of a «loop device» nor why you need -o loop to mount the image file as one. Can you explain please? I see the Wikipedia link but still don’t understand. I have an embedded Linux rootfs.ext2 roof filesystem image, and it doesn’t seem to make any difference when I mount it with vs without -o loop to inspect the files.
losetup -P automation for multi partition images
How to mount a disk image from the command line? | Unix & Linux Stack Exchange mentioned losetup -P , and here are some handy Bash functions to further automate things. Usage:
$ los my.img /dev/loop0 /mnt/loop0p1 /mnt/loop0p2 $ ls /mnt/loop0p1 /whatever /files /youhave /there $ sudo losetup -l NAME SIZELIMIT OFFSET AUTOCLEAR RO BACK-FILE DIO /dev/loop1 0 0 0 0 /full/path/to/my.img $ # Cleanup. $ losd 0 $ ls /mnt/loop0p1 $ ls /dev | grep loop0 loop0 los() ( img="$1" dev="$(sudo losetup --show -f -P "$img")" echo "$dev" for part in "$dev"?*; do if [ "$part" = "$p*" ]; then part="$" fi dst="/mnt/$(basename "$part")" echo "$dst" sudo mkdir -p "$dst" sudo mount "$part" "$dst" done ) losd() ( dev="/dev/loop$1" for part in "$dev"?*; do if [ "$part" = "$p*" ]; then part="$" fi dst="/mnt/$(basename "$part")" sudo umount "$dst" done sudo losetup -d "$dev" ) Как монтировать образы дисков для просмотра и редактирования файлов (РЕШЕНО)
Как просмотреть информации об образах для монтирования. Как определить файловую систему образа
С помощью команды file можно анализировать, какая файловая система используется в файлах, являющихся образами дисков.
Пример проверки файла test.image:
/mnt/disk_d/test.image: ISO 9660 CD-ROM filesystem data 'ARCH_202010' (bootable)
Пример анализа образа disk.ntfs:
/mnt/disk_d/disk.ntfs: DOS/MBR boot sector, code offset 0x52+2, OEM-ID "NTFS ", sectors/cluster 8, Media descriptor 0xf8, sectors/track 63, heads 255, dos < 4.0 BootSector (0x0), FAT (1Y bit by descriptor); NTFS, sectors/track 63, physical drive 0x80, sectors 15654911, $MFT start cluster 786432, $MFTMirror start cluster 2, bytes/RecordSegment 2^(-1*246), clusters/index block 1, serial number 06258074758071a05; contains bootstrap BOOTMGR
Как можно убедиться, это образ с файловой системой NTFS.
Проверка образа rootfs.sfs:
/mnt/disk_d/rootfs.sfs: Squashfs filesystem, little endian, version 4.0, zstd compressed, 625010200 bytes, 58466 inodes, blocksize: 262144 bytes, created: Sat Jun 6 08:14:32 2020
Это образ с файловой системой Squashfs.
Анализ образа ext3-img-kw-1.dd:
file /mnt/disk_d/ext3-img-kw-1.dd
/mnt/disk_d/ext3-img-kw-1.dd: Linux rev 1.0 ext3 filesystem data, UUID=e2307119-024a-427f-bd74-dbe8a95687a6, volume name "KW_SEARCH"
Это образ с файловой системой ext3.
Чтобы выполнять команды по монтированию файлов-образов, вы можете создать образы, например, сделав клон флешки примерно следующим образом:
sudo dd if=/dev/sdc of=/mnt/disk_d/disk.ntfs
В этой команде утилита dd считывает содержимое диска /dev/sdc и сохраняет его в файл /mnt/disk_d/disk.ntfs. Помните, что программа dd считывает не файлы, а байты со всего диска. Поэтому получаемый образ по размеру будет равен диску (разделу) с которого он был сделан, независимо от заполненности этого диска. То есть если флешка размером 8 Гигабайт и на ней ничего не записано, то всё равно получится образ размером 8 Гигабайт.
Вы также можете перейти на страницу http://dftt.sourceforge.net/ - на ней есть ссылки на уроки, с которых вы можете скачать образы самых разных файловых систем.
Как смонтировать файл образа диска (раздела)
Общий вид команды монтирования файлов образов следующий:
mount ОПЦИИ ОБРАЗ ДИРЕКТОРИЯ
- ОПЦИИ — опции утилиты mount или опции монтирования
- ОБРАЗ — файл с образом диска
- ДИРЕКТОРИЯ — папка, где будут доступны файлы со смонтированного устройства
По сути, синтаксис монтирования образов с помощью mount отличается от монтирования диска тем, что вместо УСТРОЙСТВА указывается путь до ОБРАЗА. ОПЦИИ указывать необязательно, тип файловой системы будет определён автоматически.
К примеру, нужно смонтировать образ диска disk.ntfs, расположенный по пути /mnt/disk_d/disk.ntfs.
Начнём с создания временной точки монтирования в /tmp:
Монтируем образ /mnt/disk_d/disk.ntf в папку /tmp/disk:
sudo mount /mnt/disk_d/disk.ntfs /tmp/disk
Просмотрим содержимое образа disk.ntfs:
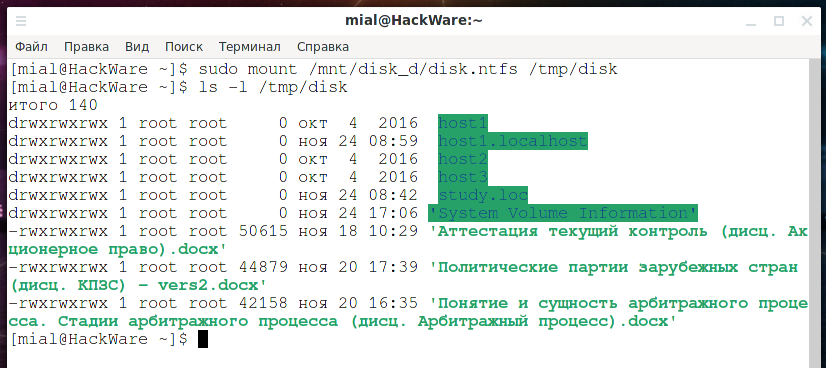
Мы можем видеть файлы, размещённые в образе disk.ntfs, их можно открывать и копировать.
Некоторые файловые системы (например, ISO образы) доступны только для чтения. Но в данном случае мы можем записать любые изменения в папку /tmp/disk и они сохраняться в файле disk.ntfs даже после размонтирования и повторного монтирования диска disk.ntfs.
Для размонтирования образа можно использовать любую из команд:
sudo umount /ПУТЬ/ДО/ОБРАЗА sudo umount /ТОЧКА/МОНТИРОВАНИЯ/
Пример просмотра содержимого образов с помощью монтирования
Для практики, возьмём установочный образ дистрибутива Linux. Они интересны тем, что там может быть сразу несколько файлов образов с разными файловыми системами. Для примера посмотрим содержимое установочного диска Manjaro.
Создадим папку для монтирования:
У меня установочный диск расположен по пути /mnt/disk_d/Share/manjaro-kde-20.0.3-200606-linux56.iso, а монтировать я его буду в /tmp/iso, тогда команда следующая:
sudo mount /mnt/disk_d/Share/manjaro-kde-20.0.3-200606-linux56.iso /tmp/iso
Получено следующее сообщение:
mount: /tmp/iso: WARNING: source write-protected, mounted read-only.
Оно означает, что монтирование было выполнено, но источник защищён от записи, поэтому монтирование выполнено с правами только чтение. Помните, что последующие монтирования файлов с этого образа могут быть формально доступны для записи, но поскольку начальное хранилище открыто только для чтения, то любые сделанные изменения не сохранятся.
Посмотрим содержимое установочного диска:

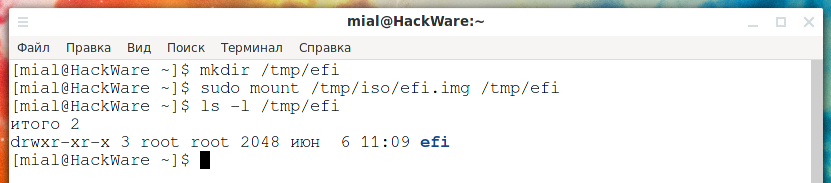
Там среди прочего есть файл efi.img, проверим, какая у него файловая система:
/tmp/iso/efi.img: DOS/MBR boot sector, code offset 0x3c+2, OEM-ID "mkfs.fat", sectors/cluster 4, root entries 512, sectors 8192 (volumesМы можем посмотреть содержимое этого файла. Создадим точку монтирования для него
И смонтируем файл /tmp/iso/efi.img в папку /tmp/efi:
sudo mount /tmp/iso/efi.img /tmp/efiТеперь нам доступно содержимое этого файла:

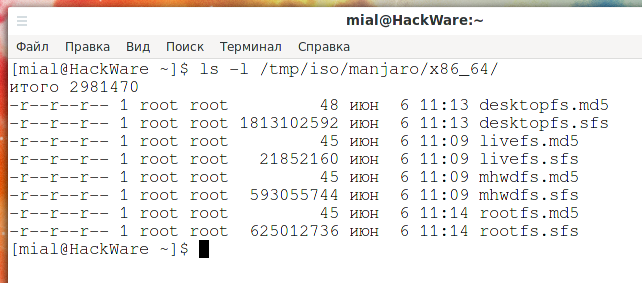
Вернёмся к нашему смонтированному ISO образу и посмотрим содержимое папки manjaro/x86_64/:
Крошечные файлы с расширением .md5 это просто контрольные суммы. Но файлы desktopfs.sfs, livefs.sfs, mhwdfs.sfs и rootfs.sfs интереснее. Они содержат основные файлы, необходимые для работы LIVE образа и установки дистрибутива Linux.
Мы можем посмотреть содержимое любого из этих файлов. Допустим, нас интересует desktopfs.sfs.
Создаём для него новую временную точку монтирования:
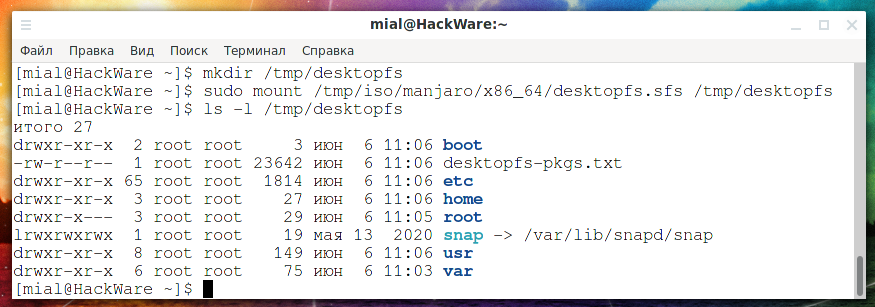
И монтируем файл /tmp/iso/manjaro/x86_64/desktopfs.sfs в папку /tmp/desktopfs:
sudo mount /tmp/iso/manjaro/x86_64/desktopfs.sfs /tmp/desktopfsСмотрим содержимое файла desktopfs.sfs:
Вы можете самостоятельно смонтировать и изучить содержимое других образов .sfs на этом установочном диске. Либо для самостоятельных упражнений вы можете скачать установочный диск Linux Mint. Там образ файловой системы расположен в файле casper/filesystem.squashfs.
Что касается установочного диска Kali Linux, то там сопроводители дистрибутива не стали использовать образы, а просто разместили файлы внутри iso9660, то есть его не так интересно исследовать.
Связанные статьи:
Possible to mount an ext4 partition image via FUSE? [closed]
Questions on Server Fault must be about managing information technology systems in a business environment. Home and end-user computing questions may be asked on Super User, and questions about development, testing and development tools may be asked on Stack Overflow.
I'm attempting to mount an ext4 partition image in userspace. (no sudo, no special config/permissions modification to /dev/loop0 or /etc/fstab etc). So I'm hoping FUSE will come to the rescue. However it seems that each file system mounted through the FUSE system needs to have a special FUSE driver, and I've not been able to find a linux read-write ext4 FUSE driver for linux. Is there a way to mount ext4 images via FUSE (with write permission)?
I've seen that. It doesn't solve the problem for two reasons: It's OSX specific (unless I'm mistaken) and it's read-only. I should have specified that I need write access, but please be more polite before you know if someone has actually done their homework.
Apologies, I skipped over the word "result" in your answer : / Sorry. The use-case is building and manipulating disk images in userspace, where root access is not available.
3 Answers 3
fuseext2 apparently will mount ext4 partitions read-write.
Caveat: ext4 support is not advertised in their documentation, and attempts to mount come with a warning:
This is experimental code, opening rw a real file system could be dangerous for your data. Please add "-o ro" if you want to open the file system image in read-only mode, or "-o rw+" if you accept the risk to test this moduleAFAIK, even fuseext2 only mounts ext4 read only. That still comes back to the original question- why do you need FUSE driver that writes to your ext4 partition? And how and why is this question on a website for system administrators?
The text of my post specifically includes the warning that mentions that it does rw. As stated in my reply to your answer, the use case is manipulating disk images without root access. And this is definitely a system administration issue.
You need a specific fuse driver for each file system type, as the point of fuse is to have the file system code running in user-land. So any pre-existing kernel driver code, running in kernel-land (ext2, ext3, ext4, xfs. ) can't be used 'as-is' by fuse.
Nothing prevent developers to re-use part of the code from the corresponding kernel driver to implement a user-land fuse driver. But anyway, you always have to create a new driver for fuse for each file-system type. Kernel C code and user-land C code are quite different (no standard libc in the kernel, the driver entry-points do not have the same signature, etc. )
It would be an interesting project to be able to use a kernel module as a fuse driver though. I'm wondering if it's possible (running a kernel module in a kind of "emulated kernel environment").
guestmount libguestfs trickery
sudo apt-get install libguestfs-tools # Workarounds for Ubuntu 18.04 bugs. # https://serverfault.com/questions/246835/convert-directory-to-qemu-kvm-virtual-disk-image/916697#916697 sudo rm -rf /var/cache/.guestfs-* echo dash | sudo tee /usr/lib/x86_64-linux-gnu/guestfs/supermin.d/zz-dash-packages sudo chmod +r /boot/vmlinuz-* # Create a test image. mkdir sysroot dd if=/dev/urandom of=sysroot/myfile bs=1024 count=1024 virt-make-fs --format=raw --type=ext2 sysroot sysroot.ext2 # Mount it, have fun, unmount! mkdir -p mnt # /dev/sda becuase we have a raw filesystem. guestmount -a sysroot.ext2.qcow2 -m /dev/sda mnt cmp sysroot/myfile mnt/myfile guestunmount mntTested on Ubuntu 18.04, libguestfs-tools 1:1.36.13-1ubuntu3.