How can I mount a disk image?
I have a disk image myimage.disk which contains the partition table and a primary partition (i.e. a FAT32 filesystem). Think that as a USB pen image. I want to mount the primary partition to a local directory. I know how to mount a partition image using the loop utils but here I have disk image. My guess is that I have to mount the image «skipping» the partition table but how can I do that?
See also superuser.com/questions/117136/… You may want to use simply losetup —partscan —find —show disk.img followed by mount /dev/loop0p1 /mnt/disk
5 Answers 5
The kpartx tool makes this easier. It creates loop devices in /dev/mapper for each partition in your image. Then you can mount the loop device that corresponds with your desired partition without having to calculate the offset manually.
For example, to mount the first partition of the disk image:
kpartx -a -v myimage.disk mount /dev/mapper/loop0p1 /mnt/myimage When you’re done with the image, remove the loop devices:
umount /mnt/myimage kpartx -d -v myimage.disk Alternatively, if you have a recent kernel, and pass loop.max_part=63 on boot (if loop is built-in) or to modprobe (if loop is a module), then you can do it this way:
losetup /dev/loop0 myimage.disk partprobe /dev/loop0 # Re-read partition table if /dev/loop0 was used with a different image before mount /dev/loop0p1 /mnt/myimage When you’re done with the loop:
Create, Mount And Unmount .img Files In Ubuntu
Recently I moved from Windows to Ubuntu on one of my laptops and since then I was trying to look for the way to create a VHDs or some sort of image files that I can use as a container. So I looked up for the solution and found a working solution scattered though places. So here I am putting it in a blog post to have all it in one place.
First we need to create an image file (.img) by using the dd command. The dd command is used to copy and convert the file. The reason it is not called cc is because it is already being used by C compiler. Here goes the command.
$ dd if=/dev/zero of=cdata.img bs=1G count=5
Note: The command execution time depends on the size of the image you have opted out for.
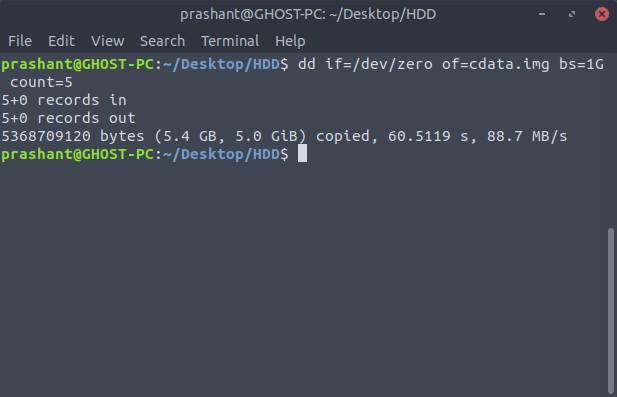
The if param stands for input file to refer the input file. As if , of stands for output file and this will create the .img file with the name you specify. The third param bs stands for block size . This will let you set the size of the image file. The G in the above command stands for GigaByte (GB). You can set the image size by specifying the block size. In this case G stands for GigaBytes (GB), K for KiloBytes (KB), T for TeraBytes (TB), P for Petabytes (PB) and so on. Here I am creating a 5 blocks of 1 GB each for the image file name cdata .
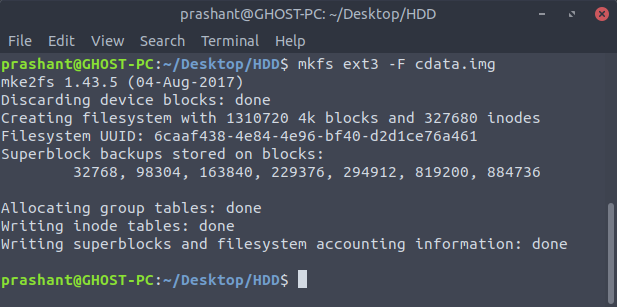
This command will create the .img file but you cannot mount this file as of yet. To do that you have to format the image so that it can have a file system. To do this make use of mkfs command.
I am creating an ext3 filesystem on my image file. -F is to force the operation. Here is the output of the command.
Now we can mount the image file by using the mount command:
$ sudo mount -o loop cdata.img ~/Desktop/HDD/
With the success of the above command, you can see the image mounted on your desktop. You can unmount the image by clicking the eject or unmount button as shown in the below screenshot or you can execute the umount command to do that.
Unmounting the image by using command line.
How to Mount IMG Files in Linux
ISO images are often used to contain CD-ROM or DVD data, but Linux users will occasionally find themselves working with IMG files instead. These contain direct disk images, which can be worked with in a similar way. At one point these were generally used for writing an entire file system directly to a discrete diskette, but few people would ever wish to do that in today’s world. There are two major reasons modern Linux users would need to work with them, however. One is if an IMG file was used to distribute a driver or other piece of an operating system that needed to be restored. The IMG file can be mounted and the individual file from inside of it’s contained system could then be copied over to a booted file structure. The other reason, which is becoming extremely popular, is for working with virtual machines and other forms of hardware virtualization.
Linux provides several different ways to work with these contained structures. Depending on your distribution, you might be able to work with them in a purely graphical environment. The same CLI tools that mount ISO images could also mount IMG if this isn’t possible for you, however.
Method 1: Mount With Graphical Menus
If you’re using PCManFM or another file manager that supports mounting an image directly via the /media folder with a menu driven system such as some versions of Nautilus, then you should hold launch your manager to start. You’ll either need to launch this from the Panel Menu in LXDE or from the Applications menu in GNOME. Once you’re open, navigate to the Downloads folder by clicking the link in the left panel and then right click on the disk image you downloaded. It’s generally smart to have ensured that your browser didn’t detect any malware before proceeding.
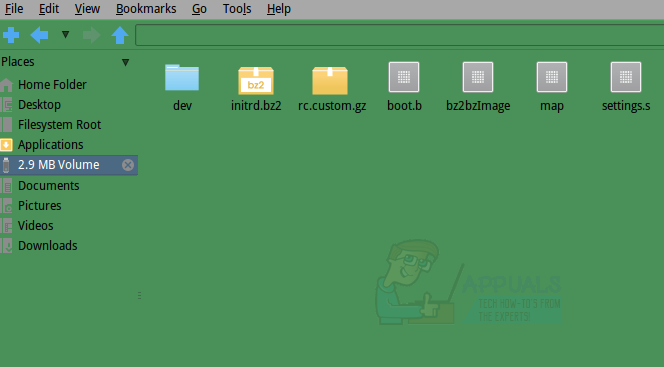
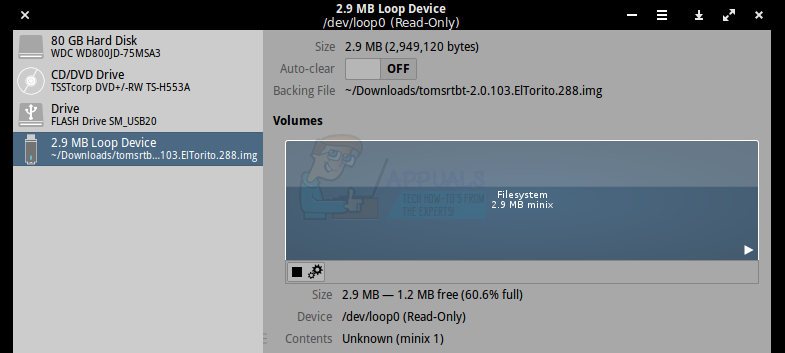
Once the context menu appears, select the “mount disk image” option. The label for this command will change depending on your particular distribution. The image will automatically mount at /media/USERNAME/disk, with USERNAME being replaced with your actual user name. Click on the left panel of the file manager where it reads the size of the image in question. In our example we used an image of an older Linux distribution called tomsrtbt (pronounced Tom’s Root Boot), which fit an entire operating system in less than three megabytes. Hence the “2.9 MB Volume” label refers to the image in question.
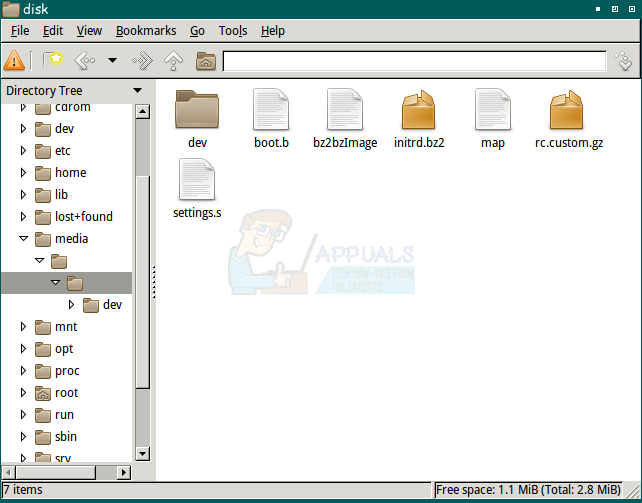
You may now drag or right click and copy any of these files to any other section of your file system for safekeeping. When you’re done you can click on the X logo next to the label to close it. If you’re using a file manager that doesn’t support this method of unmounting an image, then start the GNOME Disks utility from the Panel Menu or the Applications tab. Click on the device that has the same name as the label from the file manager and then click on the square stop button to close down the file system.
Method 2: Via the Loopback Device
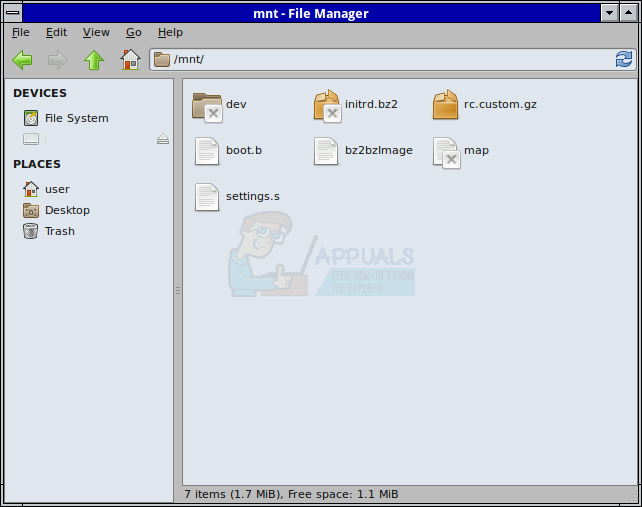
Disk images could be mounted via the loopback device as well, in much the same way as ISO images can be. This technique will be necessary if you use Thunar, Konqueror or any other file manager that doesn’t support direct mounting via graphical techniques. If you haven’t been able to mount an image graphically, then hold down CTRL, ALT and T at the same time. Type ls /mnt to make sure your /mnt directory is empty. If it’s not or if you don’t feel comfortable using it directly, then you can use sudo mkdir /mnt/toms to create a mountable directory. You could theoretically call the directory whatever you’d like. Type sudo mount -o loop tomsrtbt-2.0.103.ElTorito.288.img /mnt and press enter. You will be prompted to enter your password, which you will be required to do. The /mnt directory can then be explored via the CLI or the file manager you prefer. Naturally you’ll need to replace tomsrtbt-2.0.103.ElTorito.288.img with the image you’re using and /mnt with the directory tree segment you’re using.
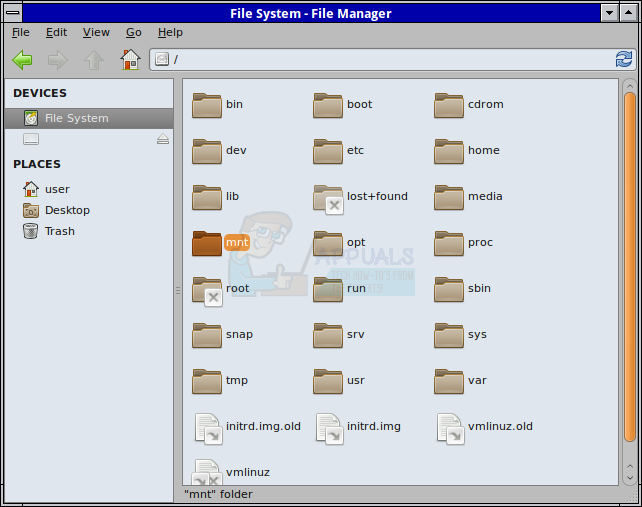
Hold down CTRL and E to open your graphical manager or start it from the Applications or Whisker menu depending on which desktop environment you are using. Select the File System option from the left pain, navigate to /mnt and then select the /mnt folder. You’ll now be able to examine the contents of the image file.
At the CLI type sudo umount /mnt and press enter to umount the image. You would need to substitute whatever mount point you used for /mnt when you do so.
How to mount a .img as a hard drive?
I’m trying to install ChromiumOS from the Vanilla build. To install to hard drive, it is recommended to just dd it to a flash drive and copy the files from the finished flash drive to identical partitions that you’ve created yourself. But, if I could somehow trick Ubuntu into recognizing a .img file as an actual block device or open it with GParted, I could use GParted’s partition copying to stick in empty space in an extended partition and so boot it from my hard drive without having to do the intermediary flash-drive copying. Is this even possible? (edit: this is a whole-disk image)
1 Answer 1
Yes, but there are many types of «img» file. For the purposes of this discussion, I am going to assume that your image file contains raw disk blocks, which is what dd does.
One type of img file contains an entire hard disk image. Another type contains a partition image.
The general concept of an .img file created via dd is that it contains the disk blocks that comprise the hard drive (or respectively, the partition). The difference is this:
If the img file is for an entire hard disk, then it contains:
- The partition table (whether it’s GPT, MBR, or something else).
- The boot sector, if any.
- All partitions for the hard disk, each one respecting the layout/format of the partition table and containing filesystem-specific data.
If the img file is for a partition, then it only contains one partition’s data without any of the «container» data of the partition table.
Think of your entire hard disk like an orange or grapefruit that’s been cut down the middle. You have these little walls built around the orange sections of fruit.
The partition table creates those little walls, and the filesystem data is the orange juicy fruit itself.
It sounds like your img file is probably an entire hard disk, so it contains a partition table.
What you will do is run the losetup command to «map» your img file into a loopback block device. This translates your file, which is just a normal file containing binary data, into a block device which the kernel can do disk-like I/O on.
The loopback device node that you choose, for example /dev/loop3 , can be thought of as equivalent in functionality to /dev/sda (the entire hard disk) if your img is an entire hard disk. If your img is just one partition, then the loop device can be thought of as equivalent in functionality to /dev/sda1 (just a partition).
If it’s the entire hard disk, then you can run tools such as gparted , palimpsest , cfdisk , etc. to:
- Identify the partition table type
- Determine where the partitions are, their size, and their filesystem type
- Mount the individual partitions to modify them
If it’s just one partition, then you can run the mount command directly on the loopback device, e.g. mount /dev/loop3 /mnt/part .
The losetup(8) manpage. Learn to read manpages; I won’t give you the exact syntax to type into the command line because it depends on your system configuration.