How to map a network drive?
I am unable to map a Windows network drive in Ubuntu. I executed the following command in the terminal:
karthick@karthick:~$ sudo mount -t cifs -o username=raghu //172.29.32.184 /media/Data/ Password: mount error(2): No such file or directory Refer to the mount.cifs(8) manual page (e.g. man mount.cifs) It’s generally accepted that you should manually mount to /mnt/ , while /media/ is for system managed mounts (such as a USB).
6 Answers 6
I think you need to also pass the windows share name as well as confirm that you’ve created /media/Data
to list the shares, then append the share name to your mount
sudo mount -t cifs -o username=raghu //172.29.32.184/sharename /media/Data/ - Note- If you receive the error: wrong fs type, bad option, bad superblock on. make sure you have cifs-utils installed, it may not be installed on your distro by default. sudo apt-get install cifs-utils
If you need to mount your windows share permanently then there is an excellent HowTo by dmizer UbuntuForums Staff (scroll to the permanent mount section)- I wont reproduce the advice here because its got some excellent debugging hints and tips and other workarounds that you may encounter.
Spot on. In order to map a share (even using Windows as the client) you have to point directly at a share. You can’t mount the entire computer and you can’t [directly] mount a subdirectory of the share.
I have followed your instruction, but i am getting the following error.mount error(11): Resource temporarily unavailable Refer to the mount.cifs(8) manual page (e.g. man mount.cifs)
@karthick87 — thats a new one on me — maybe worth posting that one on that active forum thread. The only google search on this error that I found that vaguely might be related is this one: linuxquestions.org/questions/linux-server-73/…
The following did the trick: mount -t cifs -o ‘username=domain\uname’ ‘\\machine\folder’ /mnt/folder . Worked on Redhat as well.
- open a Nautilus window
- click Go in the menu, or alternatively press Ctrl+L
- enter smb://remote_host/share_name
- Go to Bookmarks and click add
@DavidCole-GrammarPolice I’d disagree: as long as this answer is offering a different solution, it does have value and use. (didn’t check the meta for an official take on these issues. )
I think this way will work as long as you are using Nautilus. I am not sure if it works when you use another Gnome file manager
Thank you for posting an alternative that’s more user-friendly and doesn’t require sudo for normal users! I can confirm that the above works for Kubuntu’s Dolphin on Ubuntu 17.04 .
This solution did not have the smb mounted share name appear in my file system. I did however help me get past copying files back and forth so it did help me. The other solutions are giving me permission denied errors (I’m trying to track that down).
I use @fossfreedom’s answer in one line command use this :
echo '' | sudo -S mkdir /mnt/sharedfolder/ | sudo -S mount -t cifs -w -o username=nabed -o password=nabed //192.168.0.58/sharedfolder /mnt/sharedfolder/ Download VisiPics and install it with Wine.
Mount the shared folder if it exists:
sudo -S mkdir /mnt/sharedfolder/ sudo -S mount -t cifs -w -o username=nabed -o password=nabed //192.168.0.58/sharedfolder /mnt/sharedfolder/ Then go to VisiPics and open Z: drive and folder /mnt . Inside you will find the network data.
Geeqie does great job too and has an Ubuntu version.
As of 2020 this is what works for me on Ubuntu 18.04:
- open the Nautilus file manager
- press Ctrl+l to write into the address bar
- insert sftp://your_user_name@target_ip_address where target_ip_address should have the form 102.69.35.384 , then just press Enter to confirm
Now you will be asked for the log-in user name and password. That’s it, you should now have a graphical connection in Nautilus to the drive
That will work, but technically it’s not mounting a share. You mount a share by it’s name, without knowing the path to it’s location on disk. Your solution mounts a users homedir and emulates a filesystem via sftp protocol.
@SorenA I guess you are right, I am a newbie and not really aware of the terminology. What is then my suggestion doing — «mapping» a drive? Where is the difference in use to «mounting»? Thanks
Another way is to use the file browser to connect to a network location. Then it is mounted under ~/.gvfs
From there, you can mkdir ~/winbox and then ln -s ~/.gvfs/blahblahblah ~/winbox .
I recall there being some permanence to this, but I forget the details. 😛 I was developing php/odbc app for Quickbooks which needs to be run on the Quickbooks computer.
Edit for 2018 and beyond: After 14.04, ubuntu seems to no longer use .gvfs , so the above might not work for you. Some folks got really mad that something changed and my old answer didn’t work.
Check out this comment: ~/.gvfs moved to /run/user/[UID]/gvfs/blahblah . After using Nautilus to make a location using sftp://host:port , the remote server’s file system showed up there.
Монтирование сетевой папки в Linux
В одной из прошлых статей мы рассматривали как настраивать сетевые папки в Linux с помощью NFS. Если в Windows используется для этих целей Samba, то в Linux принято организовывать общие папки с помощью сетевой файловой системы NFS.
В этой статье мы поговорим о том как монтировать такие папки вручную, а также как настроить их монтирование при обращении с помощью autofs. Так вы будете экономить трафик между серверами и получите неплохую производительность.
Монтирование сетевой папки в Linux
Для того чтобы примонтировать сетевую папку в системе должен быть установлен пакет nfs-commons. В Ubuntu его можно установить такой командой:
sudo apt install nfs-common
Затем можно выполнять монтирование с помощью обычной команды mount, которой надо передать адрес сервера NFS и путь к папке в файловой системе сервера. Например, чтобы смонтировать папку /var/nfs выполните:
sudo mount ip_адрес:/var/nfs /mnt
Никакой авторизации в NFS нет, поддерживается только ограничение доступа по IP адресу, поэтому монтирование должно пройти успешно. Если статическое монтирование работает хорошо, можно переходить к настройке autofs. Не забудьте размонтировать сетевую папку:
Сначала нужно установить этот сервис. Для этого в Ubuntu выполните команду:
Все настройки сетевых папок, которые надо монтировать находятся в файле /etc/auto.master. Каждая строчка представляет из себя отдельную папку и имеет такой синтаксис:
/точка/монтирования /файл/с/карты —timeout=значение
Здесь файл карты, обычно это /etc/auto.misc — файл в котором более подробно описано что и куда надо монтировать. Синтаксис одной записи в файле /etc/auto.misc такой:
/точка/монтирования опции_монтирования ip_адрес:/путь/к/сетевой/папке
Для примера будем монтировать ту же сетевую папку /var/nfs на сервере 185.117.155.209 в локальную папку /mnt. В файл /etc/auto.master надо добавить такую строчку:
/mnt /etc/auto.nfs —timeout=100
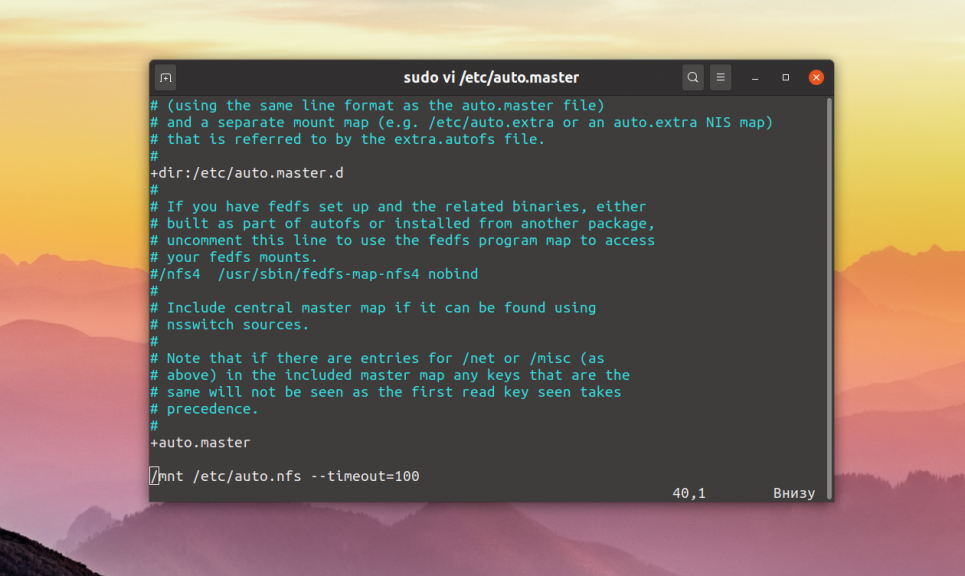
Здесь мы сообщаем, что общая папка монтирования для всех ресурсов, описанных в файле /etc/auto.nfs — /mnt и если к ресурсу не обращаются на протяжении 100 секунд, то её следует размонтировать. Далее надо добавить описание монтирования в файл /etc/auto.nfs:
share -fstype=nfs4,rw 185.117.155.209:/var/nfs
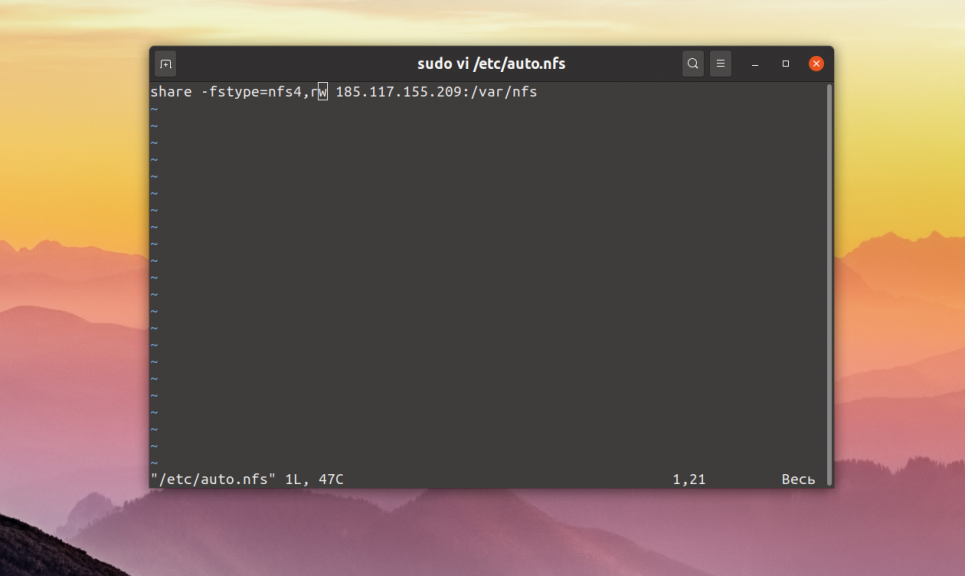
Здесь — share это точка монтирования нашей сетевой папки в папке /mnt, затем идут опции монтирования, а потом адрес сервера и путь к папке на удалённой машине. Далее надо перезапустить сервис autofs:
sudo systemctl restart autofs
Затем можно попытаться обратиться к этой папке и она автоматически смонтируется:
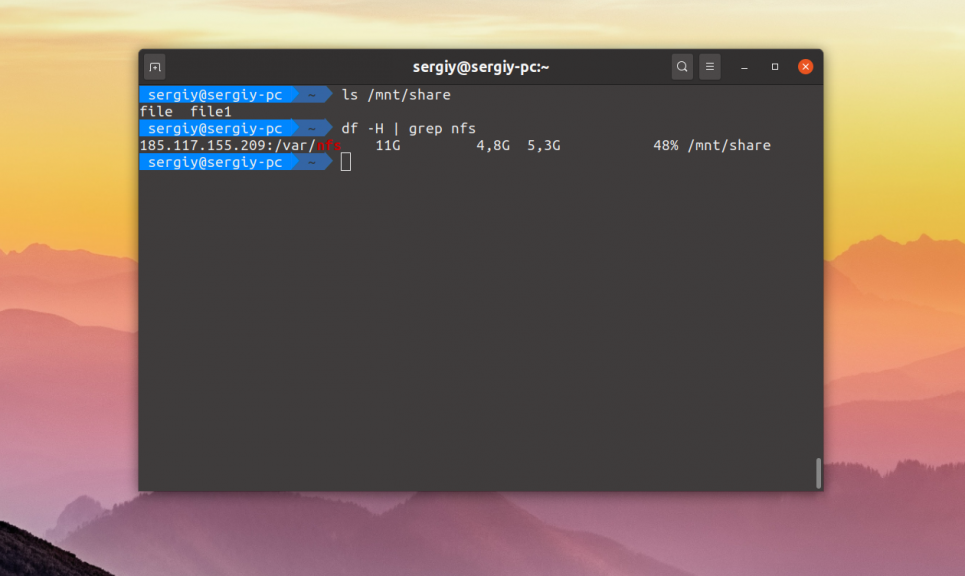
Как видите, всё достаточно просто. Так и выполняется автоматическое монтирование сетевых папок в Linux. Но чтобы у вас появилась возможность создавать файлы в этой папке, надо чтобы сервер NFS был правильно настроен. Об этом смотрите предыдущую статью про настройку NFS.
Обнаружили ошибку в тексте? Сообщите мне об этом. Выделите текст с ошибкой и нажмите Ctrl+Enter.