- Mount specific ntfs directory on Linux
- 4 Answers 4
- Как смонтировать раздел NTFS в Linux
- Смонтировать раздел NTFS с разрешением только для чтения
- Определить раздел NTFS
- Создать точку монтирования и смонтировать раздел NTFS
- Смонтировать раздел NTFS с разрешениями на чтение и запись
- Обновить репозитории пакетов
- Установите Fuse и ntfs-3g
- Смонтировать раздел NTFS
- Как монтировать нестандартные файловые системы в Linux
- NTFS
- Установка компонентов
- Ручное монтирование
- Автоматическое монтирование
- GeeseFS (Yandex Cloud диск)
- Установка компонентов
- Авторизация
- Ручное монтирование
- Автоматическое монтирование
- How to Mount NTFS Partition in Linux
- Mount NTFS Partition with Read-Only Permission
- Identify NTFS Partition
- Create Mount Point and Mount NTFS Partition
- Mount NTFS Partition with Read-and-Write Permissions
- Update Package Repositories
- Install Fuse and ntfs-3g
- Mount NTFS Partition
Mount specific ntfs directory on Linux
I have Linux mount question. I have a dual-boot Win7/Linux machine.
My main OS is Windows, and that’s where most of my work lives.
Generally all work done under Linux, is to be migrated for further Win usage. I would therefore like to mount my NTFS partitions onto my Linux OS.
However, I wish to protect me from me.
I would like to (say) mount my Win-Desktop folder, as a device of its own, without mounting the whole relevant drive.
Is it possible? Further more, if it’s not possible, I at-least want the drive to be mounted without being visible on the Linux desktop, and just have the Win-Desktop folder visibly mounted. I would appreciate any comment, or past expiriance.
4 Answers 4
I realize this question is almost two years old, but I answer it for those who find this in search and need the answer.
First, mount your Windows partition as read-only. If your Windows partition is the first partition on your first hard drive add this to the file /etc/fstab :
/dev/sda1 /mnt/windows ntfs ro,umask=0222,defaults 0 0 You have to create a directory called windows first.
If you want to mount the partition after boot and not be logged in as root, use this:
/dev/sda1 /mnt/windows ntfs user,ro,umask=0222,defaults 0 0 To mount a specific Windows directory as read and write, use ntfs-3g or fuse-ntfs-3g . Most people will want to mount their Documents, so I will use this use example. If you are user David on Windows and david on Linux, use this (substituting fuse-ntfs-3g for ntfs-3g or whatever current kernel module you have installed):
/mnt/windows/Users/David/Documents /home/David/Documents ntfs-3g rbind,user,umask=0222,defaults 0 0 rbind is what remounts an already location to another. For a more detailed explanation of other options in the comma separated list, type info ntfs-3g in a command console. The Documents directory in Linux must exist and should be empty. This line must be after the line that mounts the Windows partition.
This is for Windows Vista and 7. If you have Windows XP, use /mnt/windows/»Documents and Settings»/David/Documents . The quotations are important because mount cannot accept spaces in the directory name even though Linux has no problems with spaces in directories.
If you don’t have a kernel module that can mount NTFS as read and write, you need to install one.
Ubuntu comes with ntfs-3g , automount , and ntfsconfig . Any currently connected partition should be automatically detected and set up to be mounted automatically. Ubuntu also mounts nonnative partitions like Windows under /media instead, usually with the name of the operating system, so your Windows 7 partition is mounted at /media/Windows 7 . You will find your fstab entry uses unicode strings for special characters so that the line says /media/Windows\0407 , where \040 is substituted for the space without the need for quotes.
To mount David’s Windows 7 documents in david’s Linux home directory in Ubuntu, put this in /etc/fstab :
/media/Windows\0407/Users/David/Documents /home/David/Documents ntfs-3g rbind,nosuid,user,umask=0222 0 0 Как смонтировать раздел NTFS в Linux
![]()
NTFS — это система хранения файлов, стандартная для компьютеров Windows, но системы Linux также используют ее для организации данных.
Большинство систем Linux монтируют диски автоматически. Однако в конфигурациях с двойной загрузкой, где требуется обмен файлами между двумя системами с разделами NTFS, эта процедура выполняется вручную.
Эта статья покажет вам, как смонтировать раздел NTFS в Linux с разрешениями только для чтения или чтения и записи.
Смонтировать раздел NTFS с разрешением только для чтения
Выполните следующие действия, чтобы смонтировать раздел NTFS с доступом только для чтения.
Примечание. Раздел только для чтения позволяет пользователям читать файлы. Чтобы включить запись в раздел NTFS, обратитесь ко второму разделу статьи.
Определить раздел NTFS
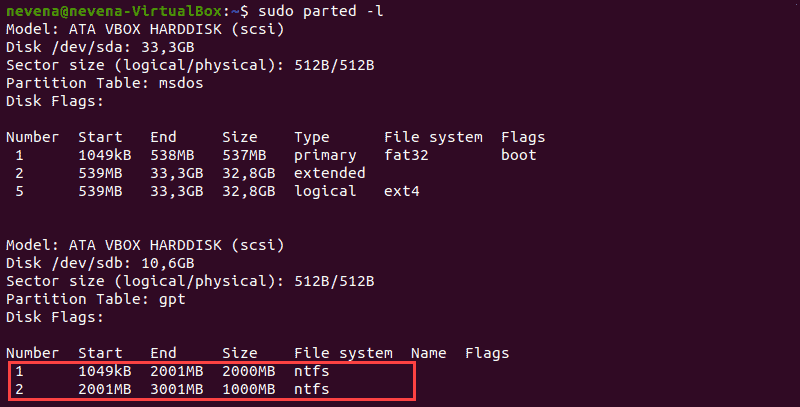
Перед монтированием раздела NTFS определите его с помощью команды parted :

В приведенном выше примере два раздела NTFS находятся на диске /dev/sdb . Прежде чем продолжить, запишите номер раздела, который вы хотите смонтировать.
Вы также можете использовать команды fdisk и grep , чтобы показать на диске только разделы NTFS:
Создать точку монтирования и смонтировать раздел NTFS
В этом примере мы смонтируем раздел /dev/sdb1 с разрешением только для чтения.
Сначала создайте точку монтирования с помощью команды mkdir :
Затем смонтируйте раздел в созданный вами каталог. Используйте команду mount и путь к разделу, который вы указали ранее:
sudo mount -t ntfs /dev/sdb1 /mnt/ntfs1
Используйте инструмент для освобождения диска, чтобы проверить подробную информацию обо всех файловых системах и убедиться, что вы успешно смонтировали раздел:
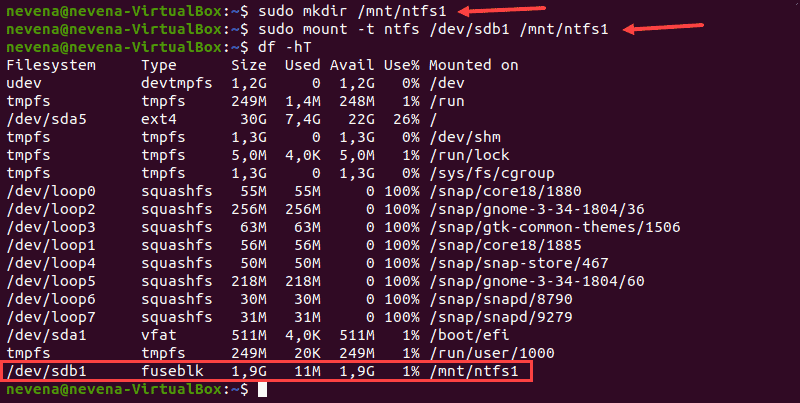
Раздел /dev/sdb1 отображается как смонтированный в нижней части списка. Теперь у вас есть доступ только для чтения к этому разделу NTFS.
Смонтировать раздел NTFS с разрешениями на чтение и запись
Чтобы смонтировать раздел NTFS с разрешениями на чтение и запись, вам необходимо установить fuse и ntfs-3 в вашей системе.
Выполните следующие действия, чтобы завершить процесс монтирования.
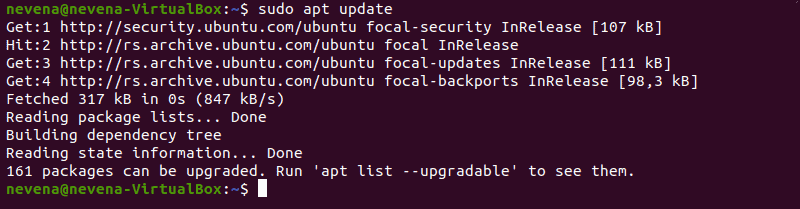
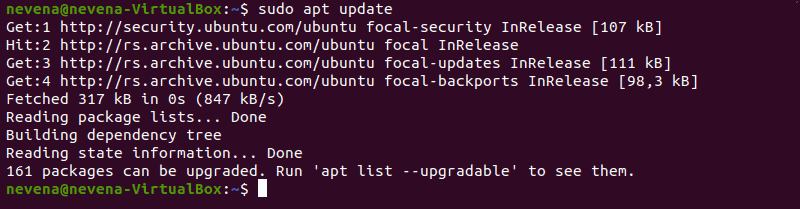
Обновить репозитории пакетов
Выполните следующую команду, чтобы загрузить и обновить репозитории пакетов:
Установите Fuse и ntfs-3g
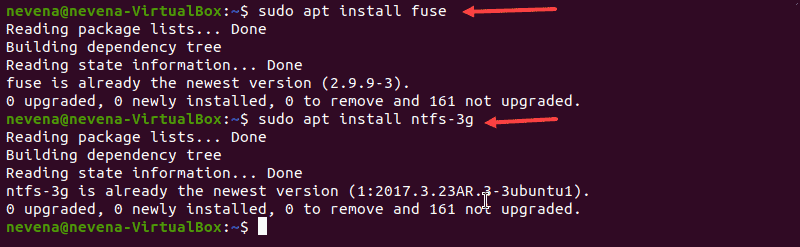
Чтобы установить fuse в вашей системе Linux из репозитория по умолчанию, используйте соответствующий менеджер пакетов. В нашем примере мы используем apt в Ubuntu.
Когда установка завершится, установите ntfs-3g , запустив:
В случае, если fuse и ntfs-3g уже установлены, вывод выглядит примерно так, как показано ниже:

Смонтировать раздел NTFS
После установки пакетов программного обеспечения fuse и ntfs-3g смонтируйте раздел NTFS.
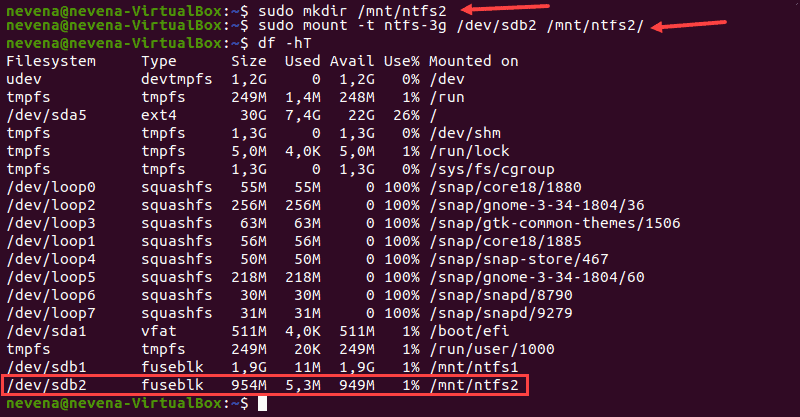
Сначала создайте точку монтирования с помощью команды mkdir :
Затем используйте команду mount , чтобы смонтировать нужный раздел. Например, /dev/sdb2 :
sudo mount -t ntfs-3g /dev/sdb2 /mnt/ntfs2/
Чтобы проверить, смонтирован ли раздел, выполните команду df :

Теперь у вас есть права на чтение и запись для подключенного раздела NTFS.
Как монтировать нестандартные файловые системы в Linux

Обновлено: 09.07.2023 Опубликовано: 09.08.2016
Данную инструкцию можно рассматривать как шпаргалку для работы с некоторыми файловыми системами в системах Linux. По мере возможности, список примеров будет пополняться.
NTFS
Установка компонентов
Для начала необходимо установить пакет ntfs-3g. В противном случае, при попытке запустить команду на монтирование раздела NTFS мы получим ошибку mount: unknown filesystem type ‘ntfs’.
Сначала устанавливаем расширенный репозиторий:
Затем сам пакет ntfs-3g
После установки данного пакета в системе появятся дополнительные команды mount.ntfs-fuse и mount.ntfs-3g., а также команда mount распознает опцию -t ntfs.
Ручное монтирование
Монтирование NTFS на чтение и запись выполняется любой из трех команд:
mount -t ntfs-3g /dev/sdb1 /mnt
* в данном примере, примотировано устройство /dev/sdb1 в раздел /mnt. Понять, какой устройство нужно монтировать можно при помощи команды fdisk -l
Автоматическое монтирование
Чтобы раздел автоматически монтировался при перезапуске компьютера, открываем на редактирование файл:
/dev/sdb1 /mnt ntfs defaults 0 0
* в данном примере мы раздел /dev/sdb1 будем монтировать в каталог /mnt.
Чтобы применить настройку и проверить ее, вводим:
Посмотреть примонтированные разделы и файловые системы можно командой:
GeeseFS (Yandex Cloud диск)
Установка компонентов
Сначала устанавливаем утилиты fuse и wget. В зависимости
yum install fuse fuse3 wget
Скачиваем geesefs и сохраняем ее в /usr/bin/geesefs:
wget https://github.com/yandex-cloud/geesefs/releases/latest/download/geesefs-linux-amd64 -O /usr/bin/geesefs
Выставляем разрешение утилиты geesefs на запуск:
Проверяем работу утилиты, посмотрев ее версию:
Мы должны увидеть что-то на подобие:
Авторизация
Yandex Cloud для монтирования диска требует прохождение аутентификации с помощью токена. Его мы получаем в личном кабинете хостера.
Для настройки доступа создаем каталог .aws в домашней директории пользователя, под которым будем монтировать диск. В моем случае, пользователь root:
После создаем файл с токеном:
[default]
aws_access_key_id = H. D
aws_secret_access_key = H. 7
Ручное монтирование
Для монтирования используем команду geesefs:
Автоматическое монтирование
Чтобы раздел автоматически монтировался при перезапуске компьютера, открываем на редактирование файл fstab:
fuse.geesefs _netdev,allow_other,—file-mode=0666,—dir-mode=0777 0 0
Если мы хотим, чтобы точке монтирования назвачался определенный владелец и группы, указываем опции uid и gid:
fuse.geesefs _netdev,allow_other,—file-mode=0666,—dir-mode=0777,—uid=1024,—gid=1024 0 0
Чтобы применить настройку и проверить ее, вводим:
How to Mount NTFS Partition in Linux
NTFS stands for New Technology File System. This file-storing system is standard on Windows machines, but Linux systems also use it to organize data.
Most Linux systems mount the disks automatically. However, in dual-boot setups, where file exchange is required between two systems with NTFS partitions, this procedure is performed manually.
This article will show you how to mount an NTFS partition in Linux with read-only or read-and-write permissions.
- A system running Linux
- A user account with sudo or root privileges
- Access to a terminal window / command line (Activities >Search >Terminal)
Mount NTFS Partition with Read-Only Permission
Follow the steps below to mount an NTFS partition with read-only access.
Note: A read-only partition allows users to read files. To enable writing to an NTFS partition, refer to the second section of the article.
Identify NTFS Partition
Before mounting an NTFS partition, identify it by using the parted command:
In the example above, two NTFS partitions are on the /dev/sdb disk. Note the partition number you want to mount before you proceed.
You can also use the fdisk and grep commands to show only NTFS partitions on a disk:
Create Mount Point and Mount NTFS Partition
In this example, we will mount the /dev/sdb1 partition with read-only permission.
First, create the mount point with the mkdir command:
Next, mount the partition to the directory you created. Use the mount command and the partition path you noted earlier:
sudo mount -t ntfs /dev/sdb1 /mnt/ntfs1Use the disk free tool to check the details of all filesystems and verify you mounted the partition successfully:

The /dev/sdb1 partition shows as mounted at the bottom of the list. You now have read-only access for this NTFS partition.
Mount NTFS Partition with Read-and-Write Permissions
To mount an NTFS partition with read-and-write permissions, you need to install fuse and ntfs-3 on your system.
Follow the steps below to complete the mounting process.
Note: Some Linux distributions may have fuse and ntfs-3g already installed by default.
Update Package Repositories
Run the following command to download and update the package repositories:
Install Fuse and ntfs-3g
To install fuse on your Linux system from the default repository, use the appropriate package manager. In our example, we use apt in Ubuntu.
When the installation completes, install ntfs-3g by running:
In case both fuse and ntfs-3g are already installed, the output looks similar to the one below:
Mount NTFS Partition
After you install the fuse and ntfs-3g software packages, mount your NTFS partition.
First, create a mount point by using the mkdir command :
Next, use the mount command to mount the partition you want. For example, /dev/sdb2 :
sudo mount -t ntfs-3g /dev/sdb2 /mnt/ntfs2/To check if the partition is mounted, run the df command:
You now have the read/write permissions for the NTFS partition you mounted.
Note: Linux kernel version 2.6.20 or newer is recommended for mounting a partition via ntfs-3g. Learn on how to update the kernel on Ubuntu or how to update the kernel on CentOS.
After reading this article, you should have learned to mount an NTFS partition. Partition manipulation is crucial in a Linux system, and next, we recommend learning how to delete a partition in Linux and how to format disk partitions in Linux.
Dejan is the Head of Content at phoenixNAP with over 8 years of experience in Web publishing and technical writing. Prior to joining PNAP, he was Chief Editor of several websites striving to advocate for emerging technologies. He is dedicated to simplifying complex notions and providing meaningful insight into data center and cloud technology.
In Linux systems, in order to use storage devices such as Hard Drives and USB drives, you need to understand.
The ls command (short for ‘list’) lists information about directories and any type of files in the working.
A list of all the important Linux commands in one place. Find the command you need, whenever you need it or.