- How to mount a new drive on startup [duplicate]
- How To Automount File Systems on Linux
- Step 1: Get the Name, UUID and File System Type
- Step 2: Make a Mount Point For Your Drive
- Step 3: Edit /etc/fstab File
- Some Explanation
- Can’t Mount Your Disk Drive?
- 39 Responses to “How To Automount File Systems on Linux”
How to mount a new drive on startup [duplicate]
I have recently installed a new hard drive to my Ubuntu 10.0.4 box. I used System -> Administration -> Disk Utils to format the disk (ext4 file type) — but did not create a partition (is this advisable?). I have manually mounted the drive as /mydata. I want to have the machine automatically mount the device on startup/reboot. How may I do this? [[Update]] This is the output from running sudo fdisk -l on my system:
Disk /dev/sda: 500.1 GB, 500107862016 bytes 255 heads, 63 sectors/track, 60801 cylinders Units = cylinders of 16065 * 512 = 8225280 bytes Sector size (logical/physical): 512 bytes / 512 bytes I/O size (minimum/optimal): 512 bytes / 512 bytes Disk identifier: 0x000858bf Device Boot Start End Blocks Id System /dev/sda1 * 1 59334 476595200 83 Linux /dev/sda2 59334 60802 11789313 5 Extended /dev/sda5 59334 60802 11789312 82 Linux swap / Solaris Disk /dev/sdb: 500.1 GB, 500107862016 bytes 255 heads, 63 sectors/track, 60801 cylinders Units = cylinders of 16065 * 512 = 8225280 bytes Sector size (logical/physical): 512 bytes / 512 bytes I/O size (minimum/optimal): 512 bytes / 512 bytes Disk identifier: 0x00000000 Disk /dev/sdb doesn't contain a valid partition table Disk /dev/sdc: 16.0 GB, 16026435072 bytes 254 heads, 63 sectors/track, 1956 cylinders Units = cylinders of 16002 * 512 = 8193024 bytes Sector size (logical/physical): 512 bytes / 512 bytes I/O size (minimum/optimal): 512 bytes / 512 bytes Disk identifier: 0x00000000 Device Boot Start End Blocks Id System /dev/sdc1 1 1955 15641929 c W95 FAT32 (LBA) How To Automount File Systems on Linux
Today I’m going to show you how to automatically mount a drive at boot time in Linux. My laptop has one SSD and one mechanical drive. I install operating systems on SSD and store files on the mechanical drive. So oftentimes I need to mount the mechanical drive in the file manager manually to access my mp3 and video files. Mounting drive manually is just a waste of time. So I’m going to show you an easy way to automount drive in Linux.
Step 1: Get the Name, UUID and File System Type
Open your terminal, run the following command to see the name of your drive, its UUID(Universal Unique Identifier) and file system type.
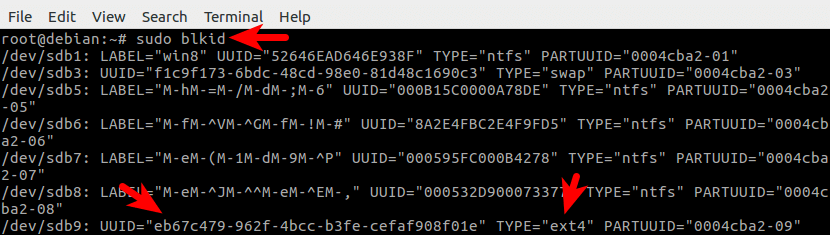
In the output of this command, the first column is the name of your drives. The second column is the label of the drive (if you set a label for it) and the third column is the UUID of your drives.
First, you need to know the name of the drive that is going to be automatically mounted. For example, the name of the drive that is going to be automatically mounted on my computer is /dev/sdb9 .
Then you need to know its UUID and file system type. As you can see the UUID of /dev/sdb9 is eb67c479-962f-4bcc-b3fe-cefaf908f01e and the file system of /dev/sdb9 is ext4 which is the standard file system in Linux.
Step 2: Make a Mount Point For Your Drive
We are going to make a mount point under /mnt directory. Enter the following command,
For example, I issued the following command:
Step 3: Edit /etc/fstab File
Run the following command to edit the /etc/fstab file. Nano is a command-line editor on Linux.
We need to append one line of code at the end of the file. The format of this line of code is as follows:
Note that you need to separate these items with Tab key. For example, I added the following line to the end of /etc/fstab .
UUID=eb67c479-962f-4bcc-b3fe-cefaf908f01e /mnt/sdb9 ext4 defaults 0 2

If you want to automount an NTFS file system, here is an example.
UUID= /mnt/ntfs ntfs defaults 0 2
If you want to automount a Btrfs file system, then change the file system type to btrfs.
UUID= /mnt/btrfs btrfs defaults 0 2
Save and close the file. Then run the following command to see if it works.
So that’s how you automount a file system in Linux.
Some Explanation
For swap partitions, the mount point field should be specified as none.
The defaults mount option will give users read and write access to the file system.
The value of the dump field is usually zero.
The pass field is used by the fsck program to determine the order in which filesystem checks are done at reboot time. As you can see in this file, the value of the pass field for the root file system is 1. Swap partitions do not need to be checked and the value for them is zero. All other file systems should have a value of 2. So I set the pass value to 2 for my drive.
Can’t Mount Your Disk Drive?
If you see the “can’t read superblock” error when trying to mount your disk drive, please follow the tutorial below to fix this error.
39 Responses to “How To Automount File Systems on Linux”
Hello, this works beautifully minus one problem, i can’t write to the volumes without using sudo or some other form of root access
You can run the following command to grant read, write and execute permissions. Replace username with your real username and mount-point with the path of mount point.
sudo setfacl -R -m u:username:rwx mount-point
Thank you, this technique has worked very well for me. I think it is also worth mentioning that if there is an error or typo in fstab, it will boot in emergency mode, at least in my case using Debian 10.
Helly Kyle, yes if you don’t do the above process correctly you boot into emergency mode on Ubuntu as well. To fix this simply use nano /etc/fstab and delete the lines that are causing the errors.
I also have my OS(ubuntu) on an SSD drive and had the same problem, I opened nautilus from the terminal with root access to open and edit the file with GUI text editor, entered a carriage return, then entered lines as instructed (NTFS file systems) saved the fstab , ^C out of nautilus and reboot then os failed to boot and entered emergency mode from which I deleted the added lines and reboot again, where do you think the problem is? editing the text with graphical tools or opening it with nautilus? cause I’m sure I didn’t make any mistakes typing the directories and device names
The trouble with this method is that many people (me!) have a lot of usb drives for various purposes. Trying to maintain a fstab with a listing for each of them would be impossible, not to mention creating all those different mountpoints. Better to let udev handle it. If you give the usb drive partitions a label, it will create “/media// automatically. It’s possible to fiddle with the udev rules, but doing so would take a whole tutorial by itself!
The number of usb ports isn’t really the issue with regard to what I said. I didn’t suggest I had dozens of USB drives all plugged in at once. Even if I had only one port, and I plugged in my USB drives one at a time ( I have many! ), each partition on each drive would have its own UUID, and would need its own individual entry in fstab. If I was *sure* no two would be plugged in at the same time, I could escape with just one mountpoint, although any programs and scripts that referenced it might get confused. On the other hand, with udev, you just give each partition it’s own label, and all would be taken care of. No fstab changes needed.
By default, when you insert an USB drive to a Linux computer, you need to click the name of the drive in file manager to mount it. This article assumes the USB drive is plugged in before the computer boots, adding a fstab entry would automatically mount it. This is useful when the Linux system doesn’t have a GUI or does’t have a monitor connected to it, like a Raspberry Pi.
Also just in general its super annoying to have to manually mount a drive on every boot. I just want to be able to use the storage I have on my PC by default. This solution worked perfectly for me!
Didn’t work for mounting volumes on my RAID5 array. Rebooted in emergency mode where I had to remove the /etc/fstab additional line. Volumes automatically mount when I click on them in Nautilus. Is there a way to see how they are mounted in order to reproduce this in /etc/fstab? (Not a big deal, but until I manually mount them in Nautilus, Plex server doesn’t see the files.) My mdadm conf file has the following line: ARRAY /dev/md/pv00 metadata=1.2 UUID=f28ef44a:f135a3ed:6314af35:6f68c74c name=nasdcde96:pv00 What should the /etc/fstab line be ?
it is mounted in directory but I want it to show in file manager as moounted like other storage devices like usb .
UUID=eb67c479-962f-4bcc-b3fe-cefaf908f01e /wdusb ext4 defaults,nofail,x-systemd.device-timeout=1ms 0 2
UUID=eb67c479-962f-4bcc-b3fe-cefaf908f01e /wdusb ext4 defaults,nofail,discard 0 2
Hi, I followed the instructions but can’t see the drive at all HELP Below is my code UUID=01D39AF1CB6EFA00 /mnt/sda1 ntfs defaults 0 2
my kali linux os showing
Escritorio
file system
waterbasket = Desktop
Computer
Trash How to change this ?
I would really like to be able to use this technique to mount two drives from my in-house server. However, I have never been able to get it to work. The Ubuntu 20.04 server drives show up in Nemo (Linux Mint Cinnamon 19.3), but I get an “operation permitted for root only.” message. Here’s the line I am using for one of them. I would like to use a more secure way to log in (store a file), but for now if I could just get THIS part working I’d be happy.
//192.168.0.7/media/serverhd1 /home/mainuser/ubuntuserver/serverhd1 nfs4 username=YYYYYYY,password=XXXXXXX,dir_mode777,file_mode=0777,iocharset=utf8 0 0
Man please, be careful with html tags in comments – its very dangerous to give this kind of option for user without registration – they can inject code and make xss atacks on website’s or what ever they want. Take this comment into consideration – above I have created a button – do you know what can I also ? 😛
Hi.
I have done the similar line in fstab, with a cifs nas mount.
Working fine but when i restrt the system i have to run the sudo mount -a command to mount the drive. How can I mount it automaticly?
I was reading instructions for a day and I can’t find the soultion.
I’m using a plex server, watching it outside from home, and if a powercut happens the plex can’t see the files. Please help!
Many thanks
sudo nano /etc/systemd/system/auto-mount.service
[Unit] Description=Automatically mount all file sysetms at boot time After=network-online.target Wants=network-online.target [Service] Type=oneshot ExecStart=/usr/bin/mount -a [Install] WantedBy=multi-user.target
sudo systemctl enable --now auto-mount.service
Cool tutorial, and thanks for sharing! Using this I was able to auto-mount my two main data partitions (mostly containing files generated or accumulated in Windows) in my new Manjaro Linux (I converted my computer to a Windows/Linux dual-booter). These two partitions are “D:” and “E” in Windows, but in Linux they’re “/d” and “/e”. One criticism of your tutorial: I found it’s not necessary to put mountpoint dirs in “/mnt”, nor is it necessary to name those dirs after the partition slices that mount there. For example, on my system, partition slice “sdb1” doesn’t have to mount to “/mnt/sdb1”; that does work, yes, but I find that it mounts just fine to “/d”, like so:
UUID=A0E42A6AE42A4340 /d ntfs defaults 0 2 UUID=08DF0C4F08DF0C4F /e ntfs defaults 0 2
"D:\sl\Red Barn.jpg" -> "/d/sl/Red Barn.jpg" "E:\Music\Pink-Floyd\Keep Talking.mp3" -> "/e/Music/Pink-Floyd/Keep Talking.mp3"
Yes, you don’t have to use the /mnt/ directory to mount other partitions, but using /mnt/ conforms to the Linux filesystem hierarchy standard and it makes your system clean and tidy.