- How to mount disk image taken in linux and run in virtual box
- 3 Answers 3
- A Foreword for «Mount and boot the disk image»
- Clearing up miscommunication: To boot in VirtualBox, Things Have to Change
- Further Explanation: Complications of Booting a System Image containing Windows
- How to Mount the image created in Linux and run in VirtualBox
- Option 1: Convert the .img file to a .vdi file using VBoxManager
- Option 2: Use VMWare vCenter Converter Standalone to create a .vdmk file
- Import VDI or VDMK file into VirtualBox
- How to Mount VirtualBox Disk Image (VDI) to Access VM File-System in Ubuntu
- Unmount:
- Ji m
How to mount disk image taken in linux and run in virtual box
I want to get virtual box to mount and boot the disk image I took a month ago. I have been able to mount the drive and can see its contents, everything is accessible, I want to now get the image booted up as I want to use the windows programs I need to access. How do I proceed? Typing in the question, I only see references to virtual box images. As I don’t have a VBox image file, only the image file I called ssd.img and VBox won’t mount anything other than .iso or its native format. renaming .img to .iso doesn’t work. ** EDIT ** My question still remains a mystery, to reiterate, I am not using an ISO file, it is an image of a hard disk that was created using dd command and the file is an *.img file, tried already to change the file name by renaming it and that doesn’t work. I have virtual box and want to run the windows partition of that image. In simple terms, if it runs then I know the SSD has a bad block (which Ubuntu is not repairing / moving / stuffing in to the 11th dimension. ) So I know I can then either use a scrubber and format (as the drive manufacturer suggests) then reimage and we would be all good to go again. So to reiterate again, this is not «Installing» a windows ISO, it is mounting an image of a hard disk in virtualbox, only VB only accepts ISO or its native variety of formats.
3 Answers 3
Select a virtual machine by clicking its name in the VirtualBox window
Click the Machine menu at the top of the VirtualBox window, and click Settings
Click the Storage category in the Settings window
Right-click in the storage tree pane, and click Add Floppy Controller
Right-click the Floppy Controller device, and click Add Floppy Device
Click the Choose Disk button in the prompt window that appears
Navigate to the floppy disk image file (.IMG) on your computer and double-click it
If that doesn’t work, try renaming the .IMG as .ISO and mount it.
If that too doesn’t work, use VBoxManage’s convertfromraw command as follows:
VBoxManage convertfromraw --format VDI [filename].img [filename].vdi Finally, mount the VDI as a hard disk.
I have watched most of that and I have already tried making a disk, what my problem is, I have a SSD that I took an image of, its the image I need to mount / run or whatever term is used to describe being able to use a host operating system to run a 3rd part operating system. I already have an image file, it is .img not ISO.
Attaching a raw disk image should be possible by creating a raw vmdk.
In the VirtualBox images directory (like /home//VirtualBox)
VBoxManage internalcommands createrawvmdk -filename rawtest.vmdk -rawdisk /path/to/disk.img Attaching the virtual disk to a virtual virtual machine should be possible after that. The path /path/to/disk.img can also point to a partition or a loop device.
After reading the post update and comments, essentially what you have is an .img of a Windows system that you hope to mount with Virtual Box in such a way that it boots the Windows OS on that .img file you have. In other words, you have the .img of a physical machine and want to run it as a virtual machine because there is software installed on that Window’s OS that you need to use (to be sure, this is the equivalent of having a «host operating system to run a 3rd part operating system«)
While you’ve been able to mount the drive and access the files, obviously the programs installed under Windows on that disk image won’t run in Ubuntu and why you wish to «. get the image booted up as [you] want to use the windows programs [you] need to access»
Granted, it’s been 7 years since this question was asked and perhaps the frustrations felt by the OP may have passed by now, but maybe this will serve the needs of others coming across this question or help bring clarity to a miscommunication.
A Foreword for «Mount and boot the disk image»
To provide an assured understanding of what the OP hopes to accomplish and to introduce references that may differ to help avoid confusion, let’s establish some points:
- The file «ssd.img» is a dd made copy of another system’s solid state drive (SSD) that contained a Windows operating system.
- Hypothetically, that image file could be written to a different physical SSD, and that new or replacement SSD could be installed in the original machine and be booted up.
- With that said, instead of writing the .img file to a new or replacement SSD, the OP (if I’m not mistaken) wants to mount the .img file in Virtual Box to boot it up.
Clearing up miscommunication: To boot in VirtualBox, Things Have to Change
Back in the day, we could create an .iso image of a CD-ROM, mount that iso image file, and run it as if it was the actual CD-ROM inserted in our computer. Since a hard disk image file is essentially the same thing but instead of a being a copy of a CD-ROM disc, it’s a copy of an entire hard drive, we might think we could just mount the image file and run it as if it was the actual hard drive installed, through the use of Virtual box. However, that’s not necessarily the case when it comes to an existing, already installed, operating system on an existing system’s hard drive (or SSD in this case), at least when referring to how simply it might work out.
The task which you hope to accomplish is, as briefly aforementioned, is better known as or is more often referred to as the process of taking a physical machine and converting it to a virtual machine. Though it might seem like it would be something as simple as mounting the image file and «attaching it», what you’re actually doing by mounting it in virtual box is turning it into a «virtual hard drive» to run in a virtual system environment created in Virtual Box. And, for booting it up, unfortunately it isn’t as simple as just mounting it as a primary hard drive and hitting launch virtual machine, especially with Windows (more so in earlier versions of Windows).
Thus, to accomplish what you hope to do, you would actually need to convert the system itself (or more specifically in this case, the system disk image created by dd ) from a raw disk image to a virtual disk or «virtual disk image».
Again, this is only because you want to boot the operating system contained in the .img file. Not to be confused with simply accessing the files which you’ve already mentioned being capable of doing, but to run and launch the operating system as a machine existing in VirtualBox, it needs to be converted.
Further Explanation: Complications of Booting a System Image containing Windows
Unlike a Linux installation, Windows is not as adaptive to the changes of system hardware that comes as a result of moving a hard drive from one system to the next, at least, this was the case before Windows 8/10. So, when you create a virtual environment (or virtual system) to boot the .img file, which is acting as a virtual hard drive, you’re essentially giving the Windows system that’s on therea different set of unrecognized hardware to work with. More details of the complications Windows systems presents are explained on Virtual Box’s page for How to migrate existing Windows Installations to Virtual Box and while the page does provide instructions on how to accomplish this, it is not officially supported:
Disclaimer: Migration of Windows guests from a physical host into a VirtualBox VM is not supported. These instructions are provided as-is in the hope that they are helpful.
Though this may be the case, plenty have reported being able to accomplish this. Personally, I have done this as well but the image file I had was of a Linux system and not Windows, though I was able to run it on Windows in Virtual Box.
How to Mount the image created in Linux and run in VirtualBox
While not officially supported, there are still a couple of ways to do this, and with the changes introduced in Windows 8/10, if this doesn’t apply to an older version of Windows (i.e. Windows Server 2000 or Windows 7), there are a couple of options to choose from for converting your image file so that it can be booted in Virtual Box.
Option 1: Convert the .img file to a .vdi file using VBoxManager
As previously provided answers have suggested, and as you already know, VBox doesn’t support mounting the .img directly so if you want to boot from that .img file, you’ll need to convert it to a .vdi file. Hopefully it’s become more apparent why the previous two answers both suggested that you use VboxManager to convert your .img file, however the commands they provided you were for the Windows Command line version of virtual box.
Since it sounds like you’re running an Ubuntu system and I would presume it’s the one that is hosting the installation of VirtualBox, the syntax to convert an IMG file to VDI file from terminal is:
VBoxManage convertdd ssd.img converted_ssd.vdi # You will get an output of something like this: Converting from raw image file="ssd.img" to file="converted_ssd.vdi". Creating dynamic image with size 6012964864 bytes (5735MB). Option 2: Use VMWare vCenter Converter Standalone to create a .vdmk file
Since VirtualBox is capable of reading .vdmk files, others may find it useful to optionally use the VMware vCenter Converter to convert their physical machine (or in your case the .img file) to a virtual machine. For the open source version of the converter, it can be found here.
Further instructions for using VMware vCenter Converter will vary based on the version and can otherwise be found here.
As of February 2, 2022; as noted in their blog post, VMWare announced a renewed version of vCenter Converter was in progress whereas the link above reference the older original product.
Import VDI or VDMK file into VirtualBox
After creating a .vdi image file of your ssd.img, you can create a new virtual machine and assign it as the hard disk you wish to use, selecting the option for «Use an existing virtual hard disk file» and selecting your converted .vdi or .vdmk file from the explorer window pop-up.
You should be all set from there. Hopefully this helped clear up some of the misunderstandings or misinterpretations of what was suggested in helping you be able to mount and boot/run that image file in Virtual Box.
How to Mount VirtualBox Disk Image (VDI) to Access VM File-System in Ubuntu

This tutorial shows how to mount the VirtualBox virtual disk image in Ubuntu, so you can access the Guest OS file system with read and write permission, if it does not boot.
After misconfigured my VirtualBox Guest OS, it does not longer work. I know how to correct the issue to make it boot again, but firstly accessing to the file system is required!
Since the VBox user manual does not work, here’s what I did in Ubuntu 20.04 host with VirtualBox 6.1.x:
Before getting started, make sure Guest OS is shutdown. And the disk image is not in use. Also UN-MOUNT the disk once the job done.
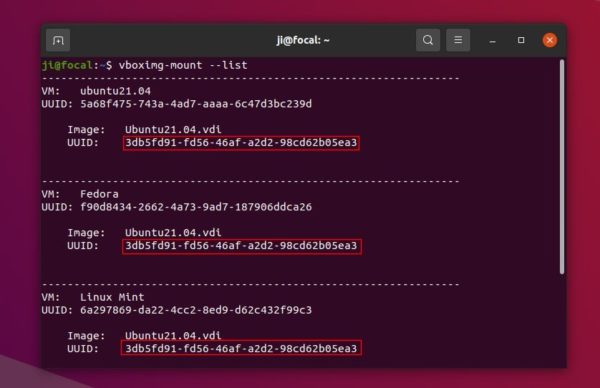
1.) Firstly open terminal from system application launcher. When it opens, run command:
vboximg-mount is a utility to make VBox disk images available to the host. With —list , it list all Disk Images as well as the UUID.
In the case, I have all Guest OSes on single Disk Image (.vdi). And the uuid is: “3db5fd91-fd56-46af-a2d2-98cd62b05ea3”
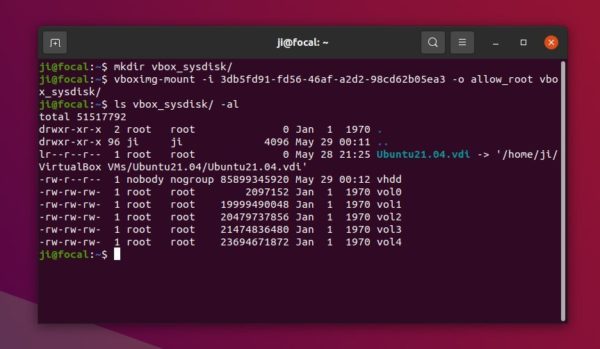
2.) Next perform a FUSE mount of the virtual disk image:
- First create a folder as mount point, vbox_sysdisk for instance:
vboximg-mount -i 3db5fd91-fd56-46af-a2d2-98cd62b05ea3 -o allow_root vbox_sysdisk
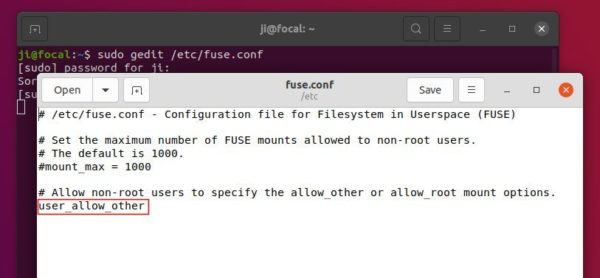
NOTE: You may need to edit the “/etc/fuse.conf” to make the -o allow_root flag work. To do so, run command sudo gedit /etc/fuse.conf and enable (remove # at its beginning) “user_allow_other” line.
3.) As the previous picture shows, I have 5 disk partitions: vol0, vol1, …, vol4. Now mount either partition (vol4 for instance) to /mnt via command:
sudo mount vbox_sysdis/vol4 /mnt
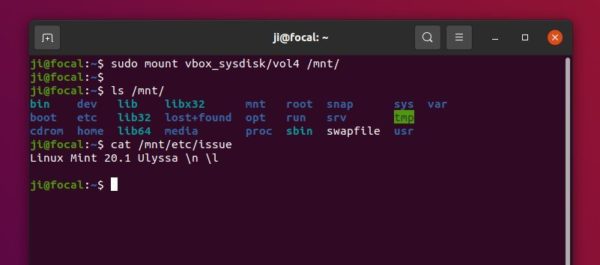
Finally go to /mnt directory and there you are.
Unmount:
To un-mount the guest os file system, run command:
To un-mount the VBox disk image, run command:
And you may finally remove that folder either from file manager or by running command in terminal:

Ji m
I’m a freelance blogger who started using Ubuntu in 2007 and wishes to share my experiences and some useful tips with Ubuntu beginners and lovers. Please comment to remind me outdated tutorial! And, notify me if you find any typo/grammar/language mistakes. English is not my native language. Contact me via [email protected] Buy me a coffee: https://ko-fi.com/ubuntuhandbook1