- How to set up a loop device at boot time?
- 2 Answers 2
- What is a Loop device in Linux?
- Loop devices: Regular Files that are mounted as File System
- Reasons for using loop Devices
- Manage loop devices
- Unmount Loop device
- Delete Loop device
- Final Words
- Что такое Loop-устройство в Linux?
- Устройства Loop: обычные файлы, смонтированные как файловая система.
- Причины использования петлевых устройств
- Управление loop устройствами
- Размонтировать Loop-устройство
- Удалить loop устройство
- Заключительные слова
- What is a «loop device» when mounting?
- 3 Answers 3
How to set up a loop device at boot time?
I want to set up a loop device at boot time. I wonder what is the best way to do this. I’ve searched for it on google. Some says adding a udev rule, some says putting a scripts in /etc/init.d , some even modifies the initramfs. So what is the best or right way to do this? Could you please give some details (about how to do)? Thank you.
I would go with /etc/init.d/something , or /etc/rc.local , but I suggest to stay with whatever method that works.
What for? If you want a file to be mounted at boot time, just add it to /etc/fstab with the loop option and mount will take care of configuring the loopback device for you.
@psusi: Thank you for your advice, but for my purpose, mounting is not enough, and in fact the file cannot be simply mounted. It is a disk image rather than a partition image. And I need to know the exact name of the loop device in order to use it to make a virtual disk in VirtualBox. (I make this kind of virtual disk thinking it is easier to share files between virtual machine and the host machine. The built-in shared folder does not work for some application.)
You can just point the virtual machine to the file rather than the loopback device. You also need to be very careful to make sure that you never run the virtual machine ( or have it suspended ) and mount the filesystem on the host at the same time, or you will corrupt the fs. For that reason, it is a much better idea to use networking to have the guest access files the host is sharing via nfs or samba or sshfs.
@Roun: Partitions in the file can still be mounted, though you have to specify the sector offset of the partition from the beginning of the file (e.g. mount /disk.img /mnt -o loop,offset=2048 for the first partition). Offsets can be found using parted or fdisk once the loop device is set up (see my answer below for that).
2 Answers 2
There are at least three «appropriate» ways to do startup things in Ubuntu (presuming you don’t merely want to mount it), listed here in decreasing order of preference:
There’s also to possibility of using udev rules, but it will be convoluted. I recommend against it. The sysvinit script is overkill for such a small thing, so I’ll focus on the other two options. The runlevel change script is simplest (though least preferred), so I’ll start there.
The /etc/rc.local file is simply executed by the /etc/init.d/rc.local sysvinit script, which is (by default) executed last upon switching to any normal «on» runlevel (e.g. when you boot normally, but not when you shut down or go to recovery mode). To implement setting up the boot device, just add this at the end of /etc/rc.local , assuming that your file is called /srv/diskimage and you wish to use /dev/loop0 as the loop device:
losetup /dev/loop0 /srv/diskimage That’s really all there is to it. Of course, replace the filenames with whatever works best on your setup.
If you want to be a bit more specific about it, you can create an Upstart job for it that sets it up once the filesystem holding it has been mounted. An example would be the following, assuming that /srv was the mount point containing your diskimage file:
description "Setup loop devices after filesystems are mounted" start on mounted MOUNTPOINT=/srv task exec losetup /dev/loop0 /srv/diskimage This should be simple enough to follow conceptually: The first line is just a comment for human readers, and it’s instructions to Upstart to wait until the /srv filesystem is mounted, execute the losetup process, and consider yourself finished when the process exits successfully (a «task», as opposed to a service that is persistent). Just put those contents in a file matching /etc/init/*.conf . I would choose /etc/init/losetup.conf , myself.
The advantages of Upstart jobs over /etc/rc.local for such a simple thing are small but important. First, /etc/rc.local is deprecated, and its use as just a «messy sandbox to get things done» is frowned upon by pretty much everyone these days. Among other reasons for frowning upon its use, some programs that do use that file will simply overwrite the contents, and it’s difficult to reconcile different scripts that need to go into the same file. Second, Upstart actually handles the dependency checking for you (making sure the filesystem is mounted first), so if there’s a problem mounting the filesystem it won’t try to set up the loop device. but will once you’ve resolved and mounted it. Third, Upstart is vastly more flexible: you can, for instance, have it be smart enough to find an unused loop device, and «emit» that loop device for use in other upstart jobs, similar to how we used the «MOUNTPOINT» variable in this example above.
What is a Loop device in Linux?
While listing mounted drives through the terminal, you must have encountered drive names starting with loop:
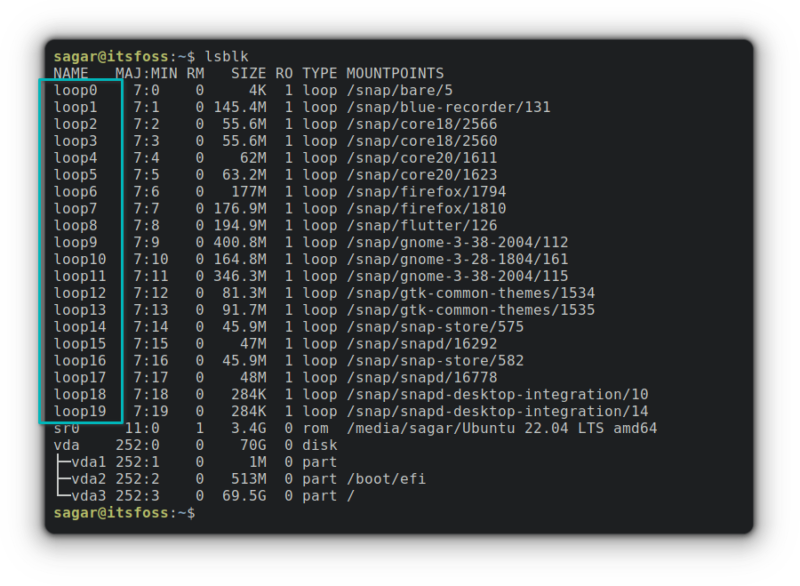
If you are an Ubuntu user, then you’ll get a long list of loop devices as shown in the screenshot above.
It is because of snaps, the universal package management system developed by Canonical. The snap applications are mounted as loop devices.
Now, this raises another set of questions such as what is a loop device and why snaps applications are mounted as a disk partition.
Let me shed some light on the topic
Loop devices: Regular Files that are mounted as File System
Linux allows users to create a special block device by which they can map a normal file to a virtual block device.
Seems too complicated right? Let me break it down for you.
In simple terms, a loop device can behave as a virtual file system which is quite helpful while working with isolated programs such as snaps.
So basically you get an isolated file system mounted at a specific mounting point. By which a developer/advanced user packs a bunch of files in one place. So it can be accessed by an operating system and that behavior is known as loop mounts.
But working with isolated systems using a loop device is one of the many reasons why loop devices are utilized and if you’re interested, here are more use cases of loop devices.
Reasons for using loop Devices
While being a virtual file system, there are endless possibilities; here are some widely known use cases of loop devices:
- It can be used to install an operating system over a file system without going through repartitioning the drive.
- A convenient way to configure system images (after mounting them).
- Provides permanent segregation of data.
- It can be used for sandboxed applications that contain all the necessary dependencies.
And the developers can do wonders when given isolated file systems.
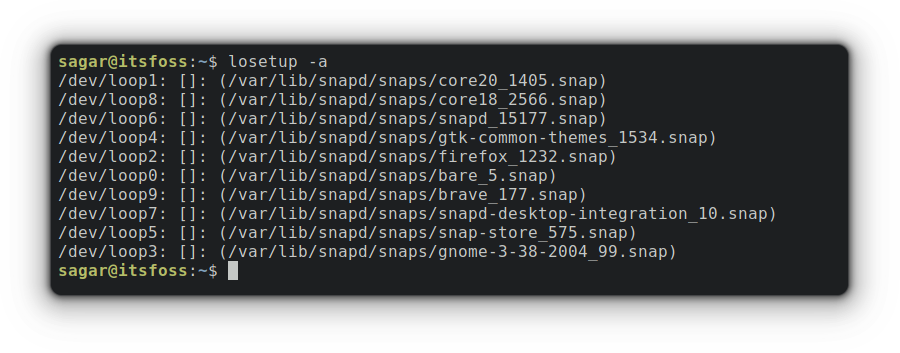
The loop devices can be easily managed through losetup utility. Let me show you how.
Manage loop devices
So let’s start with listing available loop devices.
To list them, all you need to do is pair losetup with -a option:
Unmount Loop device
The process for unmounting any loop device is pretty straightforward. For that, I’ll be using umount command.
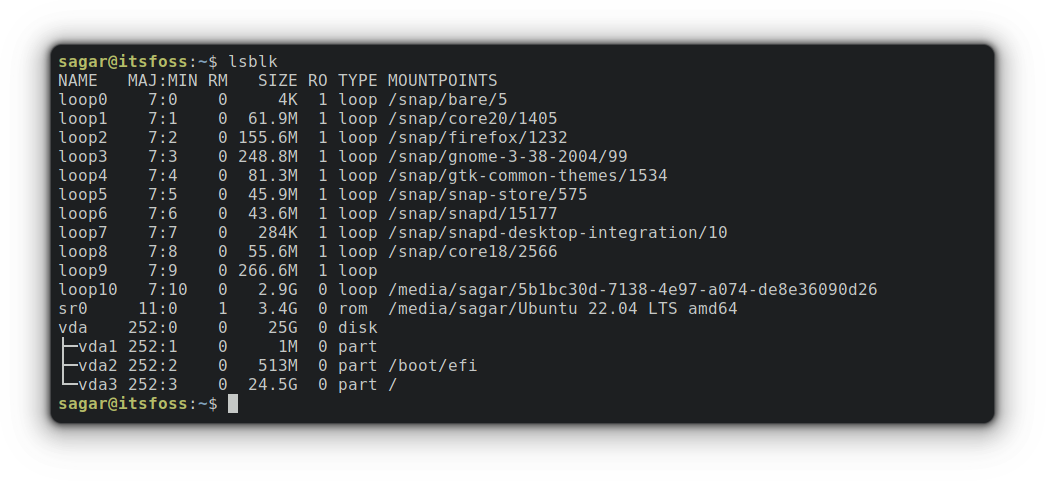
The loop9 block was brave browser installed as snap, and you can clearly see, it is no longer mounted and can’t be launched.
Delete Loop device
This is for demonstration purposes only. Don’t go and randomly delete loop devices.
Make sure to unmount the loop device before you proceed further in deleting a specific loop device.
Your first step will be detaching files to any loop device using -d option. For demonstration, I’ll be using loop9 :
And now, you can remove the loop9 device by the same old the rm command that is used to remove files and directory:
And loop9 was no longer listed in available loop devices:

Final Words
The guide was intended to cover the basics of loop devices, and I kept it simple enough so even new users could benefit from this guide.
Have a point to add? The comment section is all yours.
Что такое Loop-устройство в Linux?
При выводе с п иска смонтированных дисков через терминал вы наверняка сталкивались с именами дисков, начинающимися с loop:

Если вы являетесь пользователем Linux Mint, вы получите длинный список loop устройств, как показано на снимке экрана выше. Это из-за снимков, универсальной системы управления пакетами, разработанной Canonical. Приложения Snap монтируются как loop устройства. Теперь это поднимает другой набор вопросов, например, что такое loop устройство и почему приложения моментальных снимков монтируются как раздел диска. Позвольте мне пролить свет на тему
Устройства Loop: обычные файлы, смонтированные как файловая система.
Linux позволяет пользователям создавать специальное блочное устройство, с помощью которого они могут отображать обычный файл на виртуальное блочное устройство. Кажется слишком сложным, верно? Проще говоря, loop устройство может вести себя как виртуальная файловая система, что весьма полезно при работе с изолированными программами, такими как снимки. Таким образом, вы получаете изолированную файловую систему, смонтированную в определенной точке монтирования. По которому разработчик/продвинутый пользователь упаковывает кучу файлов в одно место. Таким образом, операционная система может получить к нему доступ, и это поведение известно как циклическое монтирование. Но работа с изолированными системами с использованием loop устройства — одна из многих причин, по которой используются loop устройства, и если вам интересно, вот еще примеры использования петлевых устройств.
Причины использования петлевых устройств
- Его можно использовать для установки операционной системы поверх файловой системы без переразметки диска.
- Удобный способ настройки образов системы (после их монтирования).
- Обеспечивает постоянное разделение данных.
- Его можно использовать для изолированных приложений, содержащих все необходимые зависимости.
И разработчики могут творить чудеса, когда у них есть изолированные файловые системы.
Loop устройствами можно легко управлять с помощью losetup утилиты . Позвольте мне показать вам, как это сделать.
Управление loop устройствами
Итак, давайте начнем с перечисления доступных петлевых устройств.
Чтобы перечислить их, все, что вам нужно сделать, это пара losetup с -a опцией:
Размонтировать Loop-устройство
Процесс отключения любого loop устройства довольно прост. Для этого я буду использовать команду umount.
Удалить loop устройство
Это только для демонстрационных целей. Не идите случайным образом удалять loop устройства.
Обязательно размонтируйте loop устройство, прежде чем продолжить удаление определенного loop устройства.
Вашим первым шагом будет отсоединение файлов от любого петлевого устройства с помощью -d опции. Для демонстрации я буду использовать loop9 :
И теперь вы можете удалить loop9 устройство с помощью той же старой команды rm, которая используется для удаления файлов и каталогов:
И loop9 больше не числился в доступных петлевых устройствах:

Заключительные слова
Руководство было предназначено для того, чтобы охватить основы loop устройств, и я сделал его достаточно простым языком, чтобы даже новые пользователи могли извлечь из него пользу.
Есть что добавить? Раздел комментариев полностью ваш.
Насколько публикация полезна?
Нажмите на звезду, чтобы оценить!
Средняя оценка 0 / 5. Количество оценок: 0
Оценок пока нет. Поставьте оценку первым.
What is a «loop device» when mounting?
In man you can search for a string by typing /mystring after man starts. You can highlight all matches with just / . See man man . I see @Josh has added such a comment to the accepted answer.
/ is the standard search feature in vi, vim and almost all commands that output in pages (less, more. )
3 Answers 3
A loop device is a pseudo («fake») device (actually just a file) that acts as a block-based device. You want to mount a file disk1.iso that will act as an entire filesystem, so you use loop.
The -o is short for —options .
And the last thing, if you want to search for «-o» you need to escape the ‘-‘.
With GNU grep, grep -e -o ( -e says «next thing is the pattern no matter what it looks like) or grep — -o ( — means stop looking for switches) work too. Of course feel free to use whatever works for you.
You can also just type: man mount , and then you can use /-o to search for and highlight all instances of «-o»
Traditionally, UNIX systems have had various types of nodes in their filesystems:
- directory
- file
- symlink
- block device
- character device
- FIFO
- UNIX domain socket
While there are now exceptions, generally block devices containing filesystems are mounted on directories.
Since you want to mount a file, you must first create a loop block device that is backed by the file. This can be done using losetup , but mount -o loop is a shortcut that handles that behind the scenes.