- How to Mount NTFS Partition in Linux
- Mount NTFS Partition with Read-Only Permission
- Identify NTFS Partition
- Create Mount Point and Mount NTFS Partition
- Mount NTFS Partition with Read-and-Write Permissions
- Update Package Repositories
- Install Fuse and ntfs-3g
- Mount NTFS Partition
- How to Mount & Unmount Filesystem/Partition in Linux/UNIX
- 1. Mounting A CD-ROM
- 2. Show All Mounts
- 3. Mount All The Filesystem Mentioned In /etc/fstab
- 4. Mount Only A Specific Filesystem From /etc/fstab
- 5. Show All Specific Type Mounted Partitions
- 6. Floppy Disk Mounting
- 7. Bind Mounts
- 8. Access The Data From New Mount Point
- 9. Mount Filesystem With Read/Write Access
- 10. Remount The Mounted Filesystem
- 11. Mount ISO Image
- 12. Unmount Multiple Mounted Point
- 13. Lazy Unmount Of A Filesystem
- 14. Unmounted File System Forcefully
How to Mount NTFS Partition in Linux
NTFS stands for New Technology File System. This file-storing system is standard on Windows machines, but Linux systems also use it to organize data.
Most Linux systems mount the disks automatically. However, in dual-boot setups, where file exchange is required between two systems with NTFS partitions, this procedure is performed manually.
This article will show you how to mount an NTFS partition in Linux with read-only or read-and-write permissions.
- A system running Linux
- A user account with sudo or root privileges
- Access to a terminal window / command line (Activities >Search >Terminal)
Mount NTFS Partition with Read-Only Permission
Follow the steps below to mount an NTFS partition with read-only access.
Note: A read-only partition allows users to read files. To enable writing to an NTFS partition, refer to the second section of the article.
Identify NTFS Partition
Before mounting an NTFS partition, identify it by using the parted command:
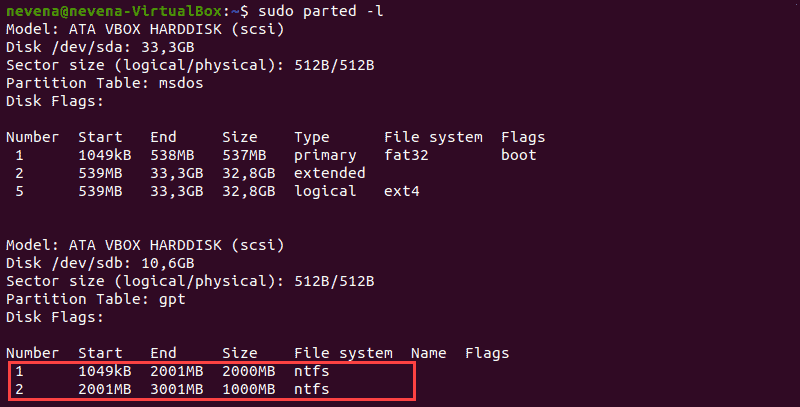
In the example above, two NTFS partitions are on the /dev/sdb disk. Note the partition number you want to mount before you proceed.
You can also use the fdisk and grep commands to show only NTFS partitions on a disk:
Create Mount Point and Mount NTFS Partition
In this example, we will mount the /dev/sdb1 partition with read-only permission.
First, create the mount point with the mkdir command:
Next, mount the partition to the directory you created. Use the mount command and the partition path you noted earlier:
sudo mount -t ntfs /dev/sdb1 /mnt/ntfs1Use the disk free tool to check the details of all filesystems and verify you mounted the partition successfully:
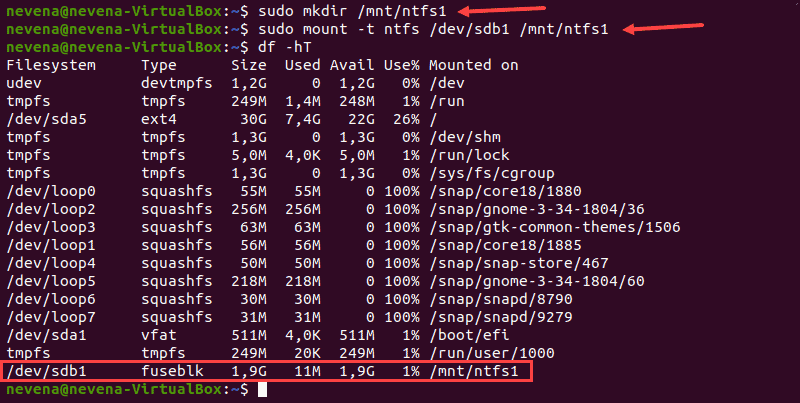
The /dev/sdb1 partition shows as mounted at the bottom of the list. You now have read-only access for this NTFS partition.
Mount NTFS Partition with Read-and-Write Permissions
To mount an NTFS partition with read-and-write permissions, you need to install fuse and ntfs-3 on your system.
Follow the steps below to complete the mounting process.
Note: Some Linux distributions may have fuse and ntfs-3g already installed by default.
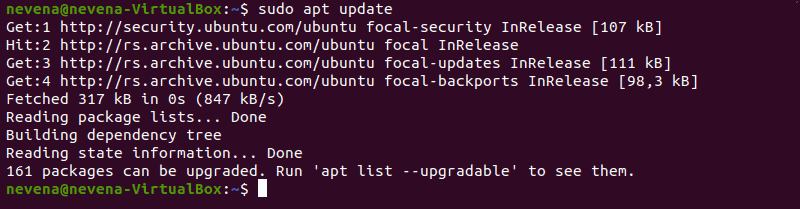
Update Package Repositories
Run the following command to download and update the package repositories:
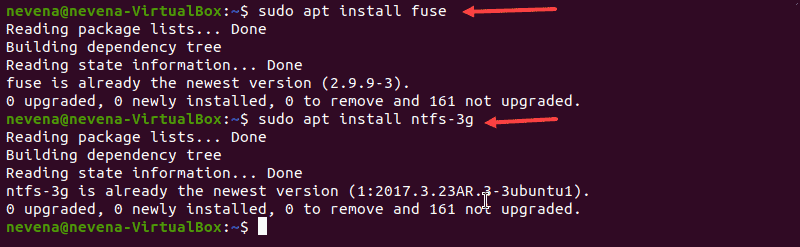
Install Fuse and ntfs-3g
To install fuse on your Linux system from the default repository, use the appropriate package manager. In our example, we use apt in Ubuntu.
When the installation completes, install ntfs-3g by running:
In case both fuse and ntfs-3g are already installed, the output looks similar to the one below:
Mount NTFS Partition
After you install the fuse and ntfs-3g software packages, mount your NTFS partition.
First, create a mount point by using the mkdir command :
Next, use the mount command to mount the partition you want. For example, /dev/sdb2 :
sudo mount -t ntfs-3g /dev/sdb2 /mnt/ntfs2/To check if the partition is mounted, run the df command:
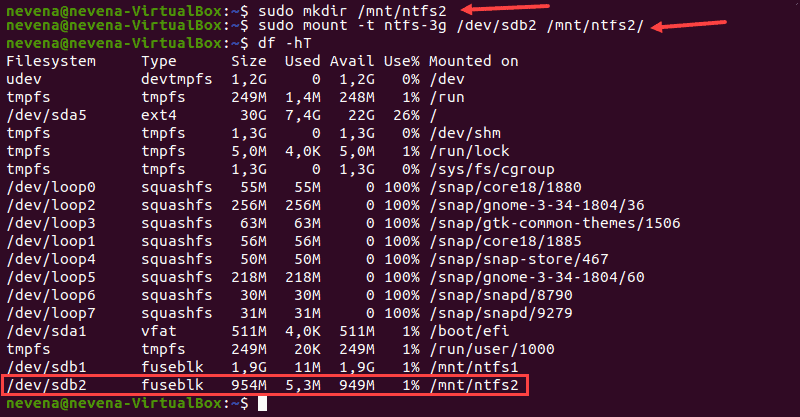
You now have the read/write permissions for the NTFS partition you mounted.
Note: Linux kernel version 2.6.20 or newer is recommended for mounting a partition via ntfs-3g. Learn on how to update the kernel on Ubuntu or how to update the kernel on CentOS.
After reading this article, you should have learned to mount an NTFS partition. Partition manipulation is crucial in a Linux system, and next, we recommend learning how to delete a partition in Linux and how to format disk partitions in Linux.
Dejan is the Head of Content at phoenixNAP with over 8 years of experience in Web publishing and technical writing. Prior to joining PNAP, he was Chief Editor of several websites striving to advocate for emerging technologies. He is dedicated to simplifying complex notions and providing meaningful insight into data center and cloud technology.
In Linux systems, in order to use storage devices such as Hard Drives and USB drives, you need to understand.
The ls command (short for ‘list’) lists information about directories and any type of files in the working.
A list of all the important Linux commands in one place. Find the command you need, whenever you need it or.
How to Mount & Unmount Filesystem/Partition in Linux/UNIX
When we install new hard disk into our Linux system, typically we use utilities such as fdisk or parted to create partitions. After creating a partitions, we use mkfs command to create ex2, ext3, or ext4 partition. Than we use mount command to mount the partition into a mount point ( directory ) to use the filesystem.
In this tutorial I am going to explain how we can use mount and unmount command in Linux with example.
Mount command syntax
mount -t type device mount_point
1. Mounting A CD-ROM
The device file for CD exist under /dev directory, you can mount it like below.
# mount -t iso9660 -o ro /dev/cdrom /mnt
-o ro : Read Only access, CD ROM mounted wtih read only access
/mnt : Mount Point
2. Show All Mounts
To show the all mounts, execute the mount command without any arguments.
# mount /dev/sda5 on / type ext4 (rw,errors=remount-ro) proc on /proc type proc (rw,noexec,nosuid,nodev) sysfs on /sys type sysfs (rw,noexec,nosuid,nodev) none on /sys/fs/fuse/connections type fusectl (rw) none on /sys/kernel/debug type debugfs (rw) none on /sys/kernel/security type securityfs (rw) udev on /dev type devtmpfs (rw,mode=0755) devpts on /dev/pts type devpts (rw,noexec,nosuid,gid=5,mode=0620) tmpfs on /run type tmpfs (rw,noexec,nosuid,size=10%,mode=0755) none on /run/lock type tmpfs (rw,noexec,nosuid,nodev,size=5242880) none on /run/shm type tmpfs (rw,nosuid,nodev)
OR, You can also use df command to show all the mount points.
# df Filesystem 1K-blocks Used Available Use% Mounted on /dev/sda5 195069136 128345036 56958520 70% / udev 2008336 4 2008332 1% /dev tmpfs 806244 928 805316 1% /run none 5120 0 5120 0% /run/lock none 2015604 228 2015376 1% /run/shm
3. Mount All The Filesystem Mentioned In /etc/fstab
/etc/fstab is used to mount the all filesystem during booting process. Follow the below command to mount all the filesytem mentioned in /etc/fstab.
# cat /etc/fstab # proc /proc proc nodev,noexec,nosuid 0 0 /dev/sda5 / ext4 errors=remount-ro 0 1 /dev/sda6 /mydata ext2 defaults 0 2 /dev/sda7 /backup vfat defaults 0 3
Now execute the mount command with -a option to mount all the /etc/fstab entries.
# mount -a # mount /dev/sda5 on / type ext4 (rw,errors=remount-ro) proc on /proc type proc (rw,noexec,nosuid,nodev) sysfs on /sys type sysfs (rw,noexec,nosuid,nodev) none on /sys/fs/fuse/connections type fusectl (rw) none on /sys/kernel/debug type debugfs (rw) none on /sys/kernel/security type securityfs (rw) udev on /dev type devtmpfs (rw,mode=0755) devpts on /dev/pts type devpts (rw,noexec,nosuid,gid=5,mode=0620) tmpfs on /run type tmpfs (rw,noexec,nosuid,size=10%,mode=0755) none on /run/lock type tmpfs (rw,noexec,nosuid,nodev,size=5242880) none on /run/shm type tmpfs (rw,nosuid,nodev) /dev/sda6 on /mydata type ext2 (rw) /dev/sda7 on /backup type vfat (rw)
To unmount all filesystem mentioned in /etc/fstab use same -a option with umount command like below.
# umount -a umount: /run/shm: device is busy. (In some cases useful info about processes that use the device is found by lsof(8) or fuser(1)) umount: /run: device is busy. (In some cases useful info about processes that use the device is found by lsof(8) or fuser(1)) umount: /dev: device is busy. (In some cases useful info about processes that use the device is found by lsof(8) or fuser(1)) umount: /: device is busy. (In some cases useful info about processes that use the device is found by lsof(8) or fuser(1))
Above some filesystem are unable to unmount because it is busy or currently in use.
4. Mount Only A Specific Filesystem From /etc/fstab
It looks the mount point entries in “/etc/fstab” when you pass the directory name to mount.
# mount | grep /mountpoint # cat /etc/fstab | grep mountpoint /dev/sda6 /mountpoint ext2 defaults 0 2
Above You can see /mountpoint is not mounted but it is mentioned in ” /etc/fstab ” file. Now execute the below command to mount it.
# mount /mountpoint # mount | grep /mountpoint /dev/sda6 on /mountpointtype ext2 (rw)
You will get below error if we run again mount command.
# mount /mountpoint mount: /dev/sda6 already mounted or /mountpointbusy mount: according to mtab, /dev/sda6 is already mounted on /mountpoint
You can also use device name instead of directory name to mount.
5. Show All Specific Type Mounted Partitions
Using -l with -t option you can list only specific type of filesystem like below.
# mount -l -t ext2 /dev/sda6 on /mountpoint type ext2 (rw) # mount -l -t ext4 /dev/sda5 on / type ext4 (rw,errors=remount-ro)
6. Floppy Disk Mounting
The device file for Floppy Disk exist under /dev directory, you can mount it like below.
7. Bind Mounts
Bind mounts are quite simple. Instead of mounting a device (with a file system) on a particular path you are mounting one path into another path.
For example: Let’s say you have a small /var but a very large /opt partition and you need additional space for your growing log files.
First, shut down the services writing to log files, then…
# mv /var/log /opt/var_log # mkdir /var/log # mount -o bind /opt/var_log /var/log
Now check the bind is done using below command.
# mount | grep var /opt/var_log on /var/log type none (rw,bind)
Now restart the previously stopped services.
If want to persist across reboots, you will need to update your /etc/fstab file like below.
# vim /etc/fstab /opt/var_log /var/log none bind 0 0
8. Access The Data From New Mount Point
Follow the below command to access the data from new mounted point.
Now you can check the old mount point moved to new mount point as shown below.
# mount | grep /mountpoint # mount | grep /mnt /dev/sda6 on /mnt type ext2 (rw)
9. Mount Filesystem With Read/Write Access
Follow the below command to mount the filesytem with Read only access.
# mount /dev/sda6 /mountpoint -r # mount | grep /mountpoint /dev/sda6 on /mountpoint type ext4 (ro)
Here -r option is synonym to -o ro.
10. Remount The Mounted Filesystem
Follow the below command to remount the mounted filesytem.
# mount | grep /mountpoint /dev/sda6 on /mountpoint type ext4 (ro,noload) # mount -o remount,rw /mountpoint # mount | grep /mountpoint /dev/sda6 on /mountpoint type ext4 (rw)
11. Mount ISO Image
Follow the below command to mount the ISO image.
# mount -t iso9660 -o loop centos_img.iso /mnt
12. Unmount Multiple Mounted Point
Follow the below command to unmount the more than one mount point.
# umount /mountpoint /mountpoint2 # mount | grep /mountpoint # mount | grep /mountpoint2
13. Lazy Unmount Of A Filesystem
Use lazy umount in cases where it was obviously stuck for various reasons (such as nfs server down), also when you need to see the original content of the directory that was mounted over by the mount. In both cases the mount is busy than you can do lazy unmount filesystem.
14. Unmounted File System Forcefully
Follow the below command to unmount the filesystem forcefully if device is busy.
If in any case it does not work go with lazy unmount.
I hope this article will help to mount and unmount the filesystem or partition in Linux. If you have any queries and problem please comment in comment section.