- Use SQL Server Management Studio on Windows to manage SQL Server on Linux
- Install the newest version of SQL Server Management Studio (SSMS)
- Connect to SQL Server on Linux
- Run Transact-SQL queries
- Create and manage databases
- Create a new database
- Drop a database
- Use Activity Monitor to see information about SQL Server activity
- Next steps
- Contribute to SQL documentation
- Как подключиться к Microsoft SQL Server из Linux?
- Инструмент для работы с Microsoft SQL Server из Linux
- Подключение к Microsoft SQL Server из Linux
- Шаг 1 – Установка Azure Data Studio на Linux
- Шаг 2 – Настройка подключения к Microsoft SQL Server
Use SQL Server Management Studio on Windows to manage SQL Server on Linux
This article introduces SQL Server Management Studio (SSMS) and walks you through a couple of common tasks. SSMS is a Windows application, so use SSMS when you have a Windows machine that can connect to a remote SQL Server instance on Linux.
If you do not have a Windows machine to run SSMS on, consider using Azure Data Studio. It provides a graphical tool for managing SQL Server and runs on both Linux and Windows.
SQL Server Management Studio (SSMS) is part of a suite of SQL tools that Microsoft offers free of charge for your development and management needs. SSMS is an integrated environment to access, configure, manage, administer, and develop all components of SQL Server. It can connect to SQL Server running on any platform both on-premises, in Docker containers, and in the cloud. It also connects to Azure SQL Database and Azure Synapse Analytics. SSMS combines a broad group of graphical tools with many rich script editors to provide access to SQL Server to developers and administrators of all skill levels.
SSMS offers a broad set of development and management capabilities for SQL Server, including tools to:
- Configure, monitor, and administer single or multiple instances of SQL Server
- Deploy, monitor, and upgrade data-tier components such as databases and data warehouses
- Backup and restore databases
- Build and execute T-SQL queries and scripts and see results
- Generate T-SQL scripts for database objects
- View and edit data in databases
- Visually design T-SQL queries and database objects such as views, tables, and stored procedures
See What is SSMS? for more information on SSMS.
Install the newest version of SQL Server Management Studio (SSMS)
When working with SQL Server, you should always use the most recent version of SQL Server Management Studio (SSMS). The latest version of SSMS is continually updated and optimized and currently works with SQL Server on Linux. To download and install the latest version, see Download SQL Server Management Studio. To stay up-to-date, the latest version of SSMS prompts you when there’s a new version available to download.
Before using SSMS to manage Linux, review the known issues for SSMS on Linux.
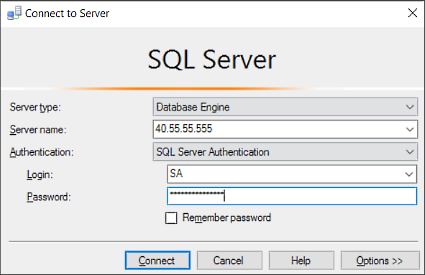
Connect to SQL Server on Linux
Use the following basic steps to get connected:
- Start SSMS by typing Microsoft SQL Server Management Studio in the Windows search box, and then select the desktop app.

- In the Connect to Server window, enter the following information (if SSMS is already running, select Connect > Database Engine to open the Connect to Server window):
Setting Description Server type The default is database engine; don’t change this value. Server name Enter the name of the target Linux SQL Server machine, or its IP address and port in the format IP,port . Authentication For SQL Server on Linux, use the authentication method that is set up for your environment. SQL Server Authentication is set up by default. Login 1 Enter the name of a user with access to a database on the server (for example, the default SA account created during setup). Password 1 Enter the password for the specified user (for the SA account, you created this during setup). 1 Login and Password only available with SQL Server Authentication
- Select Connect.

Tip If you get a connection failure, first attempt to diagnose the problem from the error message. Then review the connection troubleshooting recommendations.
Run Transact-SQL queries
After you connect to your server, you can connect to a database and run Transact-SQL queries. Transact-SQL queries can be used for almost any database task.
- In Object Explorer, navigate to the target database on the server. For example, expand System Databases to work with the master database.
- Right-click the database and then select New Query.
- In the query window, write a Transact-SQL query to select return the names of all databases on your server.
SELECT [Name] FROM sys.Databases 
If you’re new to writing queries, see Writing Transact-SQL Statements.
Although it’s possible to do almost any management task with Transact-SQL queries, SSMS is a graphical tool that makes it easier to manage SQL Server. The following sections provide some examples of using the graphical user interface.
Create and manage databases
While connected to the master database, you can create databases on the server and modify or drop existing databases. The following steps describe how to accomplish several common database management tasks through Management Studio. To perform these tasks, make sure you’re connected to the master database with the server-level principal login that you created when you set up SQL Server on Linux.
Create a new database
- Start SSMS and connect to your server in SQL Server on Linux.
- In Object Explorer, right-click on the Databases folder, and then select New Database. .
- In the New Database dialog, enter a name for your new database, and then select OK.
The new database is successfully created in your server. If you prefer to create a new database using T-SQL, then see CREATE DATABASE (SQL Server Transact-SQL).
Drop a database
- Start SSMS and connect to your server in SQL Server on Linux.
- In Object Explorer, expand the Databases folder to see a list of all the database on the server.
- In Object Explorer, right-click on the database you wish to drop, and then select Delete.
- In the Delete Object dialog, check Close existing connections and then select OK.
The database is successfully dropped from your server. If you prefer to drop a database using T-SQL, then see DROP DATABASE (SQL Server Transact-SQL).
Use Activity Monitor to see information about SQL Server activity
The Activity Monitor tool is built into SQL Server Management Studio (SSMS) and displays information about SQL Server processes and how these processes affect the current instance of SQL Server.
- Start SSMS and connect to your server in SQL Server on Linux.
- In Object Explorer, right-click the server node, and then select Activity Monitor.
Activity Monitor shows expandable and collapsible panes with the following information:
- Overview
- Processes
- Resource Waits
- Data File I/O
- Recent Expensive Queries
- Active Expensive Queries
When a pane is expanded, Activity Monitor queries the instance for information. When a pane is collapsed, all querying activity stops for that pane. You can expand one or more panes at the same time to view different kinds of activity on the instance.
Next steps
Contribute to SQL documentation
Did you know that you can edit SQL content yourself? If you do so, not only do you help improve our documentation, but you also get credited as a contributor to the page.
Как подключиться к Microsoft SQL Server из Linux?
Всем привет! У начинающих разработчиков, кто только начинает работать с Microsoft SQL Server, может возникнуть вопрос – «Можно ли каким-то образом подключиться к Microsoft SQL Server из операционной системы Linux?». Ответ – да, можно, для этого есть специальный инструмент, который позволяет работать с Microsoft SQL Server из Linux, т.е. осуществлять разработку хранимых процедур и функций, посылать SQL запросы, выгружать данные, иными словами, выполнять все те действия, которые выполняет программист, работающий с базой данных SQL Server.
Сегодня я расскажу, что это за инструмент и как с помощью него подключиться к Microsoft SQL Server из Linux.
Инструмент для работы с Microsoft SQL Server из Linux
Как известно, Microsoft SQL Server, начиная с 2017 версии, можно установить на Linux.
Однако основной инструмент для работы с SQL Server, т.е. SQL Server Management Studio, реализован только под Windows. Иными словами, SSMS не получится использовать в Linux, чтобы подключиться к SQL Server и осуществлять разработку баз данных. Это возможно, только если Management Studio установлена на Windows.
При этом операционная система Linux набрала определенную популярность и некоторые организации даже используют Linux в качестве клиентской операционной системы, таким образом, возникла необходимость в инструменте, который позволял бы подключаться к Microsoft SQL Server из Linux и полноценно работать с базами данных.
Компания Microsoft дала нам такой инструмент – это Azure Data Studio.
Azure Data Studio – это бесплатный кроссплатформенный инструмент с открытым исходным кодом для работы с базами данных Microsoft SQL Server.
Более подробно о том, что это за инструмент, для чего он создан, каким функционалом он обладает, я рассказывал в отдельной статье – Обзор Azure Data Studio.
Таким образом, основным инструментом для работы с Microsoft SQL Server, если у нас установлена операционная система Linux, будет именно Azure Data Studio.
Подключение к Microsoft SQL Server из Linux
Чтобы подключиться к Microsoft SQL Server с помощью Azure Data Studio из Linux, необходимо выполнить всего два шага.
Шаг 1 – Установка Azure Data Studio на Linux
Подробно о том, как установить Azure Data Studio на операционную систему Linux, я рассказывал в отдельном материале, поэтому здесь этот процесс я описывать не буду.
Шаг 2 – Настройка подключения к Microsoft SQL Server
Теперь, когда Azure Data Studio у нас установлена, мы можем подключиться к Microsoft SQL Server из Linux и работать с базами данных.
Для этого необходимо настроить подключение к SQL Server.
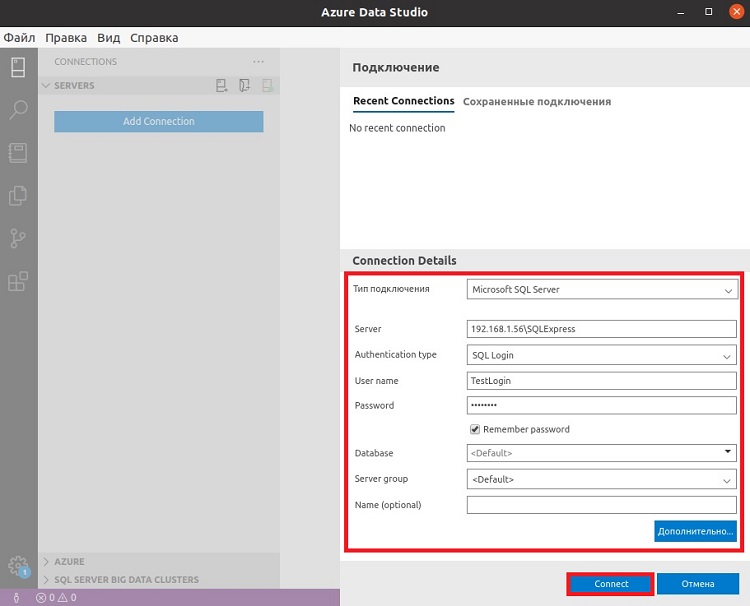
Чтобы настроить подключение, необходимо перейти в раздел «Подключения» (Connections) и нажать кнопку «Добавить подключение» (Add connection).
После этого откроется форма для настройки подключения.
Чтобы настроить подключение к Microsoft SQL Server, необходимо ввести следующие данные:
- Тип подключения – Microsoft SQL Server;
- Server – адрес сервера, на котором установлен SQL Server (включая имя экземпляра сервера);
- Authentification type – тип аутентификации, вводим «SQLLogin», данный тип подразумевает встроенную проверку подлинности SQL Server, т.е. на самом SQL Server у нас должно быть создано имя входа;
- User name – имя входа на SQL Server;
- Password – пароль от имени входа;
По желанию Вы также можете указать:
- Remember password – поставьте галочку, чтобы сохранить пароль для последующих подключений;
- Database name – имя базы данных, к которой подключаться по умолчанию;
- Server group – если есть серверные группы, Вы можете указать здесь ту группу, к которой будет относиться данное подключение.
В случае необходимости Вы можете более тонко настроить подключение, для этого необходимо нажать на кнопку «Дополнительно», в результате откроются расширенные параметры подключения.
После ввода данных нажимаем «Connect».
В итоге в подключениях отобразится новое подключение, в данном случае к Microsoft SQL Server, и Вы можете начать работать с базами данных, например, разрабатывать процедуры, функции, писать SQL запросы, выгружать данные и так далее.
На сегодня это все, надеюсь, материал был Вам полезен, пока!