- How to Assign Multiple IP Addresses to Single NIC in Ubuntu 20.04 LTS
- Assigning Multiple IP Addresses to Single NIC Temporarily
- Remove the Multiple IP addresses from NIC
- Assigning Multiple IP Addresses to Single NIC Permanently
- Remove the Multiple IP addresses from NIC
- About the author
- LinuxWays Team
- How to bind multiple addresses to an interface on Linux
- Adding multiple IP addresses to the network card (no persistent method):
- Binding multiple IP addresses to the network card (persistent):
- Removing IP addresses from your network card:
- Assign IP using DHCP:
- DHCP vs Static:
- Adding DNS:
- Conclusion:
- About the author
- David Adams
- Multiple IP source on single interface in Linux
- 2 Answers 2
How to Assign Multiple IP Addresses to Single NIC in Ubuntu 20.04 LTS
![]()
While working with computer systems, sometimes you might require multiple IP addresses on your physical machine. One of the solutions is to have multiple NICs installed on your system. However, it is not practical to buy a new NIC and plug it in your system when you have the option to assign multiple IP addresses to a single NIC which is referred to as IP Aliasing. The common use case of IP aliasing is the implementation of IP based virtual hosting.
In this post, we will be demonstrating you how to assign multiple IP addresses to a single NIC in Ubuntu OS. We will be demonstrating the procedure on Ubuntu 20.04 (Focal Fossa).
Assigning Multiple IP Addresses to Single NIC Temporarily
In the following section, we will see how to assign a second IP address to a NIC. The second IP address assigned by this method is temporary. Once you reboot the system, it will be removed automatically.
Here are the steps for assigning a second IP address to NIC.
1. First find the current IP address and the name of the interface in your system. To do so, issue the following command in Terminal:
The following output shows our network interface is ens33 and the current IP address is 192.168.72.157/24 which is the dynamic IP address assigned by DHCP.

2. Let’s assign another IP address to the NIC. To assign an additional IP address to your NIC, issue the following command in Terminal:
Replace the with the additional IP address you want to assign to your NIC and with the name of your NIC. For instance, to assign the second IP address 10.1.1.5/8 to your network interface ens33, the command would be:
3. After running the above command, verify if the second IP address has been assigned to your network interface. Run the following command to do so:
Here is the output of the above command which shows two IP addresses assigned to the ens33 network interface.

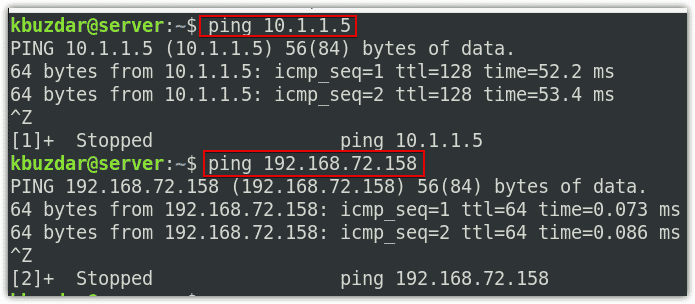
4. Now try to ping both IP addresses one by one. You can see both IP addresses are reachable.
Remove the Multiple IP addresses from NIC
In order to remove the additional IP addresses assigned to a NIC, run the following command:
Replace the with the additional IP address you have assigned to your NIC and with the name of your NIC. For instance, to remove the IP address 10.1.1.5/8 assigned to our network interface ens33, the command would be:
Assigning Multiple IP Addresses to Single NIC Permanently
In the previous section, we have assigned the second IP address using the “ip addr add” command which is not the permanent method. Once you reboot the system, the IP address removes automatically. In this section, we will see how to make the IP assignment permanent.
In order to assign multiple IP addresses to a single NIC permanently, you will need to configure it in the interfaces configuration file.
1. Edit the interfaces configuration file as follows:
Append the following lines in the file:
Replace the with the name of your NIC to which you want to assign the additional IP address and with the IP address, you want to assign. For instance, to assign the second IP address 10.1.1.5/8 to your network interface ens33, the lines would be changed to:

Once you have added the above lines, save, and close the file.
Now restart the networking service to apply the configuration changes you have made above:
Alternatively, bring down and bring up the interface to apply the changes:
Now to verify if the additional IP address has assigned to the network interface, use the following command:
As we have configured the additional IP address in the configuration file, therefore it will remain permanent even if you reboot the system.
Remove the Multiple IP addresses from NIC
You can also remove the additional IP address you have configured in the interfaces configuration file. To do so, simply edit the /etc/network/interfaces file and remove the entry for the additional IP addresses you have added. Then save and close the file and restart the networking services:
or bring down and bring up the interface to apply the changes
This is how you can assign multiple IP addresses to a single NIC in Ubuntu OS. In this post, we have discussed both the temporary and permanent methods for assigning the secondary IP address to a single NIC. Following the same methods, you can allocate multiple IP addresses to a single NIC.
About the author
LinuxWays Team
We create HowTos and Tutorials for Sys Admins. Visit us on LinuxWays.net
How to bind multiple addresses to an interface on Linux
![]()
Adding multiple addresses to a single network card is pretty simple, just as adding a unique IP address. After reading this tutorial, you’ll know how to implement this in Debian and its based Linux distributions such as Ubuntu.
To begin, list your network devices to see their current IP address by running the command below.

As you can see, there is a loopback interface and a network card named enp2s0 without an IP address assigned.
Now let’s begin adding IP addresses. This first method explained doesn’t leave persistent IP addresses; after reboot, they’ll be removed. But after those instructions, I added instructions to add multiple IP addresses to the network card permanently.
Adding multiple IP addresses to the network card (no persistent method):
The example below shows how to assign the IP address 10.0.1.100 to the network card enp2s0.
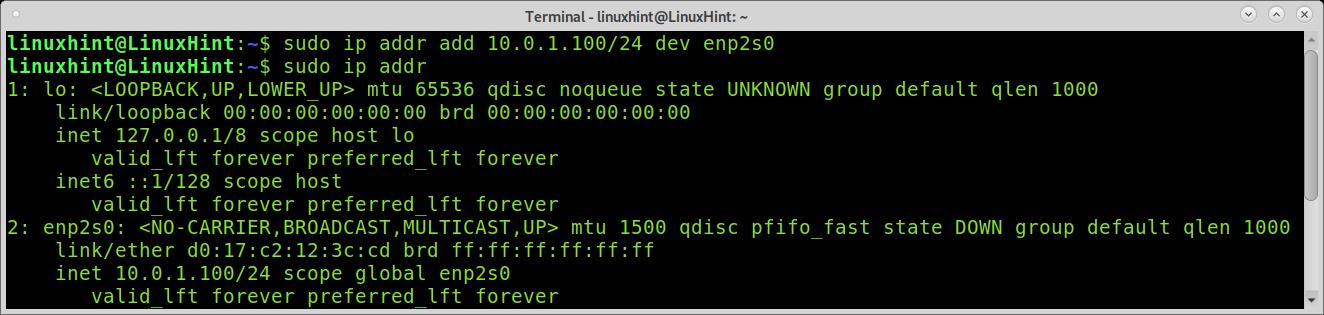
As you can see in the image above, the IP address was added properly.
Adding a second or third IP address does not require a different command than adding a single IP. Therefore, I run the following command to add the second IP address 192.168.0.100 to the same network card.
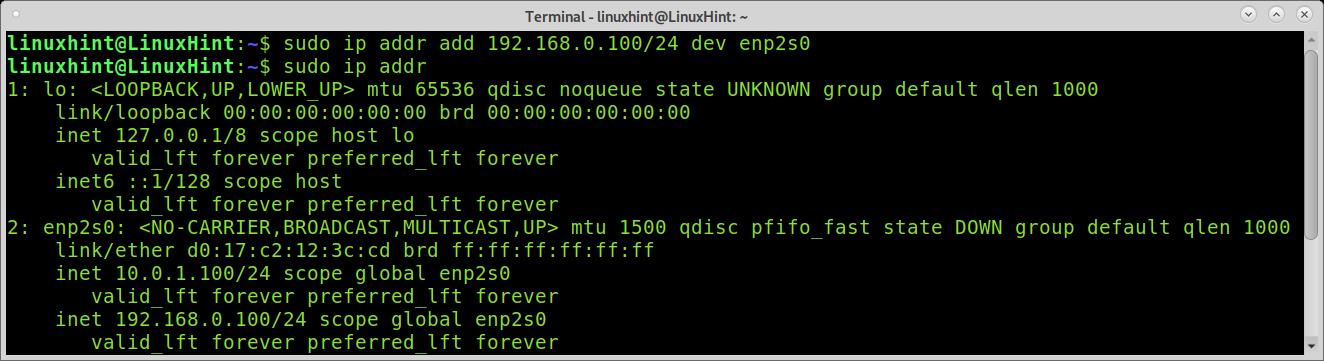
And as you can see, the second IP address was added correctly. You can add more IP addresses running the same command, replacing the IP addresses with these you want to assign to your card.
Binding multiple IP addresses to the network card (persistent):
To add multiple persistent IP addresses to your network card, you need to edit the /etc/network/interfaces configuration file.
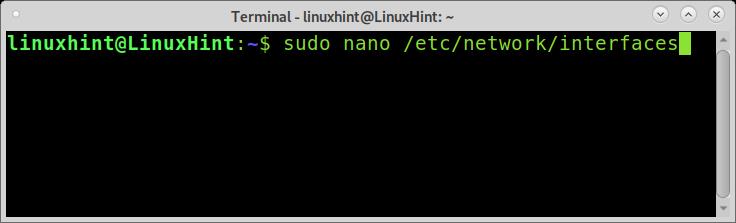
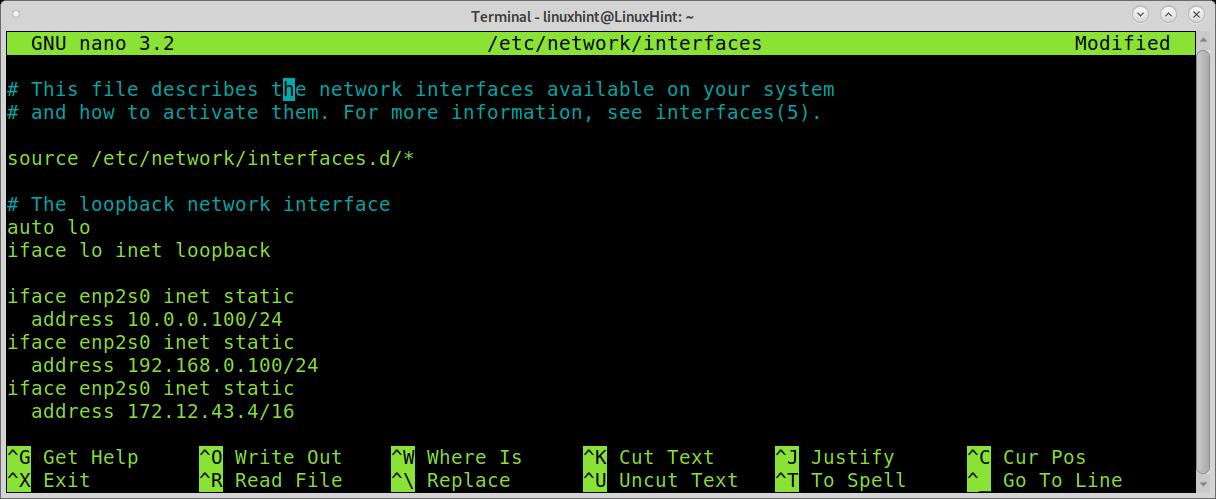
To add an IP address, the syntax is pretty simple, as depicted below.
To add multiple IP addresses, just type the syntax, adding more IP addresses as shown in the following example. In the image below, I assign 3 IP addresses to the network card named enp2s0.
Exit nano saving changes (Ctrl+X) and run the command below to apply the changes you just made.
Then check your IP addresses by running
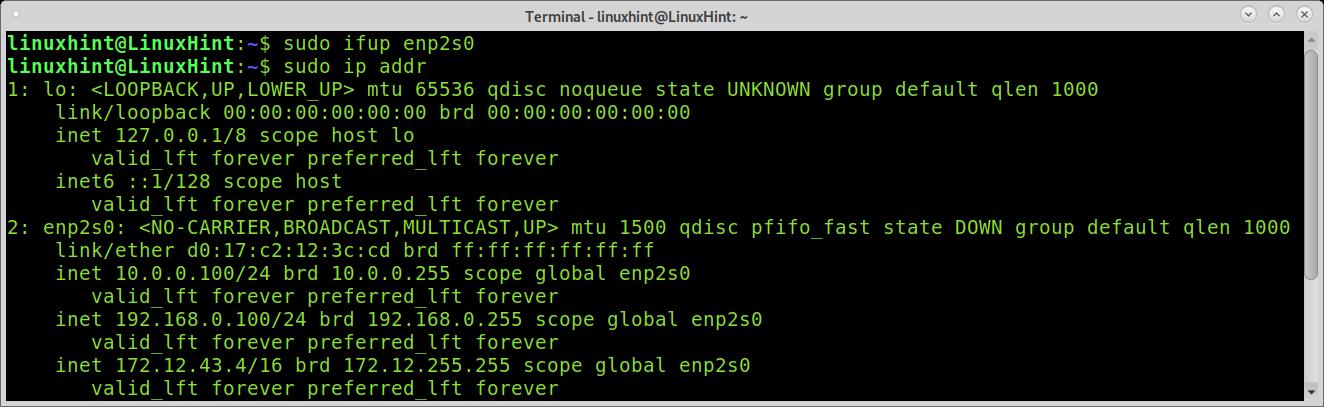
As you can see, the IP addresses were added properly.
Removing IP addresses from your network card:
To remove permanent IP addresses on the /etc/network/interfaces file, just comment or remove the addresses you added and restart the network device.
You can also remove temporary IP addresses using similar syntax as when adding; just replace add with del as shown in the image below, in which the IP 10.0.0.100/24 is deleted.
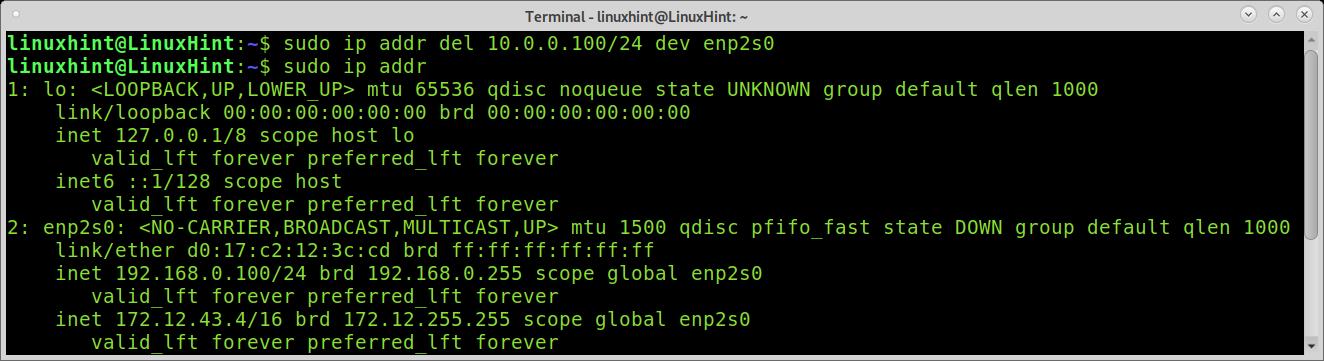
As you can see, the IP address was removed.
Assign IP using DHCP:
I decided to add instructions to get an IP address dynamically through DHCP to make this tutorial complete.
To get a dynamic IP at demand, you can execute the command below.
For a permanent configuration to get a dynamic IP at boot, edit the configuration file /etc/network/interfaces adding iface inet dhcp. You can add the line by running the following command, remember to replace enp2s0 for your network card.
Once edited, set your network device down to restart it by running the following command.
And then, set it up by executing the command below as depicted in the screenshot.
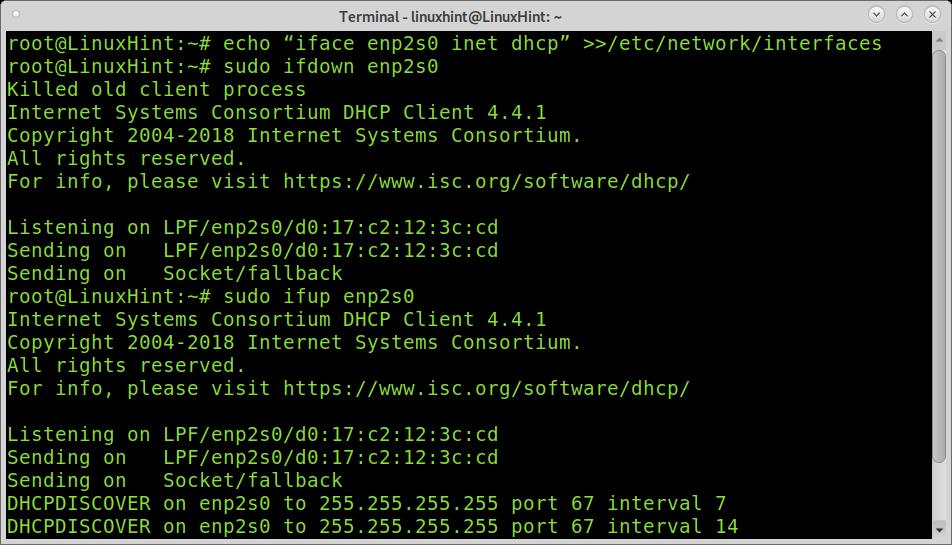
As you can see in the image, the network card tries to fetch a dynamic IP address, failing because it’s unplugged from the router.
DHCP vs Static:
Static IP addresses are a basic need to keep accessible services or network rules applied to specific devices. DHCP is a basic need, at least for guest clients without a static address configured.
Usually, if you connect with your Linux device to a public network and don’t receive an IP address, you can solve this by running dhclient ; if you don’t, the gateway may have the dhcp service disabled.
Except for the guests, keeping a network without fixed IP addresses is senseless, meaning you need to update your host’s table every time addresses change. Dynamic IP addresses are the most common way to get public internet addresses.
Adding DNS:
As an additional tip, I also decided to add DNS to your resolv.conf, in case your system doesn’t resolve hosts properly. You can add Google public DNS by running the following command.

Conclusion:
As you can see, binding multiple IP addresses to an interface on Linux is pretty easy. The process is simple and can be executed by all user levels. Assigning multiple network addresses to a single network card is a formidable method to cut resources and configuration time.
Note this tutorial only focused on up to date commands. This tutorial didn’t explain obsolete commands like ifconfig, which you can read in this ifconfig tutorial.
Thank you for reading this tutorial explaining how to bind multiple IP addresses to an interface on Linux. Keep following us for more Linux tips and tutorials.
About the author
David Adams
David Adams is a System Admin and writer that is focused on open source technologies, security software, and computer systems.
Multiple IP source on single interface in Linux

We could set multiple IP addressses on single interface, for example using NetworkManager: How to make any connection to outside of this PC to use different IP? for example if I have 8 IP addresses ( 10.7.4.x , 10.7.4.x+1 , 10.7.4.x+2 , . ), I want to connect each destination address using different IP, either using random IP or sequential mod (when destination IP mod 8 = 0, then use x , when destination mod 8 = 1, then use x+1 , and so on)
Not related to your question, but I notice that the UI is a bit misleading in that it gives the impression you can specify a separate gateway for each IP address. I see that you have specified the same gateway on all the lines, and you should probably keep it that way.
2 Answers 2
In Linux the selection of source addresses for outgoing connections can be controlled by the routing table:
ip route add 10.11.12.0/24 via 10.7.4.1 src 10.7.4.200
This is enough if you just need to use different source addresses for some fixed IP ranges. However, by combining the power of Linux netfilter ( iptables ) and policy routing ( ip rule ) you can get dynamic selection of the source address.
The basic procedure is as follows:
- Set the appropriate marks on the packets in the PREROUTING chain of the mangle table.
- Use different IP routing tables for packets with different marks ( ip rule add fwmark X table Y ).
- In each routing table use the required src address for packets.
The netfilter setup for marking packets according to the destination IP for the «mod 4» setup may look like this:
iptables -A PREROUTING -t mangle -j CONNMARK --restore-mark iptables -A PREROUTING -t mangle -m mark --mark 0x0 -d 0.0.0.0/0.0.0.3 \ -j MARK --set-mark 1 iptables -A PREROUTING -t mangle -m mark --mark 0x0 -d 0.0.0.1/0.0.0.3 \ -j MARK --set-mark 2 iptables -A PREROUTING -t mangle -m mark --mark 0x0 -d 0.0.0.2/0.0.0.3 \ -j MARK --set-mark 3 iptables -A PREROUTING -t mangle -m mark --mark 0x0 -d 0.0.0.3/0.0.0.3 \ -j MARK --set-mark 4 iptables -A POSTROUTING -t mangle -j CONNMARK --save-mark (For this particular case you can omit two CONNMARK commands, because the other marking commands will give the same result for all packets in the same connection; however, for more complex cases, like the round-robin usage of source addresses, these commands are required to ensure that all packets in the connection will use the same route.)
The IP routing setup may then look like this:
ip route add default via 10.7.4.1 src 10.7.4.200 table 1 ip route add default via 10.7.4.1 src 10.7.4.201 table 2 ip route add default via 10.7.4.1 src 10.7.4.202 table 3 ip route add default via 10.7.4.1 src 10.7.4.203 table 4 ip rule add fwmark 1 pref 1 table 1 ip rule add fwmark 2 pref 2 table 2 ip rule add fwmark 3 pref 3 table 3 ip rule add fwmark 4 pref 4 table 4