- How To Set Permanent DNS Nameservers in Ubuntu and Debian
- Why Would You Want to Edit /etc/resolv.conf File?
- Installing resolvconf in Ubuntu and Debian
- Set Permanent DNS Nameservers in Ubuntu and Debian
- How to set DNS Nameserver on Ubuntu 20.04
- Change DNS Nameserver via GUI
- Change DNS Nameserver via Config File
- Why Change DNS Nameserver on Ubuntu?
- How to Set DNS Nameservers on Ubuntu 22.04?
- Method 1: Using CLI to Set DNS Nameserver
- Configure resolv.conf file
- Verify the DNS Nameservers
- Alternative Method: Configure “01-network-manager-all.yaml” File Via netplan
- Method 2: Using GUI to Set DNS Nameserver
- Conclusion
How To Set Permanent DNS Nameservers in Ubuntu and Debian
The /etc/resolv.conf is the main configuration file for the DNS name resolver library. The resolver is a set of functions in the C library that provide access to the Internet Domain Name System (DNS). The functions are configured to check entries in the /etc/hosts file, or several DNS name servers, or to use the host’s database of Network Information Service (NIS).
On modern Linux systems that use systemd (system and service manager), the DNS or name resolution services are provided to local applications via the systemd-resolved service. By default, this service has four different modes for handling the Domain name resolution and uses the systemd DNS stub file (/run/systemd/resolve/stub-resolv.conf) in the default mode of operation.
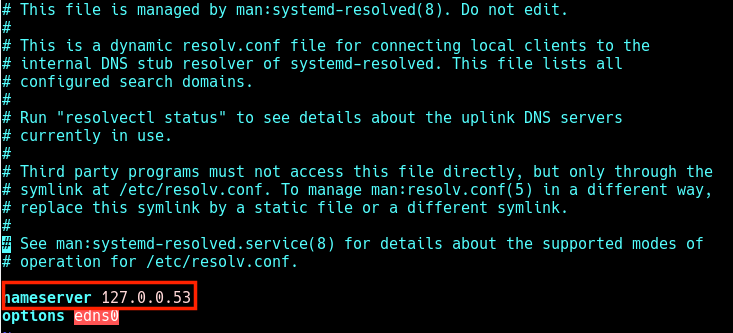
The DNS stub file contains the local stub 127.0.0.53 as the only DNS server, and it is redirected to the /etc/resolv.conf file which was used to add the name servers used by the system.
If you run the following ls command on the /etc/resolv.conf, you will see that this file is a symlink to the /run/systemd/resolve/stub-resolv.conf file.
$ ls -l /etc/resolv.conf lrwxrwxrwx 1 root root 39 Feb 15 2019 /etc/resolv.conf -> ../run/systemd/resolve/stub-resolv.conf
Unfortunately, because the /etc/resolv.conf is indirectly managed by the systemd-resolved service, and in some cases by the network service (by using initscripts or NetworkManager), any changes made manually by a user can not be saved permanently or only last for a while.
In this article, we will show how to install and use the resolvconf program to set permanent DNS name servers in /etc/resolv.conf file under Debian and Ubuntu Linux distributions.
Why Would You Want to Edit /etc/resolv.conf File?
The main reason could be because the system’s DNS settings are misconfigured or you prefer to use specific name servers or your own. The following cat command shows the default name server in the /etc/resolv.conf file on my Ubuntu system.
In this case, when local applications such as the APT package manager try to access FQDNs (Fully Qualified Domain Names) on the local network, the result is a “Temporary failure in name resolution” error as shown in the next screenshot.

The same happens when you run a ping command.

So when a user tries to manually set the name servers, the changes do not last for long or are revoked after a reboot. To resolve this, you can install and use the reolvconf utility to make the changes permanent.
To install the resolvconf package as shown in the next section, you need to first manually set the following name servers in the /etc/resolv.conf file, so that you access the FQDMs of Ubuntu repository servers on the internet.
nameserver 8.8.4.4 nameserver 8.8.8.8
Installing resolvconf in Ubuntu and Debian
First, update the system software packages and then install resolvconf from the official repositories by running the following commands.
$ sudo apt update $ sudo apt install resolvconf
Once the resolvconf installation is complete, the systemd will trigger the resolvconf.service to be automatically started and enabled. To check if it is up and running issues the following command.
$ sudo systemctl status resolvconf.service
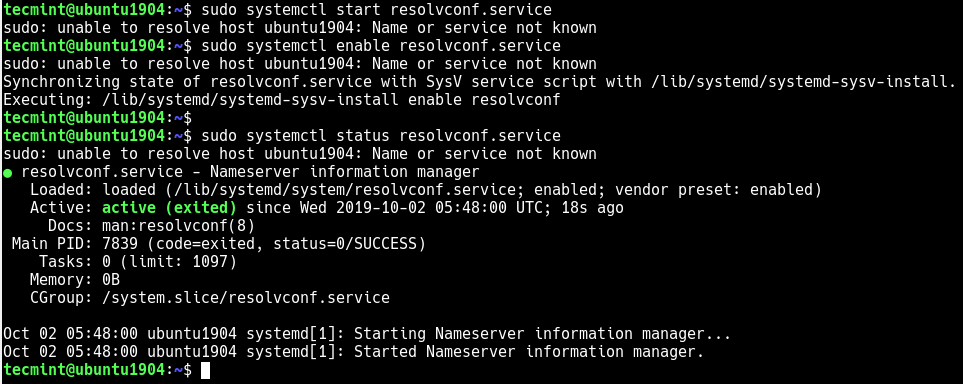
If the service is not started and enabled automatically for any reason, you can start and enable it as follows.
$ sudo systemctl start resolvconf.service $ sudo systemctl enable resolvconf.service $ sudo systemctl status resolvconf.service
Set Permanent DNS Nameservers in Ubuntu and Debian
Next, open the /etc/resolvconf/resolv.conf.d/head configuration file.
$ sudo nano /etc/resolvconf/resolv.conf.d/head
and add the following lines in it:
nameserver 8.8.8.8 nameserver 8.8.4.4

Save the changes and restart the resolvconf.service and systemd-resolved or reboot the system.
$ sudo systemctl restart resolvconf.service $ sudo systemctl restart systemd-resolved.service
Now when you check the /etc/resolv.conf file, the name server entries should be stored there permanently. Henceforth, you will not face any issues concerning name resolution on your system.

I hope this quick article helped you in setting the permanent DNS nameservers in your Ubuntu and Debian systems. If you have any queries or suggestions, do share them with us in the comments section below.
How to set DNS Nameserver on Ubuntu 20.04
The Domain Name System (DNS) translates text-based domain names to numeric IP addresses. By default, most networks are configured to work with DNS servers supplied by the internet service provider. However, users are free to change the DNS nameservers.
This tutorial will show you how to change DNS nameservers on your Ubuntu machine using GUI or the command line.
- Ubuntu 20.04 (both methods also work on Ubuntu 18.04 and later)
- Access to the terminal
- Sudo privileges
Change DNS Nameserver via GUI
Use Ubuntu Settings to complete all the steps to change DNS addresses via the graphical user interface.
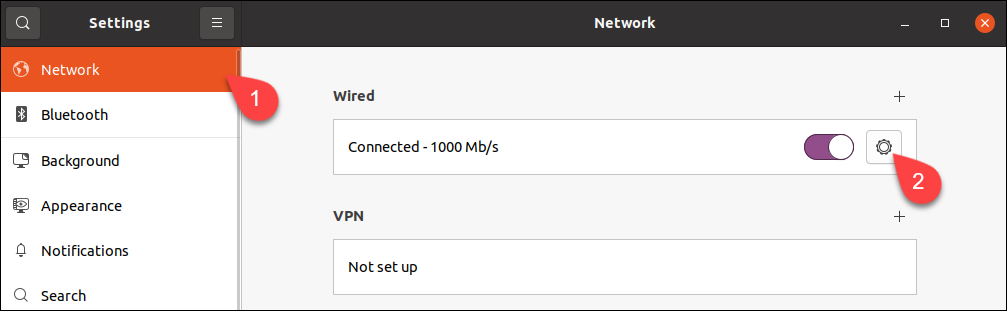
1. Launch Settings and click the Network tab in the menu on the left.
2. Click the cogwheel next to the connection you wish to set up.
Note: To change the settings for a wireless connection, select the Wi-Fi tab, choose a wireless network and proceed with the steps below.
3. Go to the IPv4 tab.
4. Disable automatic DNS configuration by turning off the switch next to the DNS field.
5. Type new DNS addresses in the field. The example shows Google’s public DNS nameservers.
6. Click Apply.
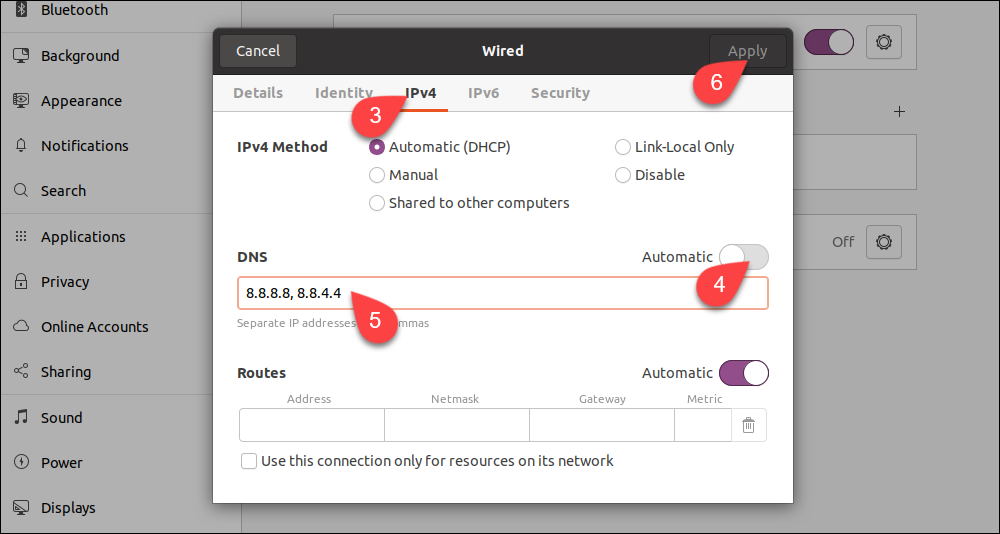
The system is now configured to work with the new DNS servers.
Note: If you wish to set up IPv6 nameservers, go to the IPv6 tab and enter them there. The IPv6 address format is different from IPv4. For example, Google’s IPv6 DNS servers are: 2001:4860:4860::8888 and 2001:4860:4860::8844 .
Change DNS Nameserver via Config File
If you do not use a GUI, change DNS settings with the command line Netplan tool.
1. Go to the Netplan directory:
2. List the directory contents with ls to see the name of the yaml file containing network configuration.

Open the file in a text editor. Your file may have a different name.
sudo nano 01-network-manager.yamlEthernet connections are listed in the ethernets section of the file. If there are any wireless connections, you can find them in the wifis section. Netplan stores the current DNS configuration parameters in nameservers subsections of each section.
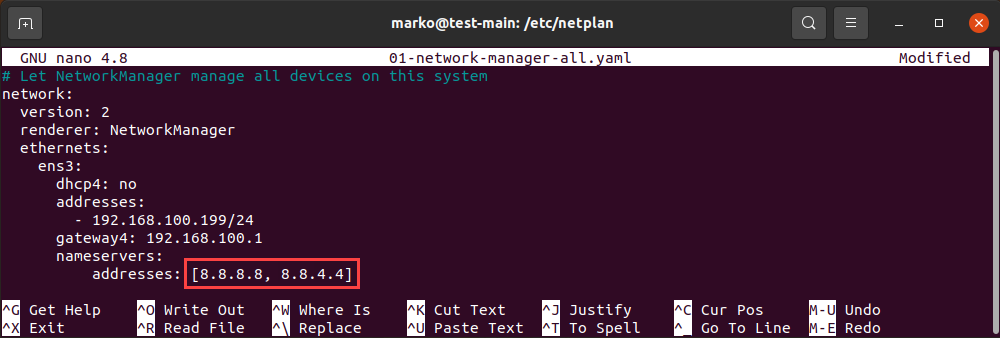
Replace the addresses located in the file with the DNS addresses you want to use. You can enter more than two addresses. Save the changes and exit.
Note: The file on your system may lack the entire ethernets or wifis section. In that case, add the lines that are missing, making sure you respect the indentation provided in the example.
3. Apply the changes you made in the config file:
If the operation is successful, there is no output. To check if the system successfully applied the changes, type:
resolvectl status | grep "DNS Server" -A2The output lists your current DNS servers:

Why Change DNS Nameserver on Ubuntu?
In most cases, your default DNS settings offer optimal performance. However, there are scenarios in which you should consider switching to a third-party DNS provider:
- Large companies with better infrastructure are usually more capable of providing uninterrupted DNS service. If your ISP is unreliable and you experience frequent downtimes, switching the DNS provider may be the solution.
- Third-party DNS servers can be faster than those provided to you by your ISP.
Note: Since latency is the primary consideration for DNS, a fast third-party server located far away may provide inferior service to a slower one that is closer to you.
- Some DNS providers offer filters that prevent phishing sites from reaching your computer. The same mechanism is also used to block sensitive content on the internet. Businesses often employ this DNS feature.
- Internet Service Providers sometimes block content on the DNS level, so switching to another DNS nameserver may help you access some geo-restricted websites.
Note: Learn how to install PowerDNS on Ubuntu, a flexible and robust DNS solution.
This tutorial showed you how to set your DNS nameservers on Ubuntu, either using a GUI or CLI.
How to Set DNS Nameservers on Ubuntu 22.04?
DNS (Domain Name System) is a system that translates human-readable domain names (such as example.com) into numerical IP addresses. Name servers contain the DNS records for a domain and are responsible for answering requests from clients, such as web browsers.
This guide will explain various methods to set the DNS Nameservers on Ubuntu 22.04. The content of this tutorial is mentioned-below:
Let’s start with the CLI method.
Method 1: Using CLI to Set DNS Nameserver
To set the DNS name servers on Ubuntu 22.04 via the command line, users can follow these steps:
Configure resolv.conf file
Open the “/etc/resolv.conf” file in a nano text editor using the “sudo” privileges:

Add a line to the file for each DNS name server you want to use. The line should start with the nameserver with the IP address:
$ nameserver 8.8.8.8 $ nameserver 8.8.4.4

Save the file and exit the text editor.
Verify the DNS Nameservers
To verify the DNS Nameserver, execute the below script with the “sudo” privilege:
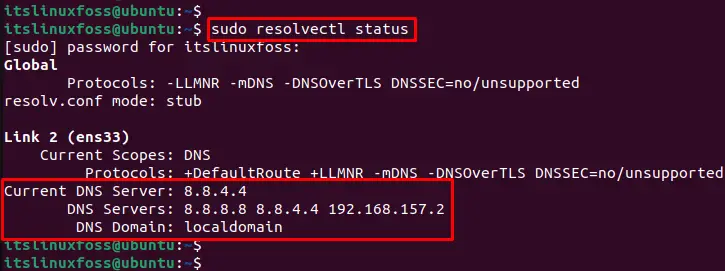
The output confirms that DNS nameservers 8.8.8.8 and 8.8.4.4 have been set.
Alternative Method: Configure “01-network-manager-all.yaml” File Via netplan
Netplan is a tool to configure networking on Linux systems. It allows you to specify the DNS nameservers that your system should use to resolve hostnames.
To set the DNS nameservers in Netplan, you need to edit the Netplan configuration file for your network interface. The configuration file is usually located at /etc/netplan/ and has a .yaml file format.
$ sudo nano /etc/netplan/01-network-manager-all.yaml

Here’s an example of how you can set the DNS nameservers in a Netplan configuration file The description of the script is provided below:
network: version: 2 renderer: networkd ethernets: enp0s3: dhcp4: no addresses: [192.168.157.140/24] gateway4: 192.168.157.140 nameservers: addresses: [8.8.8.8,8.8.4.4]
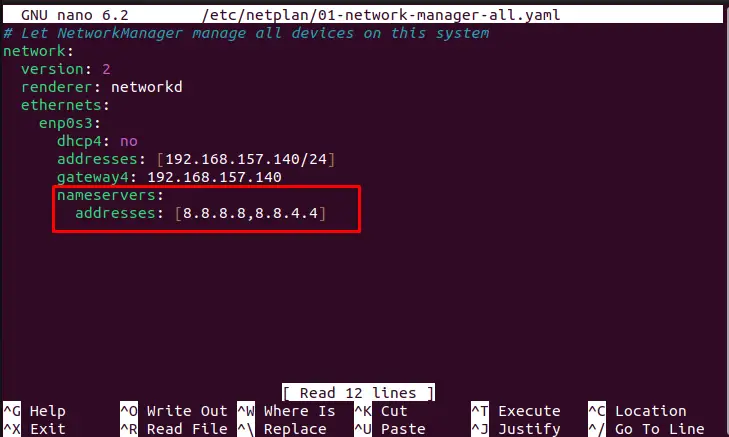
In this example, the nameservers section specifies that the system should use Google’s public DNS servers (8.8.8.8 and 8.8.4.4) to resolve hostnames. Also, the machine’s IP address is “192.168.157.140” with a subnet mask of “24”. The gateway through which traffic flows is “192.168.157.140”.
Once you have edited the configuration file, you can apply the changes by running the following command:

This will update the system’s DNS settings and cause it to use the nameservers specified in the configuration file.
Let’s head over the same method in GUI.
Method 2: Using GUI to Set DNS Nameserver
On Ubuntu, the DNS name servers resolve domain names that can be specified in the network configuration files. These configuration files can be altered following a GUI of Ubuntu which is carried out as follows:
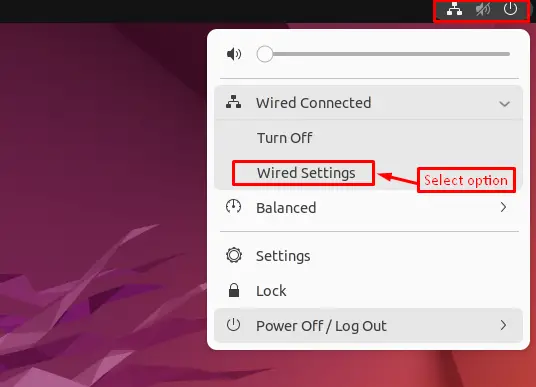
Step 1: Open the Network Settings Window
Press the icon “Network” located at the top right corner of the desktop screen and hit the “Wired Settings” option:
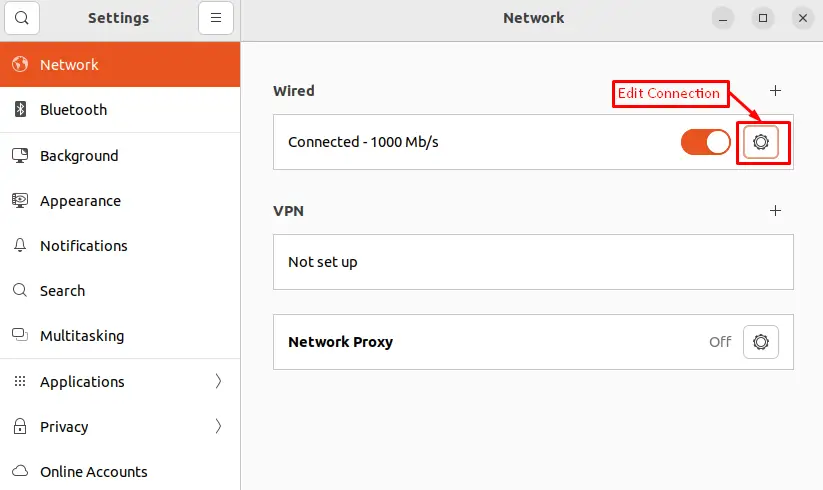
Step 2: Edit Connection
It navigates to the “Network” section in the “Settings” window. Click the “Edit” button on the connection for which you want to set the DNS nameservers:
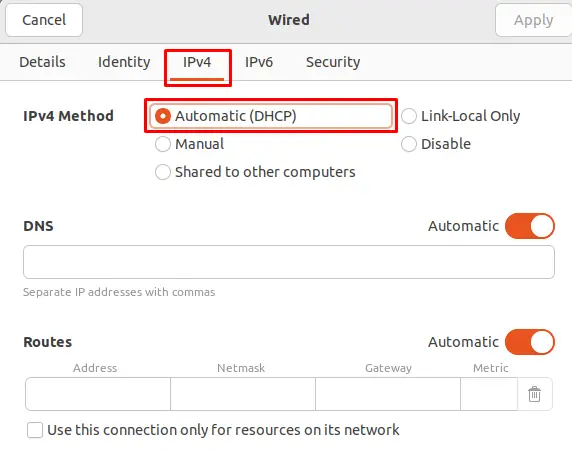
Step 3: Check the Automatic (DHCP)
In the “IPv4 Settings” tab, check if the “Automatic (DHCP) addresses” is enabled or not. If not, choose the option:
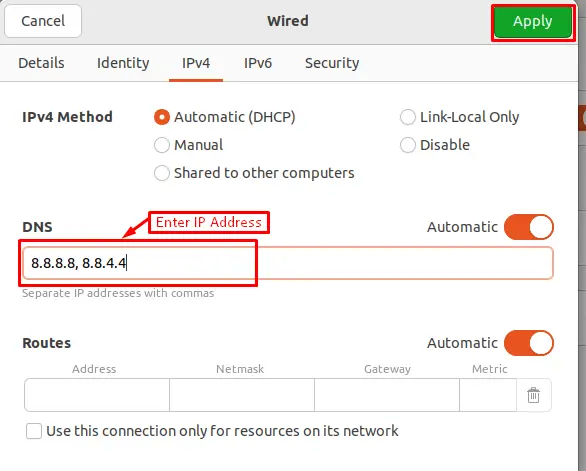
Step 4: Enter the IP Addresses of DNS
Enter the IP addresses of the DNS nameservers in the “DNS Servers” field. Then, press the button “Apply” to save the address:
That is all from the GUI method for setting the DNS Nameservers.
This is how to set DNS Nameservers on Ubuntu 22.04.
Conclusion
In Ubuntu, the Domain NameServers (DNS) can be set using GUI and CLI methods. In GUI, type the IP addresses of the DNS nameservers in the “DNSServers” field using the “NetworkSettings” window. In CLI, add the DNS Nameservers address “(8.8.8.8 and 8.8.4.4)” in the “01-network-manager-all.yaml”, “/etc/resolv.conf” files. This article has explained various ways to set DNS nameservers on Ubuntu.