- Saved searches
- Use saved searches to filter your results more quickly
- command line linux networkmanager ikev2 vpn configuration #1007
- command line linux networkmanager ikev2 vpn configuration #1007
- Comments
- Настройка IKEv2 VPN соединения на Ubuntu 17
- NetworkManager
- Linux network manager ikev2
- Support
- Live vpn service support – 24x7x365
- linux ipsec ikev2 setup
- Install IKEv2 IPSec Certificate
- Install StrongSwan Network Manager
- Setup IKEv2 VPN Profile
- IPSec Server Location Addresses
- USA IPSec VPN Gateways
- Canada IPSec VPN Gateways
- Central/South America IPSec VPN Gateways
- Europe IPSec VPN Gateways
- Africa/Middle East IPSec VPN Gateways
- Asia IPSec VPN Gateways
- Oceania IPSec VPN Gateways
Saved searches
Use saved searches to filter your results more quickly
You signed in with another tab or window. Reload to refresh your session. You signed out in another tab or window. Reload to refresh your session. You switched accounts on another tab or window. Reload to refresh your session.
Have a question about this project? Sign up for a free GitHub account to open an issue and contact its maintainers and the community.
By clicking “Sign up for GitHub”, you agree to our terms of service and privacy statement. We’ll occasionally send you account related emails.
Already on GitHub? Sign in to your account
command line linux networkmanager ikev2 vpn configuration #1007
command line linux networkmanager ikev2 vpn configuration #1007
Comments
hello!
I had the need to configure the vpn client on a linux server with no gui, so I couldn’t use the Network Manager gui to setup the VPN.
I figured out that it’s possible to setup the VPN using just the command line, with the following instruction using a redhat/centos based distro:
first of all, follow the instruction to setup a ikev2 vpn client on linux, then, instead of following the GUI instruction, issue the following command:
sudo nmcli c add type vpn ifname — vpn-type strongswan connection.id connection.autoconnect no vpn.data ‘address = , certificate = , encap = no, esp = aes128gcm16, ipcomp = no, method = key, proposal = yes, usercert = , userkey = , virtual = yes’
you can then start the vpn connection with:
maybe these instructions could be added to the howto, but they might need some testing with other linux clients.
I hope you find this useful!
The text was updated successfully, but these errors were encountered:
hello! I had the need to configure the vpn client on a linux server with no gui, so I couldn’t use the Network Manager gui to setup the VPN. I figured out that it’s possible to setup the VPN using just the command line, with the following instruction using a redhat/centos based distro:
first of all, follow the instruction to setup a ikev2 vpn client on linux, then, instead of following the GUI instruction, issue the following command:
sudo nmcli c add type vpn ifname — vpn-type strongswan connection.id connection.autoconnect no vpn.data ‘address = , certificate = , encap = no, esp = aes128gcm16, ipcomp = no, method = key, proposal = yes, usercert = , userkey = , virtual = yes’
you can then start the vpn connection with:
sudo nmcli c up
maybe these instructions could be added to the howto, but they might need some testing with other linux clients.
I hope you find this useful!
hello! My system is arrch64_ubuntu16.04 , and there was an error when I used nmcli c up , could you help me analyze it
root@HelperA133:/Certificate# nmcli c add type vpn ifname kktest vpn-type strongswan \ > connection.autoconnect no vpn.data 'address =xxxxxx, \ > certificate = /Certificate/TESTTBOX_ca.cer, \ > encap = no, esp = aes128gcm16, ipcomp = no, \ > method = key, proposal = yes, \ > usercert = /Certificate/TESTTBOX_cl.cer, \ > userkey =/Certificate/TESTTBOX.key, virtual = yes' Connection 'vpn-kktest' (9b2d28b0-e612-4c45-9e9f-2ca82faa1902) successfully added. root@HelperA133:/Certificate# root@HelperA133:/Certificate# root@HelperA133:/Certificate# nmcli c up id vpn-kktest Error: Connection activation failed: Could not find source connection. hello! I had the need to configure the vpn client on a linux server with no gui, so I couldn’t use the Network Manager gui to setup the VPN. I figured out that it’s possible to setup the VPN using just the command line, with the following instruction using a redhat/centos based distro:
first of all, follow the instruction to setup a ikev2 vpn client on linux, then, instead of following the GUI instruction, issue the following command:
sudo nmcli c add type vpn ifname — vpn-type strongswan connection.id connection.autoconnect no vpn.data ‘address = , certificate = , encap = no, esp = aes128gcm16, ipcomp = no, method = key, proposal = yes, usercert = , userkey = , virtual = yes’
you can then start the vpn connection with:
sudo nmcli c up
maybe these instructions could be added to the howto, but they might need some testing with other linux clients.
I hope you find this useful!
hello! My system is arrch64_ubuntu16.04 , and there was an error when I used nmcli c up , could you help me analyze it
root@HelperA133:/Certificate# nmcli c add type vpn ifname kktest vpn-type strongswan \ > connection.autoconnect no vpn.data 'address =xxxxxx, \ > certificate = /Certificate/TESTTBOX_ca.cer, \ > encap = no, esp = aes128gcm16, ipcomp = no, \ > method = key, proposal = yes, \ > usercert = /Certificate/TESTTBOX_cl.cer, \ > userkey =/Certificate/TESTTBOX.key, virtual = yes' Connection 'vpn-kktest' (9b2d28b0-e612-4c45-9e9f-2ca82faa1902) successfully added. root@HelperA133:/Certificate# root@HelperA133:/Certificate# root@HelperA133:/Certificate# nmcli c up id vpn-kktest Error: Connection activation failed: Could not find source connection. I think you are missing the connection.id parameter just after vpn-type strongswan
Also check that nmcli is managing your default connection, otherwise it won’t know what connection to tie the VPN session to.
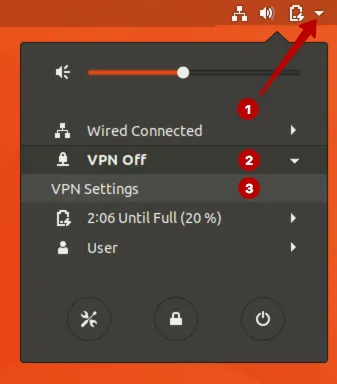
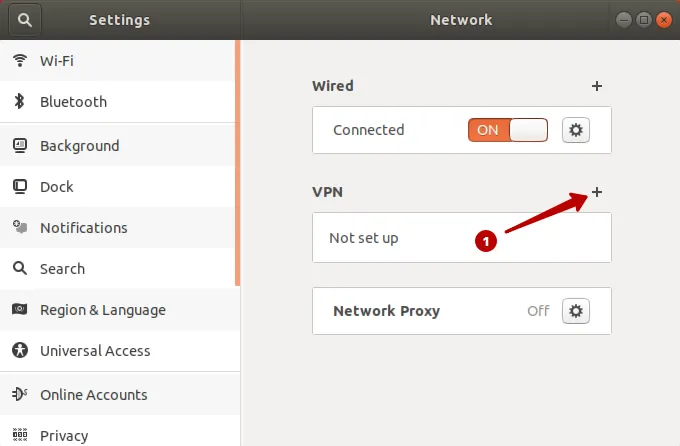
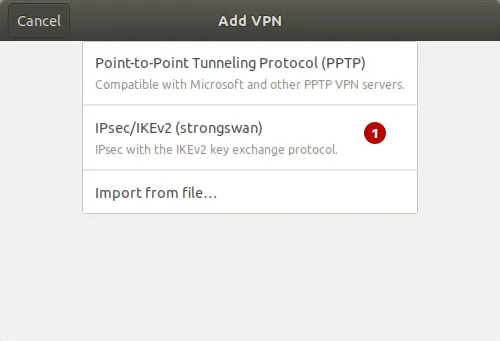
Настройка IKEv2 VPN соединения на Ubuntu 17
Эта инструкция подходит только для операционной системы Ubuntu 17.
Ubuntu 16 содержит устаревшие пакеты, которые работают не корректно.
Рекомендуем настроить OpenVPN подключение на Ubuntu 16.
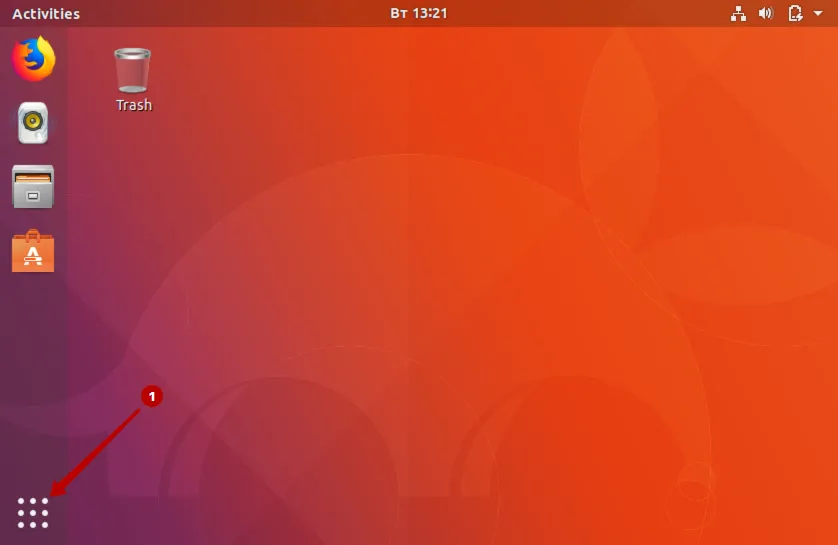
Зайдите в раздел Все программы.
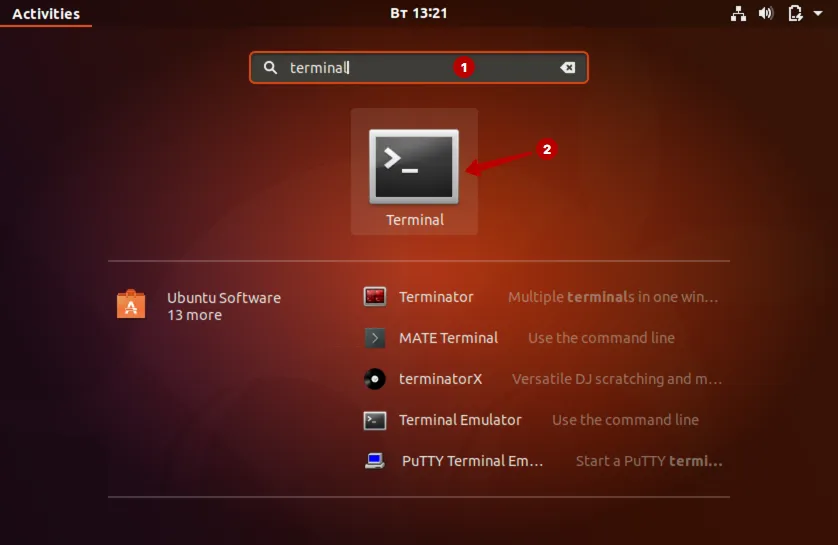
Введите в строку поиска: terminal и запустите Терминал.
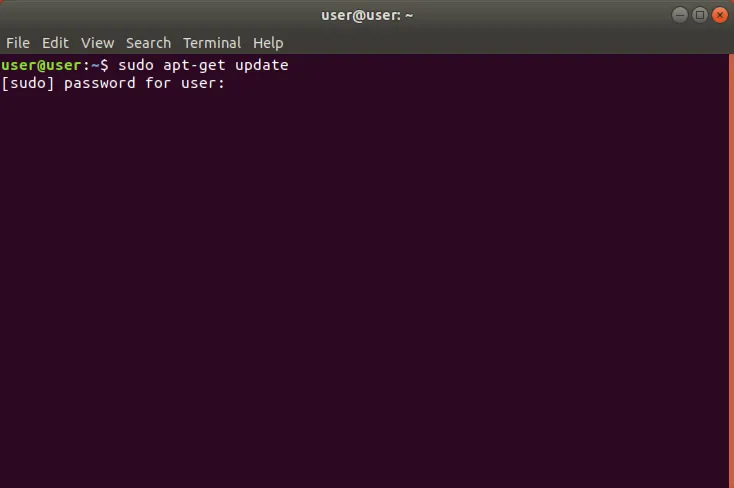
Введите команду. Возможно потребуется ввод пароля.
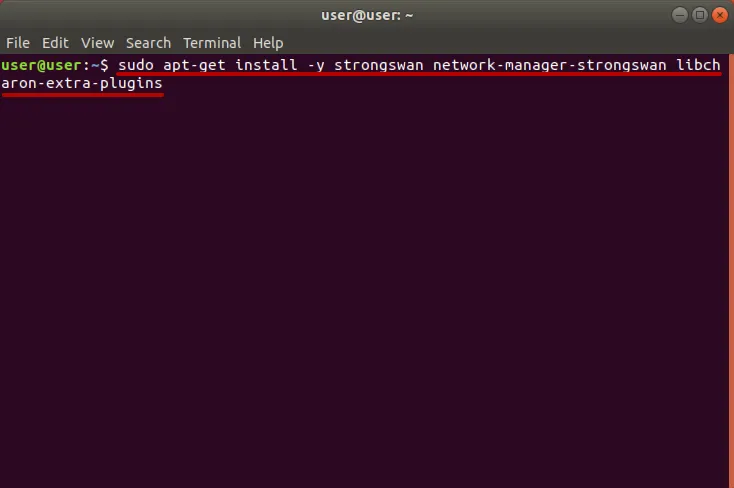
Выполните следующую команду для установки приложений.
sudo apt-get install -y strongswan network-manager-strongswan libcharon-extra-plugins
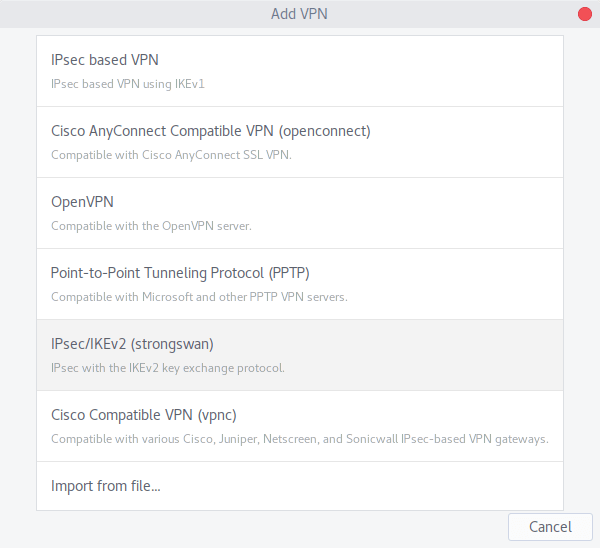
Выберите IPSec/IKEv2 (strongswan).
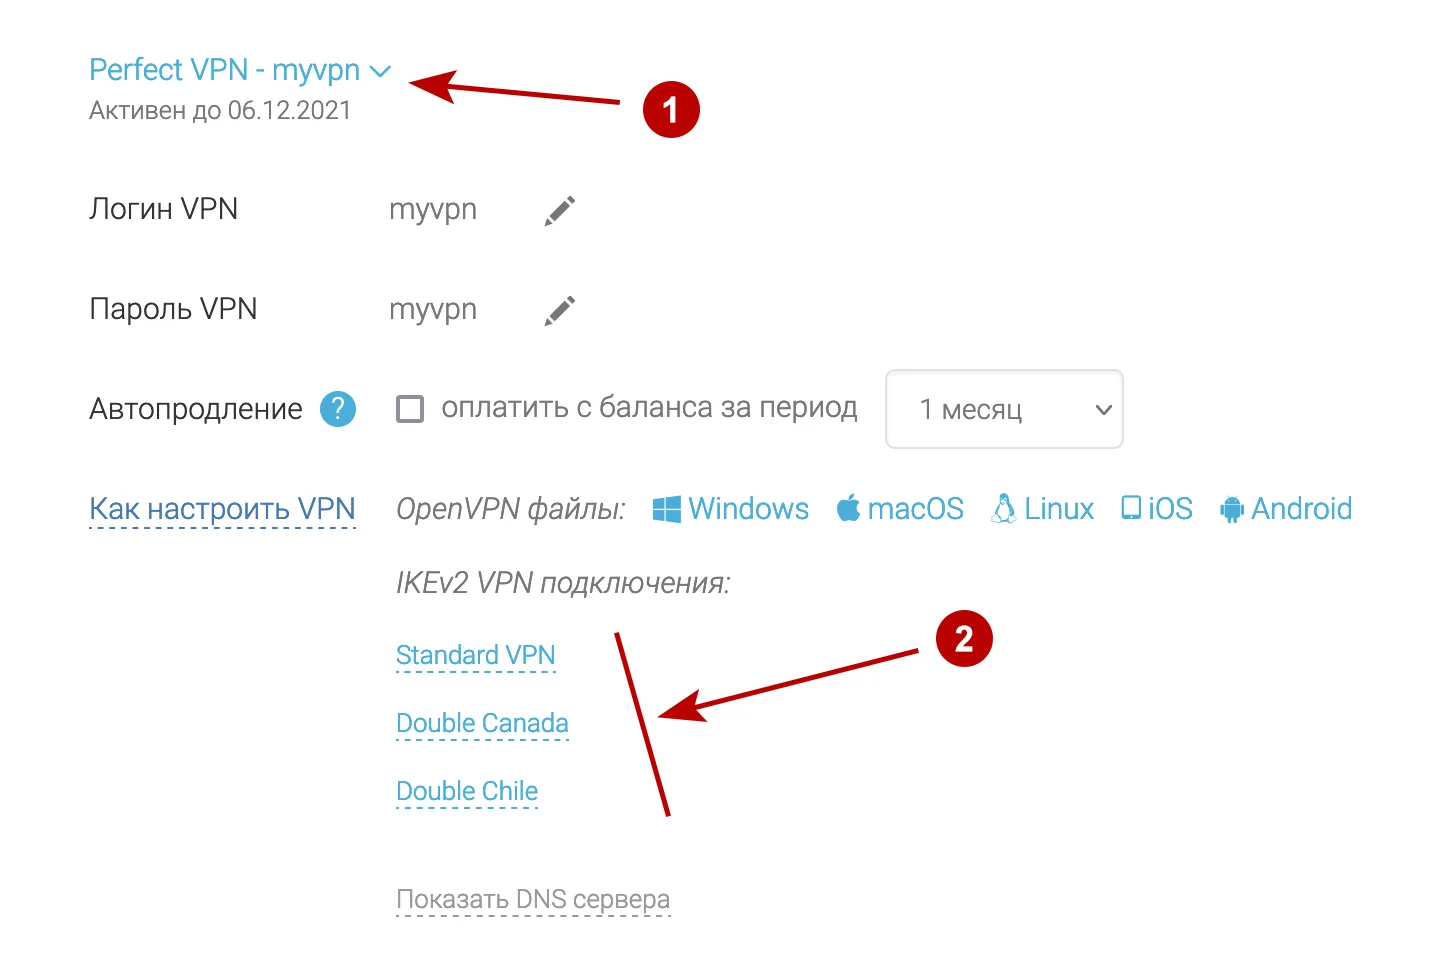
В разделе Подписки посмотрите домен для IKEv2 VPN, а также Логин и Пароль VPN.
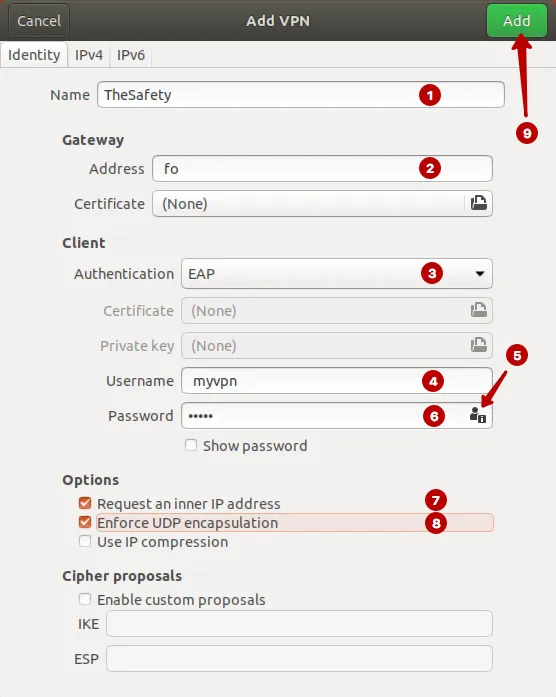
- Напишите любое название подключения
- Домен IKEv2 VPN сервера из раздела Аккаунт
- Аутентификация EAP
- Логин VPN
- Нажмите на иконку пользователя для сохранения пароля
- Пароль VPN
- Поставьте галку
- Поставьте галку
- Нажмите Add
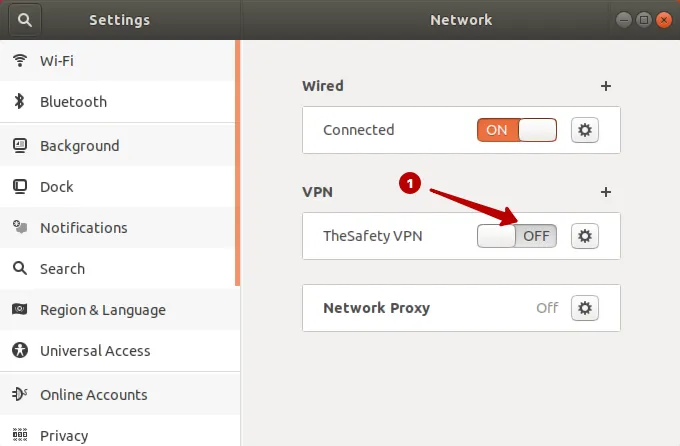
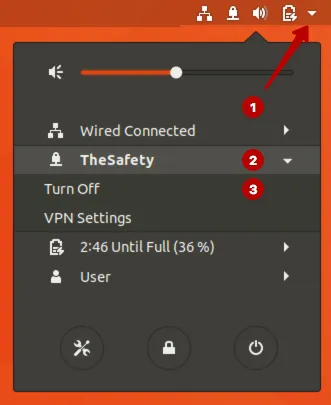
Подключитесь к IKEv2 VPN на Ubuntu 17.
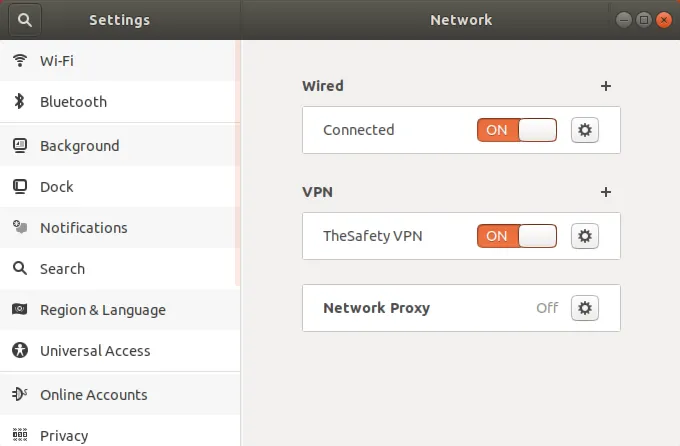
IKEv2 VPN подключение успешно установлено.
Также можно подключиться к IKEv2 VPN через верхнее меню.
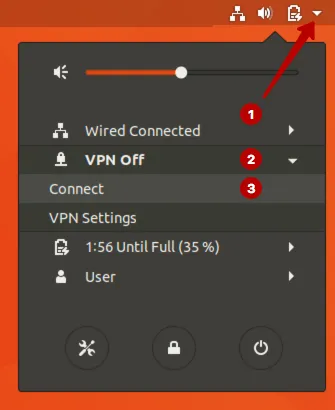
Отключитесь от VPN сети при необходимости.
VPN и прокси сервис защищает своих клиентов с 2006 года, используя надежные технологии в области анонимности передачи данных в Интернете.
NetworkManager
NetworkManager allows configuration and control of VPN daemons through a plugin interface. We provide such a plugin for NetworkManager to configure roadwarrior clients for the most common setups. The plugin supports connections using the IKEv2 protocol only.
NetworkManager uses D-Bus to communicate with a special build of the charon IKE daemon ( charon-nm ) which runs independently of the regular daemon (e.g. charon-systemd ) to avoid conflicts.
The plugin uses a certificate for server authentication and supports EAP and public key authentication for client authentication (since version 5.8.3 / NetworkManager-strongswan 1.5.0 also EAP-TLS ). PSK authentication is supported starting with version 1.3.1 of the plugin but strong secrets (a minimum of 20 characters) are enforced.
You can use any password based EAP method supported by strongSwan ( MD5 / GTC / MSCHAPv2 ) or public key authentication. Private keys are either stored in a file or accessed through your ready-to-use ssh-agent . You’ll need a certificate matching that key. Also private keys and certificates on a smart card can be used (see below for details).
If you configure the server certificate directly on the clients, there are no requirements to the certificate. If you deploy CA certificates, the server certificate will need a subjectAltName including the host name of the server (the same you enter in the client’s configuration). Since version 5.8.3 / NetworkManager-strongswan 1.5.0 it’s possible to configure the server identity explicitly. You can also use preinstalled root CA certificates of your distribution, using the —with-nm-ca-dir ./configure option. Since version 5.5.1 this can also be modified with the charon-nm.ca_dir setting in strongswan.conf . Just don’t specify any server/CA certificate in the GUI to use preinstalled root certificates. CA certificates on a smart card are automatically used.
Linux network manager ikev2
Support
Live vpn service support – 24x7x365
linux ipsec ikev2 setup
Install IKEv2 IPSec Certificate
1. From your device download our IPSec certificate.
CLICK TO INSTALL CERT
You only have to do this part once per device.
2. Save it to your downloads folder
3. Move the IPSec_ca.crt file to your HOME directory
Install StrongSwan Network Manager
Ubuntu: sudo apt-get install network-manager-strongswan -y
Fedora: sudo dnf install networkmanager-strongswan-gnome
Setup IKEv2 VPN Profile
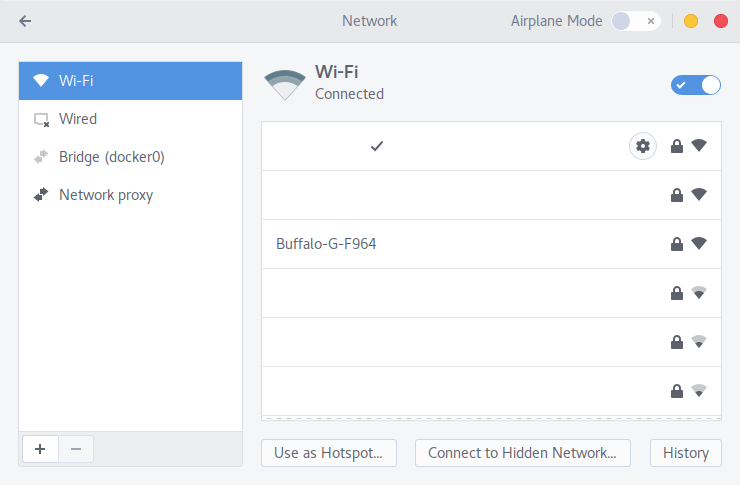
- Select Your network settings from the NetworkManager icon (your wireless or wired icon) or from your control panel (will vary depending on your distro)
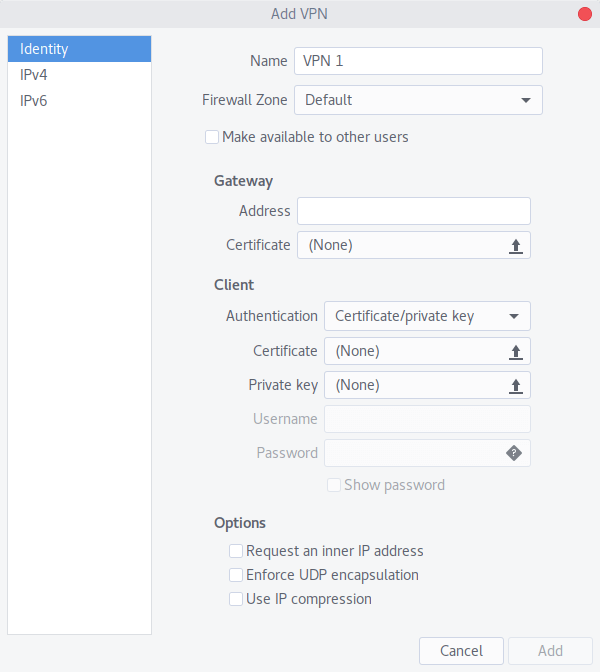
- Name: (anything you like, this a label for your ease of managing vpn profiles)
- Gateway:(select a location, you can chooe any location you like)
IPSec Server Location Addresses
USA IPSec VPN Gateways
ipsec.ashburn.witopia.net
ipsec.atlanta.witopia.net
ipsec.baltimore.witopia.net
ipsec.boston.witopia.net
ipsec.chicago.witopia.net
ipsec.dallas.witopia.net
ipsec.denver.witopia.net
ipsec.kansascity.witopia.net
ipsec.losangeles.witopia.net
ipsec.lasvegas.witopia.net
ipsec.miami.witopia.net
ipsec.newark.witopia.net
ipsec.newyork.witopia.net
ipsec.phoenix.witopia.net
ipsec.portland.witopia.neta
ipsec.redding.witopia.net
ipsec.sanfrancisco.witopia.net
ipsec.seattle.witopia.net
ipsec.washingtondc.witopia.net
Canada IPSec VPN Gateways
ipsec.montreal.witopia.net
ipsec.toronto.witopia.net
ipsec.vancouver.witopia.net
Central/South America IPSec VPN Gateways
Europe IPSec VPN Gateways
ipsec.amsterdam.witopia.net
ipsec.barcelona.witopia.net
ipsec.berlin.witopia.net
ipsec.brussels.witopia.net
ipsec.bucharest.witopia.net
ipsec.budapest.witopia.net
ipsec.copenhagen.witopia.net
ipsec.dublin.witopia.net
ipsec.frankfurt.witopia.net
ipsec.helsinki.witopia.net
ipsec.istanbul.witopia.net
ipsec.kiev.witopia.net
ipsec.lisbon.witopia.net
ipsec.london.witopia.net
ipsec.luxembourg.witopia.net
ipsec.madrid.witopia.net
ipsec.manchester.witopia.net
ipsec.milan.witopia.net
ipsec.moscow.witopia.net
ipsec.mumbai.witopia.net
ipsec.oslo.witopia.net
ipsec.paris.witopia.net
ipsec.prague.witopia.net
ipsec.riga.witopia.net
ipsec.reykjavik.witopia.net
ipsec.stockholm.witopia.net
ipsec.vilnius.witopia.net
ipsec.warsaw.witopia.net
ipsec.zurich.witopia.net
Africa/Middle East IPSec VPN Gateways
Asia IPSec VPN Gateways
ipsec.bangkok.witopia.net
ipsec.hanoi.witopia.net
ipsec.hongkong.witopia.net
ipsec.kualalumpur.witopia.net
ipsec.newdelhi.witopia.net
ipsec.singapore.witopia.net
ipsec.seoul.witopia.net
ipsec.tokyo.witopia.net
Oceania IPSec VPN Gateways
ipsec.auckland.witopia.net
ipsec.melbourne.witopia.net
ipsec.sydney.witopia.net
Authentication: EAP
Username: [your vpn username]
There are two potential formats for your vpn username. You must use the one you selected when you activated your service. If you do not remember, you can log in to your account on our website here here and under your active service it says “USERNAME”. This is your VPN username.
#1: Your email = W\your@email.com
#2: WiTopia username = username@witopiaYou MUST use a Capital W with a backslash “\” if your vpn username is an email.
If you have a username ending in “@witopia” then you do *not* use W\ before the username or “.net” after the username
Password: [your vpn password]