- How to Set a Static IP Address On Ubuntu 22.04
- Find Network Interfaces on Ubuntu 22.04
- Set Static IP Address on Ubuntu 22.04 Desktop
- 1. Using GNOME Network Manager
- Set IP for Wired Interface using GNOME
- Set IP Address for Wi-Fi using GNOME
- 2. Using Netplan
- 3. Using NetworkManager CLI
- Set IP for Wired Interface using nmcli
- Set IP Address for Wi-Fi using nmcli
- Set Static IP Address Using NetPlan on Ubuntu 22.04 Server
- Set IP for Wired Interface using Netplan
- Set IP Address for Wi-Fi using Netplan
- Verify Static IP Address on Ubuntu 22.04
- Static IP Address with NetworkManager for Fedora
How to Set a Static IP Address On Ubuntu 22.04
![]()
The first task anyone would do after installing Ubuntu is setting an IP address to a system to connect to the network/internet. If the Wi-Fi router, ISP, or network doesn’t provide DHCP services, you must manually assign IP addresses.
Here, we will see how to set a static IP Address on Ubuntu 22.04, using,
You can use any method to set a static IP address on Ubuntu 22.04.
Find Network Interfaces on Ubuntu 22.04
You can run any of the below commands in a terminal to get a list of network interfaces available on the system.
The output of the ifconfig command on a desktop:
enp0s3: flags=4163 mtu 1500 ether 08:00:27:36:34:ae txqueuelen 1000 (Ethernet) RX packets 226971 bytes 327928478 (312.7 MiB) RX errors 0 dropped 0 overruns 0 frame 0 TX packets 60417 bytes 4869126 (4.6 MiB) TX errors 0 dropped 0 overruns 0 carrier 0 collisions 0 lo: flags=73 mtu 65536 inet 127.0.0.1 netmask 255.0.0.0 inet6 ::1 prefixlen 128 scopeid 0x10 loop txqueuelen 1 (Local Loopback) RX packets 4714 bytes 6158753 (5.8 MiB) RX errors 0 dropped 0 overruns 0 frame 0 TX packets 4714 bytes 6158753 (5.8 MiB) TX errors 0 dropped 0 overruns 0 carrier 0 collisions 0 The output of the ifconfig command on a laptop:
lo: flags=73 mtu 65536 inet 127.0.0.1 netmask 255.0.0.0 inet6 ::1 prefixlen 128 scopeid 0x10 loop txqueuelen 1000 (Local Loopback) RX packets 188 bytes 13462 (13.4 KB) RX errors 0 dropped 0 overruns 0 frame 0 TX packets 188 bytes 13462 (13.4 KB) TX errors 0 dropped 0 overruns 0 carrier 0 collisions 0 wlo1: flags=4163 mtu 1500 ether 7c:8b:ca:0d:69:b6 txqueuelen 1000 (Ethernet) RX packets 972 bytes 346365 (346.3 KB) RX errors 0 dropped 465 overruns 0 frame 0 TX packets 426 bytes 66875 (66.8 KB) TX errors 0 dropped 0 overruns 0 carrier 0 collisions 0 Here, we will see how to configure a static IP for enp0s3 (Wired) / wl01 (Wi-Fi).
IP Address: 192.168.0.10
Netmask: 255.255.255.0
Gateway: 192.168.0.1
DNS Server 1: 192.168.0.1
DNS Server 2: 8.8.8.8
Domain Name: itzgeek.local
Set Static IP Address on Ubuntu 22.04 Desktop
1. Using GNOME Network Manager
Using the GNOME network control center to set a static IP address on In Ubuntu 22.04 desktop is straightforward.
Set IP for Wired Interface using GNOME
Open the Gnome control center using the gnome-control-center network command or go to Activities >> Settings >> Network.
Click on the gear icon on the Wired interface page and then IPv4 tab >> Manual >> Enter IP address, Netmask, Gateway, DNS (Toggle to disable Automatic DNS configuration) >> Apply.
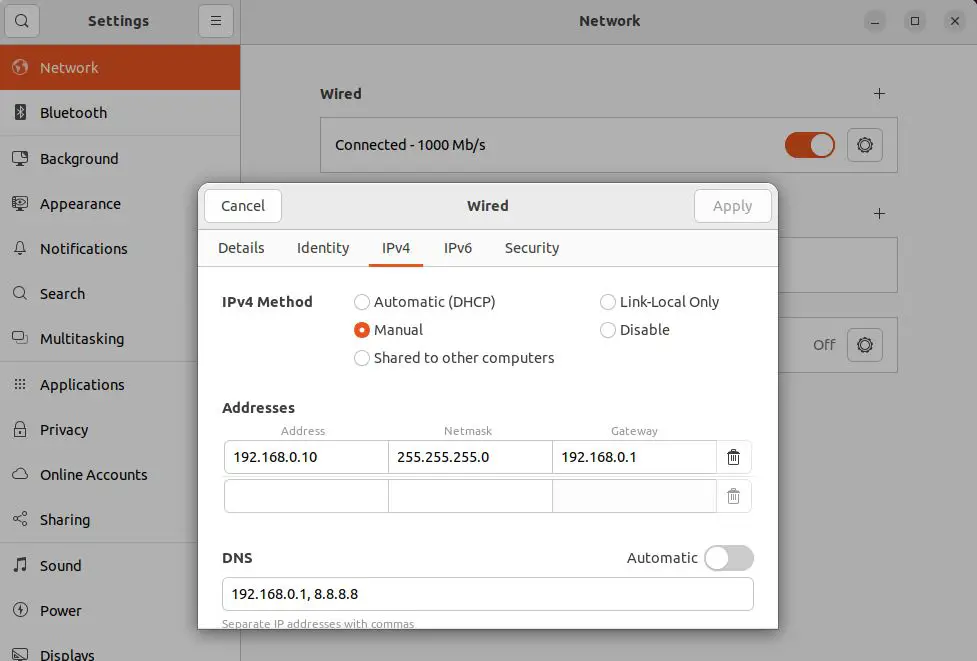
Finally, use the toggle in the Network page to disable and enable the network interface to apply the IP address.
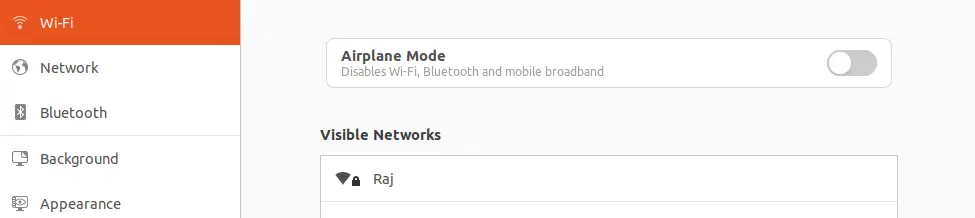
Set IP Address for Wi-Fi using GNOME
Open the Gnome control center using the gnome-control-center wifi command or go to Activities >> Settings >> Wi-Fi.
Click on your Wifi router name and then enter the router’s password to connect. Your laptop will automatically receive an IP address from a Wi-Fi router with a built-in DHCP service on a successful connection.
To assign a static IP address or Wi-Fi interface, click on the gear icon on the Wi-Fi interface page and then IPv4 tab >> Manual >> Enter IP address, Netmask, Gateway, DNS (Toggle to disable Automatic DNS configuration) >> Apply.
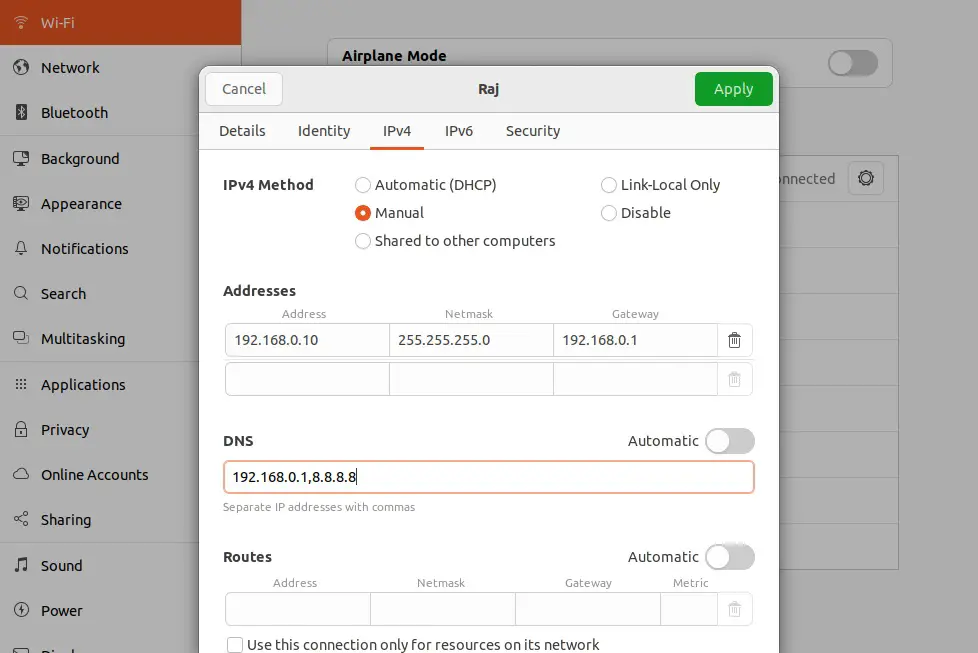
Finally, disable and enable the Wi-Fi interface to apply the IP address.
2. Using Netplan
Netplan is a utility for easily configuring networking on a Ubuntu system. It reads the configuration files .yaml present in the /etc/netplan directory.
This utility supports both networkd and Network Manager as backends. However, using Network Manager as a backend renderer: NetworkManager is recommended for the Ubuntu desktop. The remaining configurations are the same as that of the networkd.
3. Using NetworkManager CLI
Set IP for Wired Interface using nmcli
First, let us list the available network connections.
NAME UUID TYPE DEVICE Wired connection 1 db3b0cfc-d875-3a71-86c4-626adfc5834a ethernet enp0s3
Then, configure static IP address to wired interface.
sudo nmcli con mod "Wired connection 1" ipv4.addresses 192.168.0.10/24 sudo nmcli con mod "Wired connection 1" ipv4.gateway 192.168.0.1 sudo nmcli con mod "Wired connection 1" ipv4.dns "192.168.0.1","8.8.8.8" sudo nmcli con mod "Wired connection 1" ipv4.method manual sudo nmcli con mod "Wired connection 1" ipv6.method disabled
Finally, run the below commands to apply the IP address.
sudo nmcli con down "Wired connection 1" && sudo nmcli con up "Wired connection 1"
Set IP Address for Wi-Fi using nmcli
First, list the available Wi-Fi access points using the below command.
IN-USE BSSID SSID MODE CHAN RATE SIGNAL BARS SECURITY BA:DD:71:A3:D9:A4 Raj Infra 6 270 Mbit/s 100 ▂▄▆█ WPA2 Next, connect to the Wi-Fi access point.
nmcli device wifi connect Raj password MyPass ifname wlo1 name My-Wifi
And then, configure static IP address to Wi-Fi interface.
sudo nmcli con mod "My-Wifi" ipv4.addresses 192.168.0.10/24 sudo nmcli con mod "My-Wifi" ipv4.gateway 192.168.0.1 sudo nmcli con mod "My-Wifi" ipv4.dns 192.168.0.1 sudo nmcli con mod "My-Wifi" ipv4.method manual sudo nmcli con mod "My-Wifi" ipv6.method disabled
Finally, run the below commands to apply the IP address
sudo nmcli con down "My-Wifi" && sudo nmcli con up "My-Wifi"
Set Static IP Address Using NetPlan on Ubuntu 22.04 Server
Netplan is a network configuration utility that reads YAML files and generates all network configurations for the renderer tool (NetworkManager or networkd) to configure the network on a system.
Netplan configuration files are found in the /etc/netplan/ directory.
Remove any configuration files .yaml present in the /etc/netplan directory.
Set IP for Wired Interface using Netplan
Now, create a new netplan configuration for the wired network interface.
sudo nano /etc/netplan/01-wired-interface-1.yaml
Then, make changes to the below information and use it for your requirement.
network: version: 2 renderer: networkd ethernets: enp0s3: dhcp4: no dhcp6: no addresses: - 192.168.0.10/24 routes: - to: default via: 192.168.0.1 nameservers: addresses: - 192.168.0.1 - 8.8.8.8 search: - itzgeek.local
And then generate the required configuration for the renderers.
Finally, apply all network configurations and restart renderers.
Set IP Address for Wi-Fi using Netplan
Wi-Fi Interface Name: wl01
Wireless Access Point Name: Raj
Wireless Access Point Password: MyPass
First, create a new netplan configuration for the wired network interface.
sudo nano /etc/netplan/01-wireless-interface-1.yaml
Then, make changes to the below information and use it for your requirement.
network: version: 2 renderer: networkd wifis: wlo1: dhcp4: no dhcp6: no addresses: - 192.168.0.10/24 routes: - to: default via: 192.168.0.1 nameservers: addresses: - 192.168.0.10 - 8.8.8.8 search: - itzgeek.local access-points: Raj: password: MyPass
And then generate the required configuration for the renderers.
Finally, apply all network configurations and restart renderers.
Verify Static IP Address on Ubuntu 22.04
Verify the static IP address using the below commands.
enp0s3: flags=4163 mtu 1500 inet 192.168.0.10 netmask 255.255.255.0 broadcast 192.168.0.255 ether 08:00:27:81:43:e1 txqueuelen 1000 (Ethernet) RX packets 1684 bytes 1211790 (1.2 MB) RX errors 0 dropped 0 overruns 0 frame 0 TX packets 1004 bytes 140357 (140.3 KB) TX errors 0 dropped 0 overruns 0 carrier 0 collisions 0 lo: flags=73 mtu 65536 inet 127.0.0.1 netmask 255.0.0.0 inet6 ::1 prefixlen 128 scopeid 0x10 loop txqueuelen 1000 (Local Loopback) RX packets 549 bytes 44488 (44.4 KB) RX errors 0 dropped 0 overruns 0 frame 0 TX packets 549 bytes 44488 (44.4 KB) TX errors 0 dropped 0 overruns 0 carrier 0 collisions 0
Also, verify the DNS server’s entries.
Global Protocols: -LLMNR -mDNS -DNSOverTLS DNSSEC=no/unsupported resolv.conf mode: stub Link 2 (enp0s3) Current Scopes: DNS Protocols: +DefaultRoute +LLMNR -mDNS -DNSOverTLS DNSSEC=no/unsupported Current DNS Server: 192.168.0.1 DNS Servers: 192.168.0.1 8.8.8.8 DNS Domain: itzgeek.local
Static IP Address with NetworkManager for Fedora
I just wanted to set up a static IP address for a fedora 19 machine in my LAN. I’m used to /etc/network/interfaces from debian but that file doesn’t exist here.
After googling around a little bit, I found a small tutorial that tells one to disable NetworkManager via systemctl and enable network. After that one could configure the static IP address in a file called /etc/sysconfig/network-scripts/ifcfg-*interfacename* . Here is my first problem: I found a file with the MAC address of my interface as displayed by ifconfig but the name after ifcfg- doesn’t match the name from ifconfig. Why is that like this? My second problem is about using NetworkManager.service or network.service. I read in a Forum, that network.service is still included for compatibility reasons and may be excluded soon. If network.service will soon be replaced by NetworkManager.service, shouldn’t I choose NetworkManager.service to configure my network interfaces? If yes, how do I do that with NetworkManager from a shell? Edit:
Here are the outputs requested:
[root@bitch /]# ifconfig lo: flags=73 mtu 65536 inet 127.0.0.1 netmask 255.0.0.0 inet6 ::1 prefixlen 128 scopeid 0x10 loop txqueuelen 0 (Local Loopback) RX packets 97 bytes 12042 (11.7 KiB) RX errors 0 dropped 0 overruns 0 frame 0 TX packets 97 bytes 12042 (11.7 KiB) TX errors 0 dropped 0 overruns 0 carrier 0 collisions 0 p3p1: flags=4163 mtu 1500 inet 192.168.178.11 netmask 255.255.255.0 broadcast 192.168.178.255 inet6 fe80::214:85ff:febc:1c63 prefixlen 64 scopeid 0x20 ether 00:14:85:bc:1c:63 txqueuelen 1000 (Ethernet) RX packets 134347 bytes 169988336 (162.1 MiB) RX errors 0 dropped 0 overruns 0 frame 0 TX packets 78199 bytes 6595669 (6.2 MiB) TX errors 0 dropped 0 overruns 1 carrier 0 collisions 0 [root@bitch /]# ls -l /etc/sysconfig/network-scripts/ total 200 -rw-r--r--. 1 root root 437 Sep 15 02:05 ifcfg-enp2s5 -rw-r--r--. 1 root root 254 May 31 09:49 ifcfg-lo lrwxrwxrwx. 1 root root 24 Jun 27 19:12 ifdown -> ../../../usr/sbin/ifdown -rwxr-xr-x. 1 root root 627 May 31 09:49 ifdown-bnep -rwxr-xr-x. 1 root root 5553 May 31 09:49 ifdown-eth -rwxr-xr-x. 1 root root 781 May 31 09:49 ifdown-ippp -rwxr-xr-x. 1 root root 4141 May 31 09:49 ifdown-ipv6 lrwxrwxrwx. 1 root root 11 Jun 27 19:12 ifdown-isdn -> ifdown-ippp -rwxr-xr-x. 1 root root 1642 May 31 09:49 ifdown-post -rwxr-xr-x. 1 root root 1068 May 31 09:49 ifdown-ppp -rwxr-xr-x. 1 root root 837 May 31 09:49 ifdown-routes -rwxr-xr-x. 1 root root 1444 May 31 09:49 ifdown-sit -rwxr-xr-x. 1 root root 1462 May 31 09:49 ifdown-tunnel lrwxrwxrwx. 1 root root 22 Jun 27 19:12 ifup -> ../../../usr/sbin/ifup -rwxr-xr-x. 1 root root 12445 May 31 09:49 ifup-aliases -rwxr-xr-x. 1 root root 859 May 31 09:49 ifup-bnep -rwxr-xr-x. 1 root root 10234 May 31 09:49 ifup-eth -rwxr-xr-x. 1 root root 12033 May 31 09:49 ifup-ippp -rwxr-xr-x. 1 root root 10437 May 31 09:49 ifup-ipv6 -rwxr-xr-x. 1 root root 804 May 31 09:49 ifup-ipx lrwxrwxrwx. 1 root root 9 Jun 27 19:12 ifup-isdn -> ifup-ippp -rwxr-xr-x. 1 root root 642 May 31 09:49 ifup-plip -rwxr-xr-x. 1 root root 1043 May 31 09:49 ifup-plusb -rwxr-xr-x. 1 root root 2609 May 31 09:49 ifup-post -rwxr-xr-x. 1 root root 4154 May 31 09:49 ifup-ppp -rwxr-xr-x. 1 root root 1925 May 31 09:49 ifup-routes -rwxr-xr-x. 1 root root 3268 May 31 09:49 ifup-sit -rwxr-xr-x. 1 root root 2607 May 31 09:49 ifup-tunnel -rwxr-xr-x. 1 root root 3775 May 31 09:49 ifup-wireless -rwxr-xr-x. 1 root root 4623 May 31 09:49 init.ipv6-global -rw-r--r--. 1 root root 13836 May 31 09:49 network-functions -rw-r--r--. 1 root root 26134 May 31 09:49 network-functions-ipv6 PEERROUTES="yes" IPV6INIT="yes" NAME="enp2s5" IPV6_PEERDNS="yes" DEFROUTE="yes" UUID="7622e20e-3f2a-4b5c-83d8-f4f6e22ed7ec" PEERDNS="yes" IPV4_FAILURE_FATAL="no" HWADDR="00:14:85:BC:1C:63" BOOTPROTO="static" IPV6_DEFROUTE="yes" IPV6_AUTOCONF="yes" IPV6_FAILURE_FATAL="no" TYPE="Ethernet" ONBOOT="yes" IPV6_PEERROUTES="yes" IPADDR=192.168.178.11 NETMASK=255.255.255.0 BROADCAST=192.168.178.255 NETWORK=192.168.178.0 GATEWAY=192.168.178.1 [root@bitch network-scripts]# dmesg | grep udevd [ 0.788381] systemd-udevd[97]: starting version 204 [ 2.457296] systemd-udevd[322]: starting version 204 [ 3.110272] systemd-udevd[329]: renamed network interface eth0 to p3p1