- How to configure Nginx
- BitLaunch
- BitLaunch
- Nginx basics: config location and terminology
- Nginx.conf directives
- Nginx server blocks
- Location blocks
- Server name and virtual hosting
- How to Install LEMP Stack on Ubuntu 20.04
- A Beginners Guide to systemctl
- Creating NGINX Plus and NGINX Configuration Files
- Directives
- Feature-Specific Configuration Files
- Contexts
- Virtual Servers
- Sample Configuration File with Multiple Contexts
- Inheritance
- Reloading Configuration
How to configure Nginx
Nginx is a popular open-source software that server admins can use for a variety of tasks, from the setup of a reverse proxy server to media streaming, load balancing, and web serving.
BitLaunch
BitLaunch
Sign up for BitLaunch and learn how to configure Nginx today.
Nginx is a popular open-source software that server admins can use for a variety of tasks, from the setup of a reverse proxy server to media streaming, load balancing, and web serving. We’ve already covered how to quickly install Nginx on Ubuntu 20.04, but the bulk of the work comes in its full configuration.
The idea of this tutorial isn’t to show you how to configure Nginx for your specific situation, but to give a better understanding of basic parameters and conventions so you have the flexibility to utilize it for various use cases in the future. Either way, you’ll want to be aware of a few pre-requisites if you want to explore the Nginx config files for yourself while we explain them:

- A Linux install, preferably on a VPS (we’ll be using Ubuntu 20.04)
- Your VPS credentials, found in your hosts’ control panel
- A pre-existing Nginx install on your VPS or local machine
- An SSH tool like PuTTy, to connect to your VPS
- A secured VPS server to avoid breaches
Nginx basics: config location and terminology
The Nginx config location, as you may expect, is in /etc/nginx . You can type cd nginx followed by ls to view them all, but know that the main file you’ll be working with is nginx.conf.
Before we dive into things, it’s worth pinning down some terminology. Nginx configuration options are known as Nginx directives, with themselves are organized into groups, called Nginx contexts or Nginx blocks. There’s no real difference between blocks and contexts, and the two can be used interchangeably.
A # , also known as a comment, usually precedes text and forces Nginx to ignore that line. This is typically used to explain options, but it can also be utilized to temporarily remove a troublesome value from the document for troubleshooting purposes. Commenting a line is different from removing the semi-colon from the end of it – Nginx will still try to run lines without a semi-colon and will report an error.
Nginx.conf directives
Open your Nginx configuration file with with sudo nano /etc/nginx/nginx.conf . You’ll see similar output to our Nginx test config below:
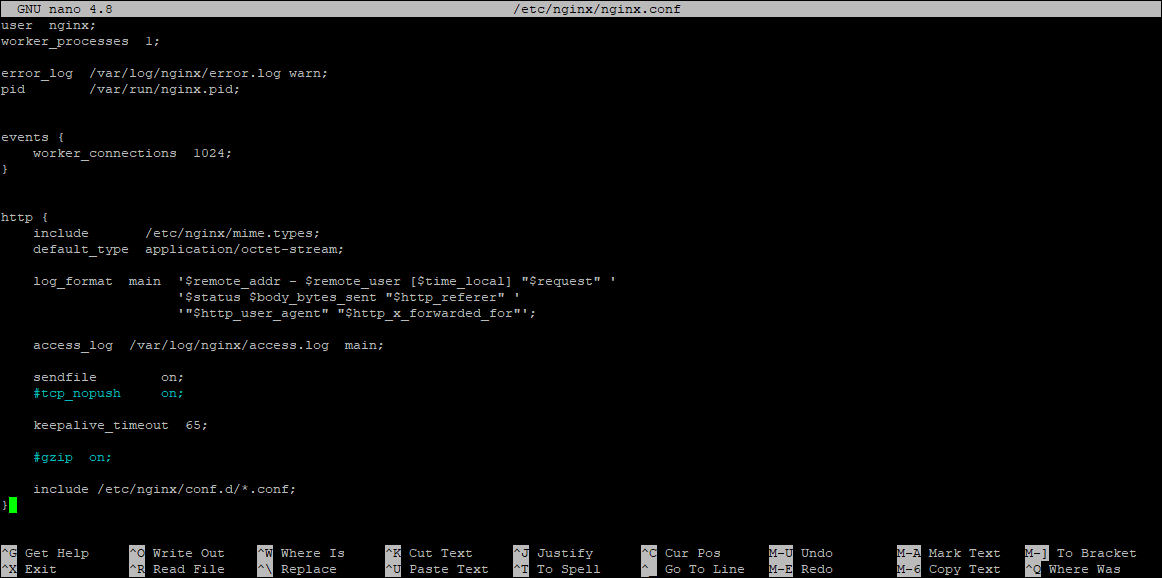
In this case, we have four directives that sit on their own: user nginx , worker_processes , error_log , and pid . Directives that aren’t within a block/context are referred to as being in the main block. You’ll notice that events and http are also in the main block, but they have room for additional directives inside their brackets. We can, therefore, refer to them as the http block and the events block.
The http block helps to define how Ngnix handles web traffic. The directives in this block are inherited by all the website configs Nginx servers, making them universal. You can see, for example, that our config has a line, #tcp_nopush on; , which is commented out. Removing the hash would enable the use of the TCP_cork option on Linux for all sites under Nginx. You can read a full list of http directives in the official Nginx documentation.
Nginx server blocks
You may have noticed that the include directive at the bottom of the http block links to further .conf files. This is the location of your website Ngnix files, and their location will vary depending on which option you used to install Nginx in our previous tutorial.
If you installed Nginx via apt-get , the line will point to /etc/nginx/sites-enabled* . Insides the sites-enabled directory will be symlinks to Nginx config files in /etc/nginx/sites-available . You can therefore remove sites from sites-available by removing the symlink. You can view symlinks in a folder with ls -l , then remove them with rm symlink_name .
Those who installed Nginx via the official repository will instead see include etc/nginx/conf.d/*.conf; . Exploring the folder, you’ll notice that each site hosted with Nginx will have its own .conf file here with its url at as the name.
You’ll find an Nginx config example to give you an idea of what Nginx server blocks look like at etc/nginx/sites-enabled/default or /etc/nginx/conf.d/default.conf .
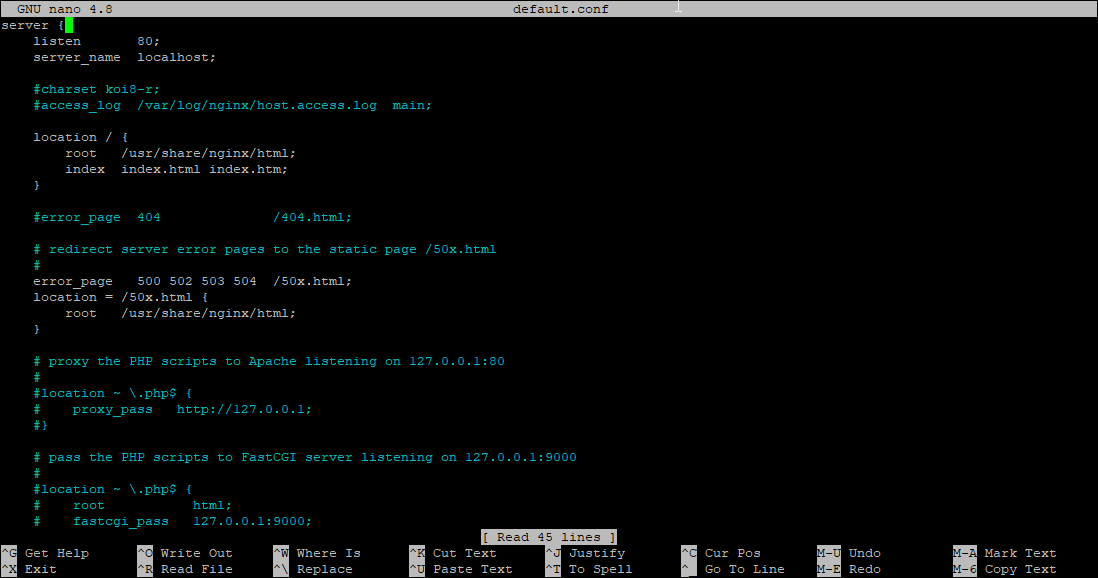
Ours looks like the above, but a real site may have some additional Nginx directives and will point to the server URL, rather than localhost. You’ll also note the listen directive, which is 80 by default, and defines the port at which Nginx should listen for HTTP connections. You’ll likely have two of these, one of IPv4 and one for IPv6, and they may or may not contain the argument default_server .
“The default_server parameter, if present, will cause the server to become the default server for the specified address:port pair,” explains Nginx. “If none of the directives have the default_server parameter then the first server with the address:port pair will be the default server for this pair.”
Location blocks
In your server directive, you’ll also notice the location block, which lets the admin define how Ngnix will process resource requests. As a result, you’ll see several directories and files here, such as
location /about/ < >location /about/education < >location /education/ < >location /education/about
Nginx will always return the location with the longest matching prefix string when someone sends a HTTP request. It looks for strings first, then regular expressions, which are created when a location is followed by the tidle ‘~’ symbol. Here’s one from our example config:

Regular expression matches are always case sensitive, so \.PhP$ wouldn’t match. A case insensitive regular expression can be created by adding a * after the tilde (location ~* \.PhP$`). You can also add a caret ‘^’ before your tilde to tell Nginx to stop searching for more specific matches once it matches a particular string. The equals = sign, meanwhile, forced an exact match and stop searching for more specific matches after that point.
Exact strings are processed first, followed by literal strings, then regular expressions, and finally, the most specific literal string if there are no matching regular expressions.
You may have also noticed a location setting like this in your config:
The location directive can have its own blocks. These determine how it will respond to a request once a match is found. Index determines what Nginx will serve to the user if nothing is specified. Therefore, if somebody tries to visit http://yourwebiste.com, they’ll be served index.html, or index.htm if the html file doesn’t exist in that directory. If there’s no match, they’ll be hit with a 404 error.
Server name and virtual hosting
The server_name field in your server block may point to an IP address or the name-based version of the site (www.bitlaunch.io). It can be used to serve more than one domain from a single IP, for example, if you want it to process requests for bitlaunch.com and www.bitlaunch.io, for example, which would read:
It’s best to create one Nginx config file for each site you want to host on your server, rather than defining server_name for bitlaunch.io and example.com in the same .conf.
To save time, you can use wildcards to indicate that Nginx should process requests for all subdomains, or even for request from all domain names beginning with a certain string:
- For subdomains:
- server_name *.yourwebsite.com;
- For all domains beginning with yourwebsite.:
- server_name yourwebsite.*;
If your server is over LAN, server_name also lets you define server names that don’t exist. One instance of this is in our example default.conf file, where you’ll notice server_name localhost .

How to Install LEMP Stack on Ubuntu 20.04
LEMP is a stack of software that includes Linux, Nginx, MySQL and PHP, and is used for the deployment and management of web applications such as WordPress.
A Beginners Guide to systemctl
Today, we’re going to be showing you how to perform all of the above, while explaining some core concepts surrounding the tools so you can gain a better understanding.
Creating NGINX Plus and NGINX Configuration Files
Understand the basic elements in an NGINX or NGINX Plus configuration file, including directives and contexts.
NGINX and NGINX Plus are similar to other services in that they use a text‑based configuration file written in a particular format. By default the file is named nginx.conf and for NGINX Plus is placed in the /etc/nginx directory. (For NGINX Open Source , the location depends on the package system used to install NGINX and the operating system. It is typically one of /usr/local/nginx/conf , /etc/nginx , or /usr/local/etc/nginx .)
Directives
The configuration file consists of directives and their parameters. Simple (single‑line) directives each end with a semicolon. Other directives act as “containers” that group together related directives, enclosing them in curly braces ( <> ); these are often referred to as blocks. Here are some examples of simple directives.
user nobody; error_log logs/error.log notice; worker_processes 1; Feature-Specific Configuration Files
To make the configuration easier to maintain, we recommend that you split it into a set of feature‑specific files stored in the /etc/nginx/conf.d directory and use the include directive in the main nginx.conf file to reference the contents of the feature‑specific files.
include conf.d/http; include conf.d/stream; include conf.d/exchange-enhanced; Contexts
A few top‑level directives, referred to as contexts, group together the directives that apply to different traffic types:
- events – General connection processing
- http – HTTP traffic
- mail – Mail traffic
- stream – TCP and UDP traffic
Directives placed outside of these contexts are said to be in the main context.
Virtual Servers
In each of the traffic‑handling contexts, you include one or more server blocks to define virtual servers that control the processing of requests. The directives you can include within a server context vary depending on the traffic type.
For HTTP traffic (the http context), each server directive controls the processing of requests for resources at particular domains or IP addresses. One or more location contexts in a server context define how to process specific sets of URIs.
For mail and TCP/UDP traffic (the mail and stream contexts) the server directives each control the processing of traffic arriving at a particular TCP port or UNIX socket.
Sample Configuration File with Multiple Contexts
The following configuration illustrates the use of contexts.
user nobody; # a directive in the 'main' context events < # configuration of connection processing > http < # Configuration specific to HTTP and affecting all virtual servers server < # configuration of HTTP virtual server 1 location /one < # configuration for processing URIs starting with '/one' > location /two < # configuration for processing URIs starting with '/two' > > server < # configuration of HTTP virtual server 2 > > stream < # Configuration specific to TCP/UDP and affecting all virtual servers server < # configuration of TCP virtual server 1 > > Inheritance
In general, a child context – one contained within another context (its parent) – inherits the settings of directives included at the parent level. Some directives can appear in multiple contexts, in which case you can override the setting inherited from the parent by including the directive in the child context. For an example, see the proxy_set_header directive.
Reloading Configuration
For changes to the configuration file to take effect, it must be reloaded. You can either restart the nginx process or send the reload signal to upgrade the configuration without interrupting the processing of current requests. For details, see Controlling NGINX Processes at Runtime.
With NGINX Plus, you can dynamically reconfigure load balancing across the servers in an upstream group without reloading the configuration. You can also use the NGINX Plus API and key‑value store to dynamically control access, for example based on client IP address.