- Login loop on 16.04 and no access to console
- Linux — Local & Remote Graphical and Text Mode Console
- Logging into Local Linux Systems
- Local GUI
- Local Text Console (or Virtual Terminal)
- Logging into Remote Linux Systems
- Remote GUI
- Logging into Remote Systems with SSH (text-mode logins)
- No console login prompt in Xenial VM on KVM host
- 2 Answers 2
Login loop on 16.04 and no access to console
I am using Lenovo Thinkpad P50 with dual booting system (Win 10 and Ubuntu 16.04), Wacom Pen support and multitouch screen. After I enabled the propriety nVidia driver (361.42?) and rebooted, I got the login loop problem. Every solution I can find would suggest to go to the console or the TTY mode to enter some commands, but in my case I cannot even switch to the TTY mode — ctr+alt+F1 doesn’t work! BTW, I was trying to make the second monitor work with the nVidia driver for the nVidia Quodra M1000M card, but no luck so far. Update: I finally got into console by chance (don’t remember what works). Tried: all the solutions on Graphics issues after/while installing Ubuntu 16.04/16.10 with NVIDIA graphics. nVidia-361 abd nVidia-364 drivers didn’t work at all. UEFI has been turned off. I also uninstalled Unity (may not be complete) and installed GNOME 3.20. Tried deleting the .Xauthority file. Using Linux kernel 4.6. See comments on the answers below. It only works when I uninstall nvidia drivers, but I need the nvidia driver for external monitor (so far no luck to use the external monitor). Any suggestions? One error before unstalling unity.
openConnection: connect: No such file or directory cannot connect to brltty at :0 upstart: gnome-session (Unity) main process (2642) terminated with status 1 upstart: unity-settings-daemon main process (2632) killed by TERM signal upstart: logrotate main process (2492) killed by TERM signal upstart: bamfdaemon main process (2545) killed by TERM signal upstart: Disconnected from notified D-Bus bus upstart: unity-panel-service main process (2647) killed by TERM signal upstart: job indicator-bluetooth failed to stop Also, when I see the login loop happening, there is a flash of window popped out saying «Unknown tablet connected. The Wacom Inc. Pen and Multitouch may not work as expected. «
Linux — Local & Remote Graphical and Text Mode Console

In this blog, we will see how to log into the local console & remote graphical and text mode consoles in Linux.
We’re all used to logging in to apps or websites by providing a username and password. Logging into a Linux system is pretty much the same, so there’s not much mystery here. We’ll look at four ways to log in:
- Log into a local Linux system (local text-mode console).
- Log into a local Linux system (local graphical-mode console).
- Log into a remote Linux system (text-mode login)
- Log into a remote Linux system (graphical-mode login)
Watch this video to learn more about Linux’s main concepts.
Let’s move back to logins. In practice, most often you’ll log in to remote Linux systems. But let’s start with the less common scenarios.
Logging into Local Linux Systems
“Local” is just a tech word for “something that is in front of you” or “something you can physically access”. A computer on your desk is local. A server running on Google Cloud is remote.
Local GUI
Usually, when Linux is installed on servers, it is installed without GUI (Graphical User Interface) components. There’s no mouse pointer, no buttons, no windows, no menus, nothing of that sort, just text. But you might sometimes run across servers that include this GUI. Logging in is super easy, as it’s all “in your face”. You’ll see a list of users you can choose from and you can then type your user’s password.
Don’t forget to log out when you’ve finished your work.
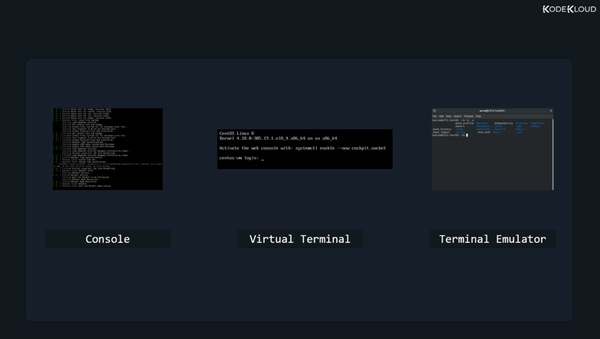
Local Text Console (or Virtual Terminal)
If the device has the typical server-oriented Linux OS installed, without any GUI components, logging in (locally) is also easy. You’ll usually see something like this on your screen:
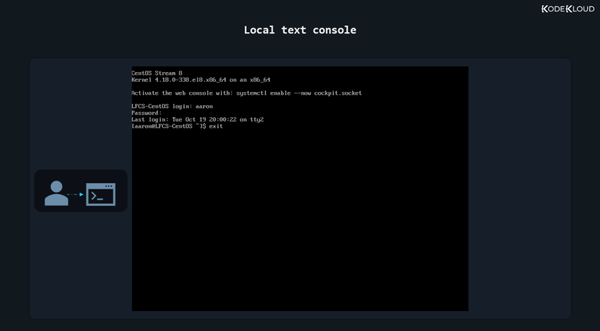
There’s no list of users this time, but you can just type your username and then your password. Note that as you type the password no text is displayed. If you’ve already done this a few times in the past, it will be no surprise. But for someone doing it for the first time, it might be misleading, giving the impression that the password is not accepted, or received, or something along those lines. It’s no issue. And if you type something wrong, you can actually press backspace to delete the last character you mistyped. Or you can press backspace multiple times to delete the whole password and type it again.
When your work is done, you should type
Logging into Remote Linux Systems
Most of your logins will be to remote systems as fewer and fewer companies keep servers on-site these days, preferring to use the cloud.
Remote GUI
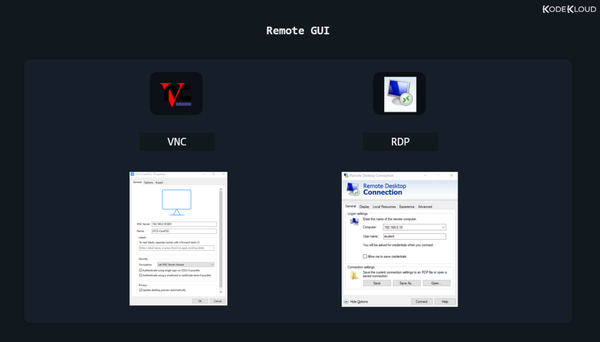
Again, most Linux operating systems running on servers will have no GUI components installed. But you will sometimes run into exceptions. Connecting to a remote server, to its graphical user interface is slightly more tricky. First of all, there is no standard set in stone. Whoever configured that server chose their preferred way of dealing with these remote graphical logins. They could have chosen to install a VNC (Virtual Network Computing) solution. In this case, you’d need to download the proper VNC client (also called “VNC viewer”) to connect to it. This might be TightVNC or RealVNC or something else entirely. It all depends on the VNC server running on the remote system and what VNC clients your local operating system supports.
If the administrator of that server wanted to let Windows users connect easily, it might mean that they used a solution allowing for RDP connections (Remote Desktop Protocol). This means you can just click on the Windows start button, type “Remote Desktop Connection”, open that app, and then enter the username and password you’ve been provided.
Whatever it might be, connecting to a remote graphical console is pretty easy. It all boils down to downloading the application that lets you do that, entering the remote system’s IP address, followed by a username and a password.
Finally, we get to the most common way you’ll log into a Linux system.
Logging into Remote Systems with SSH (text-mode logins)
Initiating a text-based remote connection to a Linux system is pretty standard. That’s because almost every Linux server uses the same tool that allows for remote logins: the OpenSSH daemon (a program that runs in the background, on the server, all the time). SSH comes from Secure SHell. Until SSH, something called telnet was the standard. telnet was highly insecure as it did not encrypt communication between you and the server you were connecting to. This meant that anyone on the same network with you could steal your Linux user password and see everything you did on that server, during your telnet session. The SSH protocol uses strong encryption to avoid this and the OpenSSH daemon is built carefully to avoid security bugs as much as possible. Long story short, OpenSSH is used by millions of servers and has stood the test of time, proving to be very hard to hack. For these reasons everyone happily uses it and trusts that it can do a pretty good job at only letting authorized people log into their operating systems while keeping bad people out.
In case you’re following along on your virtual machine, log in locally (directly from the virtual machine window) and then enter this command:
You’ll see what IP your machine uses.
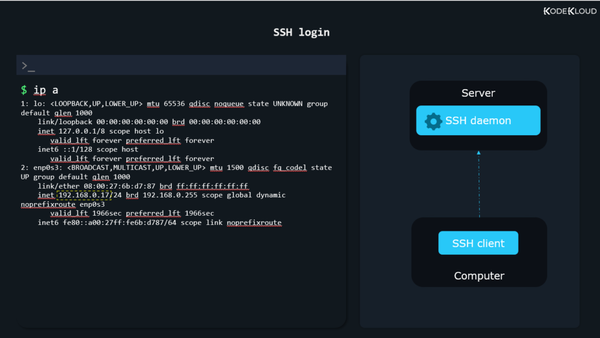
We’ll use this IP, 192.168.0.17 to simulate a situation where we have a server in a remote location.
Now to recap. We have an SSH daemon (program) running on the server. This listens for any incoming connections. To be able to connect to this remote SSH daemon, we’ll need something called an SSH client (yet another program). This client will run on our current laptop/desktop computer.
MacOS systems and Linux-based operating systems, such as Ubuntu, already have an SSH client preinstalled. If your computer/laptop had Windows on it, however, in the past, you needed to install an SSH client like PuTTY. On the latest Windows 10 this is no longer necessary as an SSH client is also preinstalled. If you’re on MacOS or Linux, open a terminal emulator window. If you’re on Windows, click the Start Menu and type “cmd” to open up Command Prompt.
To connect to a remote Linux system through SSH, type:
Of course, replace “alex” with the actual username you created inside your Linux OS running in the virtual machine. Same with the IP number.
To learn more about Linux checkout our hands-on Linux course here
To get free hands-on experience on System Administration and DevOps tasks please checkout our KodeKloud Engineer program here.
No console login prompt in Xenial VM on KVM host
I just installed a fresh VM using Xenial beta mini.iso installation like I do for any Ubuntu based VM on my KVM based virtualisation host, but this VM doesn’t show console login prompt on (KVM) VNC port. I can reach the VM perfectly fine via SSH, so there’s no immediate problem. I was just wondering what’s preventing Xenial from showing login prompt on KVM VNC port? There is just one message log line in console: /dev/vda1: clean, 60259/917504 files, 360205/3669760 blocks but no login prompt?
2 Answers 2
It seems that Xenial tends to show the graphical console (tty7) after boot — which is unfortunately empty, except for the line quoted above.
You can ‘fix’ this immediately by hitting Ctrl-Alt-1 to switch to tty1, which is a text console.
To make this permanent, add a line like this to /etc/default/grub :
GRUB_GFXPAYLOAD_LINUX=text This makes grub tell Linux to use the «text» console after boot.
I came across this and it seemed to be related to the kernel version. I had tried to take a short-cut by using a script I always use for provisioning headless VMs with a recent Ubuntu KVM image, and then adding I would ‘apt-get’ the desktop components afterwards. It nearly worked. GDM would start but Xorg couldn’t find /dev/tty1 , and there was no console output either terminal or graphical. Just a flashing cursor in top-left.
I was able to work around this. I installed the -generic version of the kernel, rebooted and removed the -kvm version. This got me further, and I then used tasksel to try switching it’s purpose further, but I suffered a network disconnection half-way through the install so it all got messy/inconsistent. I couldn’t re-connect via SSH.
I might have got further if had I kept trying, but I had already spent longer on the short-cut than expected, so I just downloaded a recent Desktop CD, mounted it into the VM and re-installed using the old-school ISO installer.