- Disable user shell for security reasons
- 6 Answers 6
- How to Create SFTP User in Ubuntu 22.04 (No Shell Access)
- Prerequisites
- Step 1 – Installing OpenSSH Server
- Step 2 – Create SFTP User
- Step 3 – Configure SFTP Directory
- Step 4 – Update SSH Configuration File
- Step 5 – Connect to SFTP User
- Conclusion
- 🐧 Как отключить доступ к оболочке для учетной записи пользователя на Linux
- Создание нового пользователя без доступа к оболочке
- Отключение оболочки для существующего пользователя
- Заключение
Disable user shell for security reasons
We have several user accounts that we create for automated tasks that require fine-grained permissions, such as file transfer across systems, monitoring, etc. How do we lock down these user accounts so that these «users» have no shell and are not able to login? We want to prevent the possibility that someone can SSH in as one of these user accounts.
6 Answers 6
You can use the usermod command to change a user’s login shell.
usermod -s /sbin/nologin myuser usermod -s /usr/sbin/nologin myuser If your OS does not provide /sbin/nologin, you can set the shell to a NOOP command such as /bin/false:
usermod -s /bin/false myuser this was my first idea, unfortunately the ‘valid’ use of some user accounts are disabled when setting nologin
@jw013 Actually I have /usr/local/bin/maybe which /dev/urandom ly selects between those two. Maybe I should use it 😀
Changing the login shell does not necessarily prevent users from authenticating (except in some services that check if the user’s shell is mentioned in /etc/shells ).
People may still be able to authenticate to the various services that your system provides to unix users, and may still be authorized to perform some actions albeit probably not run arbitrary commands directly.
Changing the shell to /bin/false or /usr/sbin/nologin will only prevent them from running commands on those services that can be used to run commands (console login, ssh, telnet, rlogin, rexec. ), so affect authorisation for some services only.
For ssh for instance, that still allows them to do port forwarding.
passwd -l will disable password authentication, but the user may still be allowed to use other authentication methods (like authorized_keys with ssh ).
With pam on Linux at least, you can use the pam_shells module to restrict authentication or authorisation to users with an allowed shell (those mentioned in /etc/shells ). For ssh , you’ll want to do it at authorisation ( account ) level as for authentication sshd uses pam in addition to other authentication methods (like authorized_keys ), or you can do it with sshd_config directives in /etc/ssh/sshd_config (like AllowUsers and friends).
Beware though that adding some restrictions in global pam authorisation will potentially prevent running cron jobs as those users.
How to Create SFTP User in Ubuntu 22.04 (No Shell Access)
SFTP is a protocol that allows for the secure transfer of files over a network. It is often used by businesses and individuals to transfer sensitive data. SFTP is similar to FTP but uses a different protocol for communication. SFTP is more secure than FTP and is often used in conjunction with SSH (Secure Shell) to provide an even higher level of security.
In this tutorial, we will help you to set up an SFTP server and create an SFTP-only user on Ubuntu 22.04 systems. That account can connect over SFTP but is not able to connect over SSH. Also, this will restrict (chroot) the SFTP user to a specific directory only.
Prerequisites
Step 1 – Installing OpenSSH Server
The Ubuntu servers have already installed the OpenSSH server but the desktop systems may not have it. Use the following command to install and run OpenSSH server:
sudo apt update && sudo apt install openssh-server Step 2 – Create SFTP User
First of all, create a new account in your system to use as sftp user.
The following command will create a new account named sftpuser with no shell access. You can change the username of your choice
sudo adduser --shell /bin/false sftpuser 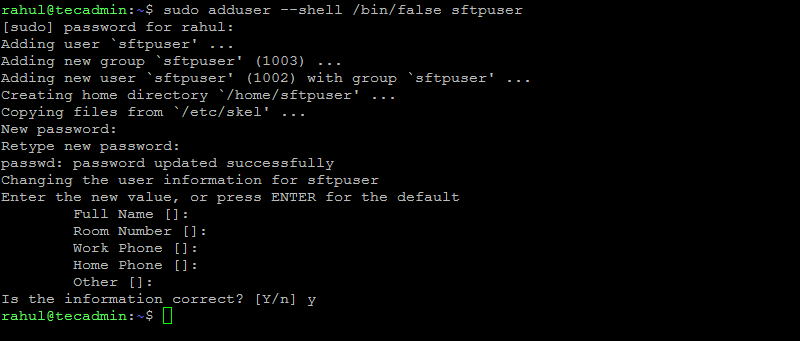
Step 3 – Configure SFTP Directory
Now, create the directory structure to be accessible by the sftp user.
sudo mkdir -p /var/sftp/files Here we will allow users to access the “files” directory only.
Now, change the ownership of the files directory to the sftpuser. So that sftpuser can read and write on this directory only.
sudo chown sftpuser:sftpuser /var/sftp/files And set the owner and group owner of the /var/sftp to root. The root user has read/write access on this access. Group members and other accounts have only read and execute permissions.
sudo chown root:root /var/sftpsudo chmod 755 /var/sftp
Step 4 – Update SSH Configuration File
Now edit the SSH configuration file in a text editor
sudo vim /etc/ssh/sshd_config and add the following settings at end of file.
Match User sftpuser ForceCommand internal-sftp PasswordAuthentication yes ChrootDirectory /var/sftp PermitTunnel no AllowAgentForwarding no AllowTcpForwarding no X11Forwarding no
Make sure to add configuration after the Subsystem line as shown in below screenshot:

Save the configuration file and close it.
Now validate the configuration file.
If the validation is successful, no output will be displayed. In case, any error shows in the output, make sure to fix it before running the next commands.
Restart the SSH service to apply changes.
sudo systemctl restart ssh All done. SFTP-only user is successfully created on your Ubuntu system. Now try logging into the remote system with the new user’s credentials, and check if everything is working correctly.
Step 5 – Connect to SFTP User
One can connect to a remote SFTP server using a command line or graphical applications like Filezilla or WinSCP. In this tutorial, I will show you both ways to connect sftp to only an account on the Ubuntu system.
Linux users can use the sftp command-line utility to connect to a remote sftp instance.
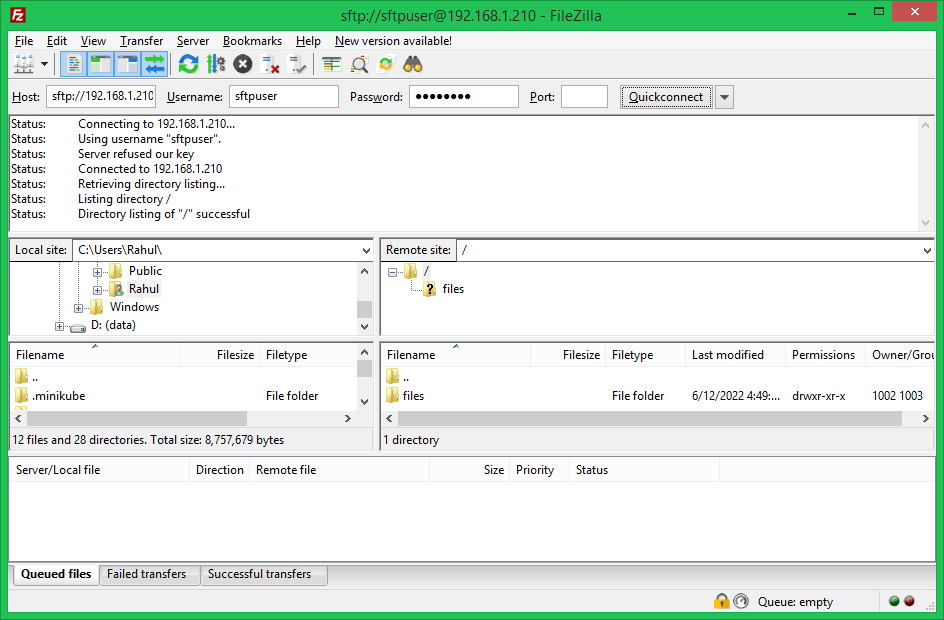
sftp [email protected] [email protected]'s password: sftp>You can also connect to a remote SFTP server using graphical interface applications like FileZilla. That is available for both Linux and Windows users. Open the Filezilla application and input to sftp details:
- Host: sftp://system-ip-host
- Username: Use SFTP user created in step 1.
- Password: Use SFTP user password created in step 1.
- Port: Use SSH server port or keep empty for default port.
Click the Quickconnect button:
Verify no shell access:
As this account is configured for SFTP-only connection. So if any user tried to connect via SSH will be disconnected immediately after successful authentication. The user will get the below message:
ssh [email protected] [email protected]'s password: This service allows sftp connections only. Connection to sftp.tecadmin.net closed.Conclusion
In conclusion, setting up an SFTP server is a great way to securely transfer files between computers. By following the steps in this article, you can set up your own SFTP server in no time on Ubuntu systems. If you have any questions, feel free to leave a comment below and we’ll be happy to help.
🐧 Как отключить доступ к оболочке для учетной записи пользователя на Linux
Мануал
По умолчанию при создании учетной записи пользователя в Linux, пользователь будет явно иметь доступ к SSH.
Бывают ситуации, когда учетным записям пользователей не нужен shell-доступ к FTP, почте или ssh.
В этом руководстве мы узнаем, как отключить доступ к shell для пользователя в Linux. В результате пользователь не сможет войти в оболочку.
Создание нового пользователя без доступа к оболочке
По умолчанию при создании учетной записи пользователю назначается оболочка, как определено в файле /etc/default/useradd.
При создании учетной записи пользователя вы можете явно указать оболочку, в которую пользователь должен войти.
Linux поставляется с оболочкой /sbin/nologin, которая выводит сообщение ‘ This account is currently not available ‘, когда пользователь пытается подключиться.
Это один из способов запретить пользователю доступ к оболочке входа в систему.
Давайте проверим две команды для создания пользователя с отключенной оболочкой.
Отключение оболочки для существующего пользователя
Чтобы изменить shell для существующего пользователя, используйте команду chsh или usermod.
Использование команды chsh:
Чтобы изменить shell на nologin для пользователя с именем bob, введите:
sudo chsh -s /sbin/nologin bob Чтобы изменить оболочку на /sbin/ftpnologin для пользователя с именем bob, введите:
sudo usermod bob -s /sbin/ftpnologin Вы можете настроить оболочку так, чтобы она показывала пользовательское сообщение, когда пользователи входят в систему через ftp.
!/bin/shNo shell access. Only FTP access allowed. Чтобы дать права на выполнение, введите:
sudo chmod a+x /sbin/ftpnologin Все оболочки доступны в /etc/shell, добавьте новую оболочку в этот список:
echo "/sbin/ftpnologin" | sudo tee -a /etc/shells Вместо вышеописанных методов, вы можете вручную изменить оболочку, отредактировав файл /etc/password, это также сработает.
Заключение
В этом руководстве мы узнали, как запретить учетной записи пользователя доступ к оболочке по умолчанию.
Спасибо за прочтение, пожалуйста, оставляйте свои отзывы и предложения в разделе комментариев ниже.
Пожалуйста, не спамьте и никого не оскорбляйте. Это поле для комментариев, а не спамбокс. Рекламные ссылки не индексируются!

- Аудит ИБ (49)
- Вакансии (12)
- Закрытие уязвимостей (105)
- Книги (27)
- Мануал (2 306)
- Медиа (66)
- Мероприятия (39)
- Мошенники (23)
- Обзоры (820)
- Обход запретов (34)
- Опросы (3)
- Скрипты (114)
- Статьи (352)
- Философия (114)
- Юмор (18)

Anything in here will be replaced on browsers that support the canvas element
OpenVPN Community Edition (CE) – это проект виртуальной частной сети (VPN) с открытым исходным кодом. Он создает защищенные соединения через Интернет с помощью собственного протокола безопасности, использующего протокол SSL/TLS. Этот поддерживаемый сообществом проект OSS (Open Source Software), использующий лицензию GPL, поддерживается многими разработчиками и соавторами OpenVPN Inc. и расширенным сообществом OpenVPN. CE является бесплатным для […]
Что такое 404 Frame? Большинство инструментов для взлома веб-сайта находятся в 404 Frame. Итак, что же представляют собой команды? Вы можете отдавать команды, используя повседневный разговорный язык, поскольку разработчики не хотели выбирать очень сложную систему команд. Команды Команды “help” / “commands” показывают все команды и их назначение. Команда “set target” – это команда, которая должна […]
В этой заметке вы узнаете о блокировке IP-адресов в Nginx. Это позволяет контролировать доступ к серверу. Nginx является одним из лучших веб-сервисов на сегодняшний день. Скорость обработки запросов делает его очень популярным среди системных администраторов. Кроме того, он обладает завидной гибкостью, что позволяет использовать его во многих ситуациях. Наступает момент, когда необходимо ограничить доступ к […]
Знаете ли вы, что выполняется в ваших контейнерах? Проведите аудит своих образов, чтобы исключить пакеты, которые делают вас уязвимыми для эксплуатации Насколько хорошо вы знаете базовые образы контейнеров, в которых работают ваши службы и инструменты? Этот вопрос часто игнорируется, поскольку мы очень доверяем им. Однако для обеспечения безопасности рабочих нагрузок и базовой инфраструктуры необходимо ответить […]
Одной из важнейших задач администратора является обеспечение обновления системы и всех доступных пакетов до последних версий. Даже после добавления нод в кластер Kubernetes нам все равно необходимо управлять обновлениями. В большинстве случаев после получения обновлений (например, обновлений ядра, системного обслуживания или аппаратных изменений) необходимо перезагрузить хост, чтобы изменения были применены. Для Kubernetes это может быть […]