How to send desktop notifications using notify-send
Every desktop environment on Linux has its own notification system which implements the Freedesktop notifications specifications. Some of them, like GNOME or KDE, use their own built-in notification systems which cannot be replaced; others like Xfce or Mate, use more modular components (Xfce notification daemon and Mate notification daemon, respectively). Desktop-independent notification systems also exist (dunst, for example): most of the time they are used on minimal setups (e.g. when using a plain window manager instead of full blown Desktop environments).
In this tutorial we learn how to send desktop notifications from the command line using the notify-send utility.
In this tutorial you will learn:
- How to install notify-send on some of the most used Linux distributions
- How to use the notify-send utility to send desktop notifications
- How to specify a notification urgency and expiration time
- How to use a custom notification icon

| Category | Requirements, Conventions or Software Version Used |
|---|---|
| System | Distribution independent |
| Software | notify-send |
| Other | Administrative privileges to install software |
| Conventions | # – requires given linux-commands to be executed with root privileges either directly as a root user or by use of sudo command $ – requires given linux-commands to be executed as a regular non-privileged user |
Installation
The notify-send utility is available on all the major Linux distributions as part of the libnotify library. Most of the times, it is installed by default, however, if for a reason or another it is not, here is how to install it explicitly. On Fedora, and other distributions of the Red Hat family, we can install the library by running the following command:
$ sudo dnf install libnotify
On Debian and Ubuntu, the utilities associated with the libnotify library are distributed in a dedicated package, separated from the library itself. The package is called libnotify-bin , and can be installed by running:
$ sudo apt install libnotify-bin
On Archlinux, the package we need to install is simply called libnotify . It is contained in the “Extra” repository and we can install it by using the pacman package manager:
Let’s see how we can use notify-send to send desktop notifications.
How to use notify-send
The notify-send utility takes only one mandatory argument which is the notification summary. In the following example we invoke the utility in this basic way:
$ notify-send "this is the summary"
Here is the result of the command, invoked in the context of the GNOME desktop environment:

When we want to include more information in a notification, we can include a body as the second argument accepted by the utility; it is displayed after the summary. Here is an example of a notification which includes a body and the output it produces:
$ notify-send "this is the summary" "this is the body of the notification"

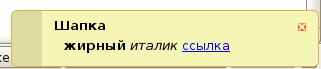
A limited set of HTML tags can be used inside the notification body:
Consequently we can make so that the text is visualized as bold or italic, use hyperlinks and images.
Specifying the urgency of a notification
There are three urgency levels which can be associated with a notification. They are, in order:
To specify the urgency of a notification when using the notify-send utility, all we have to do is to use the -u option (short for —urgency ) and pass the urgency level as argument. To send a critical notification, for example, we would run the following command:
$ notify-send -u critical "Critical notification!" "this is the body of the notification"
As you can see from the screenshot below, the icon associated with a critical notification is different from the default one. Critical notifications must be manually dismissed:

Speaking of the expiration time of a notification, it can be easily specified by using the -t option ( —expire-time ) , which takes the duration time in milliseconds as argument. Just as an example, to send a notification which should expire after 3 seconds, we would run:
$ notify-send -t 3000 "this is the summary" "this is the body of the notification"
As specified in the notify-send manual, however, not all notification system implementations respect this parameters: GNOME always ignores it, while KDE Plasma ignores it for notifications with the “critical” urgency level.
Using a custom notification icon
The notify-send utility provides an option we can use to specify the notification icon. The option is -i or —icon ; it takes the path of the icon we want to use as argument. Imagine we want to send a critical notification about the machine battery level, and use the “critical battery” Adwaita icon, which usually can be found as /usr/share/icons/Adwaita/scalable/status/battery-level-0-symbolic.svg . Here is the command we would run:
$ notify-send -u critical -i /usr/share/icons/Adwaita/scalable/status/battery-level-0-symbolic.svg "Connect charger!" "critical battery level, please connect charger"
Here is the notification produced by the command above:

Conclusions
In this article we learned how to use the notify-send utility to send desktop notifications from the command line; an ability which can be especially useful in shell scripts. We learned how to install the utility on some of the most used Linux distributions, how to specify a notification body and summary, how to specify the urgency of a notification and its expiration time, and how to use a custom icon for a notification. To know more about the Freedesktop notifications specifications you can consult the online documentation.
Related Linux Tutorials:
Linux notify send the
NAME
notify-send - a program to send desktop notifications
SYNOPSIS
notify-send [OPTIONS] summary> [body]
DESCRIPTION
With notify-send you can send desktop notifications to the user via a notification daemon from the command line. These notifications can be used to inform the user about an event or display some form of information without getting in the user’s way.
OPTIONS
-?, --help Show help and exit. -u, --urgency=LEVEL Specifies the urgency level (low, normal, critical). -t, --expire-time=TIME The duration, in milliseconds, for the notification to appear on screen. (Ubuntu's Notify OSD and GNOME Shell both ignore this parameter.) -i, --icon=ICON[,ICON. ] Specifies an icon filename or stock icon to display. -c, --category=TYPE[,TYPE. ] Specifies the notification category. -h, --hint=TYPE:NAME:VALUE Specifies basic extra data to pass. Valid types are INT, DOUBLE, STRING and BYTE.
SEE ALSO
AUTHORS
Andre Filipe de Assuncao e Brito decko@noisemakers.org> Original author Paul van Tilburg paulvt@debian.org> Original author Riccardo Setti giskard@debian.org> Original author
© 2019 Canonical Ltd. Ubuntu and Canonical are registered trademarks of Canonical Ltd.
Собственные уведомления (notify) в Gnome
Речь пойдет об извещениях которые показываю практически все приложения от Rhythmbox до сетевых подключений. Хотелось иметь возможность показывать в таком виде собственные и поэтому я взял бубен и начал капать )
для начала понадобится установить пакет libnotify-bin, я под ubuntu запустил команду
sudo apt-get install libnotify-bin
после этого небольшой тест. Проверяем в консоле
если у вас появилась такое окошко значит можно двигаться дальше и разбираться с настройками

notify-send [OPTION. ] [BODY] — create a notification
-u, —urgency=LEVEL
Вариантов здесь не так много, low, normal, critical. Разница лишь в полоске которая появляется с левой стороны.
-t, —expire-time=TIME Specifies the timeout in milliseconds at which to expire the notification.
Здесь все понятно, указываем время в миллисекундах которе извещение будет висеть на экране.
-i, —icon=ICON[,ICON. ] Specifies an icon filename or stock icon to display.
С иконкой тоже все замечательно, Во первых можно прямо указать путь на любое изображение на диске. Другой вариант это открыть /usr/share/icons/hicolor/48×48/apps/ и выбрать там любую и указать ее название только без расширения notify-send -i pidgin test
-c, —category=TYPE[,TYPE. ] Specifies the notification category.
по идеи задание категории должно было дать результат но я поверьте его так и не заметил, поэтому пойдем дальше
-h, —hint=TYPE:NAME:VALUE Specifies basic extra data to pass. Valid types are int, double, string and byte.
хинты дают возможность большу возможность по настройке, например местоположение на экране где должно появится извещение -h int:x:500 -h int:y:500
теперь по тексту, принимаются 2 текста, первый идет в шапку, второй это тело с небольшими возможностями гипертекста
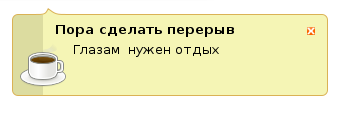
после того как разобрались с настройками сразу начинает зарождаться мысль, а куда это применить и первое это собственный органайзер. Все время говорят что надо отрываться от монитора каждые 45 минут, значит есть шанс это сделать. Шаг первый это написать небольшой скриптик
export DISPLAY=:0.0
PATH=/usr/bin/:/bin/
notify-send —urgency normal —expire-time=10000 -i typing-monitor -h int:x:500 -h int:y:500 «Пора сделать перерыв» «Глазам нужен отдых»
что здесь важно, это DISPLAY, крон его не видит в упор и поэтому команды хоть и будут выполнятся на экране ничего не появится.
сохраняем ставим на исполнение и проверяем
результат понравился? тогда дело за настройкой крона
45 * * * * /home/rus/sh1.sh
Ну вот
за дополнительной информацией обращайтесь на http://www.galago-project.org/specs/notification/0.9/x211.html
Насчет DISPLAY=:0.0. Жестковбитый DISPLAY — не хорошо. Он время от времени может меняться, даже, если всего один пользователь за компьютером. Кроме того, если ты закрыл сессию и ушел, крон будет все равно работать и ошибки будут сыпаться тебе в почту.
Лучше определять его автоматом, например, с помощью вот такой вот функции:
# get_display [USER] — Returns $DISPLAY of USER.
# If first param is omitted, then $LOGNAME will be used.
get_display () who \
| grep $ \
| perl -ne ‘if ( m!\(\:(\d+)\)$! ) END ‘
>
И в скрипте поправить вот так (в одной строчке нельзя, так как export сбивает $?):
DISPLAY=$(get_display) || exit
export DISPLAY