How to enable Nvidia fan control on Ubuntu 20.04. This is very easy.
Setting the GPU fan speed on Linux is very important if a user wants to participate in gaming and not have a burning smell come from their GPU. I have found a way to get this working and it is very simple.
Run this command to create a basic Xorg configuration to enable the setting we require.
┌──[jason@192.168.1.2]─[~] └──╼ ╼ $ sudo nvidia-xconfig -a --cool-bits=28 --allow-empty-initial-configuration
┌──[[email protected]]─[~] └──╼ ╼ $ sudo nvidia-xconfig -a —cool-bits=28 —allow-empty-initial-configuration
This creates a new /etc/X11/xorg.conf file that contains the required settings.
Section "Screen" Identifier "Screen0" Device "Device0" Monitor "Monitor0" DefaultDepth 24 Option "AllowEmptyInitialConfiguration" "True" Option "Coolbits" "28" SubSection "Display" Depth 24 EndSubSection EndSection
Section «Screen» Identifier «Screen0» Device «Device0» Monitor «Monitor0» DefaultDepth 24 Option «AllowEmptyInitialConfiguration» «True» Option «Coolbits» «28» SubSection «Display» Depth 24 EndSubSection EndSection
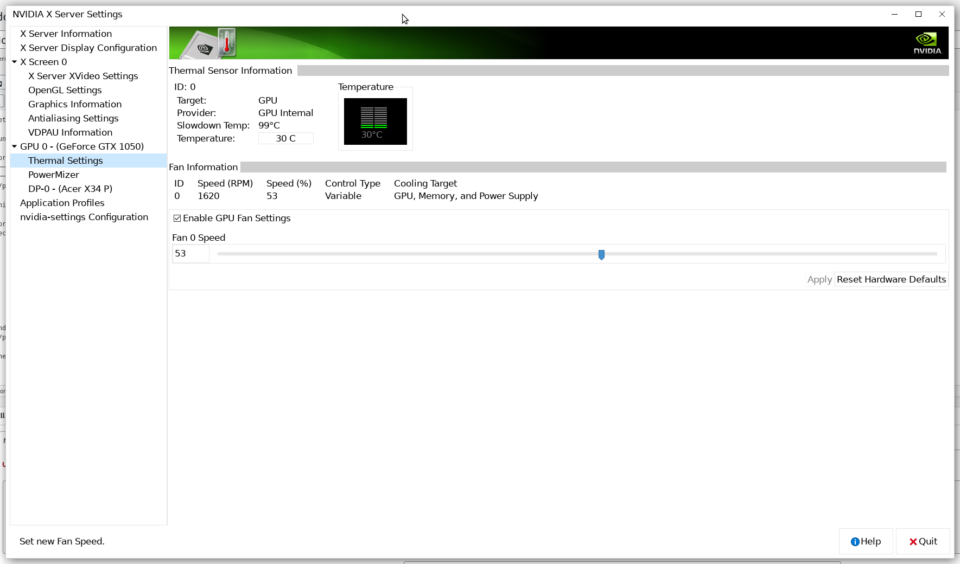
Then log out of the desktop session to GDM and then back in. Then the fan speed option should be available in Nvidia settings.
The above section of the xorg.conf has the Option «Coolbits» «28» option that will enable the Nvidia settings GUI to unlock the fan speed selection. Then set an appropriate fan speed for the GPU. 50% should be fine.
This is very simple and causes no issues. On Windows, you use MSI Afterburner to set the fan properties and monitor the temperature, but on Linux, you have Nvidia settings utility. So the ability to set the fan speed is necessary and it is very strange that this is not available unless you have configured a Xorg.conf file that is not even required anymore. But at least this setting works and allows a user to control something as simple as the speed of the GPU fan. The good thing about Linux is that there is always a good fix for a problem you encounter.
The fan speed of your Nvidia card may also be controlled with the command line. This is quick and easy to do.
┌──[jason@192.168.1.2]─[~/Documents] └──╼ ╼ $ nvidia-settings -a [fan:0]/GPUTargetFanSpeed=32 Attribute 'GPUTargetFanSpeed' (jason-desktop:1[fan:0]) assigned value 32.
┌──[[email protected]]─[~/Documents] └──╼ ╼ $ nvidia-settings -a [fan:0]/GPUTargetFanSpeed=32 Attribute ‘GPUTargetFanSpeed’ (jason-desktop:1[fan:0]) assigned value 32.
This command will return information about the GPU temperature. This is very useful to keep track of the temperature of the card whilst running intensive tasks using the GPU.
┌──[jason@192.168.1.2]─[~/Documents] └──╼ ╼ $ nvidia-smi -q -d temperature ==============NVSMI LOG============== Timestamp : Tue Dec 8 08:55:20 2020 Driver Version : 440.100 CUDA Version : 10.2 Attached GPUs : 1 GPU 00000000:04:00.0 Temperature GPU Current Temp : 31 C GPU Shutdown Temp : 102 C GPU Slowdown Temp : 99 C GPU Max Operating Temp : N/A Memory Current Temp : N/A Memory Max Operating Temp : N/A
┌──[[email protected]]─[~/Documents] └──╼ ╼ $ nvidia-smi -q -d temperature ==============NVSMI LOG============== Timestamp : Tue Dec 8 08:55:20 2020 Driver Version : 440.100 CUDA Version : 10.2 Attached GPUs : 1 GPU 00000000:04:00.0 Temperature GPU Current Temp : 31 C GPU Shutdown Temp : 102 C GPU Slowdown Temp : 99 C GPU Max Operating Temp : N/A Memory Current Temp : N/A Memory Max Operating Temp : N/A
This also shows the thermal throttling temperature and the critical shutdown temperature.
Another way to set the fan control is via the /usr/share/X11/xorg.conf.d/10-nvidia.conf file.
Section "OutputClass" Identifier "nvidia" MatchDriver "nvidia-drm" Driver "nvidia" Option "AllowEmptyInitialConfiguration" Option "Coolbits" "28" ModulePath "/usr/lib/x86_64-linux-gnu/nvidia/xorg" EndSection
Section «OutputClass» Identifier «nvidia» MatchDriver «nvidia-drm» Driver «nvidia» Option «AllowEmptyInitialConfiguration» Option «Coolbits» «28» ModulePath «/usr/lib/x86_64-linux-gnu/nvidia/xorg» EndSection
This might avoid the black screen error with Nvidia drivers as they are troublesome. Add the Option «Coolbits» «28» option here and see if this helps. On Ubuntu 20.04 with Nvidia Driver 470.63.01, you might use this instead.
Also, edit the /etc/X11/Xwrapper.config to look like this.
# Xwrapper.config (Debian X Window System server wrapper configuration file) # # This file was generated by the post-installation script of the # xserver-xorg-legacy package using values from the debconf database. # # See the Xwrapper.config(5) manual page for more information. # # This file is automatically updated on upgrades of the xserver-xorg-legacy # package *only* if it has not been modified since the last upgrade of that # package. # # If you have edited this file but would like it to be automatically updated # again, run the following command as root: # dpkg-reconfigure xserver-xorg-legacy #allowed_users=console allowed_users = anybody needs_root_rights = yes
# Xwrapper.config (Debian X Window System server wrapper configuration file) # # This file was generated by the post-installation script of the # xserver-xorg-legacy package using values from the debconf database. # # See the Xwrapper.config(5) manual page for more information. # # This file is automatically updated on upgrades of the xserver-xorg-legacy # package *only* if it has not been modified since the last upgrade of that # package. # # If you have edited this file but would like it to be automatically updated # again, run the following command as root: # dpkg-reconfigure xserver-xorg-legacy #allowed_users=console allowed_users = anybody needs_root_rights = yes
Then run this command to set the appropriate permissions.
sudo chmod 2644 /etc/X11/Xwrapper.config
sudo chmod 2644 /etc/X11/Xwrapper.config
Then reboot your Linux PC.
Another useful post. This contains a script that you may run with Startup Applications in the MATE desktop to get the fan running when you log in to your desktop.
#!/bin/bash nvidia-settings -a '[gpu:0]/GPUFanControlState=1' nvidia-settings -a '[fan]/GPUTargetFanSpeed=56'
#!/bin/bash nvidia-settings -a ‘[gpu:0]/GPUFanControlState=1’ nvidia-settings -a ‘[fan]/GPUTargetFanSpeed=56’
Add this to Startup Applications to use this script.
How can I change the nvidia GPU fan speed?
So im trying ubuntu again after being off it for awhile in win7 i can set gpu fan to 10-30% and its barly reaching 52c , however with ubuntu nvidia set it to 55% wich is really loud on my msi 460gtx. This is the only thing that keeps me from using ubuntu is there really no program or way to set manually like msi afterburner / evga precision , temperature curve & fan speed?. Default fan is way to loud and its barly 3 c diffrence from 25% gpu fan speed to 55% but the noise is alot more.
7 Answers 7
sudo nvidia-xconfig sudo nvidia-xconfig --cool-bits=4 restart your computer and search for NVIDIA X Server Settings in the Dash. There should be an option to change fan speed under Thermal Settings.
To provide some more explanations: This will generate a completely new xorg.conf and also adds Option «Coolbits» «4» to Section «Screen» . And the application called NVIDIA X Server Settings is nvidia-settings .
To control Nvidia GPU fan speed via Terminal on Linux Mint 20 with a 1070 Ti:
sudo nvidia-xconfig --cool-bits=4 to tell nvidia-xconfig to allow the fan to be controlled in the command line. You may need to reboot here.
Gives information about the GPU(s) and their numbers. Importantly I note that my 1070 Ti is GPU 0.
nvidia-settings -a "[gpu:0]/GPUFanControlState=1" -a "[fan:0]/GPUTargetFanSpeed=55" For a much more detailed overview of this feature including multiple GPU fans, check out this thorough documentation Nvidia Overclocking and Cooling
For a somewhat rambling and wayward thread which lead me to the above link, check out Set Fanspeed in Linux from Terminal
And as an extra tidbit not asked for in this question, you can also adjust the power output of your Nvidia GPU with:
Where the 0 is my GPU number, and the 90 is the maximum power in watts. If you set this too low, you will get an error. In my limited experience, setting it too high had no effect. I found I can get 95%+ performance for ~75% energy cost by setting the power level to 100 in the above command in my mining rig, but I imagine other power conscious users would appreciate this too.
Be careful about the highest voted answer. I have two 2080ti GPUs and running that command made my computer unable to boot.
Finally, I found an answer from here. Following that:
- Create a file named /etc/X11/xorg.conf.d/11-nvidia-coolbits.conf and write the following in it:
Section "OutputClass" Identifier "nvidia" MatchDriver "nvidia-drm" Driver "nvidia" Option "Coolbits" "4" EndSection Try sudo apt-get install nvclock
None of the above answers worked for me using the nvidia-settings GUI. Here’s the bash commands that enabled me to change my fan speed from the cli, when ssh tunneled into my desktop. (Note: I have SDDM (Simple Desktop Display Manager) rather than GDM (Gnome Desktop Manager) installed).
Get the Xauthority for the current Xserver.
(Note: you may need to plug in the monitor first and turn it on, otherwise, there’s a super interesting workaround option to run a new X server (e.g., X :0 && export DISPLAY=:0 avialable on the nvidia forums).
I didn’t need that since I can just plug a monitor (powered off) into the HDMI outlet. Here’s the simpler version:
Find the path to the Authorization File string that looks like -auth /var/run/sddm/ and copy the path (i.e., /var/run/sddm/ ). (Don’t use the dummy example here, it won’t work — you need to find your Auth File path with the command above).
Adjust your Nvidia GPU fanspeed
Now we’re ready to put the full command together — to set GPU 0 with a speed of 95% it’ll look like this (remember to replace the Auth File with the path you copied above):
sudo DISPLAY=:0 XAUTHORITY=/var/run/sddm/ nvidia-settings -a [gpu:0]/GPUFanControlState=1 -a [fan:0]/GPUTargetFanSpeed=95 Change the values to what you need. Check it worked by running this
Wrapping it all into a python script
If you’re lazy like me and just want a python script to do all this — you can paste the following into a file (e.g., a new file you create callsed fanspeed.py), then run python fanspeed.py .
#!/usr/bin/python import subprocess import re # Run 'ps' command and capture the output ps_process = subprocess.Popen(['ps', '-ax'], stdout=subprocess.PIPE) ps_output = ps_process.communicate()[0].decode('utf-8') # Search for the string that looks like '/usr/lib/xorg/Xorg -nolisten tcp -auth /var/run/sddm/ -background none -noreset -displayfd 17 -seat seat0 vt1' xauth_line = None for line in ps_output.split('\n'): if '-auth /var/run/sddm/)', xauth_line) #match = re.search(r'-auth\s+(.+)\s+', xauth_line) if match: xauth_value = match.group(1) print("Found Xauth value:" + xauth_value) # Adjust fan speed if xauth_value: fan_speed_command = f'sudo DISPLAY=:0 XAUTHORITY= nvidia-settings -a [gpu:0]/GPUFanControlState=1 -a [fan:0]/GPUTargetFanSpeed=95' print("Issuing command to adjust fanspeed"+fan_speed_command) subprocess.run(fan_speed_command, shell=True) # Check if it worked by running 'nvidia-smi' command nvidia_smi_process = subprocess.run(['nvidia-smi'], stdout=subprocess.PIPE) nvidia_smi_output = nvidia_smi_process.stdout.decode('utf-8') print(nvidia_smi_output)