- How to fix Nvidia vsync on Linux with proprietary drivers
- 2. Enabling “Force Full Composition Pipeline” With nvidia-settings
- 3. Disabling no-ubb
- 3. Disabling Allow Flipping and Sync to VBlank with Command Line or GUI
- 5. Fixing Performance decrease and lagging in games.
- nvidia + вертикальная синхронизация = как включить?
- Arch Linux
How to fix Nvidia vsync on Linux with proprietary drivers
I used different Debian distributions and this is the common solution to almost every common Linux distro.
Most Linux distributions come with the xserver-xorg-video-nouveau package pre installed. It’s basically the reverse engineered version on Nvidia’s proprietary(closed source) driver. nouveau is opensource but has problems when it comes to compositing and doing heavy tasks.
There are two ways to install the drivers: Ubuntu repositories or Nvidia’s website. Here’s how to install the driver from nvidia’s website The latter one is recommended the most; but for the sake of this tutorial, the first one is used :
The first step is to add the Nvidia proprietary drivers’ repository with
sudo add-apt-repository ppa:graphics-drivers and then updating the package manager with
And finally installing it.
Right now, as of 19th of September 2018, the latest driver is the nvidia-driver-396 package. it can be installed with the following command:
sudo apt-get install nvidia-driver-396. Or you can download and install the driver
If you have problems installing the driver regarding blacklisting the nouveau kernel module; do the following:
sudo bash -c 'echo -e "blacklist nouveau \n options nouveau modeset=0" > /etc/modprobe.d/blacklist-nouveau.conf' Then update the “initial ram file system” file for the blacklisting to take place:
then reboot for it to take effect:
A reboot is a must after the installation.
2. Enabling “Force Full Composition Pipeline” With nvidia-settings
After the reboot, a program called “NVIDIA X Server Settings” is installed with a simple GUI, the command line is sudo nvidia-settings (Because you can’t save to /etc/X11/xorg.conf without root permissions) . For the sake of startup process and ease of use, I’ll use the GUI.
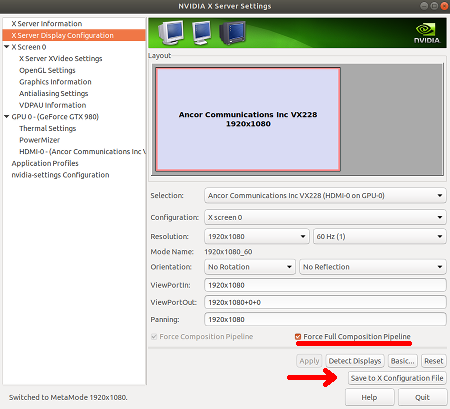
First, head over to the ‘X Server Display Configuration’ section, there are a few things which need to be altered; First, choose your resolution then press on the Advanced button in the bottom and check the «Force Full Composition Pipeline» option.
Then click the «Save to X Configuration File» button to make this permanent.
This option is also available from the command line using
nvidia-settings --assign CurrentMetaMode="nvidia-auto-select +0+0 < ForceFullCompositionPipeline = On >" You have to make this an startup command using a bash script, i prefer using the GUI and saving the ‘X Configuration File’ in the /etc/X11/xorg.conf file so the config will start with startup. Do this with the Save to X Configuration File option in the above picture.
If you don’t have access to the nvidia-settings software; You can just edit the /etc/X11/xorg.conf file and add the metamodes line to the Screen Section.
*IMPORTANT*
If you’re getting errors while trying to Save to X Configuration File; execute nvidia-settings as root:
Now click that button and save the settings.
3. Disabling no-ubb
And another thing is to disable UBB as root:
This will automatically edit the /etc/X11/xorg.conf file with the no UBB option.
OVERALL , the configuration file should look like(Only add the red line to the “Screen” Section):
Section "Screen" Identifier "Screen0" Device "Device0" Monitor "Monitor0" DefaultDepth 24 Option "AllowEmptyInitialConfiguration" "True" Option "Coolbits" "28" Option "Stereo" "0" Option "nvidiaXineramaInfoOrder" "DFP-4" Option "metamodes" "1920x1080_60 +0+0 " Option "SLI" "Off" Option "MultiGPU" "Off" Option "BaseMosaic" "off" Option "UBB" "False" SubSection "Display" Depth 24 EndSubSection EndSection 3. Disabling Allow Flipping and Sync to VBlank with Command Line or GUI
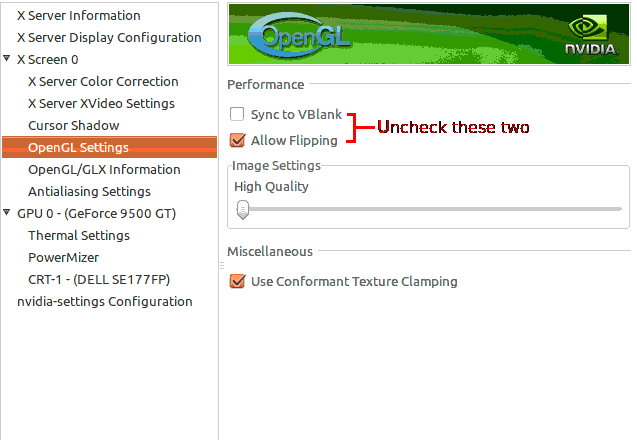
I myself had problems with some default settings that Nvidia set for OpenGL; they even document this issue but there never seems to be a patch to fix this out of the box. To do so, go into OpenGL Settings and disable Allow Flipping and Sync to VBlank :
To set this with A command line for startup purposes, etc. :
/usr/bin/nvidia-settings -a 'SyncToVBlank=0' /usr/bin/nvidia-settings -a 'AllowFlipping=0' Now that’s taken care of, we have to enable compositing through the compizconfig application from the store or with. This is only if you’re using ubuntu with Gnome.
sudo apt-get install compizconfig-settings-manager 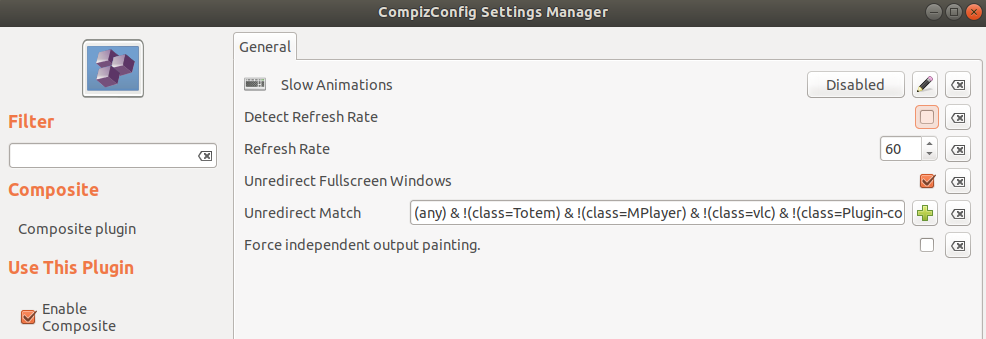
command and then entering its GUI. We only have to enable ‘Compositing’ and set the refresh rate to what you saved in nvidia x server settings.
remember to uncheck the «Detect Refresh Rate» option and set it manually.
After the «Force Full Composition PipeLine» option is it, one thing is lacking; Games don’t have any tearing even with their VSync options turned off. Which yields input lag and FPS capped at the monitor’s refresh rate. To fix this, the «Force Full Composition PipeLine» needs to be turned off while in game. To do this automatically and not having to turn it on and off ourselves. I wrote a script to help with this:
5. Fixing Performance decrease and lagging in games.
PROGS=('csgo_linux64' 'hl2_linux' 'hl_linux' 'RocketLeague' 'rust' 'GTA5.exe') while sleep 1; do for p in $; do if [[ -n $(pgrep $p) ]]; then nvidia-settings --assign CurrentMetaMode="nvidia-auto-select +0+0 < ForceFullCompositionPipeline = Off >" while [[ -n $(pgrep $p) ]]; do sleep 5 done nvidia-settings --assign CurrentMetaMode="nvidia-auto-select +0+0 < ForceFullCompositionPipeline = On >" fi done done All this script does is to check if the processes in the PROGS array are running; If any of them are running; turns the «Force Full Composition PipeLine» option off; then while it’s running, sleep for 5 seconds to keep the if condition alive and prevent overloading the cpu; Then after the process is no longer running, turns the «Force Full Composition PipeLine» option on to make the desktop tear-free; this will go on and on forever and is fault tolerant. You can add this to a startup job using systemd or /etc/rc.local . Google can help on that.
You can add other processes in the array with any other process name you don’t want «Force Full Composition PipeLine» to be run with it.
Now good luck playing any game you want!
nvidia + вертикальная синхронизация = как включить?
Добрый день!Имеется карта GF GTS250 дрова NVIDIA 195.30 В систем присутствует жесткий tearing(разрыв картинки по вертикали) при перемещении окон, просмотре видео и тд. Включение vsync to blank в nvidia settings ни на что не влияет.
# nvidia-xconfig: X configuration file generated by nvidia-xconfig # nvidia-xconfig: version 1.0 (buildmeister@builder58) Fri Dec 18 18:35:05 PST 2009 Section "ServerLayout" Identifier "Layout0" Screen 0 "Screen0" 0 0 InputDevice "Keyboard0" "CoreKeyboard" InputDevice "Mouse0" "CorePointer" EndSection Section "Files" FontPath "/usr/share/fonts/default/Type1" EndSection Section "Module" Load "glx" # 3D layer Load "dbe" EndSection Section "InputDevice" # generated from data in "/etc/conf.d/gpm" Identifier "Mouse0" Driver "mouse" Option "Protocol" Option "Device" "/dev/input/mouse0" Option "Emulate3Buttons" "no" Option "ZAxisMapping" "4 5" EndSection Section "InputDevice" # generated from default Identifier "Keyboard0" Driver "kbd" Option "XkbLayout" "ru,us" Option "XkbModel" "pc105" Option "XkbOptions" "grp:caps_toggle,grp_led:scroll" EndSection Section "Monitor" Identifier "Monitor0" VendorName "Unknown" ModelName "Unknown" HorizSync 28.0 - 33.0 VertRefresh 43.0 - 72.0 EndSection Section "Device" Identifier "Device0" Driver "nvidia" VendorName "NVIDIA Corporation" EndSection Section "Screen" Identifier "Screen0" Device "Device0" Monitor "Monitor0" DefaultDepth 24 Option "TripleBuffer" "True" Option "AddARGBGLXVisuals" "true" Option "RenderAccel" "true" Option "AllowGLXWithComposite" "true" Option "CoolBits" "1" SubSection "Display" Depth 24 EndSubSection EndSection 
compizconfig-settings-manager, в разделе General. Нужно отключить автоматическое определение частоты, включить Sync to VBlank и выставить частоту больше либо равную частоте своего монитора (автоопределение не работает).
compiz вобще выключен. Но пробовал с включенным компизом раньше и с теми настройками как вы и говорили, тоже самое.
Arch Linux
I have searched wide and far, and can find diddly squat that works.
Owing to (admittedly a very real error between the chair and the keyboard) I finished up having to reinstall my system. Now, as it happens, I had a list of installed packages already saved on my NFS drive, and /home occupies a separate (undamaged) drive, so not the end of the world, and didn’t take long to get back to almost exactly as it was. config files in /etc that I had previously changed were default again, and I can work through that.
However, nvidia drivers are now driving me mad.
I realise that glxgears is not a benchmark, but it’s a useful test. With desktop compositing off glxgears is capable of producing 40,000fps. However, after a reboot, it produces 1,400 fps, and using a frame rate dependent program (Trackmania via wine is an example) it stutters to the point of being unuseable.
I can fix this by simply getting rid of /etc/X11/xorg.conf.
My issue is that no matter what I try I can’t disable vsync at boot. Opening nvidia-settings and toggling it does, but I have no idea where it’s picking it up from for the next boot.
It isn’t any compositing manager (the only one I use is xfce4 anyway), and toggling in nvidia-settings wouldn’t fix it if it was that.
I tried deleting ~/.nvidia-settings.rc, but that just left me with a holy mess of low resolution, though I’ll post the contents here for reference.
What do I need to do to permanently disable nvidia vsync?
EDIT: For info — before the reinstall, there was no issue, so I doubt it’s a ~/ config issue, but I could be wrong.
# # /home/steve/.nvidia-settings-rc # # Configuration file for nvidia-settings - the NVIDIA X Server Settings utility # Generated on Tue Jul 21 18:44:39 2020 # # ConfigProperties: RcFileLocale = C DisplayStatusBar = Yes SliderTextEntries = Yes IncludeDisplayNameInConfigFile = No ShowQuitDialog = Yes UpdateRulesOnProfileNameChange = Yes Timer = PowerMizer_Monitor_(GPU_0),Yes,1000 Timer = Thermal_Monitor_(GPU_0),Yes,1000 Timer = Memory_Used_(GPU_0),Yes,3000 # Attributes: 0/SyncToVBlank=0 0/LogAniso=0 0/FSAA=0 0/TextureClamping=1 0/FXAA=0 0/AllowFlipping=0 0/FSAAAppControlled=1 0/LogAnisoAppControlled=1 0/OpenGLImageSettings=1 0/FSAAAppEnhanced=0 0/ShowGraphicsVisualIndicator=0 [DPY:DVI-D-0]/Dithering=0 [DPY:DVI-D-0]/DitheringMode=0 [DPY:DVI-D-0]/DitheringDepth=0 [DPY:DVI-D-0]/ColorSpace=0 [DPY:DVI-D-0]/ColorRange=0 [DPY:DVI-D-0]/SynchronousPaletteUpdates=0 [DPY:HDMI-0]/RedBrightness=0.000000 [DPY:HDMI-0]/GreenBrightness=0.000000 [DPY:HDMI-0]/BlueBrightness=0.000000 [DPY:HDMI-0]/RedContrast=0.000000 [DPY:HDMI-0]/GreenContrast=0.000000 [DPY:HDMI-0]/BlueContrast=0.000000 [DPY:HDMI-0]/RedGamma=1.000000 [DPY:HDMI-0]/GreenGamma=1.000000 [DPY:HDMI-0]/BlueGamma=1.000000 [DPY:HDMI-0]/Dithering=0 [DPY:HDMI-0]/DitheringMode=0 [DPY:HDMI-0]/DitheringDepth=0 [DPY:HDMI-0]/DigitalVibrance=0 [DPY:HDMI-0]/ColorSpace=0 [DPY:HDMI-0]/ColorRange=0 [DPY:HDMI-0]/SynchronousPaletteUpdates=0 [DPY:DP-0]/Dithering=0 [DPY:DP-0]/DitheringMode=0 [DPY:DP-0]/DitheringDepth=0 [DPY:DP-0]/ColorSpace=0 [DPY:DP-0]/ColorRange=0 [DPY:DP-0]/SynchronousPaletteUpdates=0 [DPY:DP-1]/Dithering=0 [DPY:DP-1]/DitheringMode=0 [DPY:DP-1]/DitheringDepth=0 [DPY:DP-1]/ColorSpace=0 [DPY:DP-1]/ColorRange=0 [DPY:DP-1]/SynchronousPaletteUpdates=0 [DPY:DP-2]/Dithering=0 [DPY:DP-2]/DitheringMode=0 [DPY:DP-2]/DitheringDepth=0 [DPY:DP-2]/ColorSpace=0 [DPY:DP-2]/ColorRange=0 [DPY:DP-2]/SynchronousPaletteUpdates=0 [DPY:DP-3]/Dithering=0 [DPY:DP-3]/DitheringMode=0 [DPY:DP-3]/DitheringDepth=0 [DPY:DP-3]/ColorSpace=0 [DPY:DP-3]/ColorRange=0 [DPY:DP-3]/SynchronousPaletteUpdates=0 [DPY:DP-4]/Dithering=0 [DPY:DP-4]/DitheringMode=0 [DPY:DP-4]/DitheringDepth=0 [DPY:DP-4]/ColorSpace=0 [DPY:DP-4]/ColorRange=0 [DPY:DP-4]/SynchronousPaletteUpdates=0 [DPY:DP-5]/Dithering=0 [DPY:DP-5]/DitheringMode=0 [DPY:DP-5]/DitheringDepth=0 [DPY:DP-5]/ColorSpace=0 [DPY:DP-5]/ColorRange=0 [DPY:DP-5]/SynchronousPaletteUpdates=0Last edited by Roken (2020-07-23 20:09:28)
Ryzen 5900X 12 core/24 thread — 2 x GTX 1070 8Gb, Asus Prime B450 Plus, 32Gb Corsair DDR4, Cooler Master N300 chassis, 5 HD (1 NvME PCI, 4SSD) + 1 x optical.
Linux user #545703