Using Nvidia’s NVENC with OBS Studio makes Linux game recording really great
I had been meaning to try out Nvidia’s NVENC for a while, but I never really bothered as I didn’t think it would make such a drastic difference in recording gaming videos, but wow does it ever!
I was trying to record a game recently and all other methods I tried made the game performance utterly dive, making it impossible to record it. So I asked for advice and eventually came to this way.
What is NVENC?
It essentially takes away video encoding from the CPU and does it on the GPU instead, and it’s supported on Nvidia Kepler (600) and above.
Pairing up the awesome open source OBS Studio [Official Site] and compiling FFMPEG with support for Nvidia’s NVENC is actually pretty amazing.
Note: While I have fully tested it myself, I am not responsible if you manage to break anything doing it.
After following this guide (copied below in case it vanishes, thanks Dan).
I’ve done a minor edit to the start, as the filename wget downloads is different to what the guide said.
# Download and unzip the NVIDIA Video Codec SDK from https://developer.nvidia.com/nvidia-video-codec-sdk
wget https://developer.nvidia.com/video-sdk-601
unzip unzip video-sdk-601
# Copy the headers files from the SDK so FFmpeg can find them
sudo cp nvidia_video_sdk_6.0.1/Samples/common/inc/*.h /usr/local/include/
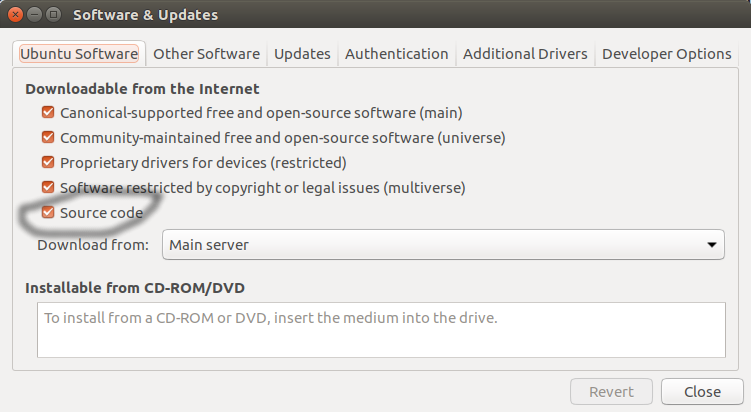
# Make sure «Source code» is enabled in System Settings. -> Software & Updates
# Download the build dependencies for FFmpeg
sudo apt-get build-dep ffmpeg
# Install libfdk_aac
sudo apt-get install libfdk-aac-dev
# Download the source for the exact version of FFmpeg you already have installed (not as root)
apt-get source ffmpeg
# Go into the ffmpeg source you just downloaded
cd ffmpeg-2.8.6
# Find out the exact command the ffmpeg was originally built with
ffmpeg -buildconf
# Copy the single line «configuration:» and pass it to «.configure» but add «—enable-nonfree —enable-nvenc —enable-libfdk-aac» on the end
# Mine looks like this:
./configure —prefix=/usr —extra-version=1ubuntu2 —build-suffix=-ffmpeg —toolchain=hardened —libdir=/usr/lib/x86_64-linux-gnu —incdir=/usr/include/x86_64-linux-gnu —cc=cc —cxx=g++ —enable-gpl —enable-shared —disable-stripping —disable-decoder=libopenjpeg —disable-decoder=libschroedinger —enable-avresample —enable-avisynth —enable-gnutls —enable-ladspa —enable-libass —enable-libbluray —enable-libbs2b —enable-libcaca —enable-libcdio —enable-libflite —enable-libfontconfig —enable-libfreetype —enable-libfribidi —enable-libgme —enable-libgsm —enable-libmodplug —enable-libmp3lame —enable-libopenjpeg —enable-libopus —enable-libpulse —enable-librtmp —enable-libschroedinger —enable-libshine —enable-libsnappy —enable-libsoxr —enable-libspeex —enable-libssh —enable-libtheora —enable-libtwolame —enable-libvorbis —enable-libvpx —enable-libwavpack —enable-libwebp —enable-libx265 —enable-libxvid —enable-libzvbi —enable-openal —enable-opengl —enable-x11grab —enable-libdc1394 —enable-libiec61883 —enable-libzmq —enable-frei0r —enable-libx264 —enable-libopencv —enable-nonfree —enable-nvenc —enable-libfdk-aac
# And finally install it over the original
sudo make install
It will take a few minutes to compile, but once that’s done, you’re pretty much set.
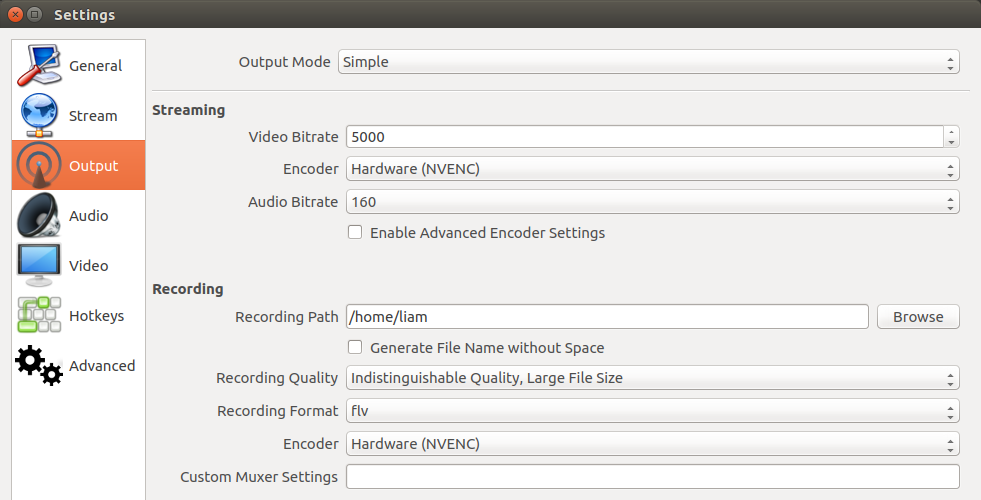
I was able to quite easily get FFMPEG sorted with NVENC and hook it into OBS Studio. I’m sure there’s probably better guides (share them in the comments!), but I have yet to find one that makes it so damn simple to do. You don’t even need to do much with OBS Studio, other than change the «Encoder» dropdown once this is sorted:
Note: You shouldn’t need to re-compile OBS Studio, as the guide above uses the same version of FFMPEG as you have already.
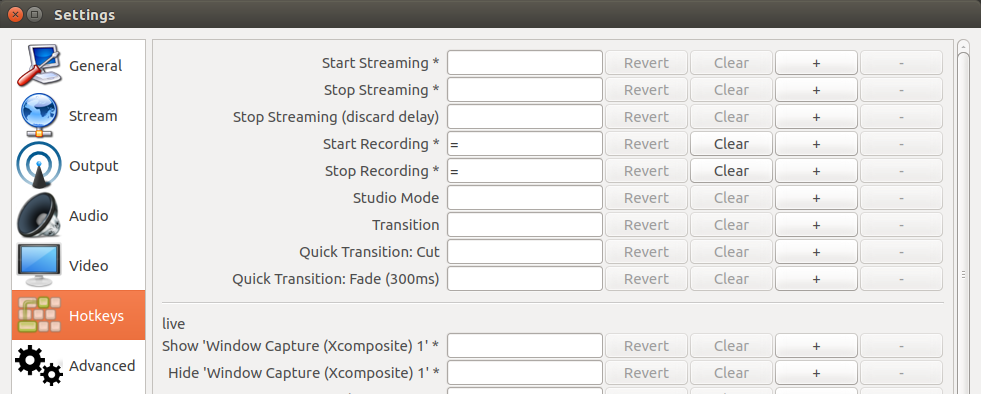
What I love about OBS Studio, is it also has custom hotkeys you can set yourself like so:
I have it set so pressing » hidden_message»>Article taken from GamingOnLinux.com.
How to use NVENC encoding with OBS on Linux – recording smooth videos at 60fps

So, you want to record smooth videos, at 60 frames per second, but OBS is gobbling up half your CPU power ? You need NVENC ! This specific encoding software only works on Nvidia graphics cards, but enables less than 10% CPU usage while recording or streaming, since it uses the GPU instead of the CPU !
Enabling it on Linux is not simple, even though it’s not that hard. All we need to do is:
1 – Download the Nvidia SDK:
wget
sudo apt install unzip
unzip video-sdk-601
sudo cp nvidia_video_sdk_6.0.1/Samples/common/inc/*.h /usr/local/include/
2 – Getting ready to compile FFMPEG
sudo cp /etc/apt/sources.list /etc/apt/sources.list.backup
sudo nano /etc/apt/sources.list
sudo apt update
sudo apt build-dep ffmpeg
sudo apt install libfdk-aac-dev
3 – Compiling ffmpeg
apt-get source ffmpeg
cd ffmpeg-VERSION NUMBER
ffmpeg buildconf
This will give us a long line of parameters. You need to copy this, and paste it in a text editor, such as Scratch on elementary OS.
We need to add the required paramters at the end of this text to make sure FFMPEG will take NVENC into account.
At the end of the line, add these lines:
–enable-nonfree –enable-nvenc –enable-libfdk-aac
Don’t forget to leave a space between the last parameter and the ones we just added !
Copy everything you have in your text file.
In your terminal, type: ./configure
then paste everything you copied.
You should have something that looks like that
Now, we build FFMPEG, by typing:
Follow me on Twitter :
Follow me on Mastodon:
Music courtesy of Kevin MacLeod
-~-~~-~~~-~~-~-
Also Watch my Experience with Manjaro Budgie on a Full AMD Linux Build:
28 Comments
If I check the available codecs in terminal, the NVENC codecs are already set up inside FFMPEG, though just in case I followed these directions anyways. It didn’t do jack shit. OBS still can’t see the option for NVENC.
Thank you so much man! Compiles great on Zorin 12.04. I was baffled by how out of date some of those guides were, back when I tried compiling this 6 months ago. They were hard to follow, and eventually fruitless after 3 days of trial and error combining guides. This worked out well and presumably would work on Ubuntu 16.04 as well. I’d just recommend you change your description from apt-get install build-dep to apt-get build-dep, otherwise other people watching this video are going to think that’s a package, not a command. 😉 Thanks again.
Please, do NOT follow these instructions. If you are on a Debian based system like this one is, or one that has a package manager (so all distros, basically), you do not want to do this under any circumstances. You can severely damage your system by doing this! If you want to recompile a package to enable a feature you need, the correct steps are: 1. apt source ffmpeg
2. apt build-dep ffmpeg
3. Now you can change your directory to the ffmpeg-x.y.z folder you just downloaded. In there you’ll find a folder called «debian», inside of it is a file called «rules», you edit this one to change the configure parameters. (please don’t ever type ./configure when rebuilding a package!) You’ll easily be able to find where to append the –enable-x parameters to.
4. After this is done, go back to the ffmpeg-x.y.z folder and type dch –local , where will be what’s appended to the version string, For something like this you could type dch –local nvenc , you will then be asked to describe your changes using nano, just type whatever you want, but I recommend something like: «Enabled support for NVENC.»
5. Now, we’re all ready to build, assuming you have all the dependencies installed for enabling NVENC (sudo apt install nvidia-cuda-toolkit if you don’t, don’t do the weird copying of the include files that he did), so it is time to type: debuild -us -uc -i -rfakeroot . This will recompile the software using the new rules in debian/rules. Once it’s done, you can find your debian packages in the folder beneath ffmpeg-x.y.z.
6. If you are running 64-bit Linux and you’re using multiarch (you probably are), you will now also need to build the i386 variant of the package. You should do this using a chroot environment. That’s beyond the scope of this, sorry. Please note that CUDA and NVENC are not supported on i386, but you will still need to recompile the i386 variant so it matches your version. Note that if you do NOT do this on a multiarch system, you will be unable to install the i386 packages, which will make it impossible to install things like Wine.
7. At this point you should set up a local repository, which is easily done with aptly, just look up a tutorial for this.
8. Type sudo apt update after setting up your local repository. It’ll notify you that upgrades are available!
9. Type sudo apt upgrade to upgrade FFmpeg to your custom compiled version.
10. Enjoy NVENC support on OBS. This sounds harder than it is. Depending on your hardware, it’ll take about 10 minutes to 20 minutes. Be aware that you will need to do this everytime FFmpeg is updated to a new version. You can consider locking FFmpeg to your custom compiled version. That’ll probably be fine, unless you install a package that needs a more recent version, but apt will notify you of that anyway.
This guide is not working with Ubuntu 18.10, error: libopencv not found. There is currently no solution anywhere on the web, and ffmpeg will not compile correctly without fixing the issue.
I started down this route to enable nvenc on Kubuntu 18.10 and then realized I should try the snap and flatpak versions of OBS first to see if they included it. Snap does not but the version on Flathub does. So rather than going through all this you can simply type ‘flatpak install com.obsproject.Studio’ and be done with it.
I ionce did all this but then was told to install the flatpack OBS studios next time so I did and NVENC was working out the box lol
after the this long command, I got a error, telling me this … WARNING: Building with deprecated library libavresample google can’t help 🙁
Hmm… not sure why, but i already had NVENC available on Fedora simply by installing latest signed drivers.
I’ve been wanting to switch from windows 10 to Linux and finally being able to use nvenc for recording games i can overall use linux as my main OS now
I’m stuck at the make command: it says that a function is not implemented.
make: * * * [ffbuild/library.mak:102: libavutil/libavutil.so] Error 1