- Debian / Ubuntu Linux: Ограничить в SSH сессии пользователя к определенному каталогу
- Как ограничить пользователей SFTP домашними каталогами с помощью chroot Jail
- Ограничить пользователей домашними каталогами
- Создание или изменение пользователей и групп
- Изменить файл конфигурации SSH
- Проверка входа пользователей SSH и SFTP
- Ограничить пользователей определенным каталогом
- Создать группу и новых пользователей
- Настройте SSH для доступа по SFTP
- Заключение
- How to Restrict SSH User Access to Certain Directory Using Chrooted Jail
- Step 1: Create SSH Chroot Jail
- Step 2: Setup Interactive Shell for SSH Chroot Jail
- Step 3: Create and Configure SSH User
- Step 4: Configure SSH to Use Chroot Jail
- Step 5: Testing SSH with Chroot Jail
- Step 6. Create SSH User’s Home Directory and Add Linux Commands
- Step 7. Testing SFTP with Chroot Jail
Debian / Ubuntu Linux: Ограничить в SSH сессии пользователя к определенному каталогу
Для установки веб-сервера, мне нужно предоставить пользователю доступ SSH, но я не доверяю пользователю. Как я могу ограничить сеанс пользователя в определенный каталог, например /home/httpd/$USERNAME? Как настроить SSH chroort ограничения на операционных системах Linux?
Вы можете установить корневую директорию например /home/httpd/foo используюя chroort, после авторизации. Все компоненты (файлы и папки) указанного пути должны принадлежать root b и не доступны для записи другим пользователям или группам. После изолирования (chroort), SSHD изменяет рабочий каталог на домашний каталог пользователя.
С описания man sshd_config
ChrootDirectory должена содержать необходимые файлы и директории для поддержки сеанса пользователя. Для интерактивного сеанса требуется, по меньшей мере оболочка, обычно sh(1), и основные /dev узлы, такие как null(4), zero(4), stdin(4), stdout(4), STDERR (4), arandom (4), и TTY (4) устройства. Для сессий передачи файлов с использованием SFTP «», никаких дополнительных настроек окружающей среды не требуется.
Вы можете предоставить доступ по SSH пользователя, которому вы не полностью доверяете.Вы можете ограничить то, что, что пользователь может увидеть или запустить только Ls. Ваш путь создания SSH CHROOT ограничен. Давайте посмотрим, как создать изолированный каталог для сервера OpenSSH на сервере Debain или Ubuntu Linux. Следующий урок протестирован на сервере Debian Linux v8.1:
Как ограничить пользователей SFTP домашними каталогами с помощью chroot Jail
В этом руководстве мы обсудим, как ограничить пользователей SFTP их домашними каталогами или определенными каталогами. Это означает, что пользователь может получить доступ только к своему домашнему каталогу, а не ко всей файловой системе.
Ограничение домашних каталогов пользователей имеет жизненно важное значение, особенно в среде с общим сервером, чтобы неавторизованный пользователь не смог проникнуть в файлы и папки другого пользователя.
Важно. Также обратите внимание, что целью этой статьи является предоставление доступа только по SFTP, а не по SSH. передача, но не разрешено выполнять удаленный сеанс SSH.
Самый простой способ сделать это — создать изолированную среду тюрьмы для доступа по SFTP. Этот метод одинаков для всех операционных систем Unix/Linux. Используя среду chroot, мы можем ограничить пользователей либо их домашним каталогом, либо определенным каталогом.
Ограничить пользователей домашними каталогами
В этом разделе мы создадим новую группу с именем sftpgroup и назначим правильных владельцев и разрешения учетным записям пользователей. Есть два варианта ограничения пользователей домашними или определенными каталогами, в этой статье мы увидим оба варианта.
Создание или изменение пользователей и групп
Давайте ограничим существующего пользователя, например tecmint , его/ее домашним каталогом с именем /home/tecmint . Для этого вам необходимо создать новую группу sftpgroup с помощью команды groupadd, как показано ниже:
Затем назначьте пользователя tecmint в группу sftpgroup.
# usermod -G sftpgroup tecmint
Вы также можете создать нового пользователя с помощью команды useradd, например senthil , и назначить пользователя в группу sftpusers.
# adduser senthil -g sftpgroup -s /sbin/nologin # passwd tecmint
Изменить файл конфигурации SSH
Откройте и добавьте следующие строки в файл конфигурации /etc/ssh/sshd_config .
Subsystem sftp internal-sftp Match Group sftpgroup ChrootDirectory /home ForceCommand internal-sftp X11Forwarding no AllowTcpForwarding no
Сохраните и выйдите из файла, перезапустите службу sshd, чтобы новые изменения вступили в силу.
# systemctl restart sshd OR # service sshd restart
Если вы подключаете нескольких пользователей к одному и тому же каталогу, вам следует изменить права доступа к домашнему каталогу каждого пользователя, чтобы запретить всем пользователям просматривать домашние каталоги других пользователей.
Проверка входа пользователей SSH и SFTP
Теперь пришло время проверить вход из локальной системы. Попробуйте подключиться к удаленной системе по ssh из локальной системы.
- tecmint — имя пользователя удаленной системы.
- 192.168.1.150 — IP-адрес удаленной системы.
Пример вывода:
's password: Could not chdir to home directory /home/tecmint: No such file or directory This service allows sftp connections only. Connection to 192.168.1.150 closed.
Затем получите доступ к удаленной системе с помощью SFTP.
Пример вывода:
's password: Connected to 192.168.1.150. sftp>
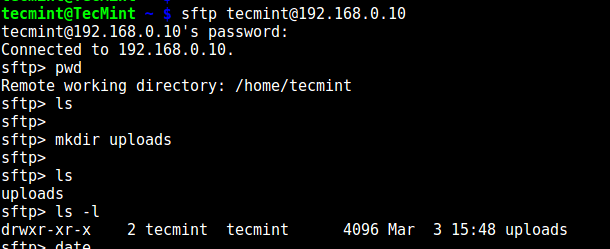
Давайте проверим текущий рабочий каталог:
sftp> pwd Remote working directory: / sftp> ls tecmint
Здесь tecmint — домашний каталог. Перейдите в каталог tecmint и создайте нужные файлы или папки.
sftp> cd tecmint Remote working directory: / sftp> mkdir test tecmint
Ограничить пользователей определенным каталогом
В нашем предыдущем примере мы ограничиваем существующих пользователей домашним каталогом. Теперь мы увидим, как ограничить нового пользователя пользовательским каталогом.
Создать группу и новых пользователей
Создайте новую группу sftpgroup .
Затем создайте каталог для группы SFTP и назначьте разрешения для пользователя root.
# mkdir -p /sftpusers/chroot # chown root:root /sftpusers/chroot/
Далее создайте для каждого пользователя новые директории, к которым у них будет полный доступ. Например, мы создадим пользователя tecmint и его новый домашний каталог с правильным групповым разрешением, используя следующую серию команд.
# adduser tecmint -g sftpgroup -s /sbin/nologin # passwd tecmint # mkdir /sftpusers/chroot/tecmint # chown tecmint:sftpgroup /sftpusers/chroot/tecmint/ # chmod 700 /sftpusers/chroot/tecmint/
Настройте SSH для доступа по SFTP
Измените или добавьте следующие строки в конец файла:
#Subsystem sftp /usr/libexec/openssh/sftp-server Subsystem sftp internal-sftp Match Group sftpgroup ChrootDirectory /sftpusers/chroot/ ForceCommand internal-sftp X11Forwarding no AllowTcpForwarding no
Сохраните и закройте файл. Перезапустите службу sshd, чтобы изменения вступили в силу.
# systemctl restart sshd OR # service sshd restart
Вот и все, вы можете проверить, войдя на удаленный сервер SSH и SFTP, выполнив шаг, описанный выше, в разделе «Проверить вход SSH и SFTP».
Помните, что этот метод отключит доступ к оболочке, то есть вы не сможете получить доступ к сеансу оболочки удаленной системы с помощью SSH. Вы можете получить доступ к удаленным системам только через SFTP и выполнять передачу файлов в локальную и удаленную системы и обратно.
Заключение
Теперь вы знаете, как ограничить домашние каталоги пользователей с помощью среды Chroot в Linux. Если вы найдете это полезным, поделитесь этой статьей в своих социальных сетях и сообщите нам в разделе комментариев ниже, если есть какие-либо другие способы ограничить домашние каталоги пользователей.
How to Restrict SSH User Access to Certain Directory Using Chrooted Jail
There are several reasons to restrict an SSH user session to a particular directory, especially on web servers, but the obvious one is system security. In order to lock SSH users in a certain directory, we can use chroot mechanism.
change root (chroot) in Unix-like systems such as Linux, is a means of separating specific user operations from the rest of the Linux system; changes the apparent root directory for the currently running user process and its child (parent) process with a new root directory called a chrooted jail.
In this tutorial, we’ll show you how to restrict SSH user access to a given directory in Linux. Note that we’ll run all the commands as root, use the sudo command if you are logged into the server as a normal user.
Step 1: Create SSH Chroot Jail
1. Start by creating the chroot jail using the mkdir command below:
2. Next, identify required files, according to the sshd_config man page, the ChrootDirectory option specifies the pathname of the directory to chroot to after authentication. The directory must contain the necessary files and directories to support a user’s session.
For an interactive session, this requires at least a shell, commonly sh , and basic /dev nodes such as null, zero, stdin, stdout, stderr, and tty devices:

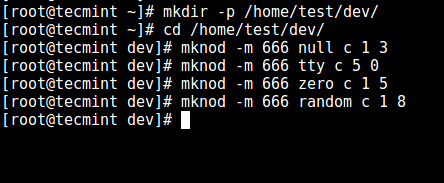
3. Now, create the /dev files as follows using the mknod command. In the command below, the -m flag is used to specify the file permissions bits, c means character file and the two numbers are major and minor numbers that the files point to.
# mkdir -p /home/test/dev/ # cd /home/test/dev/ # mknod -m 666 null c 1 3 # mknod -m 666 tty c 5 0 # mknod -m 666 zero c 1 5 # mknod -m 666 random c 1 8
4. Afterwards, set the appropriate permission on the chroot jail. Note that the chroot jail and its subdirectories and subfiles must be owned by the root user, and not writable by any normal user or group:
# chown root:root /home/test # chmod 0755 /home/test # ls -ld /home/test

Step 2: Setup Interactive Shell for SSH Chroot Jail
5. First, create the bin directory and then copy the /bin/bash files into the bin directory using the cp command as follows:
# mkdir -p /home/test/bin # cp -v /bin/bash /home/test/bin/

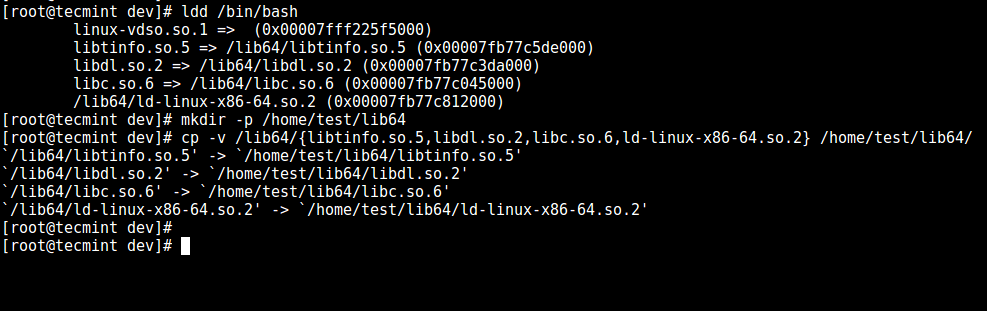
6. Now, identify the bash required for shared libs , as below, and copy them into the lib directory:
# ldd /bin/bash # mkdir -p /home/test/lib64 # cp -v /lib64/ /home/test/lib64/
Step 3: Create and Configure SSH User
7. Now, create the SSH user with the useradd command and set a secure password for the user:
# useradd tecmint # passwd tecmint
8. Create the chroot jail general configurations directory, /home/test/etc and copy the updated account files (/etc/passwd and /etc/group) into this directory as follows:
# mkdir /home/test/etc # cp -vf /etc/ /home/test/etc/

Note: Each time you add more SSH users to the system, you will need to copy the updated account files into the /home/test/etc directory.
Step 4: Configure SSH to Use Chroot Jail
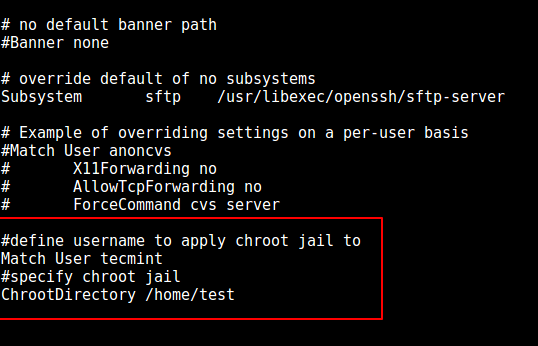
9. Now, open the sshd_config file.
and add/modify the lines below in the file.
#define username to apply chroot jail to Match User tecmint #specify chroot jail ChrootDirectory /home/test
Save the file and exit, and restart the SSHD services:
# systemctl restart sshd OR # service sshd restart
Step 5: Testing SSH with Chroot Jail
10. At this point, test if the chroot jail setup is working as expected:
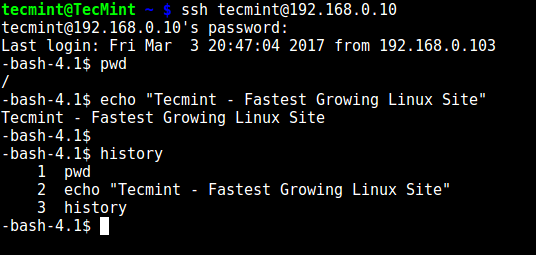
# ssh [email protected] -bash-4.1$ ls -bash-4.1$ date -bash-4.1$ uname
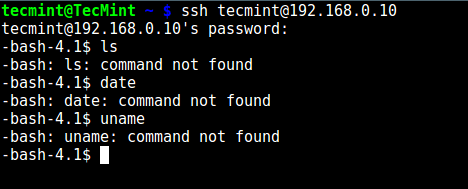
From the screenshot above, we can see that the SSH user is locked in the chrooted jail, and can’t run any external commands (ls, date, uname, etc).
The user can only execute bash and its builtin commands such as (pwd, history, echo, etc) as seen below:
# ssh [email protected] -bash-4.1$ pwd -bash-4.1$ echo "Tecmint - Fastest Growing Linux Site" -bash-4.1$ history
Step 6. Create SSH User’s Home Directory and Add Linux Commands
11. From the previous step, we can notice that the user is locked in the root directory, we can create a home directory for the SSH user like so (do this for all future users):
# mkdir -p /home/test/home/tecmint # chown -R tecmint:tecmint /home/test/home/tecmint # chmod -R 0700 /home/test/home/tecmint

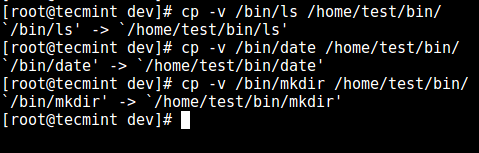
12. Next, install a few user commands such as ls, date, and mkdir in the bin directory:
# cp -v /bin/ls /home/test/bin/ # cp -v /bin/date /home/test/bin/ # cp -v /bin/mkdir /home/test/bin/
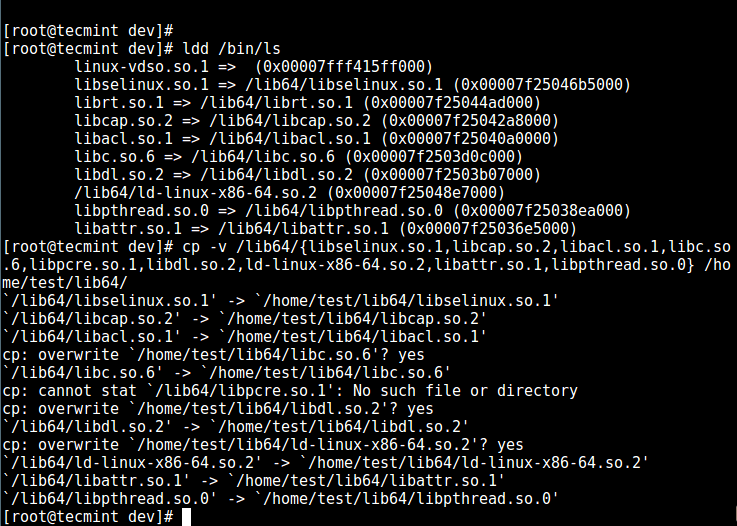
13. Next, check the shared libraries for the commands above and move them into the chrooted jail libraries directory:
# ldd /bin/ls # cp -v /lib64/ /home/test/lib64/
Step 7. Testing SFTP with Chroot Jail
14. Do a final test using sftp; check if the commands you have just installed are working.
Add the line below in the /etc/ssh/sshd_config file:
#Enable sftp to chrooted jail ForceCommand internal-sftp
Save the file and exit. Then restart the SSHD services:
# systemctl restart sshd OR # service sshd restart
15. Now, test using SSH, and you’ll get the following error:

Try using SFTP as follows:
You might also like:
That’s it for now! In this article, we showed you how to restrict an SSH user in a given directory (chrooted jail) in Linux. Use the comment section below to offer us your thoughts about this guide.