- Linux Mint Forums
- Connecting Android and Huawei P9 with Linux Mint. [Solved>
- Connecting Android and Huawei P9 with Linux Mint. [Solved>
- Re: Connecting Huawei P9 with Linux Mint.
- Re: Connecting Huawei P9 with Linux Mint.
- Re: Connecting Huawei P9 with Linux Mint.
- AnLinux: простой способ установить Linux-окружение на Android-телефон без рута
- Что такое AnLinux?
- С чего начать?
- Что же, приступим
- А что с графической оболочкой?
- Linux On Android
Linux Mint Forums
Connecting Android and Huawei P9 with Linux Mint. [Solved>
Forum rules
There are no such things as «stupid» questions. However if you think your question is a bit stupid, then this is the right place for you to post it. Please stick to easy to-the-point questions that you feel people can answer fast. For long and complicated questions prefer the other forums within the support section.
Before you post please read how to get help. Topics in this forum are automatically closed 6 months after creation.
Connecting Android and Huawei P9 with Linux Mint. [Solved>
Post by Pipeman » Wed Feb 22, 2017 10:38 am
I have a Hawei P9 smartphone.
When plugging the phone into USB, the name Huawei comes up under Devices. but I can not access any files on the phone(when clicking on it it shows an empty screen).
It also brings up CD Rom(I think Linux sees the phone as a CD Rom instead of a phone?), in the devices. This folder has four files, of which one is HiSuiteDownLoader.exe. I suspect this is an install file for the phone software, but as it has a Windows icon.
I am not sure this will work on my Linux Mint 18.1 Cinnamon 64bit.
If so, where should this file be run from. When clicking on the .exe file, it it asks me if I would like to extract files. I’m out of my depth here.
Last edited by LockBot on Wed Dec 28, 2022 7:16 am, edited 2 times in total.
Reason: Topic automatically closed 6 months after creation. New replies are no longer allowed.
Re: Connecting Huawei P9 with Linux Mint.
Post by Pipeman » Wed Feb 22, 2017 10:41 am
I also found this article on a Google Search, but I’m dubious about running all these commands, just now I break something
Here they describe the solution as follows:
Huawei have helpfully released the kernel source for the Huawei P9 on their download site. Impressively, the version posted there (3.10.90) actually matches the current release build (B136). However, the download itself is only part of the puzzle — it’s important to then know how to compile it and use it. Hence this guide.
Some points to note first of all.
This guide refers to building on Linux. You can probably build on OSX or whatever too but seriously, it’s less pain in the long run to spin up an Ubuntu VM.
In the download linked above, as well as the kernel, there are some other bits and pieces (some of which are quite bizarre). I’ve mirrored the kernel to Bitbucket, so you don’t need to grab the whole download.
Got that? OK, so here’s a step by step on how to build the kernel! I strongly recommend building stock first and testing that works for you, then you can start adding your tweaks in. I’m interested to hear what you add / change!
Open a terminal window on your Linux machine / in your Linux VM. No GUIs here. Change to the directory where you want the kernel / toolchain to live.
First of all, we’re going to clone the toolchain from AOSP.
git clone https://android.googlesource.com/platfo . ndroid-4.9
Next we’re going to clone the kernel source itself from my git repo on bitbucket.
git clone https://gitlab.com/paulobrien/android_k . wei_p9.git kernel
We need to add the toolchain location to the path.
export PATH=$(pwd)/aarch64-linux-android-4.9/bin:$PATH
We need to specify that we are cross compiling for arm64.
export CROSS_COMPILE=$(pwd)/aarch64-linux-android-4.9/bin/aarch64-linux-android-
Let’s create a directory for our output to go in to.
mkdir out
We’ve got the kernel downloaded, so let’s change to that directory so we’re ready to go.
cd kernel
A bit of cleaning up before we get started.
make ARCH=arm64 O=../out mrproper
Specify that we’re building for the P9 (hisi3650 chipset).
make ARCH=arm64 O=../out p9_extracted_defconfig
And build it!
make ARCH=arm64 O=../out -j8
When this process completes, we can check the ‘../out’ directory and you should find the file arch/arm64/boot/Image. This is the kernel that you’ve just built! You can’t flash it as is though, you need to put it into a boot image first.
Change out of the kernel directory back to its parent.
cd ..
Download tools for manipulating the boot image.
git clone https://github.com/xiaolu/mkbootimg_tools.git
Download the stock boot image (actually we’re using the root ready version for convenience).
wget -O boot.img http://nigella.modaco.com/files/boot.st . 9.b136.img
Extract the boot image.
mkbootimg_tools/mkboot boot.img boot.extracted
Copy the new kernel into the extracted boot folder.
cp out/arch/arm64/boot/Image.gz boot.extracted/kernel
Build a new boot image.
mkbootimg_tools/mkboot boot.extracted boot.newkernel.img
You now have a new boot image (boot.newkernel.img). All that’s left is to flash it to your device! Reboot to bootloader (either using ‘adb reboot bootloader’ or by powering on with volume down held), flash using ‘fastboot flash boot boot.newkernel.img’ and then reboot using ‘fastboot reboot’. Job done! In the About screen of settings you should see the date of the new kernel and details of your build machine.
1
Re: Connecting Huawei P9 with Linux Mint.
Post by Hoser Rob » Wed Feb 22, 2017 1:34 pm
That’s a patched version of the 3.10 kernel. That is a rather old kernel. I use Mint 17.3 and the kernel version is the 3.19 series. I think 17 was kernel 3.13, and Mint 18 obviously uses a newer one.
You can’t just drop older or newer kernels into Linux and expect them to work. It may fix one thing but it’s just as likely to b reak 3 other things. IMO this crap of installing newer/older kernels to fix stuff is for amateurs who don’t know how to use backports. Hackers, really. I’d expect this kernel to break stuff in 18.
I’d concentrate on the ANdroid aspect of things .
ninomrki Level 3
Posts: 100 Joined: Wed Jan 16, 2013 7:49 pm Location: Zagreb, Croatia Contact:
Re: Connecting Huawei P9 with Linux Mint.
Post by ninomrki » Thu Feb 23, 2017 3:40 pm
Pipeman wrote: I have a Hawei P9 smartphone.
When plugging the phone into USB, the name Huawei comes up under Devices. but I can not access any files on the phone(when clicking on it it shows an empty screen).
It also brings up CD Rom(I think Linux sees the phone as a CD Rom instead of a phone?), in the devices. This folder has four files, of which one is HiSuiteDownLoader.exe. I suspect this is an install file for the phone software, but as it has a Windows icon.
I am not sure this will work on my Linux Mint 18.1 Cinnamon 64bit.
If so, where should this file be run from. When clicking on the .exe file, it it asks me if I would like to extract files. I’m out of my depth here.
Pull down the notification area on your phone and there will be a message that says «USB connected» with two buttons below (Photos and Files). Unless you pick one of the buttons, your PC will only charge the battery on your phone. If you touch the notification, you will get more options.
Home is where the Wi-Fi is.
Registered Linux user #562302
AnLinux: простой способ установить Linux-окружение на Android-телефон без рута
Любой телефон или планшет, работающий на Android, — это устройство, которое управляется ОС Linux. Да, очень модифицированной ОС, но все же основа Android — ядро Linux. Но, к сожалению, для большинства телефонов опция «снести Android и поставить дистрибутив по своему вкусу» недоступна.
Поэтому, если хочется Linux на телефоне, приходится покупать специализированные гаджеты вроде PinePhone, о котором мы уже писали в одной из статей. Но есть еще один способ получить Linux-окружение практически на любом смартфоне, причем без root-доступа. Поможет в этом инсталлятор, который называется AnLinux.
Что такое AnLinux?
Это специализированное ПО, которое дает возможность использовать Linux на телефоне при помощи монтирования образа, содержащего root-файловую систему любого из дистрибутивов, включая Ubuntu, Kali, Fedora, CentOS, OpenSuse, Arch, Alpine и многих других. Инсталлятор использует PRoot для эмуляции root-доступа.
PRoot перехватывает все выполняемые пользователем вызовы, которые требуют в обычной ситуации root-доступа, и обеспечивает их работоспособность в обычных условиях. В PRoot используется системный вызов ptrace для отладки ПО, который помогает достичь цели. С PRoot все это можно сделать как с chroot, но без root-прав. Кроме того, PRoot предоставляет фейковый доступ пользователю для пседвофайловой системы.
AnLinux — небольшая программа. Но этого достаточно, ведь единственное ее предназначение — установка образов систем и запуск скриптов, поднимающих пользовательское окружение. Когда все сделано, пользователь получает вместо смартфона Linux-ПК, причем Android продолжает работать на фоне. Подключаемся к устройству при помощи VNC-вьювера или терминала, и можно работать.
Конечно, это не идеальный вариант «завести» Linux на смартфоне, но он вполне рабочий.
С чего начать?
Основное — Android-смартфон с версией ОС не ниже Lollipop. Кроме того, пойдет и 32-битное или 64-битное ARM или x86-устройство. Кроме того, потребуется солидный объем свободного файлового пространства. Для этого можно использовать карту памяти или просто устройство с большим объемом внутренней памяти.
- AnLinux (вот ссылка на Google Play).
- Termux (снова понадобится Google Play).
- VNC Client (VNC Viewer — хороший вариант).
- Bluetooth-клавиатура (опционально).
- Bluetooth-мышь (опционально).
- HDMI кабель для мобильного телефона (опционально).
Что же, приступим

Как только установлен Termux, получаем полноценную консоль. Да, рута нет (если телефон не рутован), но ничего страшного. Следующий шаг — установка образа для дистрибутива Linux.
Теперь нужно открыть AnLinux и затем — выбрать Dashboard из меню. Всего есть три кнопки, но выбрать можно лишь одну, первую. После этого появляется меню выбора дистрибутива. Можно выбрать даже не один, а несколько, но в этом случае понадобится большой объем свободного файлового пространства.
После выбора дистрибутива активируются две другие кнопки. Вторая позволяет загрузить в буфер обмена команды, необходимые для загрузки и установки Linux. Обычно это pkg, wget команды и скрипт для их выполнения.
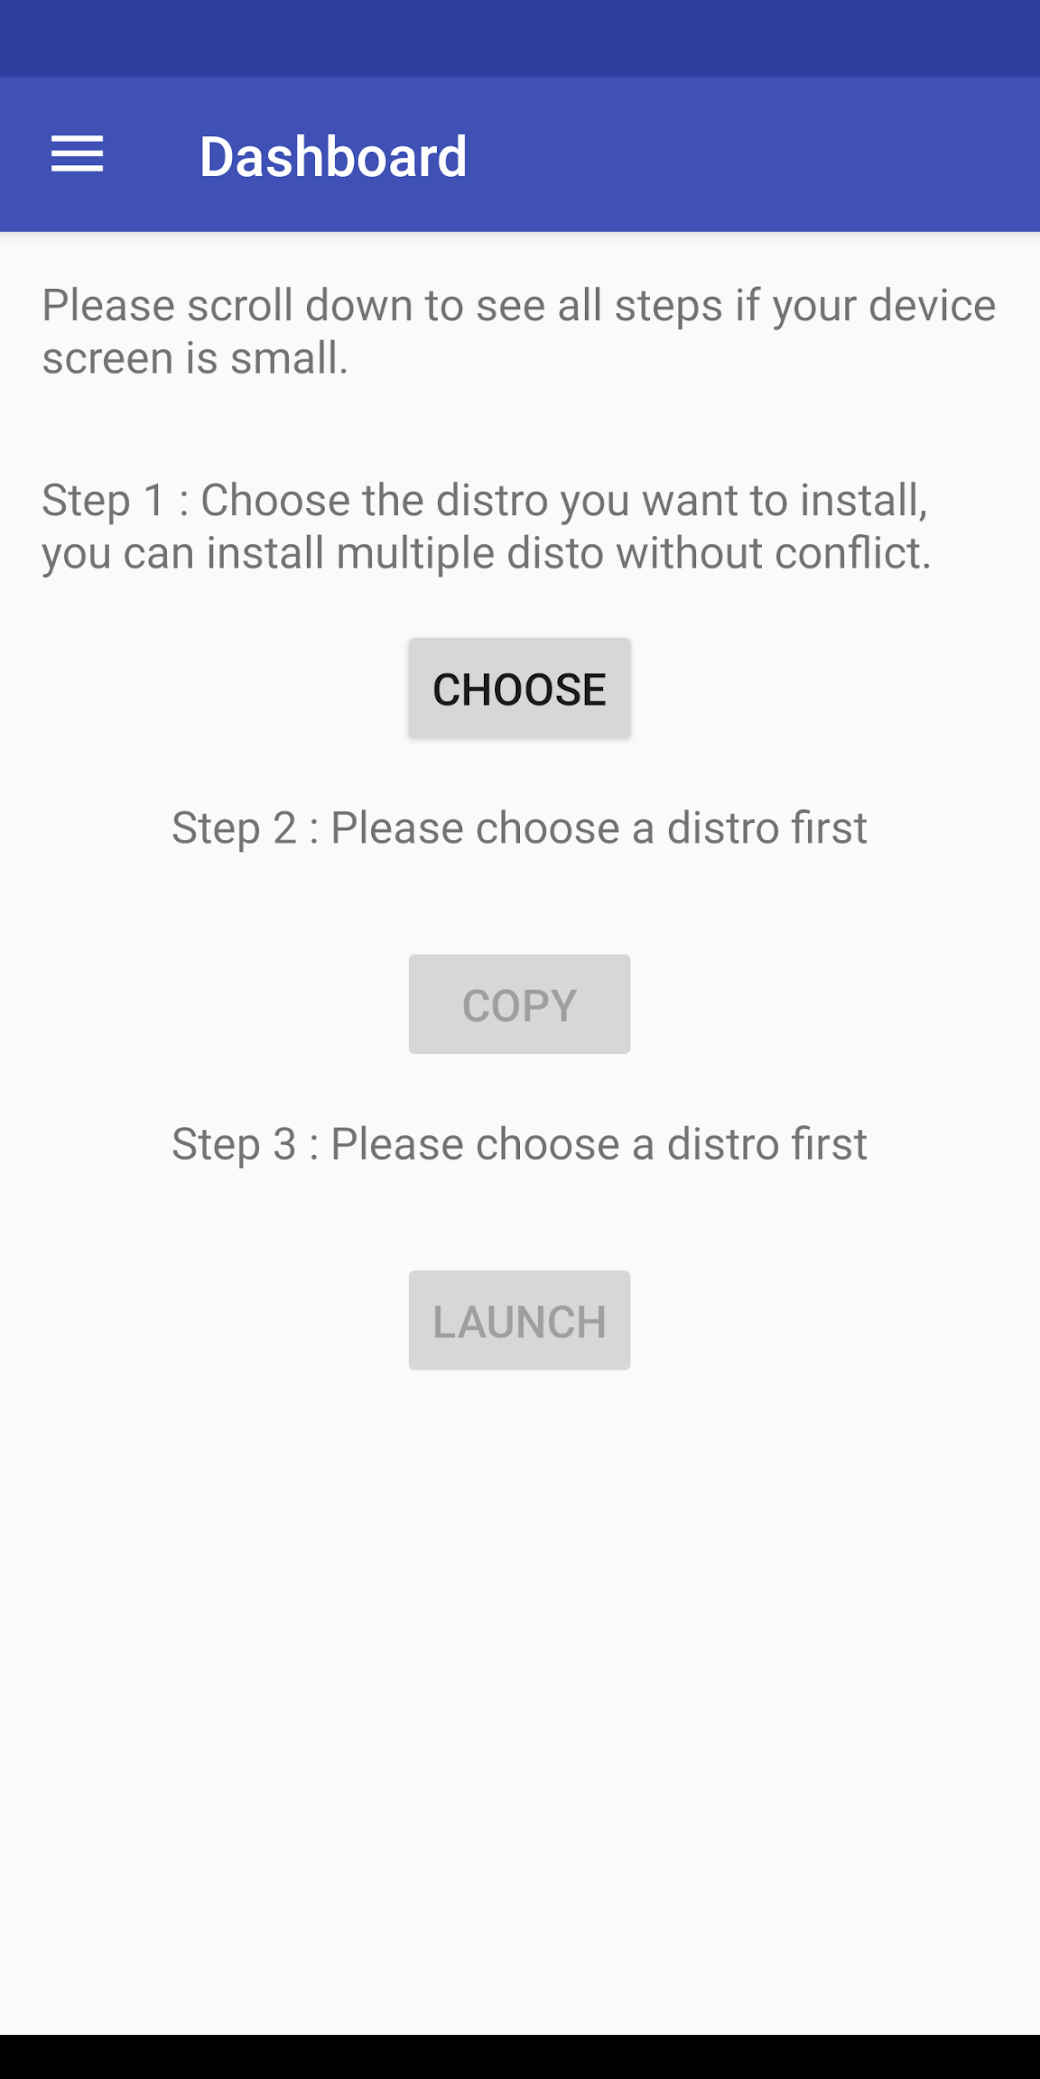
Третья кнопка запускает Termux, так что команды можно вставлять в консоль. Как только все сделано, запускается скрипт, позволяющий загрузить окружение дистрибутива. Для вызова дистрибутива нужно каждый раз запускать скрипт, но установку проводим только один раз.
А что с графической оболочкой?
Если она нужна, то следует лишь выбрать меню для десктопного окружения и использовать больше кнопок — появится не три, а больше. Кроме самого дистрибутива, нужно выбрать еще и оболочку, например, Xfce4, Mate, LXQt или LXDE. В целом, ничего сложного.
Потом кроме скрипта, который запускает дистрибутив, потребуется еще один — он активирует сервер VNC. В целом, весь процесс простой и понятный, он вряд ли способен вызвать затруднения.
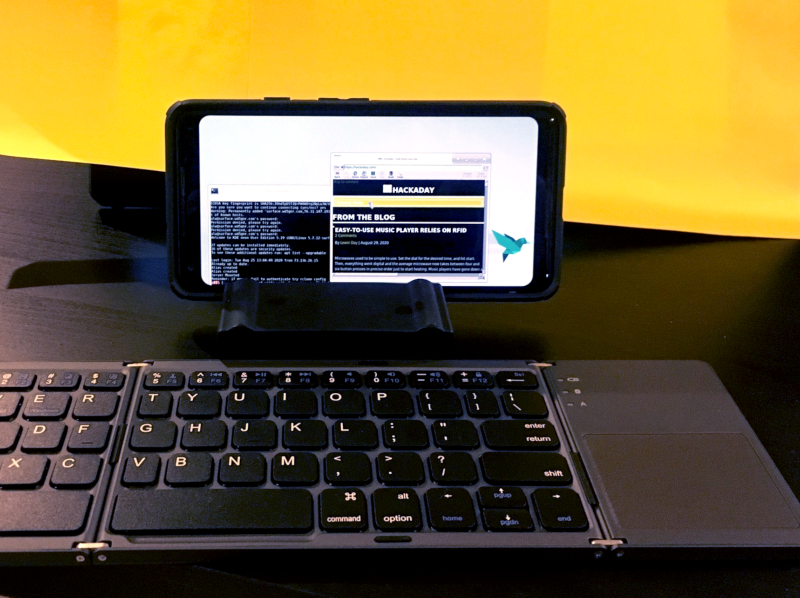
После запуска сервера VNC подключаемся со стороны клиента, воспользовавшись вьювером. Требуется знать порт и localhost. Все это сообщает скрипт. Если все сделано правильно, то пользователь получает доступ к своей виртуальной Linux-системе. Производительность современных телефонов на высоте, так что особых проблем не будет. Конечно, вряд ли смартфон сможет полностью заменить десктоп, но, в целом, все это работает.
Этот способ может пригодиться, если вдруг нужно срочно подключиться к серверу, а вы в машине, без ноутбука (конечно, в этом случае все описанные выше операции с AnLinux уже должны быть выполнены). Виртуальная Linux-машина позволяет подключиться к рабочему или домашнему серверу. А если в автомобиле по какой-то причине оказался дисплей и беспроводная клавиатура, то за считанные секунды в салоне можно организовать рабочий кабинет.
Linux On Android


Поделитесь ссылкой с друзьями


Для этого приложения пока нет обзоров
Для этого приложения пока не указаны ссылки


Получай список TOP-лучших приложений на почту: