- How To Install Kali Linux In Android Phone
- Installing Kali Linux On Android Phone
- Kali Linux System Requirements For Android
- Rooting Your Android Phone
- Install By Accepting Licenses
- Set up Linux deploy for Kali
- Installation
- VNC viewer app(optional)
- The CHROOT mode
- Other Factors
- How to Install a Complete Linux Distro on Android
- Requirements
- Linux on Android – Complete Linux Installer
- The requirements to run Complete Linux Installer application are:
- Currently supported Linux distributions are (more distributions comming!):
How To Install Kali Linux In Android Phone
Thanks to the Linux deployment team now the great wall separating android users from kali has weakened and fallen. It has been a long journey integrating Linux system on advanced RISC machine devices. It started with Ubuntu and now we have a Kali version that can run on your android device. Isn’t that great? Great indeed.
Kali Linux is a penetration testing Linux distro mainly used by digital forensics and cryptographers. Follow me and I will show you how to install Kali Linux on your android. It’s pretty easy for someone who cracked high school calculus. Oh no! Not calculus really but Haiku poetry.
Before we continue, we’d like to tell you about Contabo. We host LinuxAndUbuntu on Contabo VPS. Check them out if you need web hosting. Prices start at $6.99 per month for an 8GB RAM and 4 Core CPU VPS.

Installing Kali Linux On Android Phone
Kali Linux System Requirements For Android
- An android phone running version 2.0 and above
- Not less than 5 GB of free memory space (both internal and external)
- A nice internet connection
Nothing else or maybe a little patience to get you off the wall. There is a lot of waiting here believe me.
Rooting Your Android Phone
It is advised to have your phone rooted by an expert because root poses a threat to irreversibly damage your phone. If you can do it, however, ensure you do it correctly or you might end up damaging your phone. What you need to do first is back up your phone data. After which you should activate USB debugging and EOM unlocking in the smartphone’s developer settings. When everything is set to this step, download Android SDK tools from the Google developers site and install it in a default directory. Or you can install it anywhere but ensure you remember the directory. Uncheck everything in the resulting tab and click on install 2 packages.
Install By Accepting Licenses
Go to your phone manufacturer’s website and install device drivers. Ensure you unlock the bootloader. Note that some devices may require you to obtain an unlock key. Restart your device to fastboot mode (on most devices this is done by pressing volume up+power on). Open a command prompt on your personal computer.

Your device may require a code, copy it and paste it on your manufacturer’s website. After submitting the website form check for an email from your device manufacturer. This email will contain a key, file and further instructions necessary for rooting your smartphone.
Note that the following steps illustrated below may vary from device to device. It is recommended that you search for specific commands that regard your phone. Or you can follow this guide to learn how to root your phone.Go to the google play store on your phone and download Kingo root app. After installing the app and making sure your device is connected to your personal computer. Enable debugging and root your device.

Set up Linux deploy for Kali
NOTE: Ensure your Android phone is rooted or you have near you a rooting guide for your phone brand. Download the Linux deploy the app from Google play and just choose Kali distributions in the distributions tab. Set your installation type and path/location as well but you may also decide to stick with the defaults but we recommend configuring up the deployment app.
Installation
After the configurations: You can build on the Kali image by hitting the install button. This will take less than 5 minutes but depends on your internet speed. The install button starts a Kali Linux bootstrap directly from the Kali repository.

VNC viewer app(optional)
Go to google play and download the VNC viewer app. This is how you are to configure your VNC :set Address to localhost
set name to kali
When through with the above set-up click the connect button now and it will be possible to run your kali on the android. This process is however optional because the Kali installation comes with its own VNC or SSH server thus eliminating the need to download one.
The CHROOT mode
Once you are over with the installation, have the Linux deploy automatically mount and load your Kali Linux chroot image. This step will also entail start-up of VNC and SSH servers that will enhance easier remote access. Just press the START and this process will begin.

Note the IP address assigned to your device. You can use it to log in to your kali session.log in to chroot mode
Use either the VNC or SSH client to get into your kali instance. The VNC defaults will be as follows.
username: android Password/key: changeOther Factors
Linux deploy will normally allocate an image size of 4GB for a naked installation of kali. In case you will ever need to install more tools and utilities that might require huge space, it is recommended to reconfigure the image size at the Linux deploy settings. The above process is one of the configurations among numerous required to set up Kali OS on an Android device. It is the simplest though and in my opinion a perfect stance for entry-level technologists. Kali is a great OS which not only is a penetration testing tool but can also function as a utility operating systems. There are other alternatives to kingo root which you will also find at google play and they will all suit your needs since the process is the same.
How to Install a Complete Linux Distro on Android
For users who want to experience a complete desktop OS on their Android phone, especially tech-savvy people who don’t want to carry around a laptop or tablet, it’s entirely possible to install a fully-functional Linux OS on your Android phone.
You will need a rooted phone for this operation – you can search Appuals for a root guide for your device if you aren’t already rooted. Once you’re rooted though, the process is fairly simple.
Requirements
The first thing you’ll want to do is install BusyBox – either directly from Google Play store, or the Magisk BusyBox module if you’re rooted with MagiskSU.
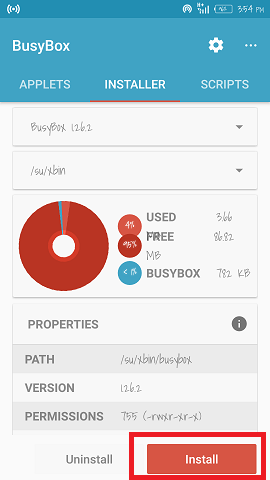
If you install BusyBox from the Google Play store, you just need to download the app, launch it, and hit the “Install” button from inside the app.
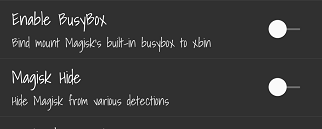
If you’re rooted with MagiskSU, you need to launch Magisk Manager and go to Settings, then enable the “Enable Busybox” button, which will utilize Magisk’s built-in BusyBox for your device.
What BusyBox does is allow your Android system to use Linux commands normally not accessible to you – many root apps depend on this. With BusyBox installed, you’re now going to launch Linux Deploy on your device.
In the Linux Deploy menu, choose “Download”, and then you’ll be presented with an options menu. Here is where you’ll configure your Linux distro before it’s installed, and I’ll explain the important settings:
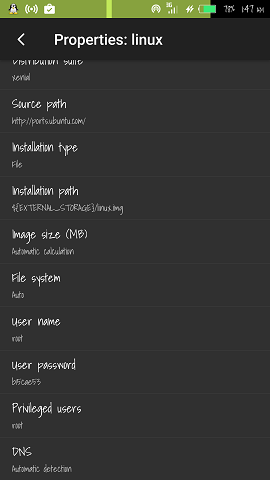
- Distribution – Choose your Linux distro to install. There’s quite a large list, but the most user-friendly would be Ubuntu.
- Distribution suite – Choose a version of the Linux distro you selected above.
- Architecture – Do not change this, it is automatically selected based on your device.
- Image size (MB) – The default is 512, but you should change this to a higher available number. Just don’t enter a number greater than 4095mb.
- SSH Settings – You’ll need to change the default port of 22 here, but Android devices can only use ports about 1024. Most users would opt for port 2222.
- Custom mounts – If you want to access your Android filesystem from within the Linux distro, go to “Mount points” and choose the ones you need. If you cannot enable the internal storage, change the default storage mount /storage/emulated/0 to /data/media/0.
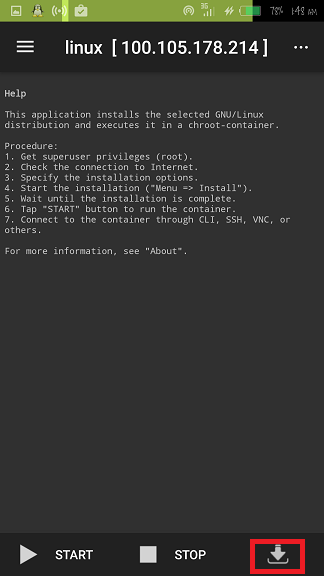
You should set your username to “root” – this will give you permanent super-user access inside the Linux distro. When everything has been configured, press the Install button, and after it’s finished, you may launch the Linux distro with the Start button – but this will launch it in chroot, which is like a command-line terminal. So we need to access the GUI using the VNC Viewer tool.
Launch VNC and set the address to “localhost:5900” and enter your password. You now have a fully-functioning Linux desktop OS on your Android phone. You may want to begin installing Linux apps, which is done through the Linux terminal. Here are a few worth grabbing:
- LibreOffice – apt-get install libreoffice
- Firefox – apt-get install iceweasel
- Python Idle – apt-get install idle
- GIMP – apt-get install gimp
- DropBox – apt-get install nautilus-dropbox
Also check out our guide on installing kali linux on android.
Linux on Android – Complete Linux Installer
We are talking about Linux On Android project. Linux On Android project brings Linux to your mobile Android device through a metod known as “chroot”. You simply download and install the Complete Linux Installer app and choose the Linux distribution you would like to run. Linux is downloaded from within the app and run similarly as a virtual machine would on your Android phone. This leaves your exsisting Android phone operating system intact and no damage to your phone is done!
The requirements to run Complete Linux Installer application are:
- ROOTED device
- Kernel that supports loop devices (see http://linuxonandroid.org/working-devices/ for known working kernels and ROMs)
- Armv7 processor (Debian does work on Armv6 but other distros do not)
- As much free RAM as possible (Are you are after all installing a desktop OS)
Currently supported Linux distributions are (more distributions comming!):

I own an MK802 III Android device as a Media Center and i will give it a go when i get home (even if it is not on a supported device list). I will let you know how it goes!
Share Facebook , Twitter , Google Plus , Pinterest , Email