- Launch Ubuntu Desktop on Google Cloud
- Before you begin:
- Create a Ubuntu VM instance
- Install Chrome Remote Desktop on the VM instance
- Set up a Ubuntu desktop environment in the VM instance
- Configure the Chrome Remote Desktop service and Connect to your Ubuntu Desktop
- Install an app on your Ubuntu Desktop
- Clean up
- Create your own Ubuntu Server on Google Cloud Platform
- Google Compute Engine (GCE)
- Post Configuration
- Next steps
- About the author
- Ranvir Singh
Launch Ubuntu Desktop on Google Cloud
This tutorial shows you how to set up a Ubuntu Desktop on Google Cloud. If you need a graphic interface to your virtual desktop on the cloud, this tutorial will teach you how to set up a desktop environment just like what you can get on your own computer.
We need four steps to set up a machine:
- Create a Ubuntu VM instance on Google Cloud.
- Install and configure the Chrome Remote Desktop service on the VM instance.
- Set up a Ubuntu desktop environment in the VM instance
- Connect from your Chrome web browser to the desktop environment on the VM instance.
Before you begin:
- Make sure that you selected a Google Cloud project for running this VM instance.
- If you don’t have the Google Chrome browser installed, you can install it from the Google Chrome homepage.
Create a Ubuntu VM instance
In this step, we will launch a VM instance in Google Cloud. The default e2-medium (2 vCPU, 4 GB memory) machine type works fine for the tutorial purpose. If you want a more performant machine, there are a variety of choices in Google Cloud.
2. Click CREATE INSTANCE.
3. Set the instance name to ubuntu-desktop .
4. Select a region and zone you want to run your instance.
5. Scroll down to the Boot disk options and click Change
6. In the Boot disk pop-up window, in Operating System, select Ubuntu Pro from the drop-down; in Version, select Ubuntu-Pro-20.04-LTS; keep the rest options as default value and click SELECT. Ubuntu Pro ensures the latest security update, which will be useful when we install the productivity applications.
7. Click CREATE to create the instance.
8. In less than one minute, you will be able to see your Ubuntu instance in RUNNING status. You can click the SSH button in the instance list to connect to your new instance.
If you prefer to start a VM through Google Cloud Shell, you can use this command to achieve the same result:
gcloud compute instances create ubuntu-desktop --zone=us-central1-a --machine-type=e2-medium --image=projects/ubuntu-os-pro-cloud/global/images/ubuntu-pro-2004-focal-v20210720Install Chrome Remote Desktop on the VM instance
The next step is to install Chrome Remote Desktop on the VM instance.
1. In the SSH window connected to your VM instance, update the package manager data and install wget and tasksel. Wget is a free software package for retrieving files using HTTP, HTTPS, FTP and FTPS, the most widely used Internet protocols. Tasksel is a Debian/Ubuntu tool that installs multiple related packages as a co-ordinated “task” onto your system.
sudo apt update sudo apt install --assume-yes wget tasksel2. Download and install the Debian Linux Chrome Remote Desktop installation package:
wget https://dl.google.com/linux/direct/chrome-remote-desktop_current_amd64.deb sudo apt-get install --assume-yes ./chrome-remote-desktop_current_amd64.debSet up a Ubuntu desktop environment in the VM instance
Now we need to install a desktop environment and window manager for Chrome Remote Desktop to communicate with the VM instance.
1. In the SSH window connected to your VM instance, install Ubuntu desktop environment:
sudo tasksel install ubuntu-desktop
2. Set your Chrome Remote Desktop session to use Gnome, which is the default desktop environment for Ubuntu:
sudo bash -c ‘echo “exec /etc/X11/Xsession /usr/bin/gnome-session” > /etc/chrome-remote-desktop-session’
3. You just need to reboot your Ubuntu VM instance.
You will lose connection to your VM instance immediately. Don’t panic, close the SSH window, wait a few seconds and you will SSH into it through the Cloud Console again in the next step.
Configure the Chrome Remote Desktop service and Connect to your Ubuntu Desktop
To start the remote desktop connection, you need to have an authorization key for your Google account.
1. In the Cloud Console, click the SSH button to connect to your instance.
2. On your local computer, using the Chrome browser, go to the Chrome Remote Desktop command line setup page:
https://remotedesktop.google.com/headless
3. On the Set up another computer page, click Begin.
4. Click Next. You already installed the Chrome Remote Desktop on the remote computer in STEP2(Install and configure the Chrome Remote Desktop service on the VM instance)
5. Click Authorize.
6. Now you get the command to set up and start the Chrome Remote Desktop service on your VM instance. Copy the command for Debian Linux.
7. Paste the command to the SSH window that connects to your VM instance. Run the command.
8. Enter a 6 digit PIN when prompted. This PIN will be used when you log into the VM instance from your Chrome. If you see errors like Fail to read or No net_fetcher, ignore them.
9. Verify that the Chrome Remote Desktop service is running by using the following command.
sudo systemctl status chrome-remote-desktop@$USER
If the service is running, you will see the status is active:
Active: active (running) since DATE_TIME; ELAPSED_TIME
Now you are ready to connect to the VM instance through Chrome Remote Desktop web application.
10. On your local computer, go to the Chrome Remote Desktop web site. You will find your Ubuntu Desktop shows up in the portal.
11. Click the remote desktop instance. In this case, it is ubuntu-desktop. And you will be prompted to input the 6 digit PIN you set in step-8.
12. You will see this page, just cancel it.
Ubuntu uses a software component called Polkit, which is an application authorization framework that captures actions performed by a user to check if the user is authorized to perform certain actions. When you connect to Ubuntu remotely using RDP / Windows Remote Desktop, you will see the above errors because the Polkit Policy file cannot be accessed without superuser authentication.
If you don’t want to see it again, you can create a new configuration file in /etc/polkit-1/localauthority.conf.d/02-allow-colord.conf in your VM instance. In your SSH window, input the following:
$ sudo nano /etc/polkit-1/localauthority.conf.d/02-allow-colord.conf
polkit.addRule(function(action, subject) < if ((action.id == "org.freedesktop.color-manager.create-device" || action.id == "org.freedesktop.color-manager.create-profile" || action.id == "org.freedesktop.color-manager.delete-device" || action.id == "org.freedesktop.color-manager.delete-profile" || action.id == "org.freedesktop.color-manager.modify-device" || action.id == "org.freedesktop.color-manager.modify-profile") && subject.isInGroup("")) < return polkit.Result.YES; >>);Save (press CTRL+X, and Y) and exit (press Enter).
This tells Polkit to continue without requiring the RDP authentication.
Now, Ubuntu desktop is fully functional in your Chrome web browser:
Install an app on your Ubuntu Desktop
Let’s install Visual Studio Code from the Snap Store. In your terminal, run:
$ sudo snap install –classic code # or code-insiders
Visual Studio Code will be ready for you in less than a minute.
Clean up
To avoid incurring charges to your Google Cloud account for the resources used by this tutorial, you may delete the VM instance.
In the Cloud Console, DELETE this VM instance:
Then on your Google Chrome Remote Desktop, DELETE ubuntu-desktop from your Remote Devices list.
That’s it. Enjoy your Ubuntu Desktop anywhere anytime!
Create your own Ubuntu Server on Google Cloud Platform
![]()
Google Cloud Platform offers a number of services ranging from App Engine, fully managed Kubernetes, Database as a Service, Function as a Service, Object store and much more. It is easy enough to get overwhelmed by all the functionalities, each as attractive as other. The Google Cloud Platform dashboard, in my opinion, doesn’t make it any easier for the user, either!
Sometimes, all we need is a simple VM. Despite the uprising of containers, VMs are still useful and simple. You don’t have to worry about giving your application permissions for a different Database service, an object store service etc. Everything from compute to storage can be contained within a single (scalable) VM.
In this post, let’s dive into how one can spin up a Ubuntu server in Google’s Cloud Platform.
Google Compute Engine (GCE)
GCE is the product that actually lets you configure and deploy virtual machines on Google’s infrastructure. Everything from the amount of resources to the networking capabilities, SSH-keys and Operating system are selected herein.
Login to your Google Cloud Platform dashboard, and search for GCE. At once Compute Engine will show up in the results, click on it.

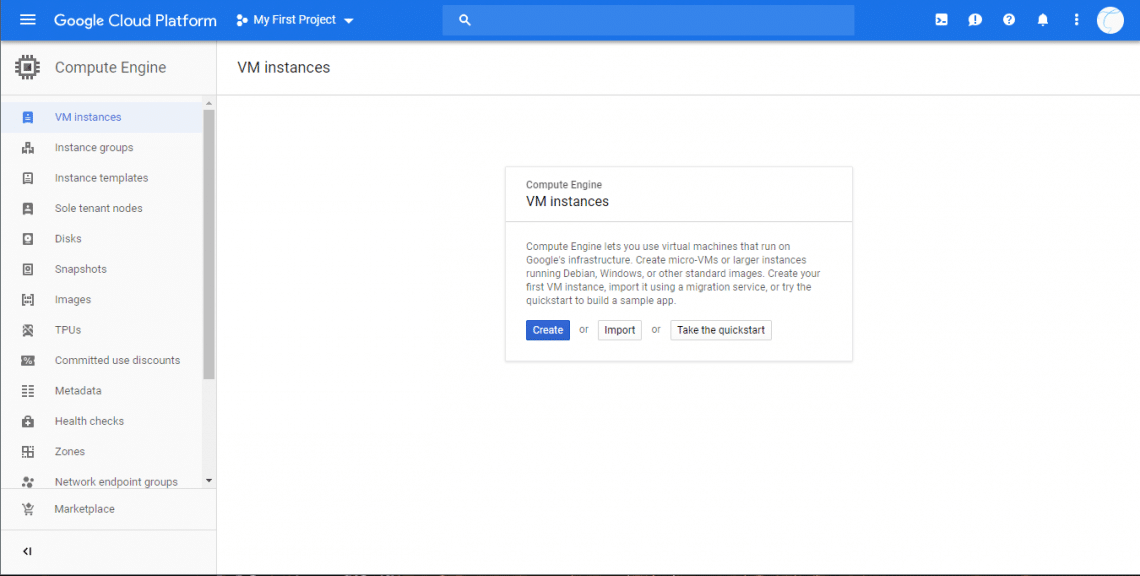
Here’s an overview of Compute Engine:
As you can see, the side menu has a lot of options for managing your VMs and monitoring them. We will stick to VM instances for now. Since this lets us create a single VM. If you wish to create a group of them “Instance groups” might serve you better.
Let’s start by clicking on Create, as shown in the screenshot above.

A VM template with all the default values provided by Compute Engine will appear. Let’s configure a few of the defauls. I’ll leave the CPU to 1 vCPU and memory to 3.75 GB as those values are good enough for a demo. If you want more/less resources for optimal price and performance, feel free to tweak these parameters.
First thing I will tweak is the boot disk. We want Ubuntu, so, under boot disk, click on Change and select Ubuntu 18.04 LTS. This disk will have the OS installed and the remaining space is what you will use for your application, packages, etc. (unless you are adding extra block storage). So if you want more storage than the default 10GB, make sure to increase the size, as shown below.
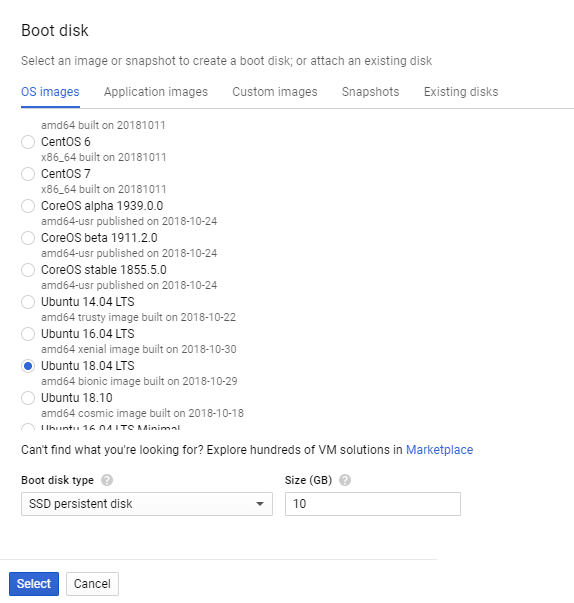
Moreover, for better performance you can select SSD persistent disk. This is a significant improvement over standard persistent disk. Once the boot disk is selected to be Ubuntu, we can just create the VM and have a Ubuntu server installed in the cloud for us.
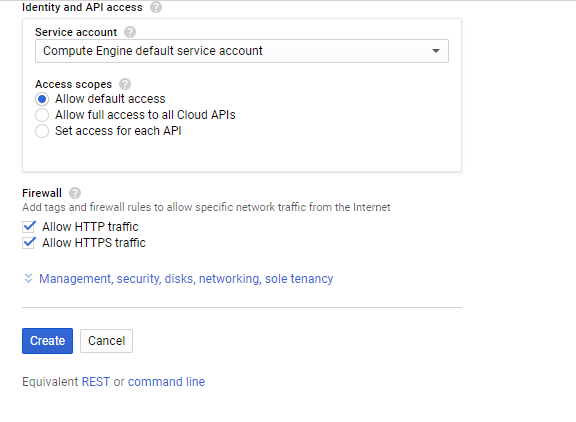
However, let’s configure, for convenience sake, Firewall and SSH keys.
If you wish to host an HTTP or HTTPS server, make sure to check the boxes saying “Allow HTTP Traffic” and “Allow HTTPS Traffic”. Most websites would need this, and so would most API servers, reverse proxy servers, etc. As for the Identity and API access parameters are concerned, you can leave that to default.
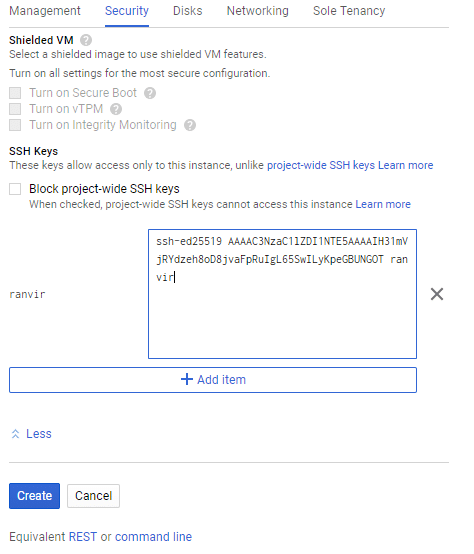
Now click on “Management, security, disks…” section to access more customization features. Within this dropdown go to Security and you can paste your public ssh key in here. The username within the key will also be created inside the VM. For example, the key
Will create a user named ranvir with sudo access and place the SSH key within this user’s home directory (~/.ssh/authorized_keys) so you can access the VM remotely.
We are almost done. Review the monthly estimated price this VM will cost you as well as the region where it will be spun up, by scrolling all the way up again. Regions are a subjective, but important parameter. For someone trying to create a VPN, a VPN several time zones away is better suited. On the other hand, if you require lower latencies, you need to select a region nearest to you.
Then click on create and you have your Ubuntu VM up and running!
Post Configuration
In order to make sure that you can ssh into the VM reliably as well as point domain names to this VM, you would need a static public IP address. If you view the Compute Engine dashboard, you will see the status of your VM along with its external (public) IP.
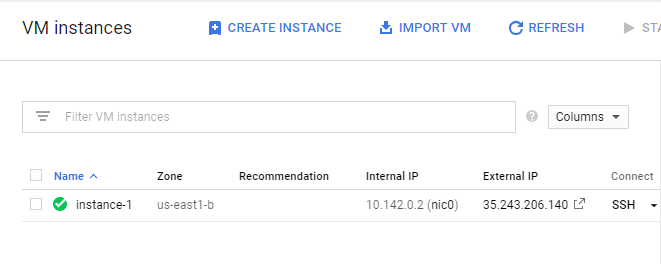
But if you click on the VM’s name (instance-1 in my case) then you will notice that the IP is, in fact, ephemeral.

This means trouble, especially if you are using external domain name servers to point your FQDN towards this IP address. To change this to static, click on Edit, from the top menu. Scroll back to network interfaces (nic0, in our case) and edit it.
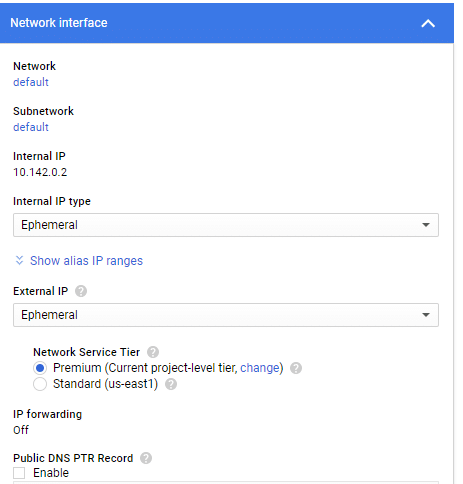
Click on Ephemeral under the External IP and select Create IP address.
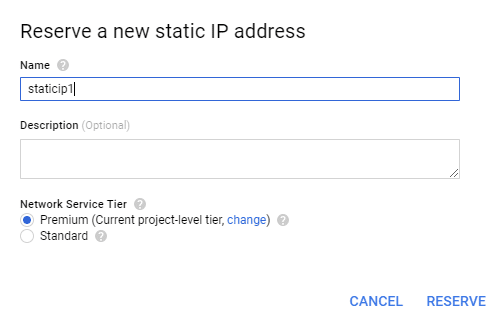
It will open up a dialogue box asking you for a name to give to this new static IP. Give it a reasonable name and click Reserve. You will notice that the external IP of the VM has indeed changed and, hopefully, for the last time.
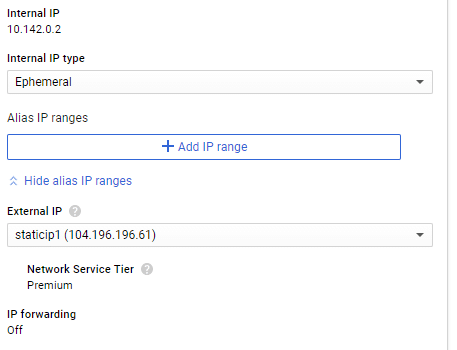
You can now try to ssh into this VM via its external IP. Remember the username that was associated with your public SSH key? Just use that along with the static IP you obtain, like in my case it would be:
Your username and IP would be very different from mine, use those instead.
Next steps
When it comes to computation, automation is the name of the game. VMs are often created as a disposable entity in the cloud, especially if you just want to use them for a few hours of testing, or running batch processes, etc.
Now that you know how to create a VM using the GUI, try automating the process using the gcloud CLI or the REST API. Whatever actions you perform on the Compute Engine GUI, an equivalent HTTP request or gcloud command is available in the bottom of the page.

Use them to automate the tedious process of spinning up VMs. This will help you save an enormous amount of time.
About the author
Ranvir Singh
I am a tech and science writer with quite a diverse range of interests. A strong believer of the Unix philosophy. Few of the things I am passionate about include system administration, computer hardware and physics.