- Как установить Linux на Virtualbox
- Что такое виртуальная машина
- Что такое Virtualbox
- Как создать виртуальную машину в Virtualbox
- Как установить Linux на Virtualbox
- Linux oracle vm virtualbox настройка
- How to run an Ubuntu Desktop virtual machine using VirtualBox 7
- What you’ll learn
- What you’ll need
- Download an Ubuntu Image
- Download and install VirtualBox
- 2. Create a new virtual machine
- Create a user profile
- Define the Virtual Machine’s resources
- 3. Install your image
- 4. Explore Virtual Box
- 5. Tell us your thoughts!
- How will you use this tutorial?
Как установить Linux на Virtualbox
В статье мы расскажем, как установить ОС семейства Линукс на виртуальную машину Virtualbox.
Что такое виртуальная машина
Виртуальная машина (ВМ или VM) — это виртуальная операционная система, которая обладает функционалом физического ПК. Простыми словами, ВМ — это виртуальный компьютер, который создан на физическом при помощи программного обеспечения.
Предположим, что на вашем компьютере установлена ОС Windows. Однако вам потребовалась программа, которая поддерживается только на ОС семейства Linux. Можно ли установить Линукс в качестве второй хостовой (физической) системы? Да, но это не всегда возможно: например, большая часть физических ресурсов может быть задействована в работе Windows. Тогда для корректной работы Linux не хватит мощностей. Оптимальное решение в этой ситуации — создание VM, на которую можно установить Linux в качестве гостевой (виртуальной) системы.
Файловая система виртуальной машины изолирована от файлов на физическом компьютере. Благодаря этой особенности ВМ можно использовать для тестирования неизвестного ПО: если вместе с незнакомым приложением в файлы гостевой ОС проникнет вирус, он не затронет хостовую систему.
Создать виртуальную машину можно при помощи специальной программы — гипервизора. Один из популярных гипервизоров называется Virtualbox: о нем мы расскажем ниже.
Что такое Virtualbox
Oracle VM Virtualbox — это гипервизор, который поддерживает компания Oracle. С помощью этой программы можно создать виртуальную машину с одной из популярных ОС, среди которых:
- Windows,
- Linux,
- macOS,
- FreeBSD,
- Solaris,
- OpenSolaris,
- ReactOS,
- DOS и др.
Virtualbox не поддерживает операционные системы версии 32 bit (например, Ubuntu, Windows и др.).
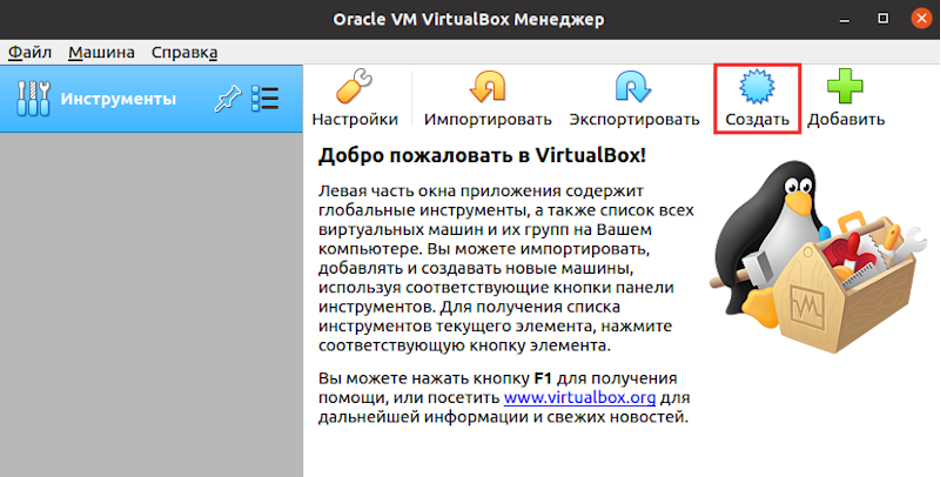
Как создать виртуальную машину в Virtualbox
Чтобы создать виртуальную машину:
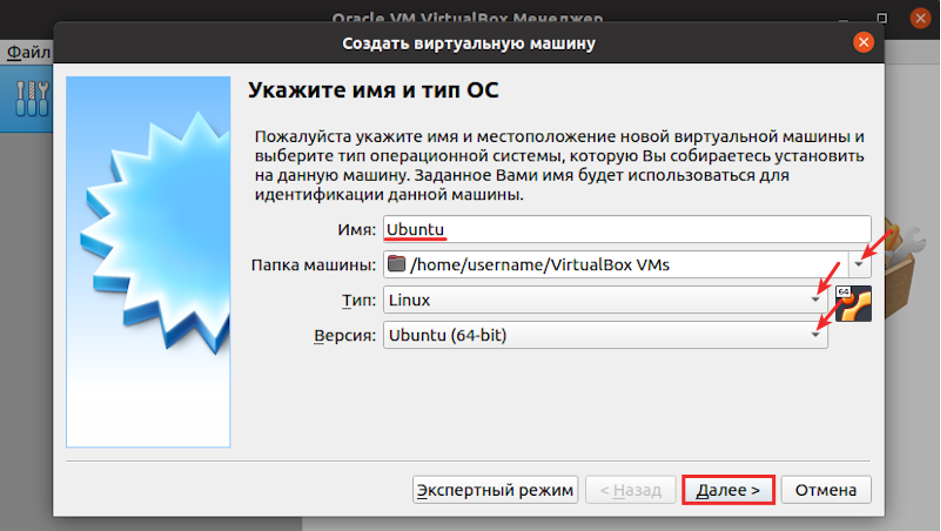
- Укажите название виртуальной машины. Выберите директорию для хранения ВМ, семейство и название гостевой ОС. Затем кликните Далее:
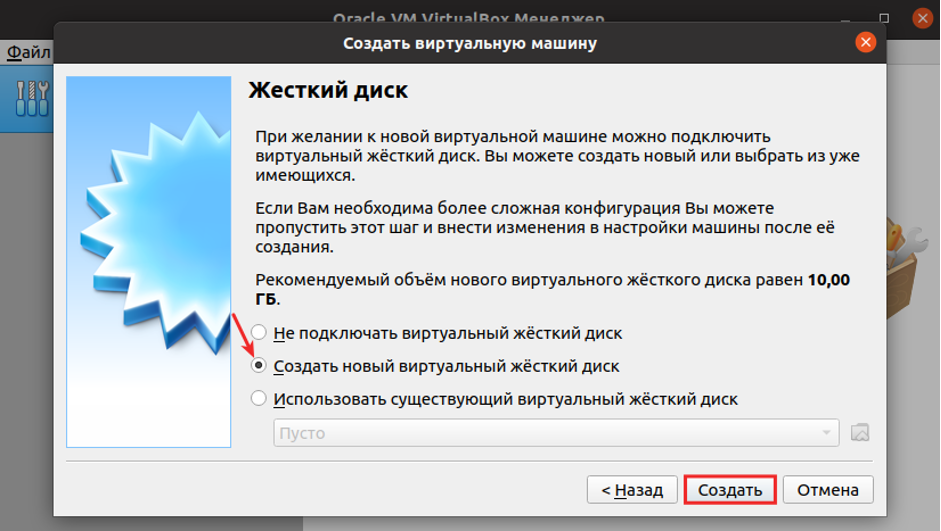
- Отметьте пункт Создать новый виртуальный жесткий диск и кликните Создать:
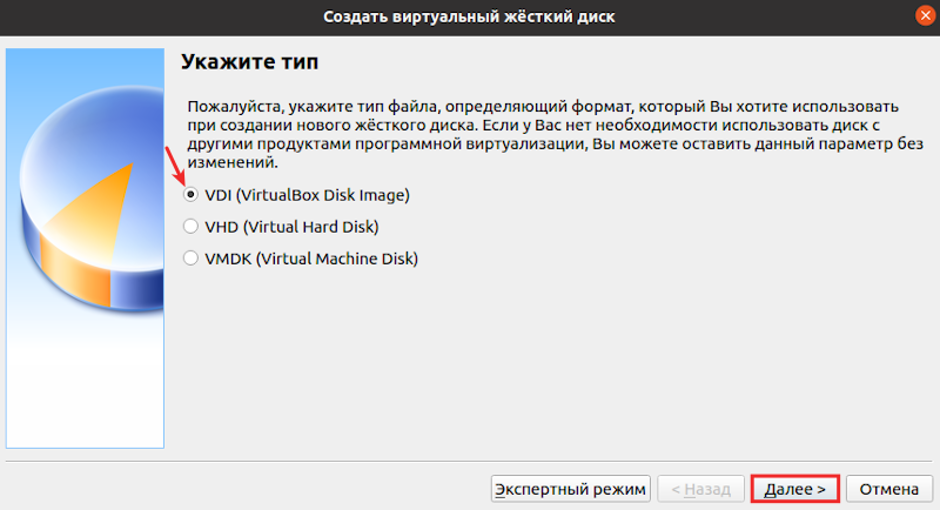
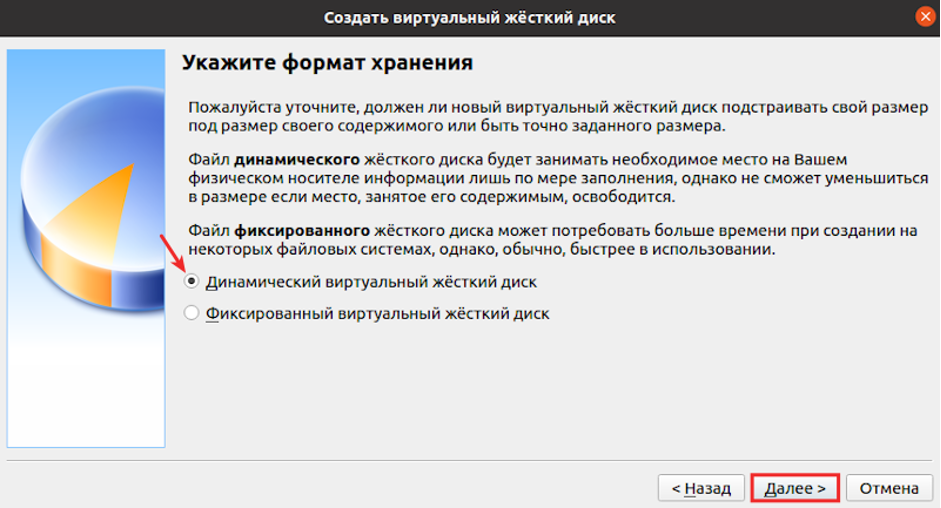
- Выберите директорию для хранения виртуального диска и его объем. Затем кликните Создать:

Готово, вы создали виртуальную машину. Теперь можно перейти к настройке образа Линукс для Virtualbox.
Как установить Linux на Virtualbox
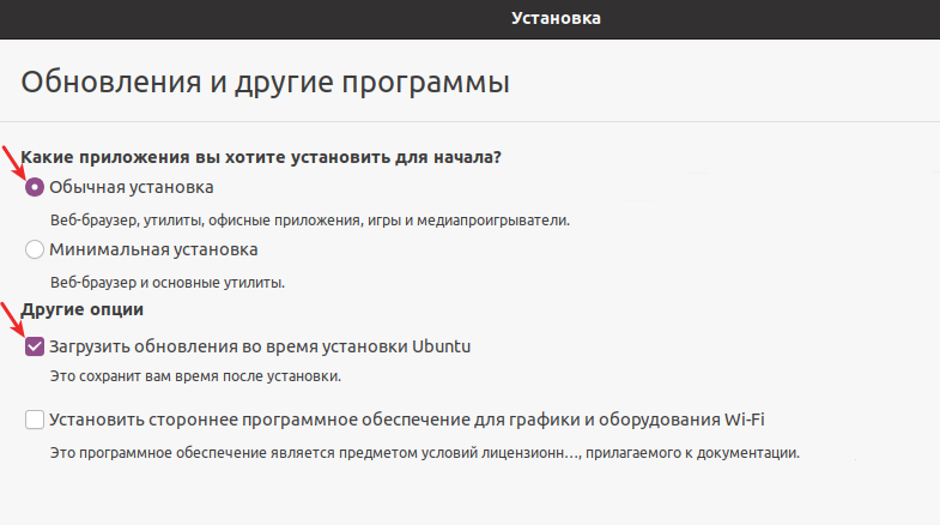
Виртуальная машина Линукс для Virtualbox потребует настройки компонентов ОС. Набор этих компонентов индивидуален и зависит от задач, которые вы хотите выполнять на гостевой ОС. Мы опишем процесс установки и настройки на примере ОС Ubuntu из семейства Linux.
Предварительно нужно скачать образ диска Ubuntu (Linux) для Virtualbox c официального сайта. После этого приступайте к установке гостевой операционной системы:
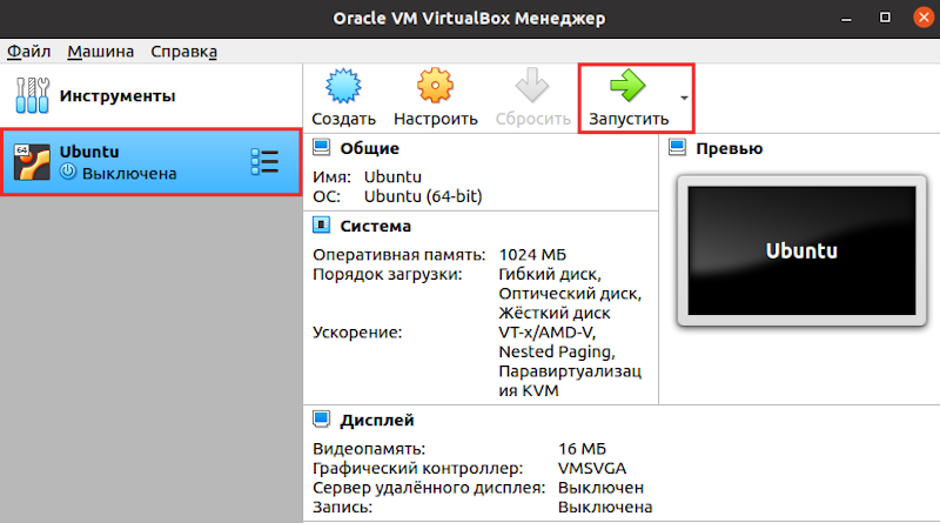
- Запустите гипервизор VirtualBox.
- Выберите созданную виртуальную машину и нажмите Запустить:
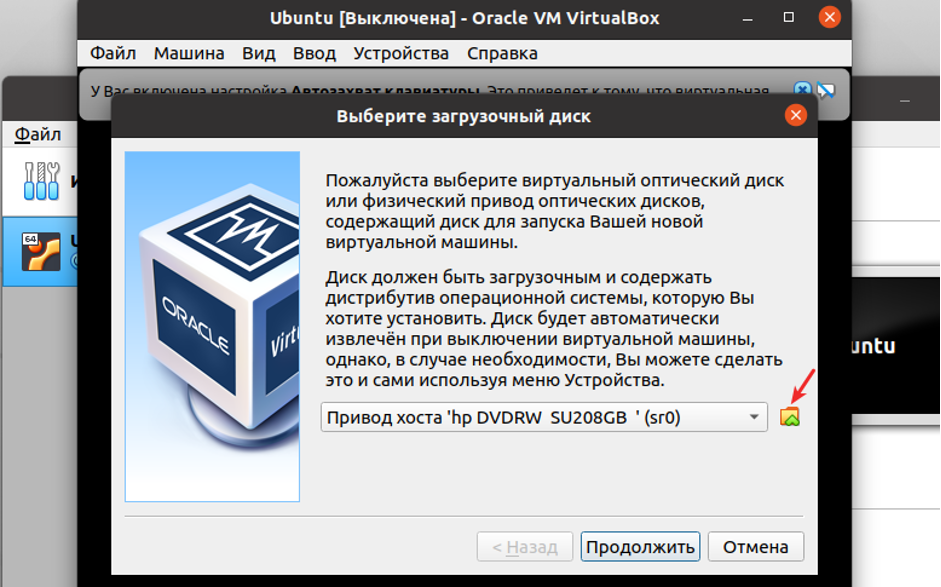
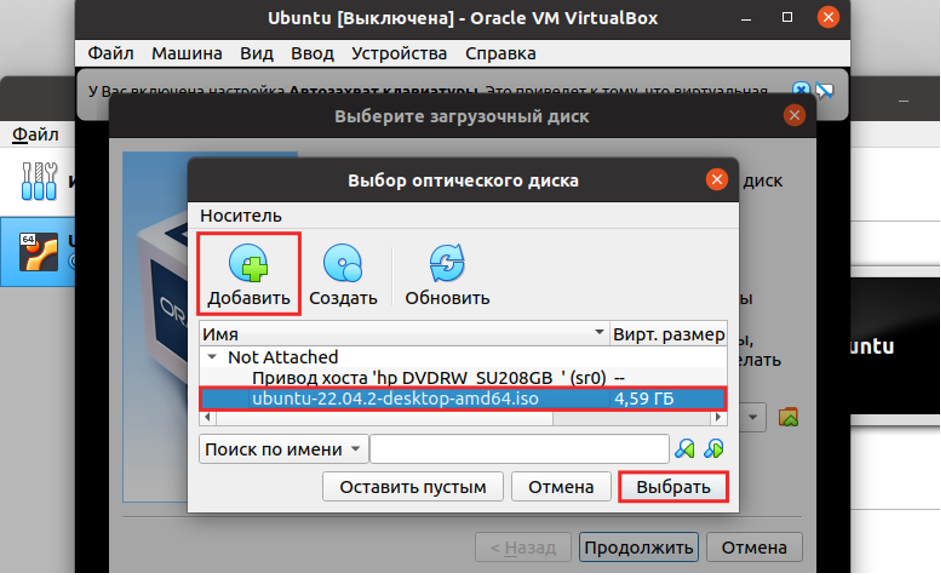
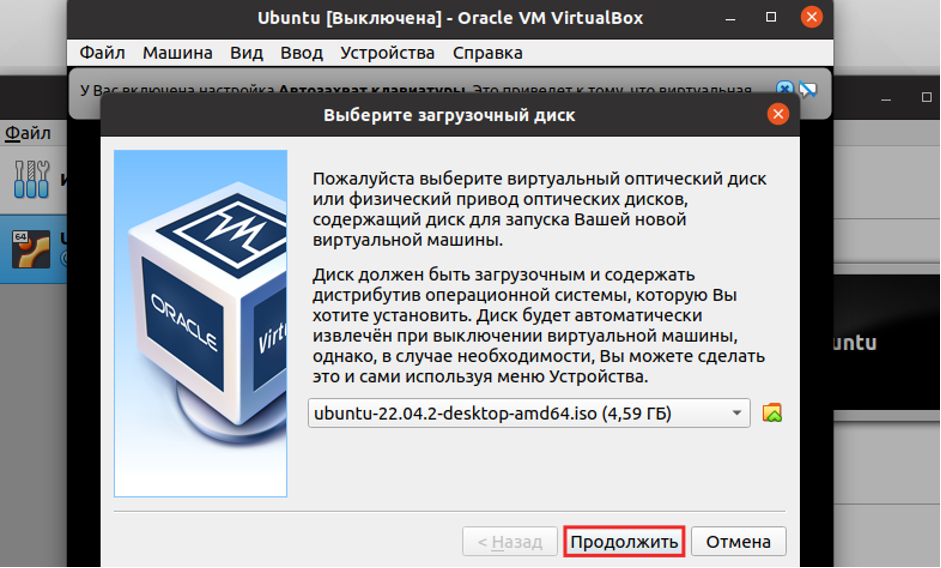
- Нажмите Добавить и выберите образ диска операционной системы. Затем кликните по названию ISO-образа и нажмите Выбрать:
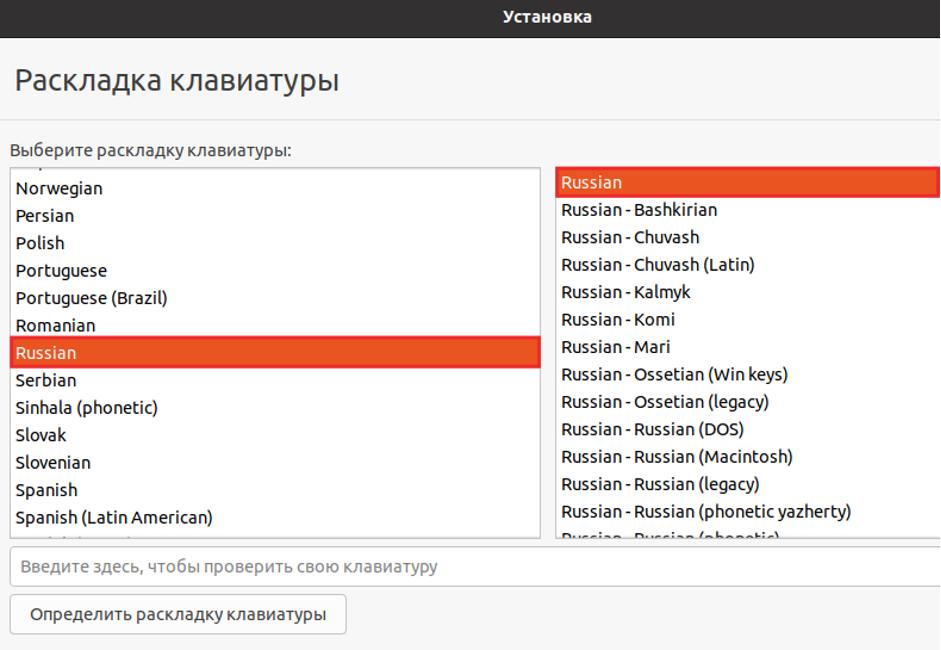
- Выберите раскладку клавиатуры и набор символов на ней. Затем кликните Продолжить:
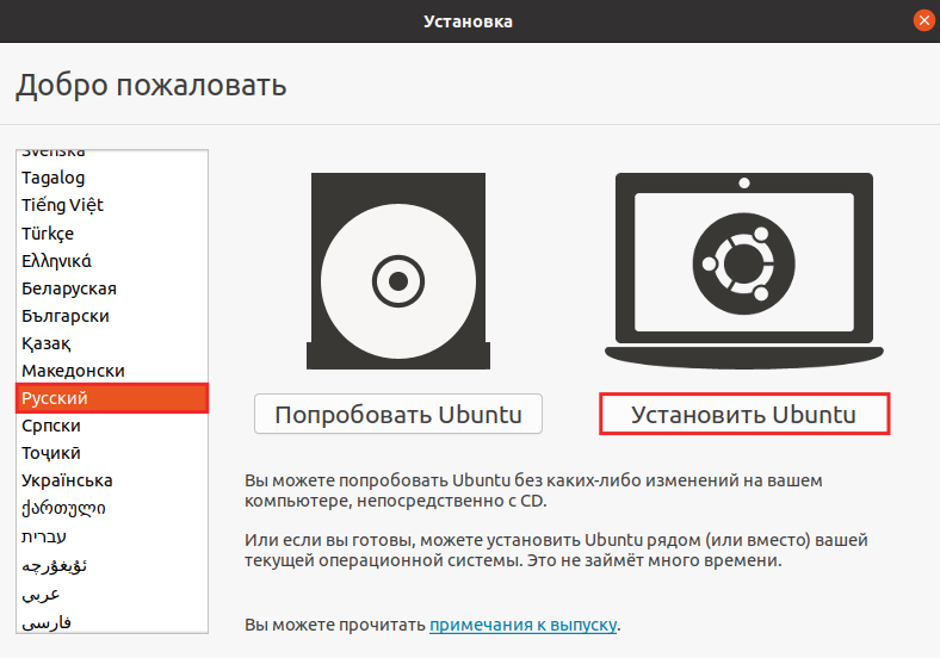
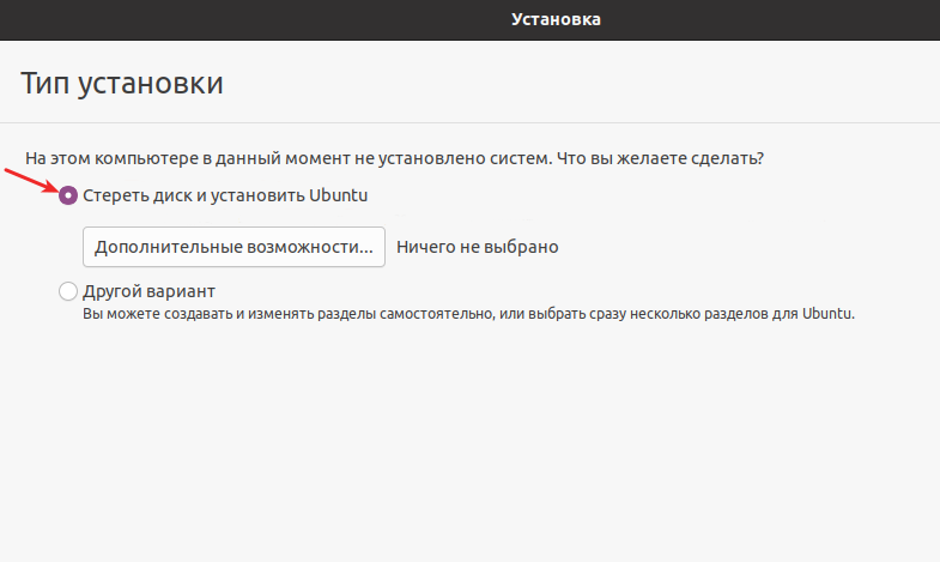
- Выберите вариант Стереть диск и установить Ubuntu и кликните Установить:
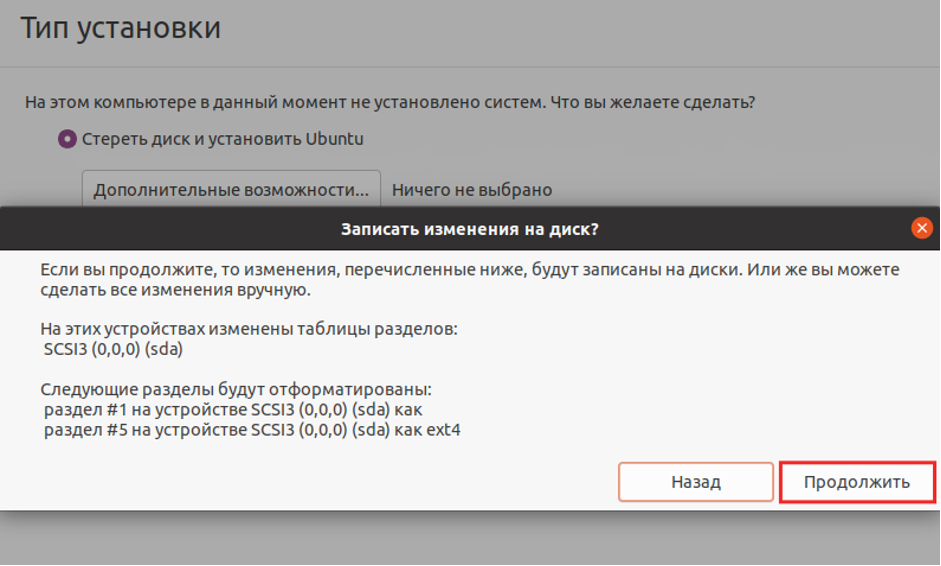
Подтвердите свое решение, нажав Продолжить:

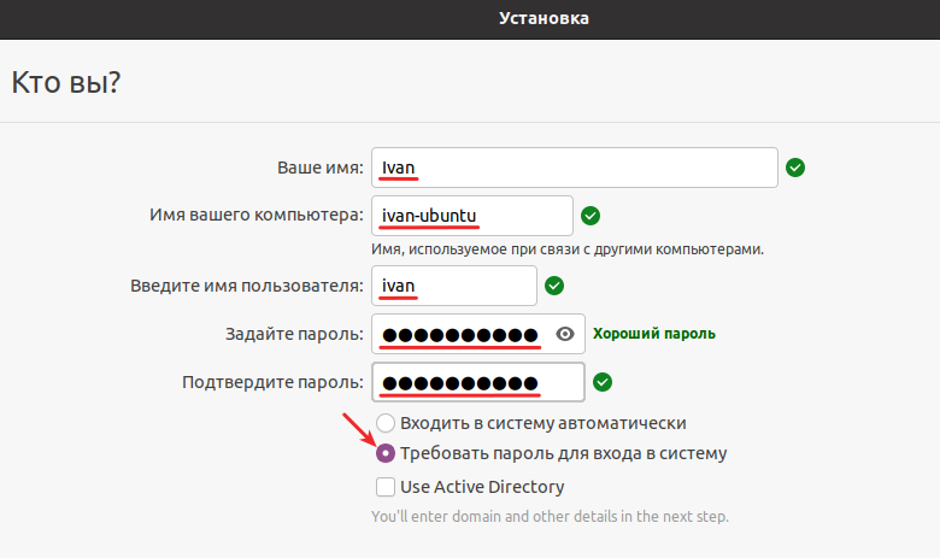
- Создайте пользователя ОС. Для этого заполните поля:
- Ваше имя — введите полное имя;
- Имя вашего компьютера — укажите имя виртуального компьютера, которое будет использоваться при создании сети;
- Введите имя пользователя — укажите логин для входа в систему;
- Задайте пароль — введите пароль для входа в систему;
- Подтвердите пароль — повторите пароль;
- Требовать пароль для входа в систему — отметьте этот пункт, чтобы пароль запрашивался при каждом запуске ОС.
Затем перейдите к установке:
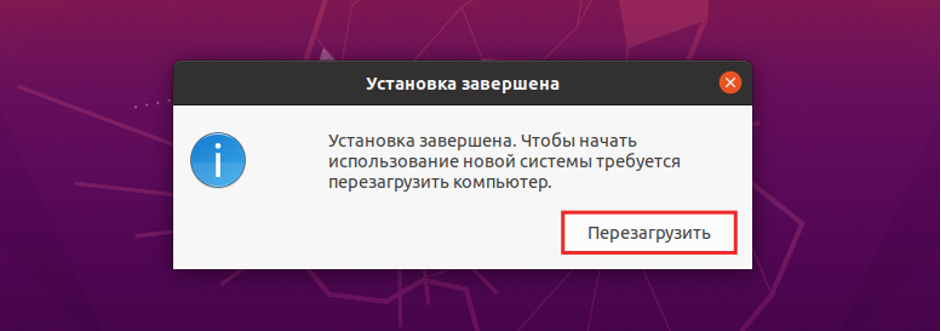
Готово, вы установили Linux на Virtualbox.
Linux oracle vm virtualbox настройка
1. Вступление
В рамках этой статьи рассмотрим подробную установку средства виртуализации Oracle VM VirtualBox (далее просто VirtualBox) и создания виртуальной машины под управлением Ubuntu 18.04 Server.
Почему будем использовать именно VirtualBox?
Причин несколько:
1) Он прост в установке на любую операционную систему (Windows, MacOS, Linux);
2) Имеет обширное комьюнити пользователей, а значит — можно найти ответ на любой вопрос;
3) Поддерживает создание множества виртуальных машин под разными ОС (Windows, FreeBSD, Ubuntu, CentOS, RedHat и др.);
4) Создание отдельных виртуальных сетей между виртуальными машинами;
5) Cоздание и восстановление снимков системы (снапшотов) и довольно обширную интеграцию с ОС хоста;
6) Бесплатный;
Зачем это нужно?
1) Для обучения;
2) Для тестирования каких-то программ, сборки пакетов под определённую конфигурацию системы;
3) Для решения задач «домашнего сервера» при наличии мощной машины хоста;
Версии ПО используемые для установки в данном руководстве:
— Windows 10, версии 1903;
— VirtualBox 6.1;
— Ubuntu 18.04 Server LTS;
2. Подготовка
2.1 Скачивание, установка и настройка Oracle VM VirtualBox
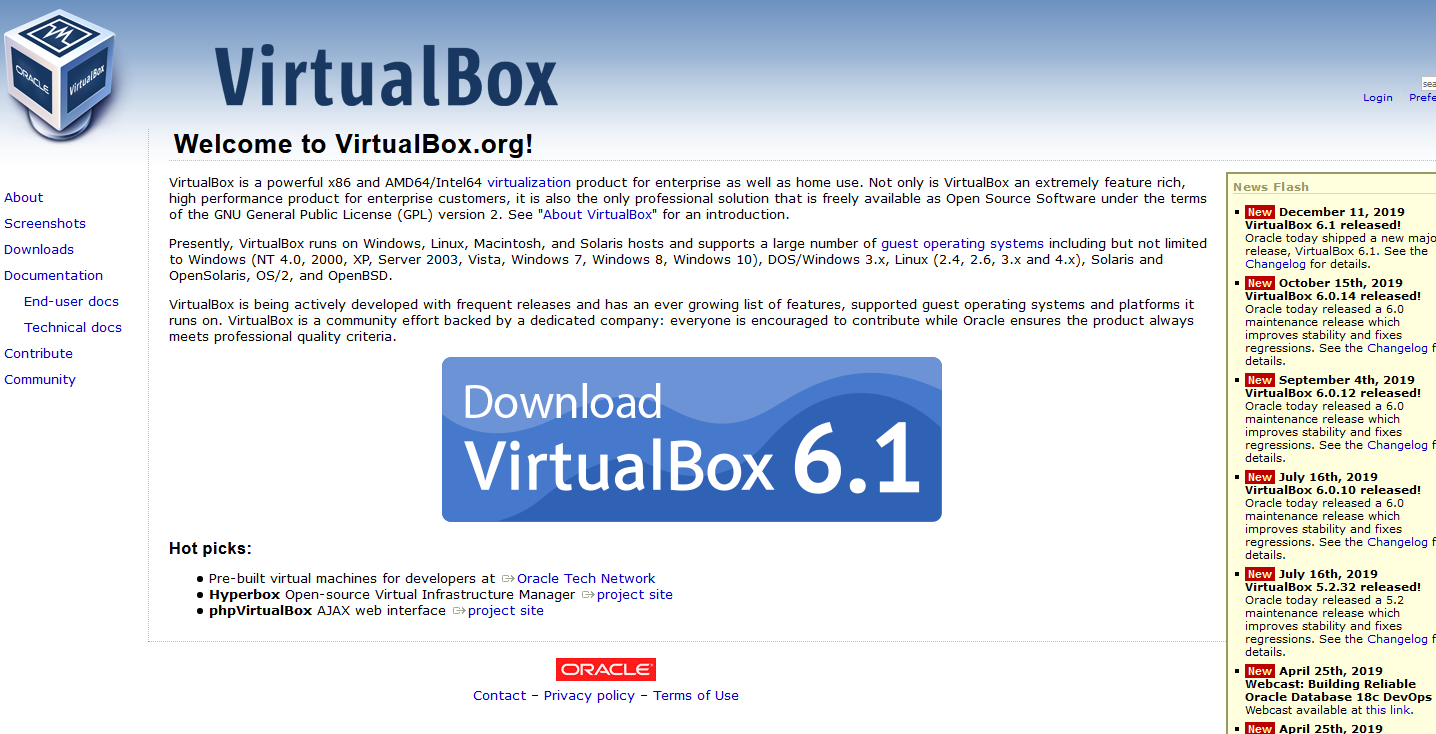
Скачать VirtualBox можно с официального сайта — ссылка: https://www.virtualbox.org
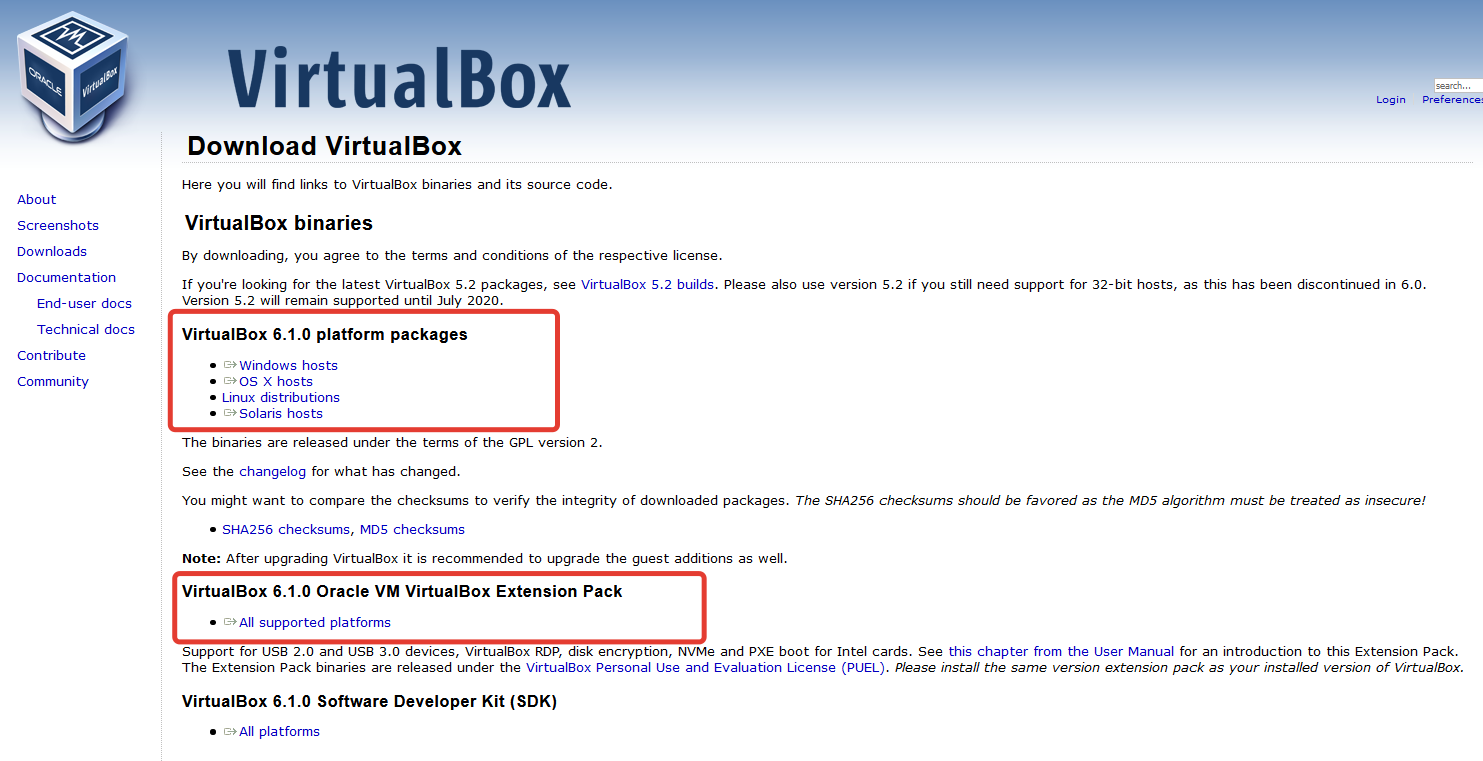
Нам необходимо скачать то,
что на скриншоте выделено
красными прямоугольниками,
а именно:
— Сам установочный файл
VirtualBox:
https://download.virtualbox.org/virtualbox/6.1.0/VirtualBox-6.1.0-135406-Win.exe
— И т.н Extension Pack —
пакет очень полезных
расширений
(общие папки, поддержка
USB выше 2.0 и др.)
для виртуальных машин:
https://download.virtualbox.org/virtualbox/6.1.0/Oracle_VM_VirtualBox_Extension_Pack-6.1.0.vbox-extpack
2.2 Скачивание образа системы Ubuntu 18.04 Server
Пока скачивается одно, можно загрузить образ системы с официального сайта:
https://releases.ubuntu.com/18.04.4
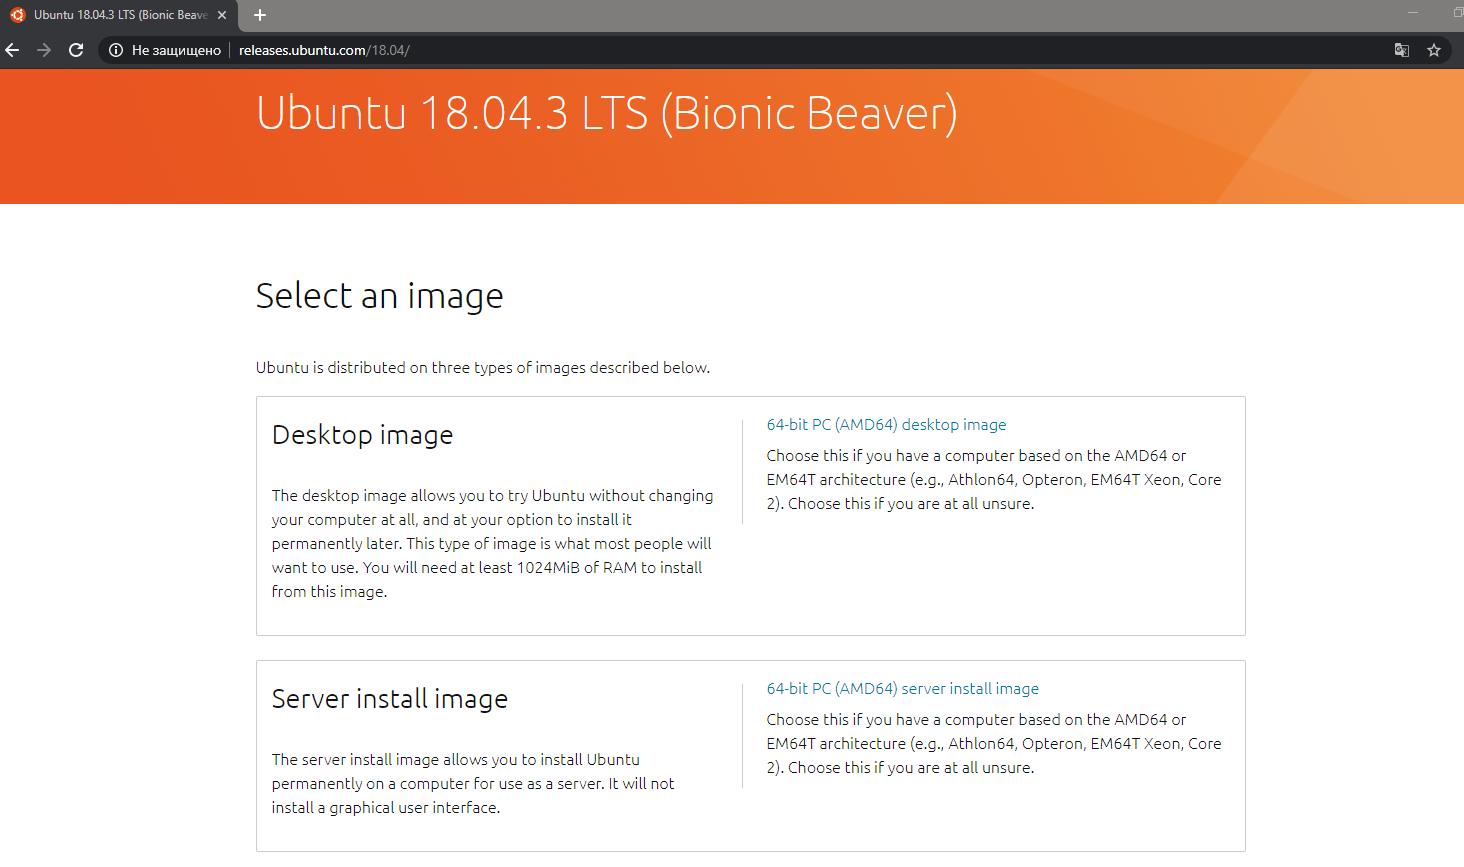
Выбираем тут Server install image
(Прямая ссылка:
http://releases.ubuntu.com/18.04/ubuntu-18.04.3-live-server-amd64.iso ),
выбираем путь для сохранения.
Готово.
3. Установка VirtualBox
Установка самого VirtualBox
не сложна и заключается, в основном,
в «Далее-Далее-Принять-Готово»,
(кроме двух моментов о которых
расскажу далее),
подробно расписывать его
установку смысла не имеет,
но скриншоты процесса приложу ниже.
Два «сложных» момента заключаются в следующем:
1) Необходимо включить в BIOS
ПК на который устанавливается
средство виртуализации,
настройку Virtualization Technology.
2) При установке кратковременно
пропадёт сеть на ПК, VirtualBox
об этом любезно предупредит.
How to run an Ubuntu Desktop virtual machine using VirtualBox 7
In this tutorial, we’ll walk you through one of the easiest ways to try out Ubuntu Desktop on a virtual machine. VirtualBox is a general purpose virtualiser that is available across Linux, Mac OS and Windows. It’s a great way to experience Ubuntu regardless of your current operating system.
VirtualBox 7 and above includes a new feature called Unattended Guest OS Install which significantly streamlines the setup experience for common operating systems like Ubuntu, making it easier than ever to get started.
Note: This tutorial will also work for other distributions, so try it out with some of the Ubuntu flavours as well!
What you’ll learn
- How to install and configure VirtualBox
- How to import an Ubuntu image
- How to run a virtual instance of Ubuntu Desktop
- Further configuration options
What you’ll need
Download an Ubuntu Image
You can download an Ubuntu image here. Make sure to save it to a memorable location on your PC! For this tutorial, we will use the latest Ubuntu 22.10 release.

Download and install VirtualBox
You can download VirtualBox from the downloads page here. This page includes instructions on how to install VirtualBox for your specific OS so we won’t repeat those here.
Once you have completed the installation, go ahead and run VirtualBox.
2. Create a new virtual machine
Click New to create a new virtual machine. Fill in the appropriate details:
- Name: If you include the word Ubuntu in your name the Type and Version will auto-update.
- Machine Folder: This is where your virtual machines will be stored so you can resume working on them whenever you like.
- ISO Image: Here you need to add a link to the ISO you downloaded from the Ubuntu website.
We want to install Ubuntu unattendedly so we can leave the checkbox to skip unchecked.
Create a user profile
To enable the automatic install we need to prepopulate our username and password here in addition to our machine name so that it can be configured automatically during first boot.
The default credentials are:
It is important to change these values since the defaults will create a user without sudo access.
Ensure your Hostname has no spaces to proceed!
It is also recommended to check the Guest Additions box to install the default Guest Additions ISO that is downloaded as part of VirtualBox. Guest additions enables a number of quality of life features such as changing resolution and dynamic screen resizing so it is highly recommended!
Note: If you choose not to use unattended install then this step will be skipped and you will go straight to the following screen. Once your machine has been created you will be able to create a username and password by proceeding through the standard Ubuntu Desktop installation flow on first boot.
Define the Virtual Machine’s resources
In the next section we can specifiy how much of our host machine’s memory and processors the virtual machine can use. For good performance it’s recommended to provide your VM with around 8GB of RAM (althought 4GB will still be usable) and 4 CPUs. Try to remain in the green areas of each slider to prevent issues with your machine running both the VM and the host OS.
Then we need to specify the size of the hard disc for the virtual machine. For Ubuntu we recommend around 25 GB as a minimum. By default the hard disk will scale dynamically as more memory is required up to the defined limit. If you want to pre-allocate the full amount, check the ‘Pre-allocate Full Size’ check box. This will improve performance but may take up unnecessary space.
Click Next to continue and view a summary of your machine setting.
After this click Finish to initialize the machine!
3. Install your image
Click Start to launch the virtual machine.
You will see a message saying ‘Powering VM up …’ and your desktop window will appear.
On first boot the unattended installation will kick in so do not interact with the prompt to ‘Try and Install Ubuntu’ and let it progress automatically to the splash screen and into the installer.
Note: If you chose not to use unattended install then you will need to progress through the Ubuntu install manually. Check out our Ubuntu Desktop installation tutorial for more details.
You will notice at this stage that the resolution of the window is fixed at 800×600. This is because the Guest Additions features are not installed until after the Ubuntu installation has completed.
Once the installation completes, the machine will automatically reboot to complete the installation.
Finally you will be greeted with the Ubuntu log-in screen where you can enter your username and password defined during the initial setup (don’t forget that the default password is ‘changeme’ if you left everything as the default).
4. Explore Virtual Box
Enjoy your shiny new Ubuntu Desktop!
As always we recommend opening a terminal and running sudo apt update && sudo apt upgrade -y and then sudo snap refresh to get everything updated to the latest versions.
Once you’ve finished your session you can close your machine by clicking the X in the top right of the window and choosing whether to keep your machine frozen in its current state or shut it down completely.
As you can probably tell, there are tonnes of further configuration options available in VirtualBox and we’ve only scratched the surface.
VirtualBox allows you to create and configure multiple virtual machines, so don’t be afraid to create new instances of Ubuntu to try out different system and storage configurations to fine tune your performance.
Why not try following the tutorial above with one of the Ubuntu flavours!

5. Tell us your thoughts!
Thank you for following this tutorial, we’d love to hear how you got on.
Give us feedback in the Ubuntu Discourse if you have any issues.
To help us improve our tutorials, we’d love to hear more about you: