- Команда cut в Linux
- Как использовать команду cut
- Как обрезать по полю
- Как вырезать по разделителю
- Чем дополнить подборку
- Как указать разделитель вывода
- Как обрезать по байтам и символам
- Примеры вырезок
- Получите список всех пользователей
- Посмотреть 10 наиболее часто используемых команд
- Выводы
- Bash Cut Command with Examples
- Syntax:
- Example no. 1:
- Printing the Range of Bytes
- Displaying the Content from the Start or End Position
- Using Cut Command by Fields
- Conclusion
- About the author
- Omar Farooq
Команда cut в Linux
В системах Linux и Unix доступно множество утилит, позволяющих обрабатывать и фильтровать текстовые файлы. cut — это утилита командной строки, которая позволяет вырезать части строк из указанных файлов или данных, передаваемых по конвейеру, и выводить результат на стандартный вывод. Его можно использовать для вырезания частей строки по разделителю, позиции байта и символу.
В этой статье мы покажем вам, как использовать команду cut на практических примерах и подробных объяснениях наиболее распространенных параметров.
Как использовать команду cut
Синтаксис команды cut следующий:
Параметры, которые указывают cut следует ли использовать разделитель, позицию байта или символ при вырезании выбранных частей строк, следующие:
- -f ( —fields=LIST ) — Выбрать, указав поле, набор полей или диапазон полей. Это наиболее часто используемый вариант.
- -b ( —bytes=LIST ) — Выбрать, указав байт, набор байтов или диапазон байтов.
- -c ( —characters=LIST ) — Выбрать, указав символ, набор символов или диапазон символов.
Вы можете использовать один и только один из перечисленных выше вариантов.
- -d ( —delimiter ) — укажите разделитель, который будет использоваться вместо разделителя по умолчанию «TAB».
- —complement — Дополнить выбор. При использовании этой опции cut отображает все байты, символы или поля, кроме выбранных.
- -s ( —only-delimited ) — по умолчанию cut печатает строки, не содержащие символа разделителя. Когда используется эта опция, cut не печатает строки, не содержащие разделителей.
- —output-delimiter — По умолчанию cut использует разделитель ввода в качестве ограничителя вывода. Этот параметр позволяет указать другую строку разделителя вывода.
Команда cut может принимать ноль или более входных имен ФАЙЛОВ. Если FILE не указан или если FILE — — , cut будет читать из стандартного ввода.
Аргумент LIST переданный параметрам -f , -b и -c , может быть целым числом, несколькими целыми числами, разделенными запятыми, диапазоном целых чисел или несколькими диапазонами целых чисел, разделенными запятыми. Каждый диапазон может быть одним из следующих:
- N -ое поле, байт или символ, начиная с 1.
- N- от N-го поля, байта или символа, до конца строки.
- NM от N-го до M-го поля, байта или символа.
- -M от первого до M-го поля, байта или символа.
Как обрезать по полю
Чтобы указать поля, которые следует вырезать, вызовите команду с параметром -f . Если не указано иное, разделителем по умолчанию является «ТАБЛИЦА».
В приведенных ниже примерах мы будем использовать следующий файл. Поля разделены табуляцией.
245:789 4567 M:4540 Admin 01:10:1980 535:763 4987 M:3476 Sales 11:04:1978 Например, чтобы отобразить 1-е и 3-е поля, вы должны использовать:
245:789 M:4540 535:763 M:3476 Или, если вы хотите отображать с 1-го по 4-е поля:
245:789 4567 M:4540 Admin 535:763 4987 M:3476 Sales Как вырезать по разделителю
Чтобы вырезать по разделителю, вызовите команду с параметром -d , за которым следует разделитель, который вы хотите использовать.
Например, чтобы отобразить 1-е и 3-е поля с использованием «:» в качестве разделителя, вы должны ввести:
245:4540 Admin 01 535:3476 Sales 11 В качестве разделителя можно использовать любой одиночный символ. В следующем примере мы используем пробел в качестве разделителя и печатаем 2-е поле:
echo "Lorem ipsum dolor sit amet" | cut -d ' ' -f 2Чем дополнить подборку
Чтобы дополнить список полей выбора, используйте параметр —complement . Это напечатает только те поля, которые не выбраны с помощью опции -f .
Следующая команда распечатает все поля, кроме 1-го и 3-го:
cut test.txt -f 1,3 --complement4567 Admin 01:10:1980 4987 Sales 11:04:1978 Как указать разделитель вывода
Чтобы указать разделитель вывода, используйте параметр —output-delimiter . Например, чтобы установить разделитель вывода на _ вы должны использовать:
cut test.txt -f 1,3 --output-delimiter='_'245:789_M:4540 535:763_M:3476 Как обрезать по байтам и символам
Прежде чем идти дальше, давайте проведем различие между байтами и символами.
Один байт составляет 8 бит и может представлять 256 различных значений. Когда был установлен стандарт ASCII, он учитывал все буквы, цифры и символы, необходимые для работы с английским языком. Таблица символов ASCII состоит из 128 символов, и каждый символ представлен одним байтом. Когда компьютеры стали доступны во всем мире, технологические компании начали вводить новые кодировки символов для разных языков. Для языков, содержащих более 256 символов, простое сопоставление 1 к 1 было невозможно. Это приводит к различным проблемам, таким как совместное использование документов или просмотр веб-сайтов, и требовался новый стандарт Unicode, который может обрабатывать большинство мировых систем письма. UTF-8 был создан для решения этих проблем. В UTF-8 не все символы представлены 1 байтом. Символы могут быть представлены от 1 до 4 байтов.
Параметр -b ( —bytes ) указывает команде вырезать разделы из каждой строки, указанной в заданных позициях байтов.
В следующих примерах мы используем символ ü который занимает 2 байта.
echo 'drüberspringen' | cut -b 5Выберите 5-й, 9-й и 13-й байты:
echo 'drüberspringen' | cut -b 5,9,13Выберите диапазон от 1-го до 5-го байта:
echo 'drüberspringen' | cut -b 1-5На момент написания этой статьи версия cut входящая в состав GNU coreutils, не имела возможности вырезать по символам. При использовании параметра -c команда cut ведет себя так же, как и при использовании параметра -b .
Примеры вырезок
Команда cut обычно используется в сочетании с другими командами через трубопровод. Вот несколько примеров:
Получите список всех пользователей
Вывод команды getent passwd передается в cut , который печатает первое поле с использованием : качестве разделителя.
Посмотреть 10 наиболее часто используемых команд
В следующем примере cut используется для удаления первых 8 байтов из каждой строки вывода команды history .
history | cut -c8- | sort | uniq -c | sort -rn | headВыводы
Команда cut используется для отображения выбранных полей из каждой строки заданных файлов или стандартного ввода.
Хотя это очень полезно, cut имеет некоторые ограничения. Он не поддерживает указание более одного символа в качестве разделителя и не поддерживает несколько разделителей.
Если у вас есть какие-либо вопросы или отзывы, не стесняйтесь оставлять комментарии.
Bash Cut Command with Examples
Linux provides us with many commands and utilities that allow us to cut out pieces and parts of specific files and process and filter those files. “cut” is also a command line utility in Linux that allows us to cut specific parts and sections of files and show us the data as standard output by printing it. We can use it to cut out the parts of files by delimiter, field, bytes, position, and characters.
Cut breaks up a line and takes out the text in it. It is mandatory to provide the options while writing the command; otherwise it will throw an error. If we operate on multiple files by providing more than one file name, then data from both files will not be preceded by its name. This command comes with a list of options that are as follows:
-f (–fields= LIST): Selects using a field specified by the user.
-b(–byte= LIST): Selects using a byte specified by the user.
-c(–character= LIST): Selects using a character specified by the user.
-d(–delimiter): It uses a default “TAB” delimiter but if we specify the delimiter using the option, it will use the specified delimiter.
–complement: It instructs the “cut” command to execute all characters, bytes, or fields instead of the selected part.
-s(–only-delimited): By default, the lines that contain delimiters are not printed. Specifying –s along with the cut command instructs it to not print the lines that do not have any delimiter.
–output-delimiter: It is specified for using the string as an output. By default, the string acts as an input.
–help: It is used to view the help manual.
–version: It is used to verify the version.
These are the options that we already discussed above.
If we want to cut from a specific file, we will have to specify the filename at the end of our command. We can cut single or multiple bytes depending on our requirements.
Syntax:
The syntax to use the cut command is shown below where any option can be any flag that is used to perform additional operations on the content that is to be cut from the file. We can use multiple options at a time. [File] parameter takes the name of the file that we want to extract from. If we do not specify the file name to our “cut” command, it will read from the standard input and start working according to it. In that case, this command will filter the “pipeline”
Example no. 1:
In this example, we will use the cut command to have a better understanding of how the cut command works. Let us first verify the version of the cut we have right now. For that, we will run the below-mentioned command.
To verify the version of the cut, we will simply run the cut command along with the “version” flag that we have studied above. As displayed in the snippet, in our case it is the 8.30 version.
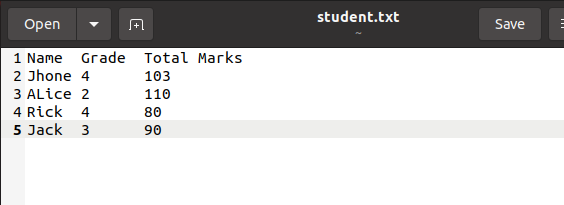
Let us suppose we have a file in our home directory that stores the data of five students along with their “names”, “grades” and “marks”.
Printing Some Bytes of FileNow, we will perform some actions on this file using the cut command. For printing the bytes of the file, we will simply run the command that is displayed below.
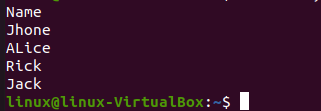
When we try to run the above command, it will give the output as can be seen below in which it enlisted the number of bytes starting from 1 to 6, which are the names of the students.
Printing the Range of Bytes
Same as above, we can also print the multiple ranges of bytes. Let us suppose we want to print the name along with the marks of the students. For that, we will range from 1 to 6 and then from 14 to 24.
After running the above command, we will get the output displayed below in which the name and total marks of the students are displayed.
Displaying the Content from the Start or End Position
To print the content from the starting specified point, we will simply run a single command that is mentioned below. Let us suppose we want to print the character from the index “6”.
As shown below, the characters from index 7 up to the last index have been displayed in our terminal. This included the students’ grades and marks.
Same as above, we can instruct the cut command to print the content to the limited index. For that, we will run the command that is mentioned in the next line.
When we run this command, we will get the content from the start of the index “1” until the index “13” is reached. As shown below, in the output, the name and the grades only are displayed where the marks of the students are excluded.
Using Cut Command by Fields
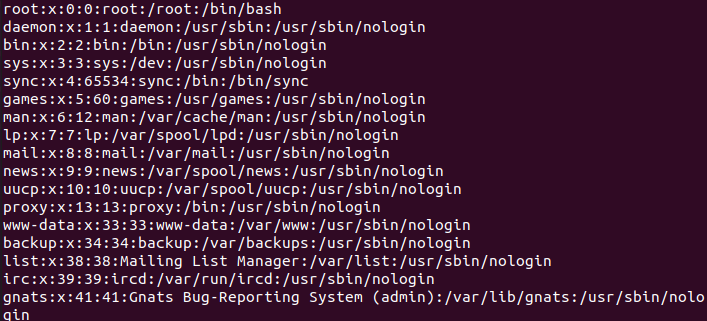
Now, we will try another file to cut the content using fields. For that, we will be using the “/etc/passwd” file. Let us check the user’s details that are allowed to access this system, for this we will run the cat command along with the file name as listed below.
Below are the details of the users that are allowed to access the system.
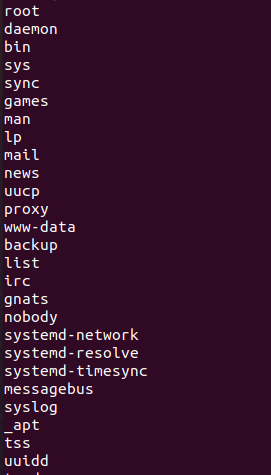
Now, it contains all details of the users. But we just want the names of the users, for that we will run the following command.
After running the above command in which, we specified the cut command to just print the first field of the file using the delimiter “:”.
Conclusion
Today we introduced you to the Linux command “cut” which is used to cut some part of the specified portion of any file. After giving its overview, we explained the syntax and performed some operations of cutting the portions from files to make it easy for you to understand the concept of the cut command.
About the author
Omar Farooq
Hello Readers, I am Omar and I have been writing technical articles from last decade. You can check out my writing pieces.


