- How can I convert a PFX certificate file for use with Apache on a linux server?
- 5 Answers 5
- Извлечение ключа и сертификата из .pfx
- Извлечение приватного ключа из .pfx.
- Извлечение сертификата из .pfx.
- Добавить комментарий Отменить ответ
- Рубрики
- соц сети
- Архив новостей
- Свежие записи
- Свежие комментарии
- Заметки: Конвертируем PFX в KEY и CRT
- Конвертируем PFX
- Получаем сертификат
- PFX в KEY и CRT
- How to extract the private key, public key and CA cert from PFX
- 1. Export PFX from an existing server
- 2. Install OpenSSL
- 3. Extract the private key, public key and CA certificate
How can I convert a PFX certificate file for use with Apache on a linux server?
How can I convert a PFX certificate file for use with Apache on a linux server? I created the PFX from Windows Certificate Services. The PFX contains the entire certificate chain. (Which is just a root and the main cert, no intermediate.) Lead me, wise ones.
5 Answers 5
With OpenSSL you can convert pfx to Apache compatible format with next commands:
openssl pkcs12 -in domain.pfx -clcerts -nokeys -out domain.cer openssl pkcs12 -in domain.pfx -nocerts -nodes -out domain.key First command extracts public key to domain.cer .
Second command extracts private key to domain.key .
Update your Apache configuration file with:
. SSLEngine on SSLCertificateFile /path/to/domain.cer SSLCertificateKeyFile /path/to/domain.key . This is missing the command to generate the certificate authority file. The answer below is more complete.
openssl pkcs12 -in domain.pfx -clcerts -nokeys -out domain.cer openssl pkcs12 -in domain.pfx -nocerts -nodes -out domain.key I also generated Certificate Authority (CA) certificate:
openssl pkcs12 -in domain.pfx -out domain-ca.crt -nodes -nokeys -cacerts And included it in Apache config file:
. SSLEngine on SSLCertificateFile /path/to/domain.cer SSLCertificateKeyFile /path/to/domain.key SSLCACertificateFile /path/to/domain-ca.crt . @Andron when I use the third command to create the CA certificate the result is an empty crt file. I tried using both the serverSSL pfx file and the rootCA pfx file for input. (bitnami wamp) The final result is that firefox gives me a The certificate is not trusted because the issuer certificate is unknown SEC_ERROR_UNKNOWN_ISSUER error.
@khargoosh as I reported in the comment: if it is empty — just don’t use/include this line. I had the same situation.
To get it to work with Apache, we needed one extra step.
openssl pkcs12 -in domain.pfx -clcerts -nokeys -out domain.cer openssl pkcs12 -in domain.pfx -nocerts -nodes -out domain_encrypted.key openssl rsa -in domain_encrypted.key -out domain.key The final command decrypts the key for use with Apache. The domain.key file should look like this:
-----BEGIN RSA PRIVATE KEY----- MjQxODIwNTFaMIG0MRQwEgYDVQQKEwtFbnRydXN0Lm5ldDFAMD4GA1UECxQ3d3d3 LmVudHJ1c3QubmV0L0NQU18yMDQ4IGluY29ycC4gYnkgcmVmLiAobGltaXRzIGxp YWIuKTElMCMGA1UECxMcKGMpIDE5OTkgRW50cnVzdC5uZXQgTGltaXRlZDEzMDEG A1UEAxMqRW50cnVzdC5uZXQgQ2VydGlmaWNhdGlvbiBBdXRob3JpdHkgKDIwNDgp MIIBIjANBgkqhkiG9w0BAQEFAAOCAQ8AMIIBCgKCAQEArU1LqRKGsuqjIAcVFmQq -----END RSA PRIVATE KEY----- Извлечение ключа и сертификата из .pfx

PFX (Personal Information Exchange) — это файл, который используется для хранения сертификата и его приватного/публичного ключа.
В своей статье «Извлечение ключа и сертификата из .pfx» я хотел бы рассказать как можно извлечь private ключ и сертификат из файла .pfx.
Извлечение приватного ключа из .pfx.
Следующая команда извлечет приватный ключ с файла .pfx, сохранит его в my_Pkey.crt:
# openssl pkcs12 -in my_file.pfx -nocerts -out my_Pkey.pem -nodes
Вас спросят о пароле, вводим его и получаем приватный ключ.
Извлечение сертификата из .pfx.
Следующая команда извлечет сертификат с файла .pfx, сохранит сертификат в my_certificate.crt:
# openssl pkcs12 -in my_file.pfx -nokeys -out my_certificate.crt
Вас спросят о пароле, вводим его и получаем сертификат.
На этом все, тема «Извлечение ключа и сертификата из .pfx» завершена.
Добавить комментарий Отменить ответ
Этот сайт использует Akismet для борьбы со спамом. Узнайте, как обрабатываются ваши данные комментариев.
Рубрики
- Arch Linux (167)
- Commands (36)
- Debian’s (635)
- Administration tools Ubuntu (37)
- Backups Debian’s (7)
- Database в Ubuntu (58)
- Games (игры) (1)
- Monitoring в Debian и Ubuntu (49)
- Virtualization в Ubuntu / Debian/ Linux Mint (41)
- Docker (22)
- Kubernetes (6)
- KVM (4)
- OpenVZ (3)
- Vagrant (5)
- VirtualBox (6)
- ArgoCD (1)
- Concourse (1)
- Gitlab (1)
- Jenkinks (4)
- Spinnaker (1)
- Apache (32)
- Cherokee (1)
- FTP-services (5)
- Lighttpd (1)
- Nginx (26)
- PHP (27)
- Proxy для Debian’s (2)
- Tomcat (4)
- Панели управления в Ubuntu/Debian/Mint (24)
- Установка и настройка почты на Ubuntu/Debian (12)
- Хранилища (clouds) (2)
- Administration tools freeBSD (19)
- Database во FreeBSD (52)
- Monitoring во freeBSD (37)
- Virtualization во FreeBSD (22)
- VoIP (1)
- Установка Web сервисов (91)
- Установка и настройка почты (6)
- Установка из ports (пакетов) (19)
- Установка из sorce code (исходников) (23)
- Непрерывная интеграция (CI) (27)
- Database в MacOS (36)
- Monitoring в Mac OS (31)
- Security (безопасность) (12)
- Virtualization в Mac OS (30)
- Docker (19)
- Kubernetes (6)
- Vagrant (5)
- VirtualBox (5)
- ArgoCD (1)
- CircleCI (1)
- Concourse (1)
- Gitlab (1)
- Jenkinks (4)
- Spinnaker (1)
- Administration tools CentOS (49)
- Backups RPM’s (4)
- Database в CentOS (68)
- Monitoring в CentOS (67)
- Virtualization в CentOS/ Red Hat/ Fedora (42)
- Docker (23)
- Kubernetes (6)
- KVM (5)
- OpenVZ (2)
- Vagrant (5)
- VirtualBox (6)
- VMWare (3)
- ArgoCD (1)
- Concourse (1)
- Gitlab (1)
- Jenkinks (4)
- Spinnaker (1)
- Apache (35)
- Cherokee (1)
- DNS (3)
- FTP (10)
- Nginx (33)
- PHP (34)
- Proxy для RedHat’s (2)
- Tomcat (2)
- Voice (2)
- Панели управления в CentOS/Red Hat/Fedora (27)
- Прокси сервер на CentOS/RHEL/Fedora (4)
- Установка и настройка почты на CentOS/RHEL/Fedora (14)
- Хранилища (clouds) (1)
соц сети

Архив новостей
Свежие записи
Свежие комментарии
- Глеб к записи Установка Adobe Flash Player в Debian/Ubuntu/Mint
- Максим к записи Заблокировать User Agents используя Nginx
- Денис к записи Как включить EPEL репозиторий на CentOS
- Гость к записи Закомментировать/Раскомментировать строки vi/vim в Unix/Linux
- Sergey к записи Установка и настройка OpenVPN сервера на Debian/Ubuntu/Linux Mint
Заметки: Конвертируем PFX в KEY и CRT

Конвертация PFX в KEY и CRT может потребоваться в том случае, если вы используете какое-либо unix/linux-приложение с поддержкой доступа по SSL . Чаще всего это веб-приложения. В противовес этому подходу Windows использует сертификаты в формате .pfx для хранения пары закрытый-открытый ключи враз, разумеется с защитой паролем при попытке экспорта.
Регулярно приходится работать с сертификатами и процесс конвертации PFX (PKCS12) в KEY и CRT (PEM) встречается с завидной регулярностью. Которой, тем не менее, не достаточно, чтобы запомнить все нужные команды до автоматизма. Приходится постоянно лезть в маны или в гугл за нужными ключами. Уже давно пришло время написать статью-шпаргалку по этой теме. Собственно, вот и она.
Если вам интересна тематика Debian и связанных с ним приложений, рекомендую обратиться к тегу Debian на моем блоге.
Конвертируем PFX
SSL-сертификаты на данный момент распространены повсеместно и работать с ними приходится постоянно. В статье я рассмотрю лишь базовые сценарии, которые встречаются наиболее часто.
Получаем сертификат
Если у вас все ещё нет сертификата от публичного ЦС, тогда мы идем к вам то самое время его получить. Обычно для этого сначала нужно сделать CSR-запрос. Следующий шаг — отправить его в ЦС и пройти проверку домена/организации (вам отправят письмо с кодом подтверждения на какой-либо админский адрес, либо позвонят на корпоративный номер телефона в зависимости от типа проверки).
Примечание: у меня на блоге вы сможете найти множество статей по сертификатам с помощью тега SSL certificate.
Как только все формальности пройдены, на почту вы получите архив с нужным вам сертификатом в формате .crt (и всей цепочкой промежуточных на всякий случай).
PFX в KEY и CRT
Воспользуемся всем знакомой утилитой openssl, чтобы вытащить открытую часть pfx-сертификата 1 :
How to extract the private key, public key and CA cert from PFX
A pfx file is technically a container that contains the private key, public key of an SSL certificate, packed together with the signer CA’s certificate all in one in a password protected single file.
Here are the steps to extract these three in case they are needed, for instance importing them in an apache server, in a load balancer, etc.
If you need to pack the aformentioned three, check out the guide here.
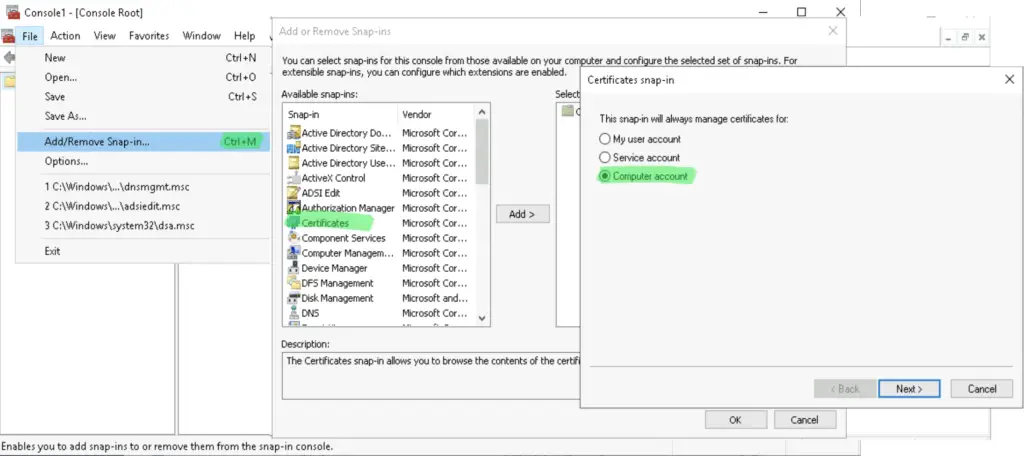
1. Export PFX from an existing server
Run mmc.exe, then import the Certificate snapin, choosing the Computer cert repository.
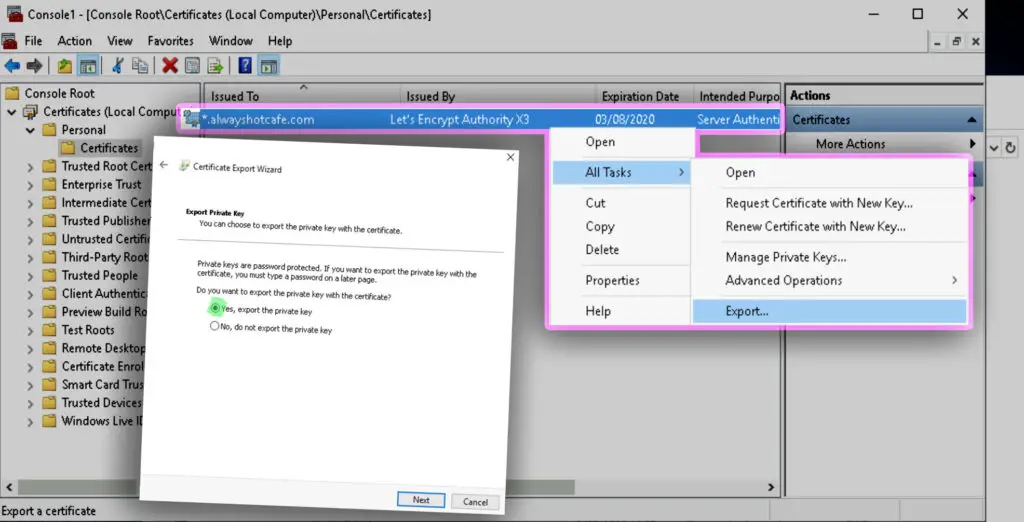
Right-click on the cert that you want to export, select «All Tasks», then «Export». Include the private key when it’s asked.
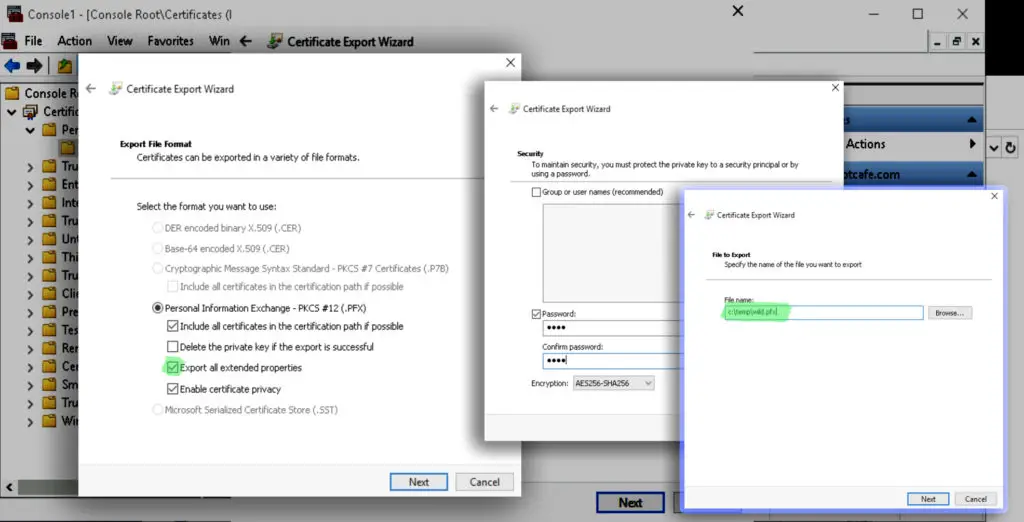
Export all properties that will include the CA cert in the PFX export. Specify a password witch which you can open the pfx later. The password is needed to protect the private key from unauthorized people as if malicious parties would get a hold on it, they could decrypt intercepted traffic that happens between the server and clients.
2. Install OpenSSL
We utilize OpenSSL to extract the packed components into a BASE64 encoded plain text format.
Unix systems have the openssl package available, if you system doesn’t have it installed, deploy it as below. On a Windows system follow the path to get the installer:
# Install OpenSSL on Debian and Ubuntu systems
sudo apt install openssl# Install OpenSSL on RHEL, CentOS
sudo yum install openssl# Windows installer location:
https://slproweb.com/products/Win32OpenSSL.html3. Extract the private key, public key and CA certificate
We use the following commands to extract the private key to priv.cer, the public key to pub.cer and the CA’s certificate into ca.cer from wild.pfx that has our *.alwayshotcafe.com wildcard SSL. Use the password you specified earlier when exporting the pfx.
# Extract the private key openssl pkcs12 -in wild.pfx -nocerts -nodes -out priv.cer # Extract the public key openssl pkcs12 -in wild.pfx -clcerts -nokeys -out pub.cer # Extract the CA cert chain openssl pkcs12 -in wild.pfx -cacerts -nokeys -chain -out ca.cer