- Linux: подключить общую сетевую папку Windows по SMB (CIFS)
- Смонтировать сетевую папку в Linux с помощью cifs-util
- Автоматическое монтирование сетевой папки в Linux
- Linux: подключиться к сетевой папке с помощью клиента samba
- How to Mount SMB Shares on Ubuntu?
- Step1: Updating and upgrading apt-cache repository
- Step2: Cifs-utils Package installation
- Step3: Creating Directory
- Step4: Creating Credentials file
- Step5: Mount samba share
- Step6: Automount on system reboot
- Conclusion
- About the author
- Shehroz Azam
Linux: подключить общую сетевую папку Windows по SMB (CIFS)
В этой статье мы рассмотрим, как в Linux смонтировать общую сетевую папку, расположенную на хосте Windows. В Windows для доступа к общим сетевым папкам используется протокол SMB (Server Message Block), который ранее назывался CIFS (Сommon Internet File System). В Linux для доступа к сетевым папкам Windows по протоколу SMB можно использовать клиент cifs-utils или Samba.
Совет. Для доступа к сетевым папкам по SMB/CIFS используется порт TCP/445. Для разрешения имени используются порты UDP 137, 138 и TCP 139. Если эти порты закрыты, вы сможете подключиться к сетевой папке Windows только по IP адресу.
Смонтировать сетевую папку в Linux с помощью cifs-util
Вы можете смонтировать сетевую папку, находящуюся на Windows хосте, с помощью утилит из пакета cifs-util. Для установки пакета выполните команду:
- В Ubuntu/Debian: $ sudo apt-get install cifs-utils
- В CentOS/Oracle/RHEL: $ sudo dnf install cifs-utils
Создайте точку монтирования:
Теперь вы можете смонтировать сетевую папку с компьютера Windows под пользователем User03с помощью команды:
$ sudo mount.cifs //192.168.31.33/backup /mnt/share -o user=User03
Укажите пароль пользователя Windows для подключения к сетевой папке.
![]()
При подключении сетевой SMB папки можно задать дополнительные параметры:
$ sudo mount -t cifs -o username=User03,password=PasswOrd1,uid=1000,iocharset=utf8 //192.168.31.33/backup /mnt/share
- //192.168.31.33/backup – сетевая папка Windows
- /mnt/share – точка монтирования
- -t cifs – указать файловую систему для монтирования
- -o опции монтирования (эту опцию можно использовать только с правами root, поэтому в команде используется sudo)
- username=User03,password=PasswOrd1 – имя и пароль пользователя Windows, у которого есть права доступа к сетевой папке. Можно указать имя пользователя guest, если разрешен анонимный доступ к сетевой папке
- iocharset=utf8 – включить поддержку кодировки UTF8 для отображения имен файлов
- uid=1000 – использовать этого пользователя Linux в качестве владельца файлов в папке

По умолчанию шары Windows монтируются в Linux с полными правами (0755). Если вы хотите изменить права по-умолчанию при монтировании, добавьте в команду опции:
dir_mode=0755,file_mode=0755
Если вы хотите использовать имя компьютера при подключении сетевого каталога Windows, добавьте в файл /etc/hosts строку:
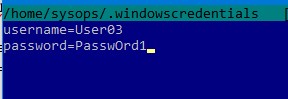
Чтобы не указывать учетные данные пользователя Windows в команде монтирования сетевой папки, их можно сохранить в файле.
username=User03 password=PasswOrd1
Для подключения к папке под анонимным пользователем:
Если нужно указать учетную запись пользователя из определенного домена Active Directory, добавьте в файл третью строку:
$ chmod 600 ~/.windowscredentials
Теперь при подключении сетевой папки вместо явного указания имени пользователя и пароля можно указать путь к файлу:
$ sudo mount -t cifs -o credentials=/home/sysops/.windowscredentials,uid=1000,iocharset=utf8 //192.168.31.33/backup /mnt/share
Отмонтировать сетевую SMB папку:
Автоматическое монтирование сетевой папки в Linux
Можно настроить автоматическое монтирование сетевой папки Windows через /etc/fstab.
Добавьте в файл следующую строку подключения SMB каталога:
//192.168.31.33/backup /mnt/share cifs user,rw,credentials=/home/sysops/.windowscredentials,iocharset=utf8,nofail,_netdev 0 0
- rw – смонтировать SBM папку на чтение и запись
- nofail – продолжить загрузку ОС если не удается смонтировать файловую систему
- _netdev – указывает что подключается файловая система по сети. Linux не будет монтировать такие файловые системы пока на хосте не будет инициализирована сеть.
Вы можете указать версию протокола SMB, которую нужно использовать для подключения (версия SMB 1.0 считается небезопасной и отключена по-умолчанию в современных версиях Windows). Добавьте в конец строки с настройками подключения параметр vers=3.0 .
//192.168.31.33/backup /mnt/share cifs user,rw,credentials=/home/sysops/.windowscredentials,iocharset=utf8,nofail,_netdev,vers=3.0 0 0
Если на стороне хоста Windows используется несовместимая (старая версия) SMB, при подключении появится ошибка:
mount error(112): Host is downилиmount error(95): Operation not supported
Чтобы сразу смонтировать сетевую папку, выполните:
Linux: подключиться к сетевой папке с помощью клиента samba
Установите в Linux клиент samba:
- В Ubuntu/Debian: $ sudo apt-get install smbclient
- В CentOS/Oracle/RHEL: # dnf install smbclient
Для вывода всех SMB ресурсов в локальной сети:
Вывести список доступных SMB папок на удаленном хосте Windows:
Если в Windows запрещен анонимный доступ, появится ошибка:
session setup failed: NT_STATUS_ACCESS_DENIED
В этом случае нужно указать учетную запись пользователя Windows, которую нужно использовать для подключения:
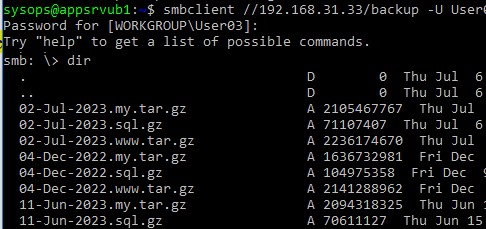
smbclient -L //192.168.31.33 -U User03
Если нужно использовать учетную запись пользователя домена, добавьте опцию –W:
smbclient -L //192.168.31.33 -U User03 –W Domain

Для интерактивного подключения к сетевой папке Windows используется команда:
smbclient //192.168.31.33/backup -U User03 -W Domain
smbclient //192.168.31.33/backup -U User03
smbclient //192.168.31.33/backup -U Everyone
После успешного входа появится приглашение:
Вывести список файлов в сетевой папке:
Скачать файл из сетевой папки Windows:
get remotefile.txt /home/sysops/localfile.txt
Сохранить локальный файл из Linux в SMB каталог:
put /home/sysops/localfile.txt remotefile.txt
Можно последовательно выполнить несколько команд smbclient:
$ smbclient //192.168.31.33/backup -U User03 -c «cd MyFolder; get arcive.zip /mnt/backup/archive.zip»
Полный список команд в smbclient можно вывести с помощью команды help. Команды smbclient схожи с командами ftp клиента.
При использовании команды smbclient может появиться ошибка:
Unable to initialize messaging contextsmbclient: Can't load /etc/samba/smb.conf - run testparm to debug it.
Чтобы исправить ошибку, создайте файл /etc/samba/smb.conf.
Если на хосте Windows отключен протокол SMB 1.0, то при подключении с помощью smbclient появится ошибка:
Reconnecting with SMB1 for workgroup listing. protocol negotiation failed: NT_STATUS_CONNECTION_RESET Unable to connect with SMB1 -- no workgroup available.
How to Mount SMB Shares on Ubuntu?
![]()
SMB is a client-server, file-sharing protocol that stands for Server Message Block which was invented by IBM in 1984 for the purpose of allowing computers to access files for reading or writing on a remote host using the LAN (Local area network). The SMB protocol that makes available the files or directories that are accessed on the remote host are called shares. This means that we can mount a shared file or directory to our system using the local area network.
SMB was previously known as CIFS and is the old version or dialect of SMB which stands for Common Internet File System which was created by Microsoft and is a particular implementation of the Server Message Block protocol.
In this article, we will provide you with each and every little step on how to mount SMB shares on Ubuntu using the Samba file server. Samba uses the SMB protocol and has the same function as SMB i-e enabling file sharing on Local area networks with other systems. But before going forward let me highlight a point that this article assumes that you have already shared a directory on a remote system and you will access that directory in this article.
Step1: Updating and upgrading apt-cache repository
The first step is to update our apt packages by using the update command in our Ubuntu 20.04 terminal:

All our packages are up to date however if our packages are not up to date then we have to run the following command to upgrade:

Step2: Cifs-utils Package installation
Execute the command that is given below to install the cifs-utils package on Ubuntu system:


Step3: Creating Directory
Let us now create a directory where we will mount the shared drive:
Step4: Creating Credentials file
This step involves creating the credentials file in our home directory and with the use of .(dot) which is needed for security reasons that will make our file hidden. For this purpose execute the below command which will open the file in the nano editor:
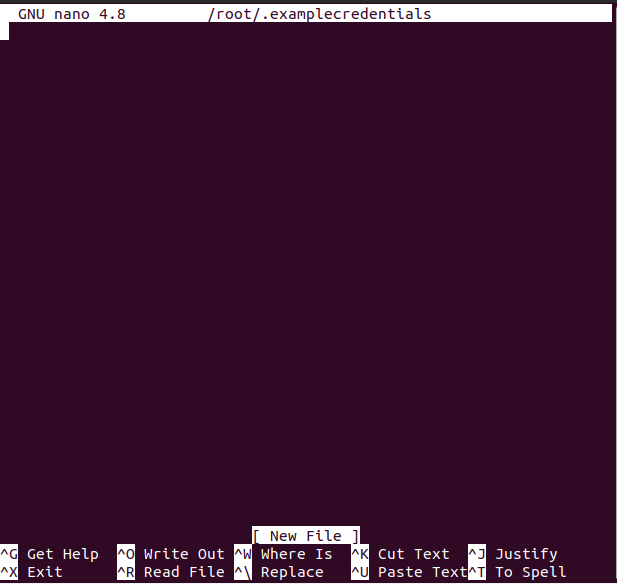
You can replace the name of the file with whatever you want the file name to be:
Now that the file is opened type the following two lines in the file which will be our samba username and password:
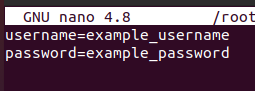
You can replace the username and password to your preferred username and password and then press CTRL+S to save the file and CTRL+X to exit the file.
Next, we will make the /root/.examplecredentials file readable only and only for the root account hence will put restriction on all non-root accounts by executing the following command in our Ubuntu 20.04 terminal:

Step5: Mount samba share
In this step we will execute the command which will mount the remote samba shared directory on our Ubuntu system:
$ sudo mount -t cifs -o rw, vers = 3.0 , credentials = / root / .examplecredentials // 192.168.18.112 / sharedDir / media / share
Replace the IP Address in the above command where you have already shared a directory or folder on the remote system and if that is Ubuntu system then you can find the IP address with ip a command:
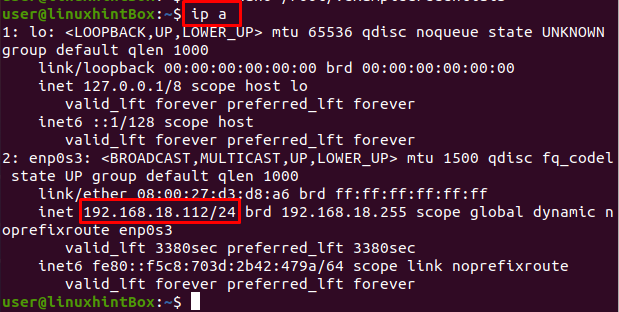
The IP address of the remote Ubuntu system from where sharedDir was shared is “192.168.18.112” which was provided in the above mount command.
Step6: Automount on system reboot
The manually mounted file system in the above step will not be mounted once our Ubuntu/system reboots, hence to solve this problem first we will open the /etc/fstab file in nano editor and then add some configuration to that file. To open the /etc/fstab file in the nano editor execute the following command:
The above command will open /etc/fstab file and you will see something like shown below on your system screen:
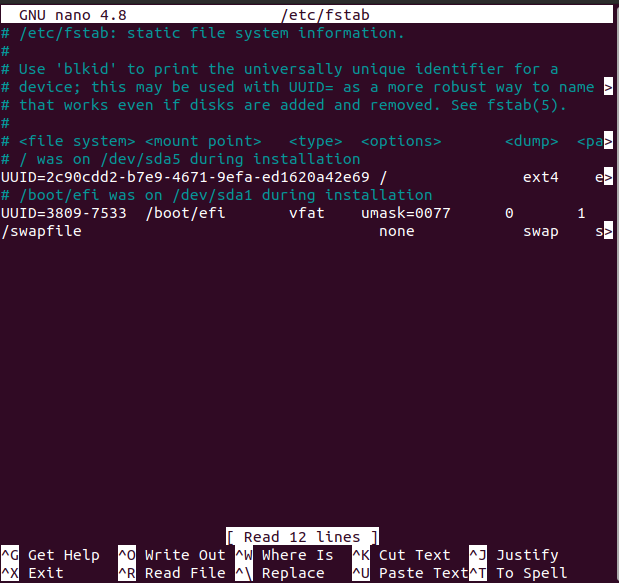
Now add the following line in the file that was opened with the nano editor:

Remember that you have to replace the IP Address with your IP Address after which press CTRL+S to save the above file and then press CTRL+X to close the file.
Conclusion
SMB is a file-sharing protocol created for the purpose of allowing computers to access remote systems files over a LAN network and CIFS is a particular dialect of SMB having almost the same functionality.
In this article, we showed you how to mount SMB share on Ubuntu 20.04 using the samba file server; however, the commands used were generic and can be applied on any Linux distribution.
About the author
Shehroz Azam
A Javascript Developer & Linux enthusiast with 4 years of industrial experience and proven know-how to combine creative and usability viewpoints resulting in world-class web applications. I have experience working with Vue, React & Node.js & currently working on article writing and video creation.