How do I know which /dev/ttyS* is my serial port?
Running that on my own Linux box (which only has 1 Serial port) produces a single ttyS0 output line. Try it on your own, you will see what I mean.
Does that mean that after running that command, if the response is . console [tty0] enabled. and no other, any device is connected to /dev/tty0 (sorry for the apparent silliness of the question)?
The only problem is that dmesg output can be cleared — so if you run this too late, you’re out of luck. Looking at /proc/tty/driver/serial seems the more robust answer and then check for rx interrupts increasing in count as you write data to that port
if you’re currently in a terminal over said serial line, you can just type tty to get the name of your tty. I assume that’s what OP meant since they did not pose the question as «which serial port(s) have getty running?»
See which UARTs where detected in /proc/tty/driver/serial . A line with uart:unknown means: nothing detected (and likely not existent).
# cat /proc/tty/driver/serial serinfo:1.0 driver revision: 0: uart:16550A port:000003F8 irq:4 tx:0 rx:0 1: uart:16550A port:000002F8 irq:3 tx:111780 rx:1321 RTS|DTR|DSR 2: uart:unknown port:000003E8 irq:4 3: uart:unknown port:000002E8 irq:3 If you see any of the CTS, DSR, (D)CD or RI flags (these are input signals), like on UART no. 1 above, you can even be pretty sure that there actually is something connected and driving these lines. Same is true for the rx-byte-count.
Seeing a positive tx-byte-count, RTS and/or DTR only reveals that some software accessed the device and ordered it to set those signals or send bytes here, but not if something was listening.
Note: you might see more ports available in hardware than ports reaching the outside of your computer in form of a connector.
Федоренко на связи
В этой заметке я расскажу про то, как можно проверить COM порт в Linux.
Для этого нам понадобятся:
- права на чтение и запись в COM порт
- программа minicom
- кусок толстого многожильного кабеля
Права доступа
проверяем какие у нас в системе есть COM порты, а также наши права на них:
# ls -l /dev/ttyS* /dev/ttyUSB*
crw-rw—- 1 root dialout 4 , 64 Дек 21 11 : 46 / dev / ttyS0
crw-rw—- 1 root dialout 4 , 65 Дек 8 15 : 43 / dev / ttyS1
crw-rw—- 1 root dialout 4 , 66 Дек 8 15 : 43 / dev / ttyS2
crw-rw—- 1 root dialout 4 , 67 Дек 8 15 : 43 / dev / ttyS3
crw-rw—- 1 root dialout 188 , 0 Дек 21 07: 27 / dev / ttyUSB0
/dev/ttyS0 это первый COM порт
/dev/ttyS1 соответственно второй COM порт
/dev/ttyUSB0 специальный кабель-переходник из USB в COM (Gembird UAS111)
Как мы видим для работы с COM портом необходимы права root либо пользователь должен входить в группу dialout
Провод для связи
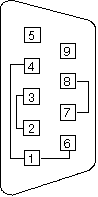
Берём многожильный кабель в оплётке длиной 4-6 см, и соединяем 2 и 3 выводы COM порта перемычкой из этого кусочка провода. Оплётка будет удерживать провод на контактах, а металлические жилы внутри будут проводниками.
Для любителей паять можно предложить спаять полный loop-back тестер. В нём соединить не только контакты приёма передачи, но и аппаратный контроль потока и готовность терминала.
Работа с программой minicom
Для начала необходимо настроить программу minicom
+————[конфигурация]————+
| Каталоги и файлы
| Протоколы
| Настройка последовательного порта
| Модем и дозвон
| Экран и клавиатура
| Сохранить настройки как dfl
| Сохранить настройки как.
| Выход
| Выход из Minicom
+————————————+
Выбираем «Настройка последовательного порта»
+————————————————————————+
| A — Последовательный порт : /dev/ttyS0
| B — Размещение lock-файла : /var/lock
| C — Программа при выходе :
| D — Программа при запуске :
| E — Скорость/Чётность/Биты : 115200 8N1
| F — Аппаратное управление потоком : Да
| G — Программное управление потоком : Нет
|
| Какую настройку изменить?
+————————————————————————+
Если нужно, меняем СОМ порт, нажимая «A»
Отключаем аппаратное управление потоком, нажимая «F»
Выходим из настроек «Enter»
Сохраняем настройки по умолчанию «Сохранить настройки как dfl»
Выходим из minicom
Собственно проверка СОМ порта
Запускаем minicom без параметров.
Пробуем нажимать на клавиши. В ответ на экране должны появляться символы.
Проверка COM порта под linux завершена.
Эта запись была сделана 21.12.2010, 13:50 под рубрикой Разное. Вы можете подписаться на эту запись с помощью RSS 2.0. Both comments and pings are currently closed.
Linux посмотреть ком порт
Как получить список доступных системе COM портов в Linux? Раньше искал в /dev файлы типа ttyS*, но что-то тут не так. На моем компе имеется один физический компорт. В /dev есть 4 порта (ttyS0, ttyS1, ttyS2, ttyS3). Но, например когда пытаюсь добавить в систему принтер, визард просит выбрать порт и показывает только ОДИН доступный компорт. Всё правильно, порт всего один. Хотя в девах их 4, в визарде только 1. На другом компе физически есть 1 компорт, а в /dev их аш 5. Как из кода в Linux-e можно получить список доступных компортов? или как проверить все ttyS0, ttyS1, ttyS2, ttyS3 и найти среди них рабочий(е)(реальный(е))?
>Как получить список доступных системе COM портов в Linux? Раньше искал в
a) grep serial /proc/ioports
b) cat /proc/tty/driver/serial
c) dmesg | grep ttyS
d) setserial -g /dev/ttyS9 | grep -v unknownsetserial получает информацию о порте через ioctl = TIOCGSERIAL.
2ACCA
Спасибо. Таким образом смог выделить из всех ttyS* только рабочие. А можно подобным образом получить инфу о портах типа ttyUSB*? Или достаточно по наличию в /dev/ttyUSB0 определить, что такой порт доступен системе?
>подобным образом получить инфу о портах типа ttyUSB*? Или достаточно по
>наличию в /dev/ttyUSB0 определить, что такой порт доступен системе?Смотря откуда этот /dev/ttyUSB* взялся. Если его udev или ещё какой hal сделал — почти достаточно.
Посмотри, что такое /dev. Если udev filesystem, то скорее всего можно — /dev/ttyUSB* создаются и убираются динамически, если udev скрипт не глюканул.
Сделай `lshal’, почитаешь много интересного про ttyUSB. dmesg | grep ttyUSB тоже поможет.
How to find which serial port is in use?
The Question: I plugged in a device (i.e. GSM modem) through a serial port (a.k.a. RS-232), and I need to see with which file in /dev/ filesystem this device was tied up, to be able to communicate with it. Unfortunately there is no newly created file in /dev/ nor can be seen anything in dmesg output. So this seems to be a hard question. Background: I had never worked with a serial device, so yesterday, when there appeared a need, I tried to Google it but couldn’t find anything helpful. I spent a few hours in seek, and I want to share a found answer as it could be helpful for someone.
I like using those bits to detect a device — I’ll probably use that, although I’ve many devices that only use the Tx/Rx pins, I could probably hack them to hold the CTS line high for that.
2 Answers 2
Unfortunately serial ports are non-PlugNPlay, so kernel doesn’t know which device was plugged in. After reading a HowTo tutorial I’ve got the working idea.
The /dev/ directory of unix like OSes contains files named as ttySn (with n being a number). Most of them doesn’t correspond to existing devices. To find which ones do, issue a command:
$ dmesg | grep ttyS [ 0.872181] 00:06: ttyS0 at I/O 0x3f8 (irq = 4) is a 16550A [ 0.892626] 00:07: ttyS1 at I/O 0x2f8 (irq = 3) is a 16550A [ 0.915797] 0000:01:01.0: ttyS4 at I/O 0x9800 (irq = 19) is a ST16650V2 [ 0.936942] 0000:01:01.1: ttyS5 at I/O 0x9c00 (irq = 18) is a ST16650V2 Above is an example output of my PC. You can see the initialization of a few serial ports:
ttyS0 , ttyS1 , ttyS4 , ttyS5 .
One of them is going to have a positive voltage upon a device plugged in. So by comparing the content of the file /proc/tty/driver/serial with and without the device plugged in we can easily find the ttyS related to our device. So, now do:
$ sudo cat /proc/tty/driver/serial> /tmp/1 $ sudo cat /proc/tty/driver/serial> /tmp/2 Next check the difference between the two files. Below is an output of my PC:
$ diff /tmp/1 /tmp/2 2c2 < 0: uart:16550A port:000003F8 irq:4 tx:6 rx:0 --- >0: uart:16550A port:000003F8 irq:4 tx:6 rx:0 CTS|DSR By comparing the three numbers with the dmesg output we can determine which one is the port:
[ 0.872181] 00:06: ttyS0 at I/O 0x3f8 (irq = 4) is a 16550A
Hence, our device is /dev/ttyS0 , mission accomplished!
@user3019105 sorry, I’ve never faced such issue. From what I understand, dmesg should have a message about assigning irq to a serial device. And if it didn’t, I’d assume some hardware problem. That’s just an assumption, and might be wrong, but if I’d debug such a problem, I’d start research with the idea in mind that serial port should’ve been initialized.
Since I move from machine to machine I have defined an alias to show me the serial ports on this machine. It works on Ubuntu family systems with systemd. alias ports=’udevadm info —export-db |grep -i «^n: ttyu»‘
You can also use setserial to get and set serial port information, in addition to dmesg .
setserial
# install it sudo apt update sudo apt install setserial # Display (and sort) serial information for all /dev/ttyS* devices setserial -g /dev/ttyS* | sort -V # Display (and sort) serial information for all /dev/ttyUSB* devices setserial -g /dev/ttyUSB* | sort -V # To see extra info. such as the baud rate too, add `-G`: setserial -g -G /dev/ttyS* | sort -V setserial -g -G /dev/ttyUSB* | sort -V Sample run and output. Notice that /dev/ttyS4 is the only port that appears to be alive and not «unknown» (whatever that means). (This /dev/ttyS4 device also shows up in the Arduino IDE even though it’s not an Arduino and I don’t know what it is.):
$ setserial -g -G /dev/ttyS* | sort -V /dev/ttyS0 uart unknown port 0x03f8 irq 4 baud_base 115200 spd_normal skip_test /dev/ttyS1 uart unknown port 0x02f8 irq 3 baud_base 115200 spd_normal skip_test /dev/ttyS2 uart unknown port 0x03e8 irq 4 baud_base 115200 spd_normal skip_test /dev/ttyS3 uart unknown port 0x02e8 irq 3 baud_base 115200 spd_normal /dev/ttyS4 uart 16550A port 0x3060 irq 19 baud_base 115200 spd_normal skip_test /dev/ttyS5 uart unknown port 0x0000 irq 0 baud_base 0 spd_normal /dev/ttyS6 uart unknown port 0x0000 irq 0 baud_base 0 spd_normal /dev/ttyS7 uart unknown port 0x0000 irq 0 baud_base 0 spd_normal /dev/ttyS8 uart unknown port 0x0000 irq 0 baud_base 0 spd_normal /dev/ttyS9 uart unknown port 0x0000 irq 0 baud_base 0 spd_normal /dev/ttyS10 uart unknown port 0x0000 irq 0 baud_base 0 spd_normal /dev/ttyS11 uart unknown port 0x0000 irq 0 baud_base 0 spd_normal /dev/ttyS12 uart unknown port 0x0000 irq 0 baud_base 0 spd_normal /dev/ttyS13 uart unknown port 0x0000 irq 0 baud_base 0 spd_normal /dev/ttyS14 uart unknown port 0x0000 irq 0 baud_base 0 spd_normal /dev/ttyS15 uart unknown port 0x0000 irq 0 baud_base 0 spd_normal /dev/ttyS16 uart unknown port 0x0000 irq 0 baud_base 0 spd_normal /dev/ttyS17 uart unknown port 0x0000 irq 0 baud_base 0 spd_normal /dev/ttyS18 uart unknown port 0x0000 irq 0 baud_base 0 spd_normal /dev/ttyS19 uart unknown port 0x0000 irq 0 baud_base 0 spd_normal /dev/ttyS20 uart unknown port 0x0000 irq 0 baud_base 0 spd_normal /dev/ttyS21 uart unknown port 0x0000 irq 0 baud_base 0 spd_normal /dev/ttyS22 uart unknown port 0x0000 irq 0 baud_base 0 spd_normal /dev/ttyS23 uart unknown port 0x0000 irq 0 baud_base 0 spd_normal /dev/ttyS24 uart unknown port 0x0000 irq 0 baud_base 0 spd_normal /dev/ttyS25 uart unknown port 0x0000 irq 0 baud_base 0 spd_normal /dev/ttyS26 uart unknown port 0x0000 irq 0 baud_base 0 spd_normal /dev/ttyS27 uart unknown port 0x0000 irq 0 baud_base 0 spd_normal /dev/ttyS28 uart unknown port 0x0000 irq 0 baud_base 0 spd_normal /dev/ttyS29 uart unknown port 0x0000 irq 0 baud_base 0 spd_normal /dev/ttyS30 uart unknown port 0x0000 irq 0 baud_base 0 spd_normal /dev/ttyS31 uart unknown port 0x0000 irq 0 baud_base 0 spd_normal dmesg
Use dmesg to also see some of this information:
# Show UART information, incl. baudrate, for /dev/ttyS* devices. dmesg | grep ttyS # Show UART information, incl. baudrate, for /dev/ttyUSB* devices. dmesg | grep ttyUSB $ dmesg | grep ttyS [ 1.624447] 0000:00:16.3: ttyS4 at I/O 0x3060 (irq = 19, base_baud = 115200) is a 16550A Even better, watch the dmesg kernel ring buffer output live with the -w option:
Now, unplug your USB device you’re trying to identify and plug it back in to see which device it is, based on the messages that show up in the dmesg output, live.