- How to find out what group a given user has?
- How do I List All Groups in Linux
- Types of Groups in Linux
- Listing Users on Linux
- Listing Users Using the /etc/passwd File
- Listing Usernames Using awk
- Listing Usernames Using getent
- Listing the Connected Users on Your Linux Host
- Listing Groups Using /etc/group File
- Listing Groups Using getent
- Listing Groups for the Current User
- Conclusion
- About the author
- Simran Kaur
- Как включить обмен файлами (Samba) и настроить рабочую группу в Ubuntu 20.04
- Как поделиться папками на компьютере с Ubuntu Linux
- Как настроить рабочую группу Ubuntu
- Вы разделяете папки между Ubuntu и Windows?
How to find out what group a given user has?
This appears to be pretty useful as well. It has more verbose output than the ‘groups’ command, so if you need the group id/user id use this!
On Linux/OS X/Unix to display the groups to which you (or the optionally specified user) belong, use:
which is equivalent to groups [user] utility which has been obsoleted on Unix.
On OS X/Unix, the command id -p [user] is suggested for normal interactive.
Explanation on the parameters:
-G , —groups — print all group IDs
-n , —name — print a name instead of a number, for -ugG
-p — Make the output human-readable.
or just study /etc/groups (ok this does probably not work if it uses pam with ldap)
Below is the script which is integrated into ansible and generating dashboard in CSV format.
sh collection.sh #!/bin/bash HOSTNAME=`hostname -s` for i in `cat /etc/passwd| grep -vE "nologin|shutd|hal|sync|root|false"|awk -F':' '' | sed 's/[[:space:]]/,/g'`; do groups $i; done|sed s/\:/\,/g|tr -d ' '|sed -e "s/^/$HOSTNAME,/"> /tmp/"$HOSTNAME"_inventory.txt sudo cat /etc/sudoers| grep -v "^#"|awk ''|grep -v Defaults|sed '/^$/d;s/[[:blank:]]//g'>/tmp/"$HOSTNAME"_sudo.txt paste -d , /tmp/"$HOSTNAME"_inventory.txt /tmp/"$HOSTNAME"_sudo.txt|sed 's/,[[:blank:]]*$//g' >/tmp/"$HOSTNAME"_inventory_users.txt My output stored in below text files.
cat /tmp/ANSIBLENODE_sudo.txt cat /tmp/ANSIBLENODE_inventory.txt cat /tmp/ANSIBLENODE_inventory_users.txt How do I List All Groups in Linux
![]()
Linux systems may have several users that are divided into many groups. These groups are the collection of users with the same set of privileges like reading, writing, or executing permission for a particular file or resources shared among the users of that group. Linux allows you to add a new user or the existing user to the existing group for utilizing the privileges of that particular group that it will grant. We will learn about the various Linux groups and how to list all the members of the group.
Types of Groups in Linux
Linux has two types of groups that contain several users:
- Primary or Login Group: it is the group associated with the files created by a specific user. The name for that primary group has the same name as the user’s name that will create that specific file. Each user must belong to exactly a single group.
- Secondary or Supplementary Group: you can use this type of group to grant privileges to a set of users that belong to that group. A user can be assigned to no or more secondary groups.
Listing Users on Linux
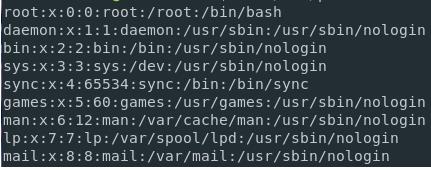
For listing all the users present on the Linux system, you can run the cat command on the ‘/etc/passwd” file. This command will help in returning the number of users that are present on the Linux system.
Also, use the “less” or “more” command for navigating within the user’s list.
Listing Users Using the /etc/passwd File
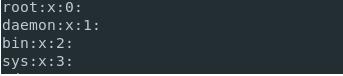
For listing the usernames on the Linux system, you can use the “cat” command and then pipe the output to the “cut” command to isolate the usernames available in the first column in the list. Run the below-mentioned command as shown below.
Listing Usernames Using awk
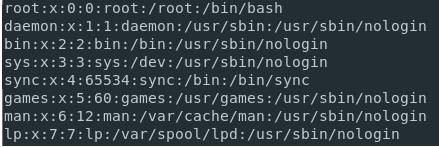
For listing the usernames on the Linux system, use the “cat” command and then pipe the output to the “awk” command that works similar to the “cat” command.
Here we are using the “awk” interpreter, as shown below.

Listing Usernames Using getent
Use the getent command along with the “passwd” argument for listing the usernames available on Linux. Also, you can mention the optional user that you want to be displayed on the screen.
The getent command retrieves the entries from the Name Service Switch databases. It is a Unix utility for retrieving entries from various data sources. Check the list of the data sources available from the nsswitch.conf, which is stored at /etc.

If you want to list all the users with the help of the getent function, you can run the following command.
Listing the Connected Users on Your Linux Host
To get the list of the users connected to the Linux system, you can use the following command.

Using this command, you will provide the connected users’ list and the shell they are using.
Also, you can use the “users” command to get the same result as the “who” command, as shown below.
Listing Groups Using /etc/group File
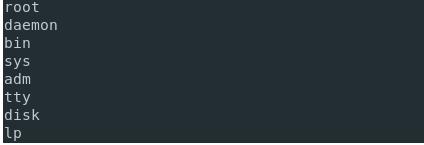
Use the most commonly used “cat” command to get the list of the groups available in the “/etc/group” file. When you run the command, you will get the list of the groups.

But if you are looking for the group names that are present in the “/etc/group” file, use the cat command and then pipe the output to the “cut” command as shown below.

Also, if you want to isolate one group to check what users belong to that group, use the below command.

Listing Groups Using getent
You can use the “getent” command for listing the users on the Linux system.
If you do not provide the key, you will get the entire group file.
Listing Groups for the Current User
Using the “group” command will display a list of groups a specific user is in.
If you do not provide any argument, you will get the list of the groups for the user that runs the command.

Conclusion
The Linux system contains users and groups in different files. Sometimes it becomes important to get the user details and to which group they belong. Thus Linux offers some commands that will help you to achieve that. You can run some commands to get the user details and the group to which they belong. You can also get the complete list of users on the Linux system, active users, and groups names.
You can go through this article to get various commands for getting the list of all the groups in Linux and understand how they work.
About the author
Simran Kaur
Simran works as a technical writer. The graduate in MS Computer Science from the well known CS hub, aka Silicon Valley, is also an editor of the website. She enjoys writing about any tech topic, including programming, algorithms, cloud, data science, and AI. Travelling, sketching, and gardening are the hobbies that interest her.
Как включить обмен файлами (Samba) и настроить рабочую группу в Ubuntu 20.04

Компьютеры и устройства Windows могут соединяться между собой и обмениваться файлами и папками между собой с помощью общих сетевых ресурсов. Однако, если вы также используете Ubuntu Linux на некоторых из своих компьютеров, совместное использование сети между ними и Windows будет непростым делом. Чтобы подключить свои компьютеры с Ubuntu Linux к компьютерам с Windows и обмениваться файлами и папками, вам необходимо выполнить ряд настроек. Первый — разрешить совместное использование файлов по протоколу Samba. Вы также должны изменить рабочую группу, используемую вашими компьютерами с Ubuntu Linux, чтобы все ваши компьютеры принадлежали к одной рабочей группе. В этом руководстве мы продемонстрируем, как включить общий доступ к файлам, а затем как настроить и изменить рабочую группу на ПК с Ubuntu.
ПРИМЕЧАНИЕ. Мы создали эту статью, используя Ubuntu 20.04 LTS.
Как включить совместное использование файлов (установить Samba) в Ubuntu Linux
Служба общего доступа или Samba по умолчанию не установлена в Ubuntu Linux. Процесс установки Samba различается по сложности в зависимости от метода, который вы предпочитаете использовать. Вот самый простой и понятный способ установить Samba:
Прежде всего, откройте Терминал, одновременно нажав CTRL + ALT + T на клавиатуре.
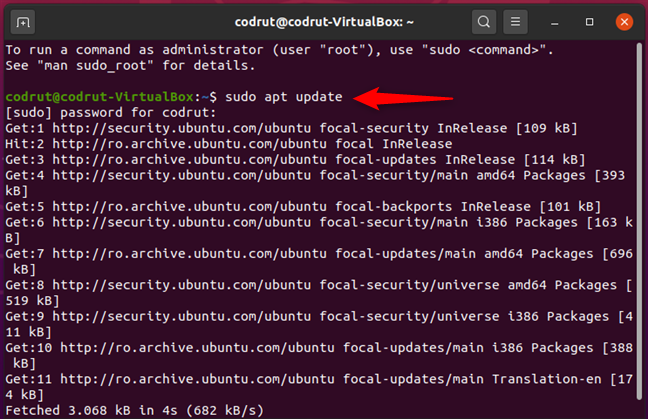
В окне Терминала запустите эту команду: sudo apt update . Эта команда загружает информацию о пакете из всех источников, настроенных на вашем ПК с Ubuntu. Другими словами, он загружает из Интернета данные об обновленных версиях пакетов программного обеспечения или их зависимостях. После запуска этой команды вас могут попросить ввести пароль пользователя.
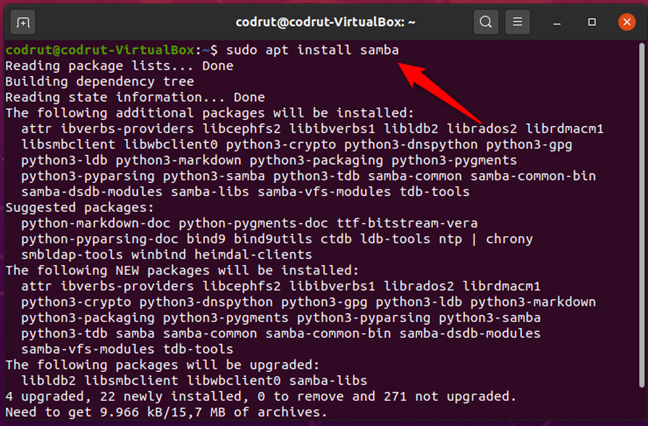
Затем запустите команду sudo apt install samba . Эта команда сообщает Ubuntu Linux о необходимости загрузить и установить все программные пакеты, необходимые для Samba — службы общего доступа — для работы на вашем компьютере. Подождите, пока команда сделает свое дело, и, если вас попросят подтвердить, что вы хотите установить определенный пакет, примите его, введя Y (Да) и нажав Enter на клавиатуре.
После завершения установки Samba должна работать на вашем компьютере с Ubuntu Linux. Однако, чтобы убедиться, что все в порядке, вы можете перезагрузить компьютер, прежде чем переходить к следующей части этого руководства.
Как поделиться папками на компьютере с Ubuntu Linux
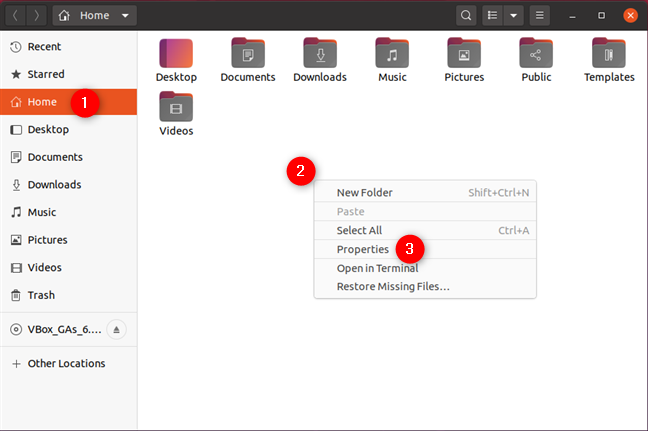
После запуска Samba вы можете легко обмениваться папками. Для этого сначала откройте Files.

Затем перейдите в папку, к которой вы хотите предоставить общий доступ в сети, и щелкните ее правой кнопкой мыши, чтобы открыть контекстное меню. В меню выберите Свойства.
В окне «Свойства» выберите общий сетевой ресурс и установите флажок «Поделиться этой папкой».
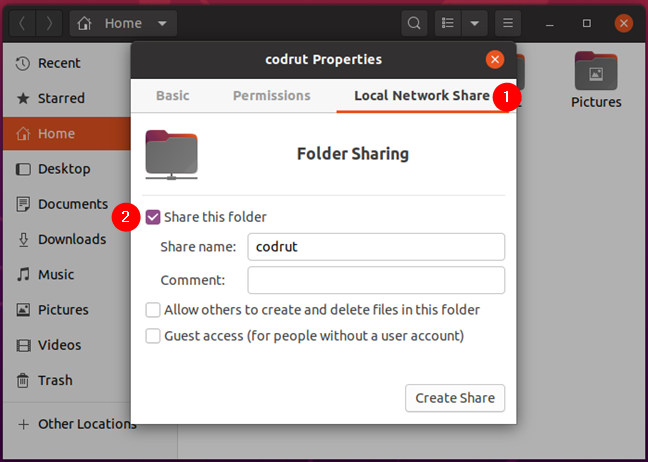
Измените имя общего доступа и добавьте комментарий, если хотите. Затем также установите или снимите флажок «Разрешить другим пользователям создавать и удалять файлы в этой папке» и «Гостевой доступ (для людей без учетной записи») в соответствии с тем, как вы хотите предоставить другим пользователям сети доступ к вашей общей папке.
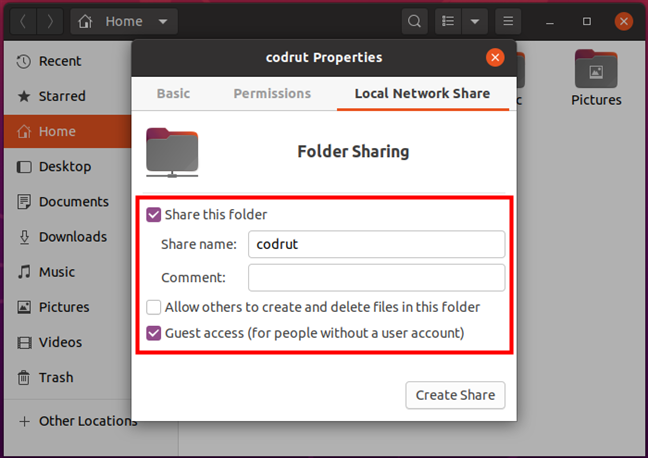
Когда закончите, нажмите кнопку Create Share, чтобы начать общий доступ к этой папке в вашей сети, включая все компьютеры и устройства Windows, подключенные к ней.
Как настроить рабочую группу Ubuntu
В большинстве случаев вам не нужно менять имя рабочей группы, потому что по умолчанию Ubuntu, Windows и Mac OS имеют одно и то же имя рабочей группы, которое на самом деле WORKGROUP. Однако, если вам нужно изменить его, выполните следующие действия.
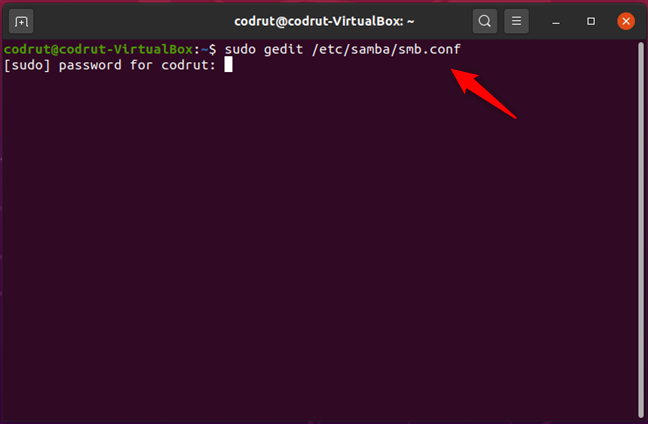
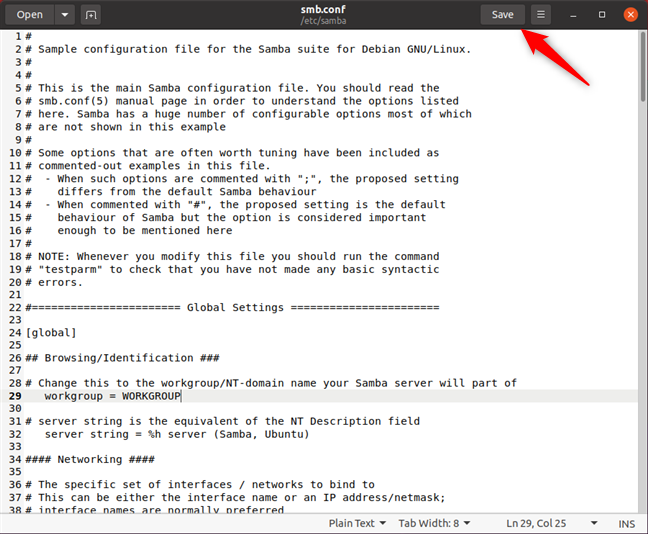
Откройте окно терминала (CTRL + ALT + T) и выполните следующую команду: s udo gedit /etc/samba/smb.conf . Затем нажмите Enter. Если вы ранее не использовали Терминал в этом сеансе, Ubuntu попросит вас ввести пароль вашей учетной записи.
Затем файл конфигурации Samba открывается в окне gedit . При необходимости прокрутите вниз, пока не найдете строку рабочей группы в разделе «Глобальные настройки».
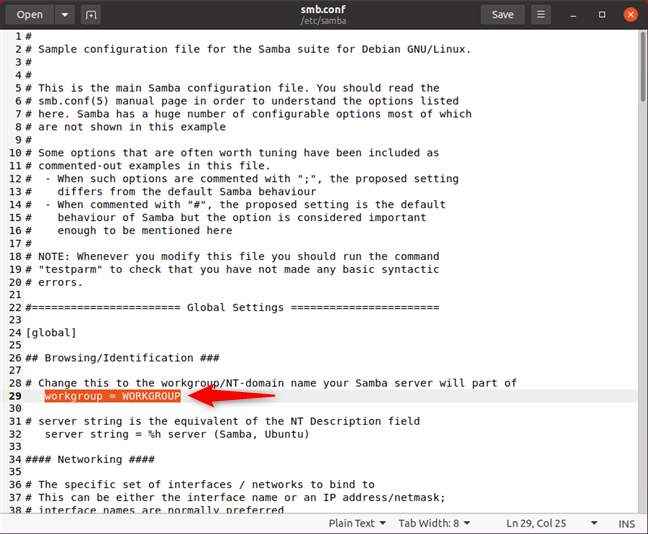
Измените значение рабочей группы Ubuntu, чтобы оно соответствовало имени рабочей группы, в которую вы хотите добавить свой компьютер Ubuntu. Затем нажмите «Сохранить» и перезапустите Ubuntu, чтобы убедиться, что новые настройки применены.
ПРИМЕЧАНИЕ. Если у вас есть сеть, в которую входят компьютеры с Windows, вам необходимо убедиться, что рабочая группа настроена так же, как на ваших компьютерах с Ubuntu. Сделайте это, если хотите, чтобы ваши ПК с Ubuntu присоединились к вашей рабочей группе Windows. Чтобы узнать, как это сделать, ознакомьтесь с этим руководством: Рабочая группа Windows 10 и как ее изменить.
Вы разделяете папки между Ubuntu и Windows?
Вы можете включить общий доступ в Ubuntu (или на любом ПК с Linux) и настроить его для присоединения к рабочей группе Windows, чтобы она была видна в той же сети и обменивалась файлами, папками и принтерами. Если вы хотите узнать больше о настройке других ПК в локальной сети или о том, как использовать сетевые функции между Linux и Windows, ознакомьтесь со статьями, перечисленными ниже.

Насколько публикация полезна?
Нажмите на звезду, чтобы оценить!
Средняя оценка / 5. Количество оценок:
Оценок пока нет. Поставьте оценку первым.