How do I verify the speed of my NIC?
I just installed a new gigabit network interface card (NIC) in Linux. How do I tell if it is really set to gigabit speeds? I see ethtool has an option to set the speed, but I can’t seem to figure out how to report its current speed.
9 Answers 9
Just use a command like: ethtool eth0 to get the needed info. Ex:
$ sudo ethtool eth0 | grep Speed
If you want to have the full list of all your interfaces with theyr speed, you can use this command: for i in $(netstat -i | cut -f1 -d» » | tail -n+3) ; do echo «$i: $(ethtool «$i» | grep Speed | sed ‘s/Speed://g’)» ; done
This only gives you the negotiated speed of your current network configuration (hence your ethernet port must be connected). The speed indicated also depends on the cable and the other end of the connection. This does NOT give the max supported speed of the NIC on your PC. For that, you need to look under Supported link modes also shown in ethtool . 1000baseT means gigabit ethernet, etc.
It is possible to use the information from the kernel when ethtool is missing:
Example for interface named eth0:
@Christian Yes it is thanks, but only on some of my interfaces which I’ve read is expected so I’m all good
What does it mean if cat /sys/class/net/eth1/speed shows 10000 but «ip a» does only show 1000. Can someone clarify?
It seems /sys/class interface was right. Dmesg also lists 100Mbit/s # dmesg|grep duplex [ 5.417536] smsc95xx 1-1.1:1.0 eth0: link up, 100Mbps, full-duplex, lpa 0xC5E1 . I am running on a special purpose OS build without ethtool .
NOTE: the man page for mii-tool has this disclaimer:
This program is obsolete. For replacement check ethtool. Use mii-tool to watch the negotiated network speed.
eth0: no link eth1: negotiated 100baseTx-FD, link ok For Debian based systems, ethtool is not installed by default. But mii-tool is, as part of the essential «net-tools» package. So this was the best solution for me.
I see this in the man page for mii-tool «This program is obsolete. Valid media are only 100baseT4, 100baseTx-FD,100baseTx-HD, 10baseT-FD and 10baseT-HD ethernet cards. For replace-ment check ethtool.» 😐
While mii-tool reports ‘negotiated 100baseTx-FD flow-control, link ok’, both ethtool and cat /sys/class/net/eth…/speed agree on ‘1000Mb/s Full duplex’. This is for a USB 3.0 controller, namely ASIX AX88179 (‘ax88179_178a’ driver for Linux).
There are some great answers here, I just wanted to add a few more options.
1. I know this is not quite what you asked (read on for other ways). But if you want to know the real world performance of your NIC, rather than what your computer says it should be, you can use iperf. I usually do this — because you never know. I bought a 1Gb NIC recently that that only transferred at 672Mbps but it’s uplink was 1Gb. Good thing I checked.
On computer one, run iperf in server mode:
On the other, run iperf in client mode:
If you want to see the full duplex speed, try this instead:
Substitute 192.168.0.10 for the servers IP address
2. On Ubuntu systems, /var/log/kern.log has limited logging of kernel events. It will record link speed and status of a NIC when it changes. I’m sure other distributions probably do something similar or can be setup to do so.
$ tail -n 300 /var/log/kern.log.1 | grep slave0 Aug 28 12:54:04 haze kernel: [ 9452.766248] e1000e: slave0 NIC Link is Up 1000 Mbps Full Duplex, Flow Control: Rx/Tx Aug 28 12:54:41 haze NetworkManager[921]: [1472403281.8486] device (slave0): link disconnected Aug 28 12:54:41 haze kernel: [ 9489.898476] e1000e: slave0 NIC Link is Down 3. You’ll probably never, ever need to go this far, but you can write c code that to get the speed. Tested working and root is not required.
#include #include #include #include #include #include #include #include #include int main (int argc, char **argv) < int sock; struct ifreq ifr; struct ethtool_cmd edata; int rc; sock = socket(PF_INET, SOCK_DGRAM, IPPROTO_IP); if (sock < 0) < perror("socket"); exit(1); >strncpy(ifr.ifr_name, "eth0", sizeof(ifr.ifr_name)); ifr.ifr_data = &edata; edata.cmd = ETHTOOL_GSET; rc = ioctl(sock, SIOCETHTOOL, &ifr); if (rc < 0) < perror("ioctl"); exit(1); >switch (ethtool_cmd_speed(&edata)) < case SPEED_10: printf("10Mbps\n"); break; case SPEED_100: printf("100Mbps\n"); break; case SPEED_1000: printf("1Gbps\n"); break; case SPEED_2500: printf("2.5Gbps\n"); break; case SPEED_10000: printf("10Gbps\n"); break; default: printf("Speed returned is %d\n", edata.speed); >return (0); > Using iperf as you stated is the answer if one wants to get current speed and not simply the nic potential speed.
As Khaled mentioned, you should be able to run ethtool with just the interface as an argument. This will list the supported speeds, the advertised speeds, the current speed, and a bunch of other things too:
Settings for eth0: Supported ports: [ TP ] Supported link modes: 10baseT/Half 10baseT/Full 100baseT/Half 100baseT/Full 1000baseT/Full Supports auto-negotiation: Yes Advertised link modes: 10baseT/Half 10baseT/Full 100baseT/Half 100baseT/Full 1000baseT/Full Advertised auto-negotiation: Yes Speed: 1000Mb/s Duplex: Full Port: Twisted Pair PHYAD: 0 Transceiver: internal Auto-negotiation: on Supports Wake-on: d Wake-on: d Current message level: 0x00000007 (7) Link detected: yes You can also run dmesg , and grep for your interface, but this might not work if your system has been running for a long time and the current buffer no longer has that information (in that case, you’ll have to grep the older /var/log/dmesg.* files):
dmesg |grep eth0 [ 2.867481] e1000: eth0: e1000_probe: Intel(R) PRO/1000 Network Connection [ 19.429444] ADDRCONF(NETDEV_UP): eth0: link is not ready [ 19.431555] e1000: eth0 NIC Link is Up 1000 Mbps Full Duplex, Flow Control: None [ 19.449341] ADDRCONF(NETDEV_CHANGE): eth0: link becomes ready [ 26.972379] e1000: eth0: e1000_set_tso: TSO is Enabled [ 29.920458] eth0: no IPv6 routers present Мониторинг пропускной способности и скорости сети в Linux
![]()
Сегодня в статье рассказываем про инструменты с открытым исходным кодом, которые позволяют вам проверить скорость вашего Интернета и пропускную способность в Linux.

Speedtest
Speedtest — старый фаворит. Это инструмент для проверки скорости загрузки и скачивания с использованием speedtest.net. Он реализован на Python, упакован в Apt, а также доступен с pip. Вы можете использовать его как инструмент командной строки или в скрипте Python.
sudo apt install speedtest-cli
sudo pip3 install speedtest-cli
Затем запустите его с помощью команды speedtest :
speedtest Retrieving speedtest.net configuration. Testing from CenturyLink (65.128.194.58). Retrieving speedtest.net server list. Selecting best server based on ping. Hosted by CenturyLink (Cambridge, UK) [20.49 km]: 31.566 ms Testing download speed. Download: 68.62 Mbit/s Testing upload speed. Upload: 10.93 Mbit/s
Это быстрая, и пригодная для скриптов утилита, поэтому вы можете запускать его регулярно и сохранять результаты в файл или базу данных для записи скорости вашей сети с течением времени.
Fast
Fast — это услуга, предоставляемая Netflix. Его веб-интерфейс расположен на Fast.com, а интерфейс командной строки доступен через npm:
npm install --global fast-cli
И веб-сайт, и утилита командной строки предоставляют один и тот же базовый интерфейс — это простой тест скорости, и ничего лишнего:
Команда показывает вашу скорость скачивания (download) через Интернет. Чтобы получить скорость загрузки (upload), используйте флаг -u :
fast -u ? 80 Mbps v / 8.2 Mbps ^
iPerf
iPerf (iPerf3) — отличный способ проверить скорость вашей локальной сети (а не скорость Интернета, как это делают два предыдущих инструмента). Пользователи Debian, Raspbian и Ubuntu могут установить его с помощью apt:
sudo apt install iperf [Debian/Ubuntu] yum install epel-release [RHEL/CentOS] yum install iperf3 [RHEL/CentOS]
iPerf также доступен в Window и Mac
После установки вам понадобятся два компьютера в одной сети, чтобы использовать его (на обоих должен быть установлен iPerf). Один мы будем использовать в качестве сервера.
ip addr show | grep inet.*brd
Запустите iperf на сервере:
Это компьютер входящих соединений от клиентов. Теперь запустите на втором компьютере iperf с флагом -c и укажите ip-адрес сервера.
NetHogs
NetHogs это утилита для проверки полосы пропускания, который группирует информацию по процессам. Это может быть полезно, чтобы понять кто занимает всю полосу пропускания. NetHogs входит во многие дистрибутивы. Для его установки используйте:
yum install epel-release [RHEL/CentOS] yum install nethogs [RHEL/CentOS] apt install nethogs [Debian/Ubuntu]

Вы можете указать определенный интерфейс после команды:
Также у команды есть дополнительные параметры, такие как выбор задержки для частоты обновления -d , информации о версии -V , tracemode -t .
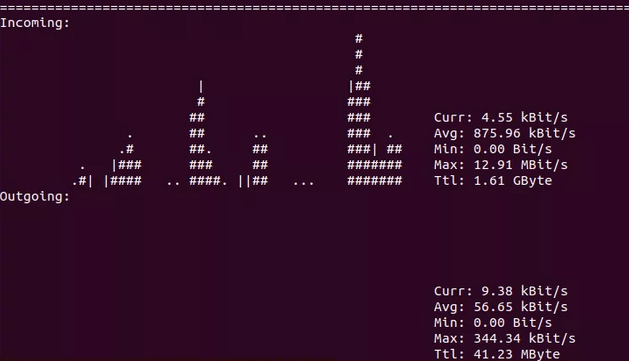
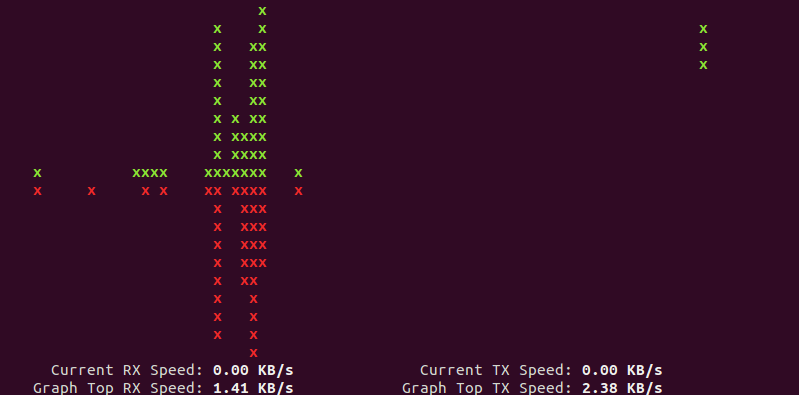
nload
nload позволяет отслеживать сетевой трафик и использование полосы пропускания в режиме реального времени, с большим количеством дополнительной информации, такой как: общий объем передаваемых данных, минимальное и максимальное использование сети и многое другое. Также nload строит графики входящего и исходящего трафика.
- device — выбор интерфейса
- -a — промежуток в секундах, для подсчитывания среднего значения
- -i — стопроцентная планка на графике пропускной способности в kBit/s
- -m — отображение нескольких интерфейсов, без графика
- -t — интервал обновления в миллисекундах
- -u — режим отображения: Bit/s, kBit/s, MBit/s
Для установки используйте:
sudo apt install nload [Debian/Ubuntu] yum install epel-release [RHEL/CentOS] um install nload [RHEL/CentOS]
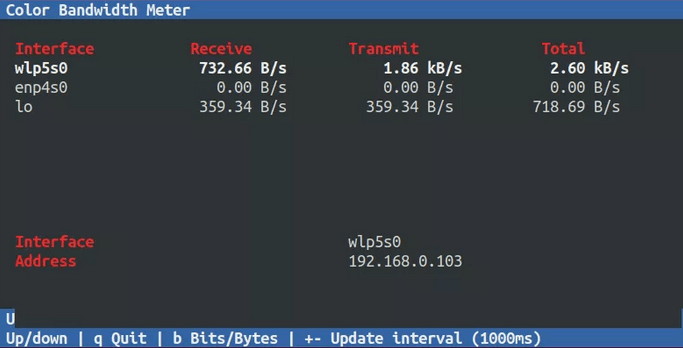
CBM – Color Bandwidth Meter
CBM — очень простой инструмент, который отображает сетевой трафик на всех подключенных устройствах. Удобство заключается в том, что команды отображаются в нижней части терминала.
Для установки используйте команду:
sudo apt install cbm -y [Debian/Ubuntu] yum install epel-release [RHEL/CentOS] yum install cbm [RHEL/CentOS]
После этого просто запустите:
vnStat
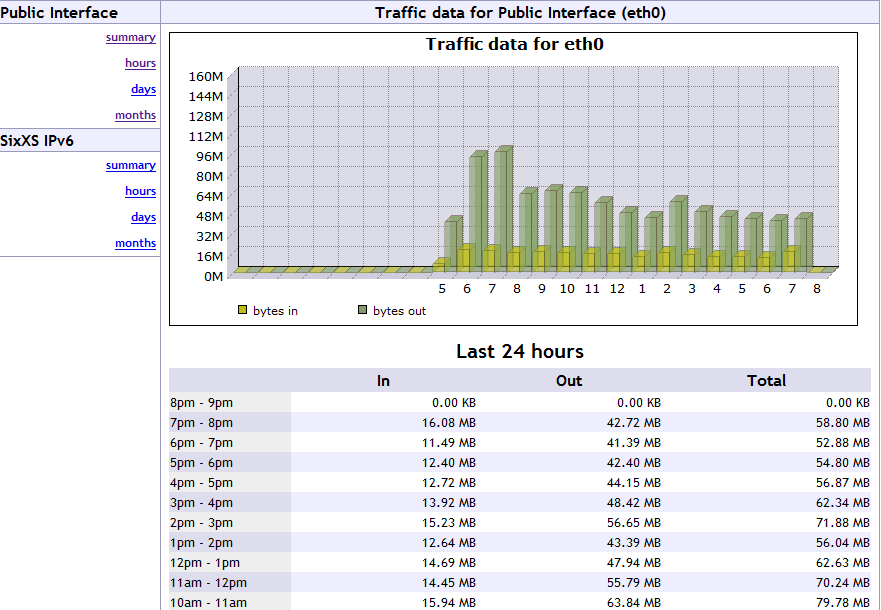
vnStat — это монитор сетевого трафика, который использует статистику сетевого интерфейса, предоставляемую ядром, что означает что он не будет перехватывать трафик и в результате гарантирует низкую загрузку ЦПУ. Особенность vnStst в том, что он сохраняет все данные в собственной базе.

vnStat также предоставляет веб-интерфейс на основе php для отображения графической статистики. Для настройки веб-интерфейса vnStat в вашей системе должны быть установлены пакеты Apache , php и php-gd .
Для установки используйте команду:
sudo apt install vnstat [Debian/Ubuntu] sudo yum install epel-release [RHEL/CentOS] sudo yum install vnstat [RHEL/CentOS]
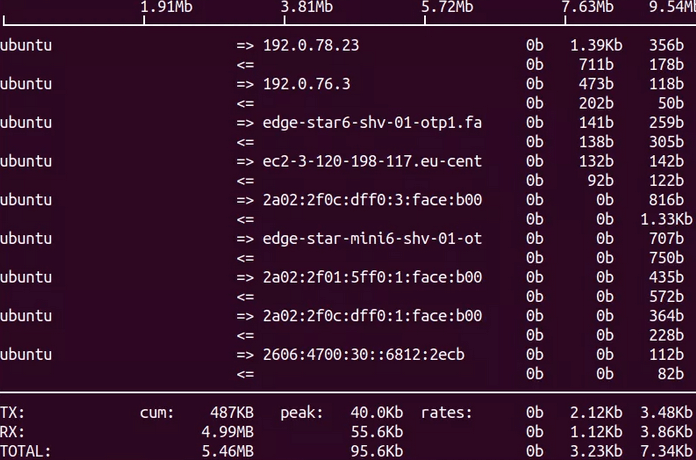
iftop
iftop — это инструмент для мониторинга, который создает обновляемый список сетевых подключений между парами хостов в реальном времени.
Для установки используйте:
sudo apt install iftop [Debian/Ubuntu] yum install epel-release[RHEL/CentOS] yum install iftop [RHEL/CentOS]
Будет произведен запуск с мониторингом всех интерфейсов.
slurm
slurm — это еще один инструмент мониторинга сетевой нагрузки для linux, который показывает результаты в графике ascii.
sudo apt-get install slurm [Debian/Ubuntu] sudo yum install slurm -y [RHEL/CentOS]