Проверка HDD/SSD/USB flash на бэд-блоки на Linux.
Сегодня в статье рассмотрим, как в Linux проверить ваш HDD,SSD или USB флешку на битые сектора – Бэд-блоки.
Бэд-блок (англ. bad block) — испорченный кластер (единица хранения данных) дискового носителя информации, куда нельзя записать информацию.
Проверка HDD на бэд-блоки программой badblocks.
Badblocks — стандартная утилита Linux для проверки на битые секторы. Она устанавливается по-умолчанию практически в любой дистрибутив и с ее помощью можно проверить как жесткий диск, так и внешний накопитель.
Но для начала воспользуемся ещё одной стандартной утилитой для просмотра подключенных накопители к нашей системе — fdisk.
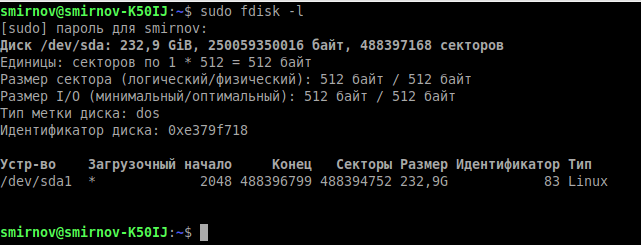
- -l – показать список разделов и выйти.
Теперь, когда мы знаем, какие разделы у нас есть, мы можем проверить их на битые секторы программой badblocks:
sudo badblocks -sv /dev/sda1 > ~/badblocks.txt
- -v — вывод подробной информации о результатах проверки.
- -s — отображать в правильном порядке ход проверки блоков.
- /dev/sda1 — раздел, который мы хотим проверить на битые секторы.
- > ~/badblocks.txt — выводим результат выполнения команды в файл badblocks.txt расположенный в корневом каталоги пользователя.
Если же в результате были найдены битые секторы, то нам надо дать указание операционной системе не записывать в них информацию в будущем. Для этого нам понадобятся утилиты Linux для работы с файловыми системами:
- e2fsck. Если мы будем исправлять раздел с файловыми система Linux ( ext2,ext3,ext4).
- fsck. Если мы будем исправлять файловую систему, отличную от ext.
sudo e2fsck -l ~/badblocks.txt /dev/sda1 Или, если у нас файловая система не ext:
sudo fsck -l ~/badblocks.txt /dev/sda1 Если после ввода данных команд вы получаете что-то вроде этого:
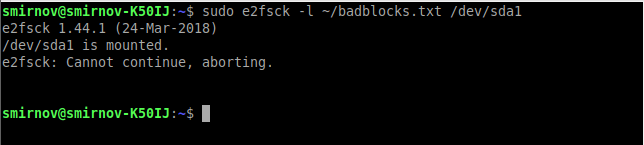
Значит данные операции надо выполнить в командной строке до загрузки операционной системы. Для этого выполним следующее:
sudo nano /etc/network/interfacesВ конце файла дописываем следующие строки:
pre-up e2fsck -l ~/badblocks.txt /dev/sda1Проверка HDD на бэд-блоки на Linux с помощью smartmontools
Теперь давайте рассмотрим более современный и надежный способ проверить диск на битые секторы linux. Современные накопители ATA/SATA ,SCSI/SAS,SSD имеют встроенную систему самоконтроля S.M.A.R.T (Self-Monitoring, Analysis and Reporting Technology, Технология самоконтроля, анализа и отчетности), которая производит мониторинг параметров накопителя и поможет определить ухудшение параметров работы накопителя на ранних стадиях. Для работы со S.M.A.R.T в Linux есть утилита smartmontools.
Давайте сначала ее установим. Если ваш дистрибутив основан на Debian\Ubuntu, то вводите:
sudo apt install smartmontoolsЕсли же у Вас дистрибутив на основе RHEL\CentOS, то вводите:
sudo yum install smartmontoolsТеперь, когда мы установили smartmontools мы можем посмотреть страницу помощи, с помощью команды:
Давайте перейдем к работе с утилитой. Вводим следующую команду с параметром -H,чтобы утилита показала нам информацию о состоянии накопителя:

Как видим, проверка диска на битые секторы linux завершена и утилита говорит нам, что с накопителем все в порядке!
Ещё одна команда, если SMART поддерживается, то добавляем -s. Если он не поддерживается или уже включён, то этот аргумент можно убрать.
sudo smartctl -s on -a /dev/sdaДополнительно, можно указать следующие параметры -a или –all, чтобы получить еще больше информации о накопителе, или -x и –xall, чтобы просмотреть информацию в том числе и об остальных параметрах накопителя.
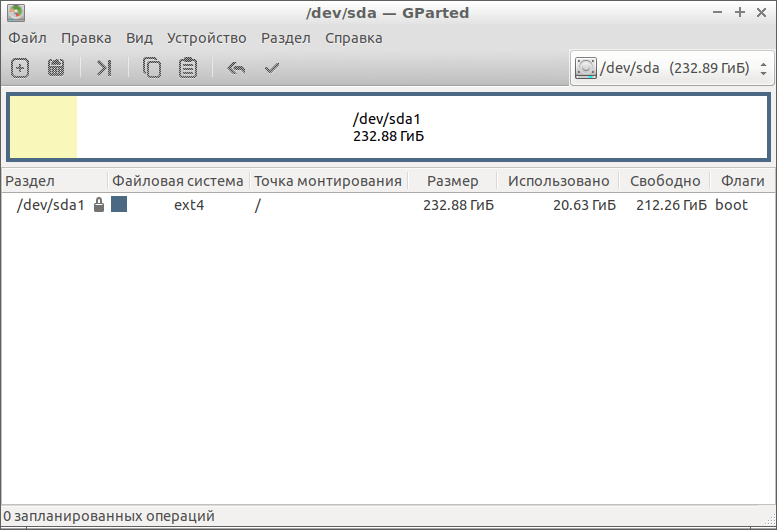
Проверка HDD на бэд-блоки на Linux с помощью GParted
GParted как раз для тех, кому текстовый интерфейс не по душе. Утилита выполняет большое количество задач, связанных с работой HDD на Ubuntu и всех Debian-подобных системах. В их число входит и проверка диска на ошибки.
Для начала нам нужно скачать и установить GParted. Вводим следующую команду, чтобы выполнить загрузку из официальных репозиториев:
- Открываем приложение. На главном экране сразу же выводятся все носители. Если какой-то из них помечен восклицательным знаком, значит, с ним уже что-то не так.
- Щёлкаем по тому диску, который хотим проверить.
- Жмём на кнопку «Разделы», расположенную сверху.
- Выбираем «Проверка на ошибки».
Программа отсканирует диск. В зависимости от его объёма процесс может занять продолжительное время. После сканирования Вы будете оповещены о его результатах.
Safecopy
Это уже та программа, которую впору использовать на тонущем судне. Если мы осведомлены, что с нашим диском что-то не так, и нацелены спасти как можно больше выживших файлов, то Safecopy придёт на помощь. Её задача как раз заключается в копировании данных с повреждённых носителей. Причём она извлекает файлы даже из битых блоков.
sudo apt install safecopyПереносим файлы из одной директории в другую. Выбрать можно любую другую. В данном случае мы переносим данные с диска sda в папку home.
sudo safecopy /dev/sda /home/Если есть вопросы, то пишем в комментариях.
Также можете вступить в Телеграм канал, ВКонтакте или подписаться на Twitter. Ссылки в шапке страницы.
Заранее всем спасибо.
RSS
Добавление RSS-ленты на главную страницу этого сайта не поддерживается, так как это может привести к зацикливанию, замедляющему работу вашего сайта. Попробуйте использовать другой блок, например блок Последние записи, для отображения записей сайта.
Если вы нашли ошибку, пожалуйста, выделите фрагмент текста и нажмите Ctrl+Enter.
В этой статье поговорим о том как записать iso-образ какой либо операционной системы из терминала Linux дистрибутива. Для Linux на Читать
Что такое SSD, в чём его отличие от HDD, на что стоит обратить внимание при выборе SSD накопителя и как Читать
Уникальный идентификатор компьютера в сети, построенной на базе стека TCP/IP. Сетевые устройства взаимодействуют друг с другом, используя его. На данный момент применяется Читать
Как быстр ваш USB? Как быстр ваш SSD-накопитель? Это очень распространенный вопрос. Я собрал и скомпилировал несколько тестов, которые помогут Читать
How to check the physical health of a USB stick in Linux?
How to check the health status of a USB stick? How do I know that a USB is broken beyond repair, or repairable?
7 Answers 7
There is no way to query a USB memory stick for SMART-like parameters; I’m not aware of any memory sticks that support doing so even via publicly-available proprietary software. The best you can do is to check that you can successfully read+write to the entire device using badblocks .
You want to specify one of the write tests, which will wipe all data on the stick; make a backup first.
Find the device by looking at dmesg after plugging in the USB stick; you’ll see a device name (most likely sd , e.g., sdc , sdd , etc.) and manufacturer information. Make sure you’re using the proper device!
If the stick is formatted with a valid filesystem, you may have to unmount it first (with the umount command).
Example syntax, for a USB stick enumerated as /dev/sdz , outputting progress information, with a data-destructive write test and error log written to usbstick.log :
sudo badblocks -w -s -o usbstick.log /dev/sdz You’ll need to repartition and reformat the stick afterwards, assuming it passes; this test will wipe everything on the stick. Any failures indicate a failure of the device’s memory controller, or it has run out of spare blocks to remap failed blocks. In that case, no area of the device can be trusted.
badblocks is probably the best option. the comments that say «not worth it» completely miss several cases when this can be very needed (for example, a company might have purchased merchandise flashdrives, and would like to see how badly they got scammed. )
as pointed out in the wikipedia article linked, there’s also e2fsck -c that uses badblocks and effectively hides those badblocks from the filesystem, thus avoiding corrupted writes. It should be noted however that, if the disk got new badblocks it’s probably getting damaged and new ones may arrise later, meaning its life is shortening and you should consider replacing it.
I suggest adding the -v flag as well do see the error in the terminal windows. (if you let it run over night for example. The logfile is not that helpful for a quick view how bad it is.
I suggest adding time in front of the command to see how long it takes in order to calibrate one’s self to how long this takes. Ex: time sudo badblocks -w -s -o usbstick.log /dev/sdz . Note: for me on a 16 GiB USB 3.0 flash drive it took a couple hrs I think (I forgot to use time :(, so I’m guessing here).
Via [ubuntu] Error Check USB Flash Drive, I eventually found this, which could be helpful:
I arrived at the blogs Fight Flash Fraud and SOSFakeFlash, which recomend the software H2testw (see here or here) to test flash memories. I downloaded H2testw and found two issues with it: (1) it is for Windows only, and (2) it is not open source. However, its author was kind enough to include a text file that explains what it does; this page is about my GPLv3 implementation of that algorithm.
My implementation is simple and reliable, and I don’t know exactly how F3 compares to H2testw since I’ve never run H2testw. I call my implementation F3, what is short for Fight Flash Fraud, or Fight Fake Flash.
Addendum by @pbhj: F3 is in the Ubuntu repos. It has two part, f3write writes 1GB files to the device and f3read attempts to read them afterwards. This way capacity and ability to write and effectively read data are tested.
I see some advantages for a typical user: (1) it detects (quickly) a fake flash, which as @bmaupin mentioned badblocks can’t do reliably (nor quickly), and is able to «fix» a fake flash, (2) to check full drive health, it is comparable to badblocks, but it doesn’t require root privileges and it gives a slightly more nuanced output, (3) if you don’t need to check all sectors, you don’t have to completely erase and reformat the drive.
It depends on the failure mode, I suppose. They’re cheap for a reason.
As a USB device, watching the bus via device manager in Windows or the output of dmesg in Linux will tell you if the device is even recognized as being plugged in. If it isn’t, then either the controller on board or the physical connections are broken.
If the device is recognized as being plugged in, but doesn’t get identified as a disk controller (and I don’t know how that could happen, but. ) then the controller is shot.
If it’s recognized as a disk drive, but you can’t mount it, you might be able to repair it via fdisk and rewrite the partition table, then make another filesystem.
If you’re looking for the equivalent of S.M.A.R.T., then you won’t find it. Thumbdrive controllers are cheap. They’re commodity storage, and not meant to have the normal failsafes and intelligence that modern drives have.
Along the way to today, this thread raised some questions.
—How long will this take (implied by discussion of letting it run overnight).
I’m currently testing a USB 3.0 128G Sandisk using sudo badblocks -w -s -o , it is connected to my USB 3/USBC PCIe card in an older Athlon 64×2. So, USB3 into USB3 on PCIe should be quite fast.
Here is my console command line at 33% completion:
Testing with pattern 0xaa: 33.35% done, 49:47 elapsed. (0/0/0 errors)
Testing with pattern 0xaa: 54.10% done, 1:17:04 elapsed. (0/0/0 errors)
Reading and comparing: 43.42% done, 2:23:44 elapsed. (0/0/0 errors)
This process repeats with oxaa, then 0x55, 0xff, and finally 0x00.
ArchLinux gave an unqualified statement:
For some devices this will take a couple of days to complete.
N.B.: The testing was started about 8:30 p.m., testing had completed before 8:45 a.m. the next day, completing in about 12 hours for my situation.
—Destructive testing isn’t the only method possible.
Wikipedia offered this statement:
badblocks -nvs /dev/sdb This would check the drive «sdb» in non-destructive read-write mode and display progress by writing out the block numbers as they are checked.
My current distro man page confirms the -n is nondestructive.
-n Use non-destructive read-write mode. By default only a non- destructive read-only test is done.
And finally that it isn’t worth it. statement.
A summarizing statement, based on the situation of billions of memory sites in a flash chip, a failure is a cell that has already been written and erased tens of thousands of times, and is now failing. And when one test shows a cell has failed, remember that each file you added and erased is running up those cycles.
The idea here is that when 1 cell fails, many more cells are also reaching the same failure point. One cell failed today, but you use it normally for a while longer, then 3 more cells fail, then 24 more fail, then 183, and before you know it, the memory array is riddled with bad spots. There are only so many cells that can die before your usable capacity begins to fall, eventually falling rapidly. How will you know more cells are failing? So, posts here are guarding your data by saying once you have a bad cell, you are pretty much done in regards trustworthy storage. Your usage might still give you a few months.