- How do I clear the DNS cache?
- 17 Answers 17
- Ubuntu 17.04 and higher (18.04)
- Ubuntu 22.04 and higher
- For 18.04 and higher
- For 11.10 and below
- 12.04
- By default, DNS is not cached in Ubuntu < 17.04 (but it might be cached in the network or application)
- Flush DNS Cache on Ubuntu
- How DNS Works:
- DNS Caching:
- Problems with DNS Caching:
- Checking If DNS Caching is Enabled:
- Flushing DNS on Ubuntu 18.04 LTS:
- Flushing DNS Cache on Ubuntu 16.04:
- About the author
- Shahriar Shovon
How do I clear the DNS cache?
I just updated the DNS record ( ns1 , ns2 , ns3.myhostingcompany.com ) for a site I’ve got hosted, but I still get the domain registrar parking page. I’d like to see if the problem is Ubuntu’s cached DNS records. Is there a way to clear Ubuntu’s DNS cache? (if such a thing exists?)
Also, check /etc/hosts . I’ve just been sure that the old IP address of my domain was being cached, but only strace ping example.com revealed that I forgot to remove the /etc/hosts record which I added a time ago because of lacking patience for DNS propagation.
a lot of these answers suggest caching is disabled by default, but they also refer older versions. It certainly appears to be on by default in my machine (18.04) and various answers below do show you how to flush it, just scroll down
17 Answers 17
Ubuntu 17.04 and higher (18.04)
From Ubuntu 17.04 and onwards, systemd-resolve is used for DNS. You can flush systemd’s caches like so:
sudo systemd-resolve --flush-caches Ubuntu 22.04 and higher
sudo resolvectl flush-caches This didn’t work for me on 16.04 LTS — but it was useful to see yet another way it might have been cacheing: sudo systemd-resolve —statistics
Any idea why it displays this error on Ubuntu 19.10? Failed to flush caches: Unit dbus-org.freedesktop.resolve1.service not found.
For ubuntu 22.04, we need to use: sudo resolvectl flush-caches . See answer from @codezalot in systemd-resolve-command-not-found-in-ubuntu-22-04-desktop.
For 18.04 and higher
For 11.10 and below
Ubuntu doesn’t cache dns records by default so unless you’ve installed a dns cache there isn’t anything to clear.
DNS records are likely cached by your provider’s DNS servers so if you want to check if the DNS changes you made were successful you can interrogate a DNS server from your domain hosting service with dig:
dig -t a ns1.myhostingcompany.com @domain_registrar_dns_server
It you want Ubuntu to start caching dns I recommend installing pdnsd together with resolvconf . nscd is buggy and not advisable.
Mike Shultz’s answer definitely doesn’t work on Ubuntu 20. You get this error message: sd_bus_open_system: No such file or directory
So, For 10 years later. If I disabled systemd-resolve for ubuntu and debian. Then there is no DNS cache, Each nslookup will request DNS server?
12.04
Ubuntu 12.04 uses dnsmasq which is built into network-manager , but it doesn’t cache dns so there is no need to flush it. Here is a sample line from my syslog to prove that point:
dnsmasq[2980]: started, version 2.59 cache disabled There is also no need for any configuration of dnsmasq . If you are running with stock settings it won’t be caching dns, as for it to do so you have to explicitly set it up as this Ubuntu article describes.
If you wanted to refresh your settings you could disable and then enable networking or run
sudo service network-manager restart This restarts dnsmasq because it is built in to network-manager ; check your syslog for the evidence for this.
If you are using a wired connection with dhcp network manager will be taking the settings direct from your router and your connection will be automatically established when you login to Ubuntu. You could check that the settings are correct in your router if you can access it via the web interface, and perhaps reboot it if necessary. If it is a general problem with dns, you could try using Google dns instead of your isp dns, and more information on that is detailed here.
Note that Ubuntu uses systemd-resolve from 17.04 and onwards so this answer doesn’t apply anymore to recent Ubuntu versions. See «flush DNS cache in Ubuntu 17.04 and higher (18.04)»
By default, DNS is not cached in Ubuntu < 17.04 (but it might be cached in the network or application)
To confirm one way or the other whether dnsmasq is caching, run ps ax | grep dnsmasq and look at the running command. Here’s a breakdown of my default 13.10 machine:
/usr/sbin/dnsmasq \ --no-resolv \ --keep-in-foreground \ --no-hosts \ --bind-interfaces \ --pid-file=/var/run/NetworkManager/dnsmasq.pid \ --listen-address=127.0.1.1 \ --conf-file=/var/run/NetworkManager/dnsmasq.conf \ --cache-size=0 \ --proxy-dnssec \ --enable-dbus=org.freedesktop.NetworkManager.dnsmasq \ --conf-dir=/etc/NetworkManager/dnsmasq.d
/etc/NetworkManager/dnsmasq.d is empty by default. So there aren’t any overrides coming in there and just to check —cache-size=0 means what we think it means (instead of an unlimited cache), man dnsmasq shows:
-c, --cache-size= Set the size of dnsmasq's cache. The default is 150 names. Setting the cache size to zero disables caching. So while dnsmasq can cache DNS, it isn’t caching out the box. You can check your machine and various configuration directories to check you’re on the same page.
If you are seeing cache issues, this is likely happening in one of a few places:
- Upstream from your computer. Some routers cache. Many corporate networks will cache DNS. Many ISP-run DNS servers and will use their own caches. The only way to guarantee against a network cache is to use a cache you can manually refresh. This is why I like OpenDNS.
- In the client application (notably browsers). Applications can do all sorts of their own caching that Ubuntu has no effect on. How Firefox caches DNS. How to clear Chrome’s DNS cache. Other browsers (and applications) might have their own mechanisms.
- I’m scraping the barrel here but perhaps you’ve installed a non-standard DNS server in Ubuntu instead of turning caching on in dnsmasq . There are many: nscd , DJBDNS dnscache (aka TinyDNS), pdns , pdnsd , Bind9 (and its variants), and more I can’t even remember. These will probably be evidenced in /etc/resolv.conf (with config in /etc/resolvconf/` to autogen that file). The following shows an locally intercepted DNS query:
$ nslookup askubuntu.com Server: 127.0.1.1 Address: 127.0.1.1#53 Non-authoritative answer: Name: askubuntu.com Address: 198.252.206.24 If you’re not hitting 8.8.8.8 (or whatever you expect your DNS server to be), check what you are hitting instead. In my case I can see this is just dnsmasq set up to mirror DNS queries back for LXC, but in your case it might be doing bad cachey things. If you have done of the listed caches, the process for clearing each varies:
sudo /etc/init.d/nscd reload # nscd sudo /etc/init.d/named restart # bind9 Flush DNS Cache on Ubuntu
![]()
The full form of DNS is Domain Name System. It is used to translate domain names to IP addresses. It seems really simple, but without it the internet won’t be what it is today. Can you imagine memorizing thousands of IP addresses? Can you imagine a world without google.com or yourwebsite.com? DNS makes everything about the internet very easy for us.
This article is about flushing DNS on Ubuntu. But to understand why it is necessary, first you have to understand how DNS works and a little bit about DNS caching.
How DNS Works:
Simply, DNS can be thought of a table of domain names and IP addresses as given below:
| Domain Name | IP Address |
| linuxhint.com | 1.2.3.4 |
| support.linuxhint.com | 3.4.5.7 |
| google.com | 8.9.5.4 |
| www.google.com | 8.9.5.4 |
Please know that, none of the data in this table is real. It’s just for the purpose of demonstration. So let’s get back to our original topic.
When you visit, let’s say, linuxhint.com, the browser asks the DNS server (set on your computer) a few questions.
Your Computer: Hey, do you know linuxhint.com?
DNS Server: No, I do not. But the DNS server 4.4.4.4 may know about it.
Your Computer: Contacts the DNS server 4.4.4.4 and asks, “hey, do you know linuxhint.com?”
DNS Server 2: Yes, I do. What can I do for you?
Your Computer: I need the IP address of linuxhint.com. Can I have it?
DNS Server 2: No fear, that’s why I am here. Here is the IP address of linuxhint.com 1.2.3.4.
Your Computer: You’re a life saver. Thanks.
Now your computer connects to 1.2.3.4 and your favorite website linuxhint.com shows up. That was really hard, wasn’t it?
The next time you visit linuxhint.com, the same thing happens again.
DNS Caching:
In the earlier section, you saw how a domain name is resolved to IP addresses. This journey through the DNS servers takes a while and till it’s complete and a domain name can be resolved to IP addresses, you won’t be able to connect to any website or server on the internet.
To solve this issue, DNS caching is used. Here, when you try to resolve a domain name to IP addresses for the first time, it takes a little bit longer. But once the domain name is resolved, the IP addresses are stored in your own computer. So, the next time you need to resolve the same domain name, it won’t take as long as it did on the first time.
Problems with DNS Caching:
DNS caching is good. How come DNS caching is problematic? Well, the world of internet is so dynamic that the DNS information is changing constantly. It may have changed a few times even while I am writing this article.
So, what happens when the DNS information changes and we are using the DNS information that is cached on our own computer? Well, that’s where it gets problematic. In that case, we will be using the old DNS information. We may have connectivity issues, false redirection issues and many other issues.
To solve this problem, we have to delete the cache (also called DNS flushing) and rebuild it. This is the topic of this article.
Checking If DNS Caching is Enabled:
You can check whether DNS caching is enabled very easily on Ubuntu. You need to have the nslookup or dig utility installed on your computer for this to work.
nslookup or dig command may not be available by default on your Ubuntu machine. But you can easily install it from the official package repository of Ubuntu.
First, update the APT package repository cache with the following command:

The APT package repository cache should be updated.

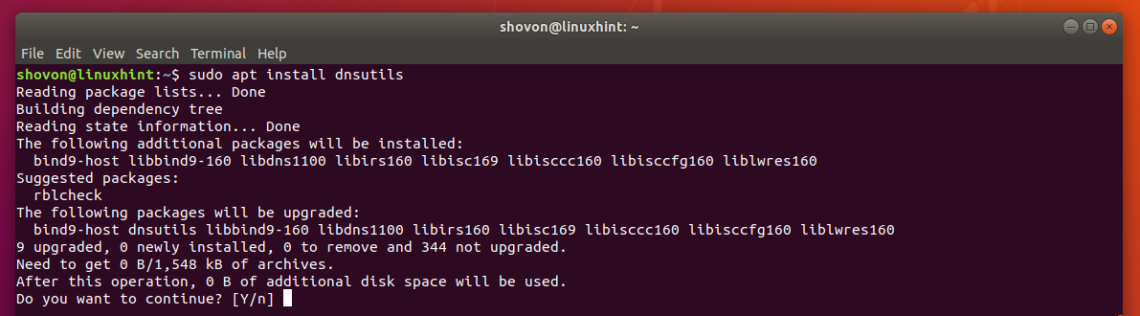
Now install the nslookup and dig with the following command:

Now press y and then press to continue.
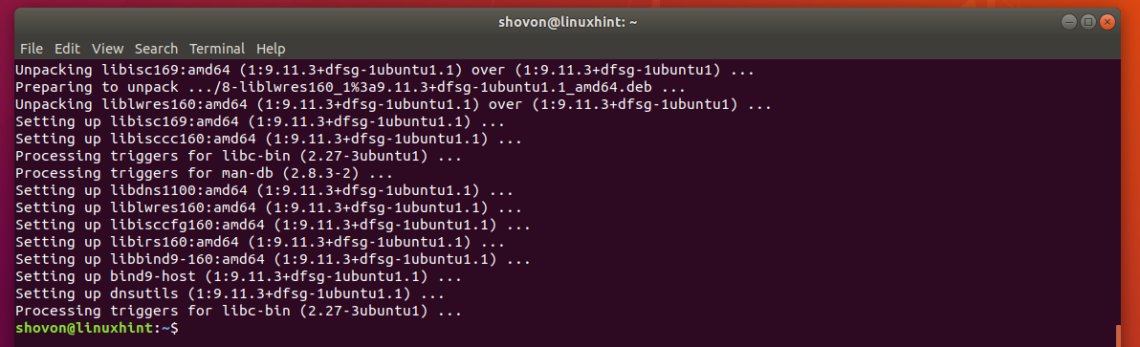
nslookup and dig commands should now be available.
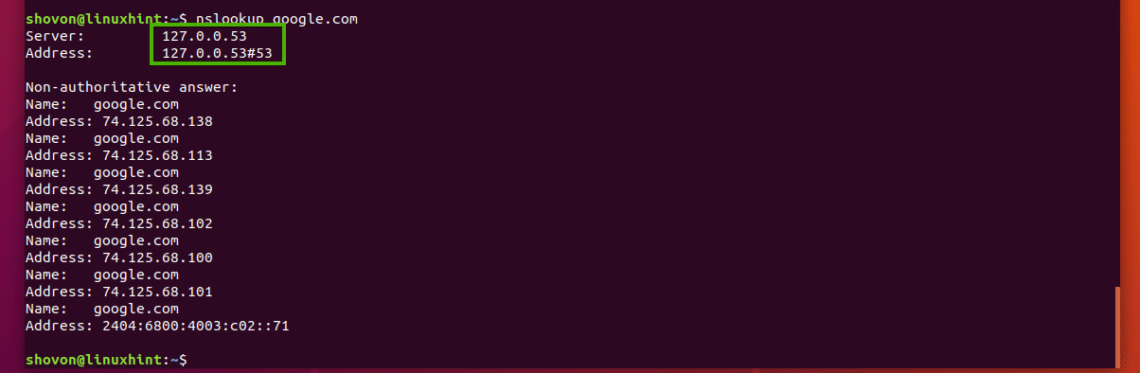
Now to test whether caching is enabled, run the following command:
As you can see, the DNS server used to resolve the domain name is 127.0.0.53, which is a loopback IP address. So DNS caching is enabled. If you have it disabled, then the DNS server should be anything other than 127.0.0.X.
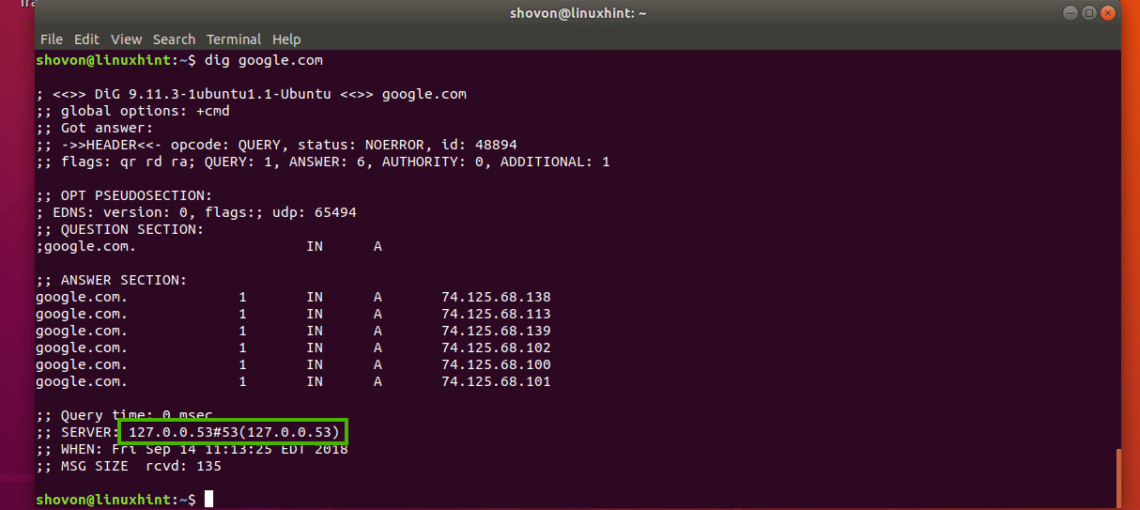
You can check the same thing with the dig command as well as follows:
As you can see, the loopback IP addresses is used as the DNS server addresses here as well. So, DNS caching is enabled.
Flushing DNS on Ubuntu 18.04 LTS:
Ubuntu 18.04 LTS uses a local DNS server and caches DNS queries by default. Ubuntu 18.04 LTS uses systemd for this purpose.
You can run the following command to check how many DNS entries are cached and many other information on Ubuntu 18.04 LTS:

As you can see, information about DNS cache is listed in the marked section of the screenshot below.
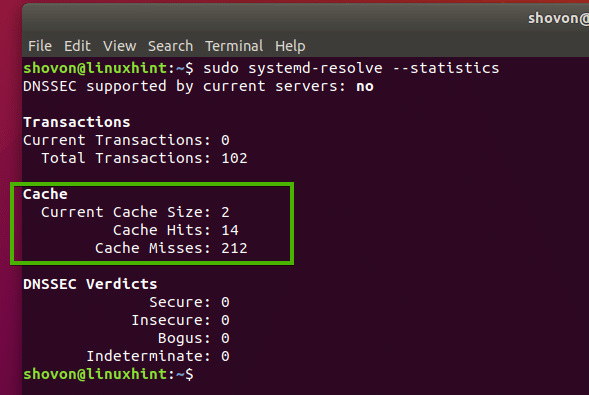
To flush the DNS cache on Ubuntu 18.04 LTS, run the following command:

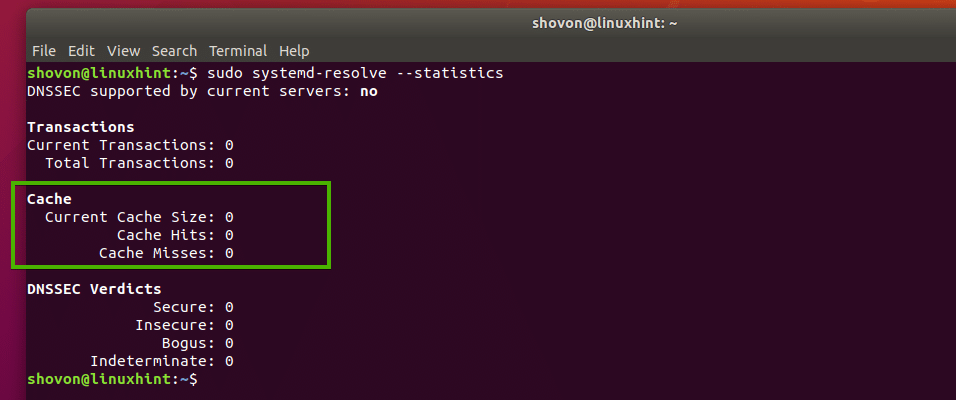
You can also restart the systemd-resolved service to flush the DNS caches on Ubuntu 18.04 LTS.
To restart the systemd-resolved service, run the following command:

As you can see, the caches are cleared.
Flushing DNS Cache on Ubuntu 16.04:
On Ubuntu 16.04 LTS, DNS cache is not enabled by default. But some applications like bind, dnsmasq, nscd etc. may cache it.
If you’re using nscd for caching DNS queries, then you can flush the DNS cache by simply restarting the nscd service.
You can restart the nscd service on Ubuntu 16.04 LTS to flush DNS caches with the following command:
If you’re using dnsmasq for caching DNS, then restarting dnsmasq service with the following command should flush the DNS cache.
So, that’s how you flush DNS cache on Ubuntu 18.04 LTS and 16.04 LTS. Thanks for reading this article.
About the author
Shahriar Shovon
Freelancer & Linux System Administrator. Also loves Web API development with Node.js and JavaScript. I was born in Bangladesh. I am currently studying Electronics and Communication Engineering at Khulna University of Engineering & Technology (KUET), one of the demanding public engineering universities of Bangladesh.