- Простой SSH туннель с помощью Putty
- Шаг №1: Создание SSH — шлюза
- Шаг №2: Делаем туннель
- Создание SSH-туннелей с помощью PuTTY
- 1. Локальный проброс порта
- 2. Удалённый проброс порта
- 3. Socks–proxy
- How to use PuTTY to create a SSH Tunnel
- Creating a SSH Tunnel using PuTTY – GUI
- Creating a SSH Tunnel using PuTTY – Command-line
- SSH Tunneling with Putty | Linux
Простой SSH туннель с помощью Putty
![]()
Многие из вас наверняка используют в повседневной работе SSH подключение к удаленным серверам. Но не многие знают, что с помощью SSH мы можем создавать защищенные соединения (туннели), через которые трафик будет передаваться в зашифрованном виде.
В статье мы расскажем о простом способе создания SSH – туннеля и использования его для HTTP/RDP доступа.
Шаг №1: Создание SSH — шлюза
Первое, что необходимо сделать, это создать SSH – шлюз. Для этого, откроем Putty и создадим подключение к шлюзу:

Сохраните сессию, чтобы потом оперативно загрузить ее с помощью кнопки Load.
Шаг №2: Делаем туннель
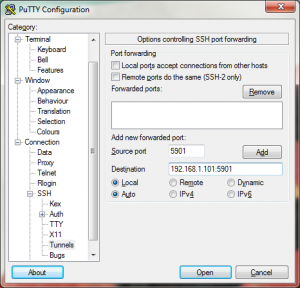
В левом меню навигации, переходим в раздел Connection → SSH → Tunnels. В данном меню настройки укажите параметр Source Port — это порт, к которому вы будете подключаться локально, чтобы отправить трафик через SSH – туннель. В поле Destination укажите адрес назначения, к которому вы будете подключаться:
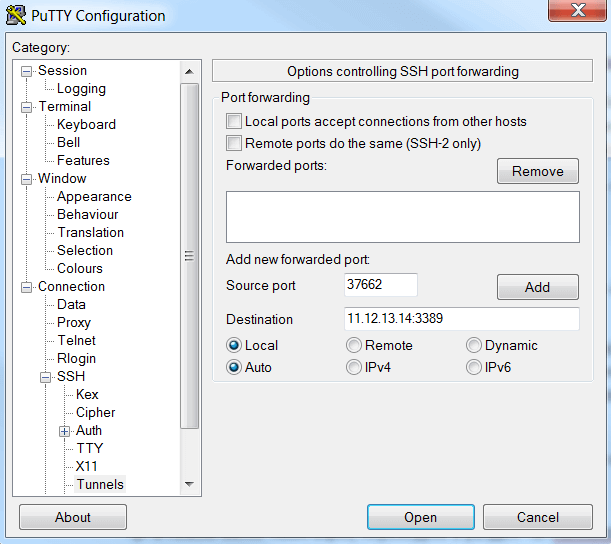
Данная запись означает то, что при подключении к локальному порту 37662 (127.0.0.1:37662), вы будете перенаправлены через SSH туннель до SSH – шлюза, а затем уйдете на адрес назначения 11.12.13.14:3389 – то есть RDP.
Помимо этого, мы добавим подключение к WEB по 80 порту. Нажимаем Add:
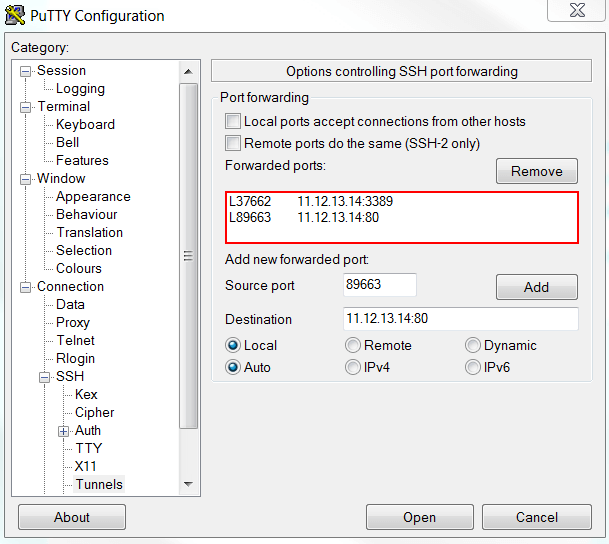
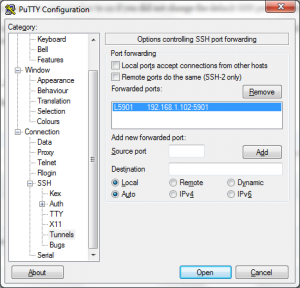
Отлично. Теперь в Putty нажимаем Open — туннель готов к использованию.
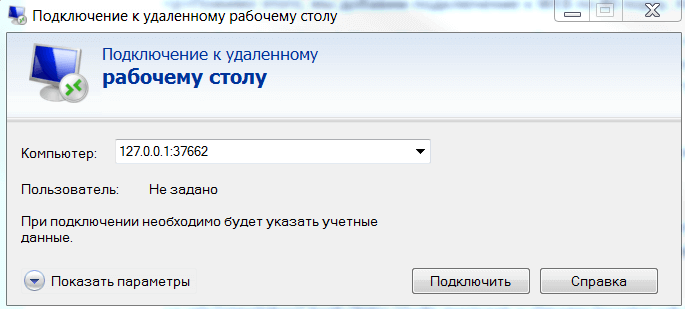
Шаг №3: Проверяем
Вызываем утилиту подключения к удаленному рабочему столу командой mstsc и указываем требуемые для нас реквизиты подключения – локалхост и созданный ранее RDP порт:
В примере, для того, чтобы «гнать» web – трафик через SSH – туннель настройте прокси сервер.
Важно: подключение через SSH – туннель будет активно до тех пор, пока открыта утилита Putty и существует коннекция с SSH – шлюзом.
Создание SSH-туннелей с помощью PuTTY
В данной статье будет описано как строить SSH–туннели с помощью PuTTY.
1. Локальный проброс порта
Рассмотрим следующую ситуацию. Мы находимся внутри корпоративной сети, у нашего компьютера адрес 192.168.0.2, доступ во внешний мир полностью закрыт (то есть никакого NAT–а, proxy и т.п.). Влиять на политику ограничения доступа у нас возможности нет, но зато есть SSH–доступ на один из серверов с маршрутизируемым IP–адресом, который доступен из Интернета. Внутренний адрес этого сервера, пусть будет для примера 192.168.0.3. Структура сети изображена на рисунке:

Предположим, что нам очень нужно подключиться, к примеру, по SSH на некоторый удалённый сервер с IP–адресом 212.212.212.212 где–то далеко в Интернет. Для этого запускаем PuTTY, создаём SSH–подключение к серверу 192.168.0.3 (далее по тексту SSH–сессия 1), идём в пункт Tunnels:

и указываем, что локальный порт 2222 нашего компьютера должен быть поставлен в соответствие порту 22 на сервере с IP–адресом 212.212.212.212. Далее жмём кнопку «Open», авторизуемся на сервере 192.168.0.3. Затем создаём ещё одно подключение (далее по тексту SSH–сессия 2), но уже на localhost, порт 2222 и жмём кнопку «Open»:

В результате SSH–сессия 2 будет туннелироваться (т.е. будет установлена внутри ранее установленной SSH–сессии 1). Для удалённого сервера 212.212.212.212 всё будет выглядеть так, как будто к нему подключается 111.111.111.111:

2. Удалённый проброс порта
В этом случае подключение внутри SSH–туннеля устанавливается в другую сторону — от удалённого сервера на наш локальный компьютер. Может быть полезно, если требуется открыть доступ к локальным сервисам нашего компьютера. Рассмотрим ту же сеть, что и в пункте 1, но для простоты предположим, что теперь у нас есть NAT:

Здесь уже у нас есть возможность подключаться через SSH напрямую к 212.212.212.212 благодаря наличию NAT–а. А вот 212.212.212.212 подключиться на 192.168.0.2 без специальных ухищрений, понятное дело, не сможет, т.к. 192.168.0.2 не подключён к Интернет непосредственно. Предположим, что пользователю, сидящему под X–ами на 212.212.212.212 нужно через remote desktop попасть на наш компьютер 192.168.0.2. Для этого в SSH–сеансе подключения с 192.168.0.2 на 212.212.212.212 нужно изменить настройки в разделе Tunnels следующим образом:

В результате после успешной авторизации на 212.212.212.212 можно увидеть следующее:
#lsof -i -nP | grep 3333 sshd 18598 avz 11u IPv4 592868957 TCP 127.0.0.1:3333 (LISTEN)
То есть sshd ожидает подключений на TCP–порт 3333, которые затем по SSH–туннелю будут перенаправлены на 192.168.0.2 порт 3389. И юзер сидящий за 212.212.212.212 сможет с помощью rdesktop увидеть наш рабочий стол:

3. Socks–proxy
В этом случае мы можем использовать сервер с SSH–демоном как промежуточный (proxy). Схема сети как в случае #1 (без NAT и штатных прокси):

Чтобы заставить PuTTY исполнять роль socks–прокси, нужно параметры SSH–сессии с 192.168.0.2 на 192.168.0.3 изменить следующим образом:

В результате после успешной авторизации со стороны клиента можно будет наблюдать следующее:
C:\>netstat -ano | find "1080" TCP 127.0.0.1:1080 0.0.0.0:0 LISTENING 2392 C:\>tasklist | find /i "2392" putty.exe 2392 Console 0 5420 КБ
То есть putty, выполняющийся с PID–ом 2392, начинает слушать порт 1080, ожидая подключений. Далее бёрем любое приложение, умеющее работать с SOCKS–прокси, например Firefox, и указываем ему использовать наш прокси:

Теперь все запросы от браузера будут проходить через сервер 192.168.0.3. В логах веб–сайтов, по которым мы таким образом будем ходить, будет отображаться внешний IP–адрес нашего сервера — 111.111.111.111.
P.S. Из help–файла Putty 0.58:
Question A.10.3: What does «PuTTY» mean?
It’s the name of a popular SSH and Telnet client. Any other meaning is in the eye of the beholder. It’s been rumoured that «PuTTY» is the antonym of «getty», or that it’s the stuff that makes your Windows useful… 🙂
How to use PuTTY to create a SSH Tunnel
The SSH protocol has a unique feature of tunneling other protocols and encrypting them. This article will show you how to use the popular terminal emulator PuTTY to create a SSH tunnel to pass VNC traffic which is normally unencrypted. This is just an example of tunneling VNC traffic through PuTTY you can tunnel almost any traffic (eg HTTP, FTP) by changing port numbers. First I will show you how this is done through the GUI and then by using command line parameters of PuTTY which are very similar to the “ssh” command in Linux. This article assumes that a VNC server software has already been installed on the target Linux computer and a VNC session has been created.
Creating a SSH Tunnel using PuTTY – GUI
Open PuTTY and enter the IP address/Hostname of the Linux server. Leave the port number to 22 if you did not change the default SSH port number on the Linux Server.
From the Category section expand “SSH” and select “Tunnels”, enter both the source port as 5901 (any port number will do) and destination as :5901 eg. 192.168.1.102:5901. I have configured a VNC session on my Linux server with the following command.
vncserver :1 -geometry 1366×768 -depth 24
Hence I will be using port 5901 as the destination. The source port can be any number, I am entering the same number just to avoid confusion.
Leave all the other radio buttons to their defaults and click the Add button. You will now see the setting under “Forwarded Ports”.
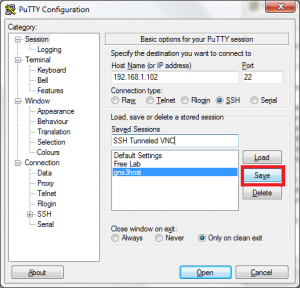
Come back to the “Session” page to save these settings as a session so that you do not need to enter them each time. Under “Saved Sessions” specify a name and click the save button.
Thats it now click open, enter your credentials. Once logged in minimize the PuTTY window and open your VNC viewer software and enter “localhost:5901” replace 5901 with the port number you entered in the SOURCE PORT field of PuTTY under SSH -> Tunnels.

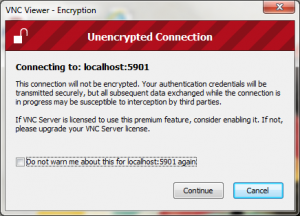
OMG what is this ? Connection is unencrypted ? But didn’t you follow this whole thing to tunnel your VNC connection over SSH using PuTTY. Worry not my friend this is normal because neither your VNC client software nor your VNC server knows that your traffic is being encrypted because all tunneling and encryption starts AFTER the data leaves the VNC Viewer software and ends BEFORE it hits the VNC server daemon running on your Linux server. That is why you entered “localhost” in the VNC viewer instead of the actual IP address of the Linux machine. So safely click continue, enter your VNC credentials and start using your encrypted VNC connection.
Still not satisfied with my answer let me show you solid proof that the connection is indeed encrypted. First up the following are the IPTables firewall rules present in my Linux machine.
iptables -A INPUT -m state —state RELATED,ESTABLISHED -j ACCEPT
iptables -A INPUT -m state —state NEW -p tcp —dport 22 -j ACCEPT
iptables -A INPUT -p icmp -j ACCEPT
iptables -A INPUT -i lo -j ACCEPT
iptables -A INPUT -j REJECT
Other than RELATED and ESTABLISHED connections the rules allow only SSH, ICMP and Loopback interface traffic even then I was able to use VNC on port 5901. You can also try these firewall rules. Here is how tunneling works.
After PuTTY is configured and a SSH connection established/authenticated, PuTTY will start listening on port 5901 (or the source port you had mentioned in PuTTY) this can be confirmed using the netstat -aon command from the Windows command line.
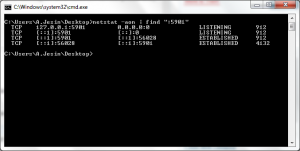
The last column shows Process IDs 912 is PuTTY and 4132 is VNC Viewer. When you enter “localhost:5901” in the VNC Viewer and click connect the following process happens.
- The VNC Viewer initiates a connection on port 5901 localhost.
- The PuTTY software listening on the port answers this connection.
- PuTTY then transfers all the VNC data through the SSH connection initiated from the client to the server.
- The SSH daemon running on the target Linux machine forwards this data to the IP address and port number entered in the “Destination field” field of PuTTY.
- This traffic passes through the loopback interface (it is matched by rule number 4 from the firewall rules mentioned above) and is answered by the VNC Server daemon.
You can use the following tcpdump command to see the movement of traffic.
All packets will contain the same IP address in both the source and destination field and that is the IP address of the VNC server. Try running the tcpdump command with the same filter but a different interface like eth0 you will not get a single packet.
Creating a SSH Tunnel using PuTTY – Command-line
Now lets do the same thing through the command-line. It’s very simpla all you have to do is go to Run -> cmd navigate to the place where putty.exe is located and enter the following.
C:\Users\A.Jesin\Desktop>putty.exe -ssh jesin@192.168.1.102 -L 5901:192.168.1.102:5901
Optionally you can add a “-N” in the end of the command which is similar to the “Don’t start a shell or command at all” option available in the GUI of PuTTY under Connection -> SSH. If you use this option you create a SSH tunnel by logging in as a user who has “nologin” shell.
SSH Tunneling with Putty | Linux
SSH tunneling or also known as port forwarding is a way of forwarding normally insecure TCP traffic through SSH. Common ports for example POP3,SMTP,HTTP and FTP can be easily tunneled using SSH.
SSH tunneling is also sometimes used to bypass firewalls where certain ports are blocked.
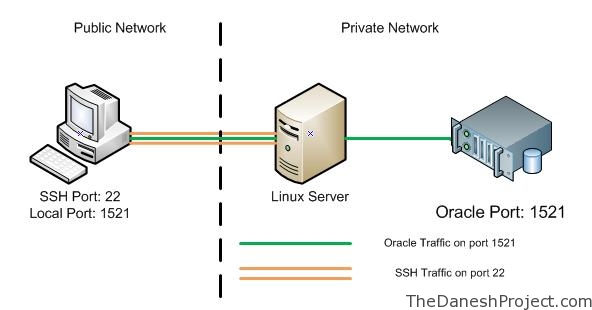
The figure below represents the network setup at my workplace where the only port available to use is SSH port 22. By implementing portwarding over ssh I am able to port forward Oracle traffic over port 22 to my Oracle DB database running on my private VM with host only networking enabled.
In this post I will show you how to apply SSH tunneling using the windows SSH client Putty. I’ll cover the Linux implementation in my future post.
You will need Putty to get started. Putty is a popular free win32 based SSH/Telnet client. Obtain the latest version 0.59 at the homepage.
Run Putty, key in the address for your Linux box. In this example “10.99.34.6” “Pandora” is the Linux box hosting VM and on the VM “192.168.66.100” the is an Oracle database running on RHEL 3. The VM is setup with host only networking so it has no access beyond the host machine “Pandora”.
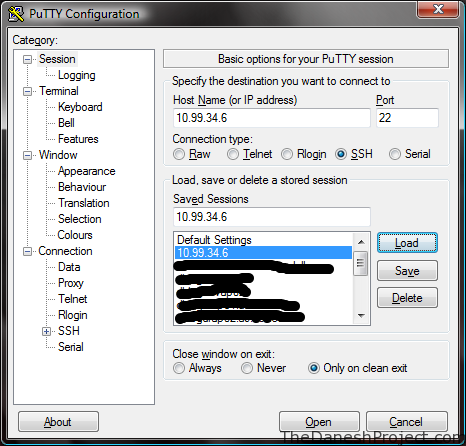
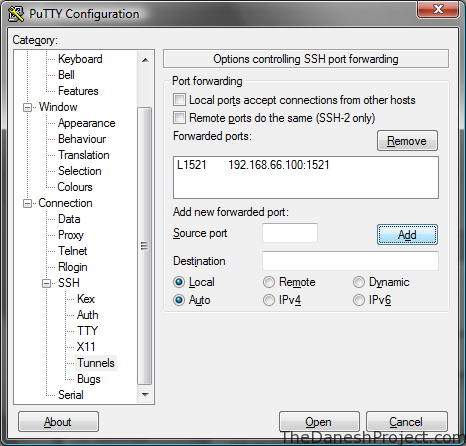
Look for the SSH tree entry in the menu to the left. Expand it and go to “Tunnels”.
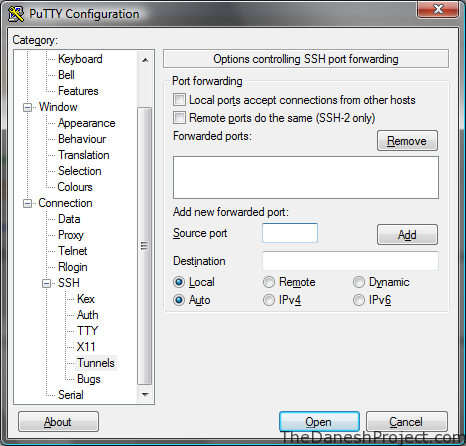
Fill the the required information and click add.
Source Port: 1521
Destination: 192.168.66.100:1521
“Source port” is the port Putty will listen on for incoming connections.
“Destination” is the destination port we are trying to access. In this example the Oracle listener is listening on port 1521 for incoming traffic so we use that.
“1521” is the standard Oracle listener port.
Remember to save the session in the session page.
Open Putty and login to the Linux box “Pandora” and port forwarding should be up.