Linux RAID
Use ZFS Instead: In the past I used Linux software RAID with ext4 for my personal NAS. I have since converted it to ZFS. I would recommend using ZFS if you care about your data. Take a look at these two related pages:
Assumptions:
- You are running Ubuntu 16.04 or 18.04
- Most commands on this page are run as root. You may want to use sudo instead.
Ubuntu Linux RAID 10 Array Setup
The Linux software RAID subsystem allows for the creation of really excellent RAID 10 arrrays. For these instructions we are going to assume you are running Ubuntu 16.04. If you are running another distro or version package names, etc. might be different but mdadm should function mostly the same.
To start, we want to make sure we install mdadm. We run apt-get update to get a fresh view of what is on the repo. We then install the mdadm package.
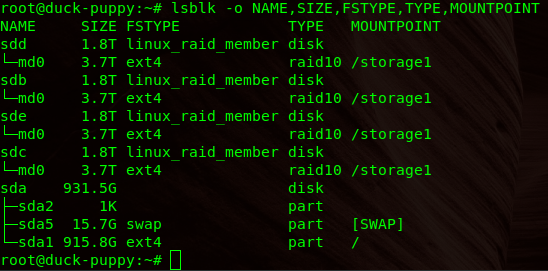
apt-get update apt-get install mdadm This will show relevant information about block devices on the system.
lsblk -o NAME,SIZE,FSTYPE,TYPE,MOUNTPOINT This is what it looks like on my NAS after setting everything up.
Create the actual array. Specify all four devices. Other numbers of drives are valid but we will use four for this example.
mdadm --create --verbose /dev/md0 --level=10 \ --raid-devices=4 /dev/sdb /dev/sdc /dev/sdd /dev/sde As an alternative it is also possible to create a four drive array with only two disks. The other two can be added later. You would use the keyword ‘missing’ in place of the second and third disk.
mdadm --create --verbose /dev/md0 --level=10 \ --raid-devices=4 /dev/sdb missing /dev/sdc missing Check the details of the array.
mdadm --detail /dev/md0 cat /proc/mdstat Save everything to the config file. The path to this file might be slightly different on other distros.
mdadm --detail --scan | sudo tee -a /etc/mdadm/mdadm.conf cat /etc/mdadm/mdadm.conf Create the filesystem on the array and mount it.
mkfs.ext4 -F /dev/md0 mkdir /storage1 mount /dev/md0 /storage1 df -h Add the mount to the fstab file.
echo '/dev/md0 /storage1 ext4 defaults,nofail,discard 0 0' >> /etc/fstab Unmount the filesystem for now.
Mount it with a single argument (relying on the fstab entry).
You might want to change the ownership if it will be used by another user other than root. If you had copied data onto the file system from somewhere else, you might want to do this recursively.
cd /storage1/ ls -la chown -R user1:user1 . ls -la If you had left two disks out, you can add them in when ready. Add the two missing disks with the following commands.
mdadm /dev/md0 --add /dev/sdb mdadm /dev/md0 --add /dev/sdd mdadm --detail /dev/md0 cat /proc/mdstat You can use mdadm for monitoring. The command can be daemonized and can send emails, etc. This isn’t a real monitoring solution. If the daemon were to die you would silently lose your monitoring.
Linux RAID — Replace a Drive
Assume we have two partitions on the drive.
smartctl -a /dev/sdb|grep -i serial mdadm --manage /dev/md0 --fail /dev/sdb1 mdadm --manage /dev/md0 --remove /dev/sdb1 mdadm --manage /dev/md1 --fail /dev/sdb2 mdadm --manage /dev/md1 --remove /dev/sdb2 Partition it the same as an existing disk in the array:
sfdisk -d /dev/sda | sfdisk /dev/sdb Add the new disk to the array:
mdadm --manage /dev/md0 --add /dev/sdb1 mdadm --manage /dev/md1 --add /dev/sdb2 Watch it syncing and wait until it is complete:
cat /proc/mdstat mdadm --detail /dev/md0 Linux — RAID 1 On The Root Disk — Setup
Install the tools you need:
apt-get install mdadm rsync initramfs-tools - Partition second disk with fdisk / cfdisk
- same size partitions as first in sectors
- type should be fd ( linux raid )
Add the second disk to array:
mdadm --create /dev/md0 --level=1 --raid-devices=2 missing /dev/sdb1 mdadm --create /dev/md1 --level=1 --raid-devices=2 missing /dev/sdb2mkswap /dev/md1 mkfs.ext4 /dev/md0Add this line to the end ( not sure why ):
echo "DEVICE /dev/sda* /dev/sdb*" >> /etc/mdadm/mdadm.conf mdadm --detail --scan >> /etc/mdadm/mdadm.confwatch -n1 cat /proc/mdstat # watch disk sync status if syncingRun a command to do the following:
- select both /dev/sda and /dev/sdb (but not /dev/md0) as installation targets
- installs bootloader on both drives
- rebuild init ramdisk and bootloader with raid support
Copy from old drive to new one:
mkdir /tmp/mntroot mount /dev/md0 /tmp/mntroot rsync -auHxv --exclude=/proc/* --exclude=/sys/* --exclude=/tmp/* /* /tmp/mntroot/Edit your fstab file and swap sda or uid for raid disk:
vi /tmp/mntroot/etc/fstab ##/dev/sda1 ##/dev/sda2 /dev/md0 /dev/md1- At the GRUB menu, hit “e”
- Edit your boot options. Just put (md/0) and /dev/md0 in the right places.
set root='(md/0)' linux /boot/vmlinuz-2.6.32-5-amd64 root=/dev/md0 ro quietOnce the system is booted up run either of these commands to verify that your system using the RAID device as expected:
Look for something like this:
/dev/md0 on / type ext4 (rw,noatime,errors=remount-ro)- Partition first disk with fdisk / cfdisk
- Use the same size partitions as second in sectors
- Make sure the partition types are set to fd ( linux raid )
Add original disk to the array:
mdadm /dev/md0 -a /dev/sda1 mdadm /dev/md1 -a /dev/sda2Check status and watch it sync:
Update grub so that you will use the RAID device when you boot from either disk.
update-grub # update grub - probably not needed dpkg-reconfigure grub-pc # because grub update didn't do both disksYou should see the second drive displayed as disabled:
cat /proc/mdstat # should show second drive as disabledOnce the system is up you can add the devices back to the array if they are missing:
mdadm /dev/md0 -a /dev/sdb1 # add it back mdadm /dev/md1 -a /dev/sdb2 # add it backEnable periodic RAID Checks to keep the disks in sync. These are built into the package.
You could also create a cron job that does the following:
echo "check" > /sys/block/md0/md/sync_actionDisk Health with Smartmon Tools
Update repo info and install Smartmon tools.
apt-get update apt install smartmontoolsGet a list of disks. Either way works.
fdisk -l|grep -i "Disk "|grep -v ram|grep -v identifier lsblk -o NAME,SIZE,FSTYPE,TYPE,MOUNTPOINTsmartctl -a /dev/sdb|grep -i errorRun a short test. This will run in the background and will take a few minutes. Once complete it will show in the smartctl -a’ output.
Wait a few minutes and check the drive again.
Configure smartd to run weekly SMART checks:
/etc/smartd.conf /dev/sda -a -d ata -o on -S on -s (S/../.././02|L/../../6/03) /dev/sdb -a -d ata -o on -S on -s (S/../.././02|L/../../6/03)Linux Raid Partition Types
For MBR partition tables either of these partition types will work but I would go with FD so that the disks can be detected as RAID. There are arguments for using DA instead of FD ( see the link to kernel.org in the references section ).
For GPT you woulduse this:
Good Resources
RAID
Redundant Array of Independent Disks (RAID) is a storage technology that combines multiple disk drive components (typically disk drives or partitions thereof) into a logical unit. Depending on the RAID implementation, this logical unit can be a file system or an additional transparent layer that can hold several partitions. Data is distributed across the drives in one of several ways called #RAID levels, depending on the level of redundancy and performance required. The RAID level chosen can thus prevent data loss in the event of a hard disk failure, increase performance or be a combination of both.
This article explains how to create/manage a software RAID array using mdadm.
RAID levels
Despite redundancy implied by most RAID levels, RAID does not guarantee that data is safe. A RAID will not protect data if there is a fire, the computer is stolen or multiple hard drives fail at once. Furthermore, installing a system with RAID is a complex process that may destroy data.
Standard RAID levels
There are many different levels of RAID; listed below are the most common.
RAID 0 Uses striping to combine disks. Even though it does not provide redundancy, it is still considered RAID. It does, however, provide a big speed benefit. If the speed increase is worth the possibility of data loss (for swap partition for example), choose this RAID level. On a server, RAID 1 and RAID 5 arrays are more appropriate. The size of a RAID 0 array block device is the size of the smallest component partition times the number of component partitions. RAID 1 The most straightforward RAID level: straight mirroring. As with other RAID levels, it only makes sense if the partitions are on different physical disk drives. If one of those drives fails, the block device provided by the RAID array will continue to function as normal. The example will be using RAID 1 for everything except swap and temporary data. Please note that with a software implementation, the RAID 1 level is the only option for the boot partition, because bootloaders reading the boot partition do not understand RAID, but a RAID 1 component partition can be read as a normal partition. The size of a RAID 1 array block device is the size of the smallest component partition. RAID 5 Requires 3 or more physical drives, and provides the redundancy of RAID 1 combined with the speed and size benefits of RAID 0. RAID 5 uses striping, like RAID 0, but also stores parity blocks distributed across each member disk. In the event of a failed disk, these parity blocks are used to reconstruct the data on a replacement disk. RAID 5 can withstand the loss of one member disk.
Note: RAID 5 is a common choice due to its combination of speed and data redundancy. The caveat is that if one drive were to fail and another drive failed before that drive was replaced, all data will be lost. Furthermore, with modern disk sizes and expected unrecoverable read error (URE) rates on consumer disks, the rebuild of a 4TiB array is expected (i.e. higher than 50% chance) to have at least one URE. Because of this, RAID 5 is no longer advised by the storage industry.
RAID 6 Requires 4 or more physical drives, and provides the benefits of RAID 5 but with security against two drive failures. RAID 6 also uses striping, like RAID 5, but stores two distinct parity blocks distributed across each member disk. In the event of a failed disk, these parity blocks are used to reconstruct the data on a replacement disk. RAID 6 can withstand the loss of two member disks. The robustness against unrecoverable read errors is somewhat better, because the array still has parity blocks when rebuilding from a single failed drive. However, given the overhead, RAID 6 is costly and in most settings RAID 10 in far2 layout (see below) provides better speed benefits and robustness, and is therefore preferred.
Nested RAID levels
RAID 1+0 RAID1+0 is a nested RAID that combines two of the standard levels of RAID to gain performance and additional redundancy. It is commonly referred to as RAID10, however, Linux MD RAID10 is slightly different from simple RAID layering, see below. RAID 10 RAID10 under Linux is built on the concepts of RAID1+0, however, it implements this as a single layer, with multiple possible layouts. The near X layout on Y disks repeats each chunk X times on Y/2 stripes, but does not need X to divide Y evenly. The chunks are placed on almost the same location on each disk they are mirrored on, hence the name. It can work with any number of disks, starting at 2. Near 2 on 2 disks is equivalent to RAID1, near 2 on 4 disks to RAID1+0. The far X layout on Y disks is designed to offer striped read performance on a mirrored array. It accomplishes this by dividing each disk in two sections, say front and back, and what is written to disk 1 front is mirrored in disk 2 back, and vice versa. This has the effect of being able to stripe sequential reads, which is where RAID0 and RAID5 get their performance from. The drawback is that sequential writing has a very slight performance penalty because of the distance the disk needs to seek to the other section of the disk to store the mirror. RAID10 in far 2 layout is, however, preferable to layered RAID1+0 and RAID5 whenever read speeds are of concern and availability / redundancy is crucial. However, it is still not a substitute for backups. See the wikipedia page for more information.
Warning: mdadm cannot reshape arrays in far X layouts which means once the array is created, you will not be able to mdadm —grow it. For example, if you have a 4x1TB RAID10 array and you want to switch to 2TB disks, your usable capacity will remain 2TB. For such use cases, stick to near X layouts.
RAID level comparison
RAID level Data redundancy Physical drive utilization Read performance Write performance Min drives 0 No 100% nX Best; on par with RAID0 but redundant