- Linux расширения для браузера
- # Packaging
- # Download .crx from the Chrome Web Store
- # Create .crx locally
- # Update a .crx package
- # Package through command line
- # Hosting
- # Updating
- # Update URL
- # Update manifest
- # Testing
- # Advanced usage: request parameters
- # Advanced usage: minimum browser version
- Как настроить оболочку Gnome с расширениями
- Инструмент интеграции Chrome
- Arch Linux
- Ubuntu
- Fedora
- OpenSUSE
- Gentoo
- Другой
- Расширение браузера Firefox
- Установка расширений
- Включение, отключение и удаление расширений
- Ubuntu
- Fedora
- Arch Linux
Linux расширения для браузера
Installing extensions on Linux
Published on Thursday, December 14, 2017 • Updated on Friday, March 23, 2018
The Chrome Web Store no longer accepts Manifest V2 extensions. Please use Manifest V3 when building new extensions. You will find a section on upgrading in the navigation tree at the left, including the Manifest V2 support timeline.
Extensions hosted outside of the Chrome Web Store can only be installed by Linux users. This article describes how to package, host, and update .crx files from a personal server. If distributing an extension or theme solely through the Chrome Web Store, consult Webstore Hosting and Updating.
# Packaging
Extensions and themes are served as .crx files. When uploading through the Chrome Developer Dashboard , the dashboard creates the .crx file automatically. If published on a personal server, the .crx file will need to be created locally or downloaded from the Chrome Web Store.
# Download .crx from the Chrome Web Store
If an extension is hosted on the Chrome Web Store, the .crx file can be downloaded from the Developer Dashboard. Locate the extension under «Your Listings» and click on «More info». In the popup window, click the blue main.crx link to download it.

The downloaded file can be hosted on a personal server. This is the most secure way to host an extension locally as the contents of the extension will be signed by the Chrome Web Store. This helps detect potential attacks and tampering.
# Create .crx locally
Extension directories are converted to .crx files at the Extensions Management Page. Navigate to chrome://extensions/ in the ominibox, or click on the Chrome menu, hover over «More Tools» then select «Extensions».
On the Extensions Management Page, enable Developer Mode by clicking the toggle switch next to Developer mode. Then select the PACK EXTENSION button.

Specify the path to the extension’s folder in the Extension root directory field then click the PACK EXTENSION button. Ignore the Private key field for a first-time package.

Chrome will create two files, a .crx file and a .pem file, which contains the extension’s private key.

Do not lose the private key! Keep the .pem file in a secret and secure place; it will be needed to update the extension.
# Update a .crx package
Update an extension’s .crx file by increasing the version number in manifest.json .
Return to the Extensions Management Page and click the PACK EXTENSION button. Specify the path to the extensions directory and the location of private key.

The page will provide the path for the updated packaged extension.
# Package through command line
Package extensions in the command line by invoking chrome.exe . Use the —pack-extension flag to specify the location of the extension’s folder and the —pack-extension-key flag to specify the location of the extension’s private key file.
=C:\myext --pack-extension-key=C:\myext.pem# Hosting
A server that hosts .crx files must use appropriate HTTP headers to allow users to install the extension by clicking a link.
Google Chrome considers a file to be installable if either of the following is true:
- The file has the content type application/x-chrome-extension
- The file suffix is .crx and both of the following are true:
- The file is not served with the HTTP header X-Content-Type-Options: nosniff
- The file is served with one of the following content types:
- empty string
- «text/plain»
- «application/octet-stream»
- «unknown/unknown»
- «application/unknown»
- «*/*»
The most common reason for failing to recognize an installable file is that the server sends the header X-Content-Type-Options: nosniff . The second most common reason is that the server sends an unknown content type—one that isn’t in the previous list. To fix an HTTP header issue, either change the configuration of the server or try hosting the .crx file at another server.
# Updating
Every few hours, the browser checks installed extensions for an update URL. For each one, it makes a request to that URL looking for an update manifest XML file.
- The content returned by an update check is an update manifest XML document listing the latest version of an extension.
If the update manifest mentions a version that is more recent than what is installed, the browser downloads and installs the new version. As with manual updates, the new .crx file must be signed with the same private key as the currently installed version.
Note: In order to maintain user privacy, Google Chrome does not send any Cookie headers with autoupdate manifest requests, and ignores any Set-Cookie headers in the responses to those requests.
# Update URL
Extensions hosted on servers outside of the Chrome Webstore must include the update_url field in their manifest.json file.
"name": "My extension",
.
"update_url": "https://myhost.com/mytestextension/updates.xml",
.
>
# Update manifest
The update manifest returned by the server should be an XML document.
gupdate xmlns='http://www.google.com/update2/response' protocol='2.0'>
app appid='aaaaaaaaaaaaaaaaaaaaaaaaaaaaaaaa'>
updatecheck codebase='https://myhost.com/mytestextension/mte_v2.crx' version='2.0' />
app>
gupdate>
This XML format is borrowed from that used by Omaha, Google’s update infrastructure. The extensions system uses the following attributes for the and elements of the update manifest:
appid The extension ID is generated based on a hash of the public key, as described in packaging. An extension’s ID is displayed on the Extensions Managment Page codebase An HTTPS URL to the .crx file. version Used by the client to determine whether it should download the .crx file specified by codebase . It should match the value of «version» in the .crx file’s manifest.json file. The update manifest XML file may contain information about multiple extensions by including multiple elements.
# Testing
The default update check frequency is several hours, but an update can be forced using the Update extensions now button on the Extensions Management Page.

This will start checks for all installed extensions.
# Advanced usage: request parameters
The basic autoupdate mechanism is designed to make the server-side work as easy as just dropping a static XML file onto any plain web server, such as Apache, and updating that XML file as new extension versions are released.
Developers hosting multiple extensions may check request parameters, which indicate the extension ID and version in the update request. Including these paramaters allow extensions to update from the same URL running dynamic server-side code instead of a static XML file.
The format of the request parameters is:
Where EXTENSION_DATA is a URL-encoded string of the format:
For example, two extensions point to the same update URL ( https://test.com/extension_updates.php ):
- Extension 1
- ID: «aaaaaaaaaaaaaaaaaaaaaaaaaaaaaaaa»
- Version: «1.1»
- ID: «bbbbbbbbbbbbbbbbbbbbbbbbbbbbbbbb»
- Version: «0.4»
The request to update each individual extension would be,
https://test.com/extension_updates.php?x=id%3Daaaaaaaaaaaaaaaaaaaaaaaaaaaaaaaa%26v%3D1.1https://test.com/extension_updates.php?x=id%3Dbbbbbbbbbbbbbbbbbbbbbbbbbbbbbbbb%26v%3D0.4Multiple extensions can be listed in a single request for each unique update URL. For the above example, if a user has both of the extensions installed, then the two requests are merged into a single request:
https://test.com/extension_updates.php?x=id%3Daaaaaaaaaaaaaaaaaaaaaaaaaaaaaaaa%26v%3D1.1&x=id%3Dbbbbbbbbbbbbbbbbbbbbbbbbbbbbbbbb%26v%3D0.4If the number of installed extensions using the same update URL is large enough that a GET request URL is too long (over 2000 characters or so), the update check issues additional GET requests as necessary.
# Advanced usage: minimum browser version
As more APIs are added to the extensions system, an updated version of an extension that will work only with newer versions of the browser may be released. While Google Chrome itself is autoupdated, it can take a few days before the majority of the user base has updated to any given new release. To ensure that a given update will apply only to Google Chrome versions at or higher than a specific version, add the «prodversionmin» attribute to the element in the update response.
gupdate xmlns='http://www.google.com/update2/response' protocol='2.0'>
app appid='aaaaaaaaaaaaaaaaaaaaaaaaaaaaaaaa'>
updatecheck codebase='http://myhost.com/mytestextension/mte_v2.crx' version='2.0' prodversionmin='3.0.193.0'/>
app>
gupdate>
This would ensure that users would autoupdate to version 2 only if they are running Google Chrome 3.0.193.0 or greater.
Updated on Friday, March 23, 2018 • Improve article
Как настроить оболочку Gnome с расширениями

Если вы когда-либо хотели получить больше от своего рабочего стола Linux, настроив его, вам повезло. Среда рабочего стола Gnome поддерживает расширения так же, как и веб-браузер. Вы можете настроить Gnome Shell с помощью расширений. С помощью расширений пользователи могут добавлять настраиваемые функции на свой рабочий стол. Эти расширения доступны для всех без изменений. Все, что требуется, — это веб-браузер, чтобы все заработало. В этой статье мы рассмотрим, как установить среду выполнения браузера Gnome, где получить расширения и как их установить. Кроме того, мы рассмотрим, как использовать инструмент настройки Gnome для отключения и удаления различных расширений.
Инструмент интеграции Chrome
Чтобы настроить Gnome Shell с расширениями, вам понадобится веб-браузер. Это потому, что Gnome в значительной степени полагается на магазин расширений на основе браузера. К сожалению, загружать что-либо в браузер становится все труднее и труднее. Плагины больше не загружаются. Фактически, Google Chrome работал с сайтом расширения Gnome. Затем Google забрал API плагина Netscape, и он перестал работать.
Именно из-за этого разработчики Gnome взяли на себя задачу создать инструмент интеграции. Вот как установить его в разных дистрибутивах Linux, чтобы пользователи могли использовать Chrome для установки своих любимых настроек рабочего стола.
Arch Linux
Среда выполнения Chrome Gnome в настоящее время не упакована в официальные репозитории Arch Linux. К счастью, есть пакет AUR.
Ubuntu
sudo apt-get install chrome-gnome-shell
Fedora
Среда выполнения Gnome доступна в Fedora благодаря пакету Copr. Установите его с помощью этих команд:
sudo dnf copr enable region51/chrome-gnome-shell sudo dnf install chrome-gnome-shell
OpenSUSE
Среда выполнения Google Chrome Gnome доступна в службе сборки Open SUSE. Перейдите на эту страницу, чтобы получить это.
Каждая текущая версия OpenSUSE (Leap and Tumbleweed) имеет кнопку установки в один клик. Нажмите кнопку, чтобы открыть инструмент установки YaST, и вскоре в вашей системе появится среда выполнения Chrome Gnome.
Gentoo
sudo emerge -av gnome-extra/chrome-gnome-shell
Другой
Если вашей операционной системы нет в этом списке, лучший способ получить среду выполнения Chrome — скомпилировать ее вручную. Вот инструкции по сборке.
Расширение браузера Firefox
Чтобы установить расширения Gnome в Linux с помощью Firefox, необходимо расширение для браузера. Это позволит Firefox напрямую взаимодействовать со средой рабочего стола Gnome Shell. Загрузите расширение для браузера здесь. Появится всплывающее окно с просьбой установить его. Когда расширение будет установлено, предупреждение исчезнет.
Примечание. Следуйте приведенным выше инструкциям среды выполнения Chrome, чтобы расширения работали с Firefox в дополнение к установке расширения браузера.
Установка расширений
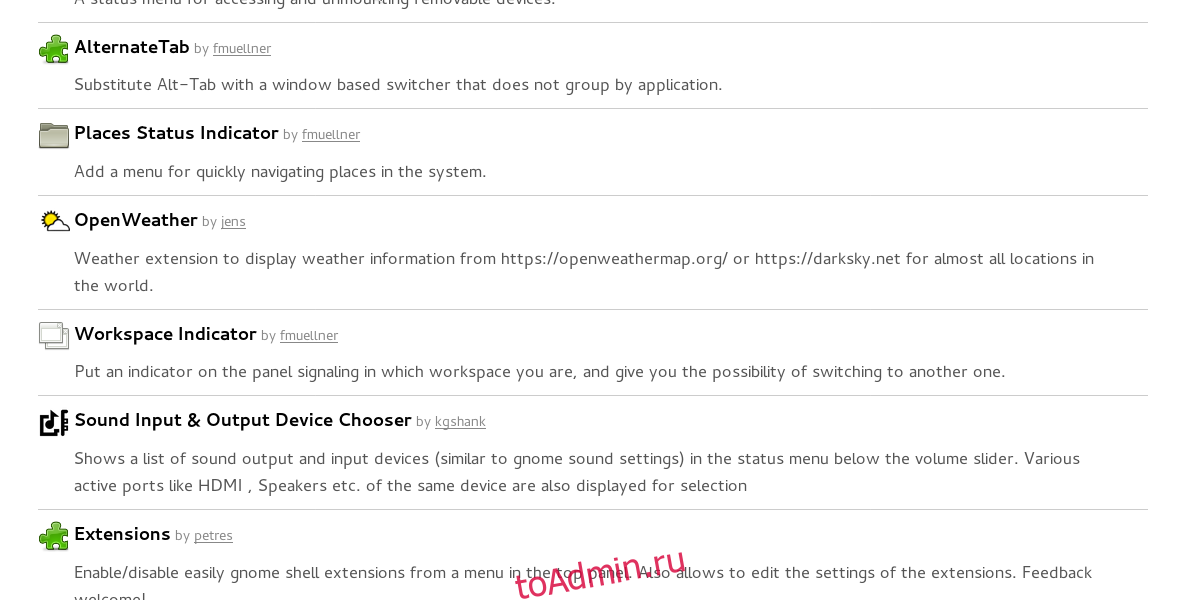
Заставить расширения Gnome работать на вашем компьютере с Linux очень просто. Сначала отправляйтесь в официальная страница расширения. Это магазин, в котором размещены различные типы настроек и изменений в среде рабочего стола Gnome. Используйте кнопку поиска, чтобы найти что-то конкретное. Или же просмотрите нумерованный список и выберите добавочный номер.
Каждое отдельное расширение имеет специальную страницу с подробным описанием. На каждой странице также есть кнопка установки. Нажмите кнопку установки, чтобы установить расширение на рабочий стол Gnome.
Включение, отключение и удаление расширений
Расширения управляются с помощью программы под названием «Gnome Tweak Tool». С его помощью пользователи могут включать, отключать и удалять расширения. Инструмент настройки является неотъемлемой частью среды рабочего стола Gnome, так как он содержит множество настроек, которые пользователи могут «настраивать».
Обычно пользователи обнаруживают, что этот инструмент уже установлен в их операционной системе Linux на основе Gnome. Если нет, очень просто установить.
Примечание: операционной системы нет в списке? Не беспокоиться! Просто найдите «gnome-tweak-tool» там, где вы обычно устанавливаете программное обеспечение.
Ubuntu
sudo apt install gnome-tweak-tool
Fedora
sudo dnf install gnome-tweak-tool
Arch Linux
sudo pacman -S gnome-tweak-tool