- 3 Ways to Burn RAW File to USB Drive
- Method 1: Burn RAW File to USB Drive with UUByte DMG Editor
- Step 1: Installation
- Step 2: Attach USB Drive and Import .raw File
- Step 3: Start Burning RAW to USB
- Method 2: Write .raw File to USB via Win32 Disk Imager
- Method 3: How to Burn RAW File to USB in Linux
- How can I write raw data to a USB device
- 1 Answer 1
3 Ways to Burn RAW File to USB Drive
RAW (.raw) files are basically a specific Photoshop format for images. These are lossless in terms of quality, but the disadvantage is that they cannot be opened like normal image files with bitmap-based tools. Users also use the term «raw image files» to refer to various other digital camera and scanner formats such as DNG, CRW, NEF, and so on, as well as raw disk image files for software installation. For this exercise, we’re referring to .raw files that are used to install software applications.
To burn a .raw file to USB drive, you will need special software like UUByte DMG Editor. Along with this versatile software, we will also showcase two other ways to burn a RAW file to a pen drive on a Windows PC.
Method 1: Burn RAW File to USB Drive with UUByte DMG Editor
First, don’t be scared or confused by its name. UUByte DMG Editor is a comprehensive tool to manage disk image files of various formats, including .raw and .dmg files. With this utility as part of your software arsenal, you can extract and burn disk image files to various media storage devices, including USB and DVD disc. The operation is simple and can be executed with the following steps:
Step 1: Installation
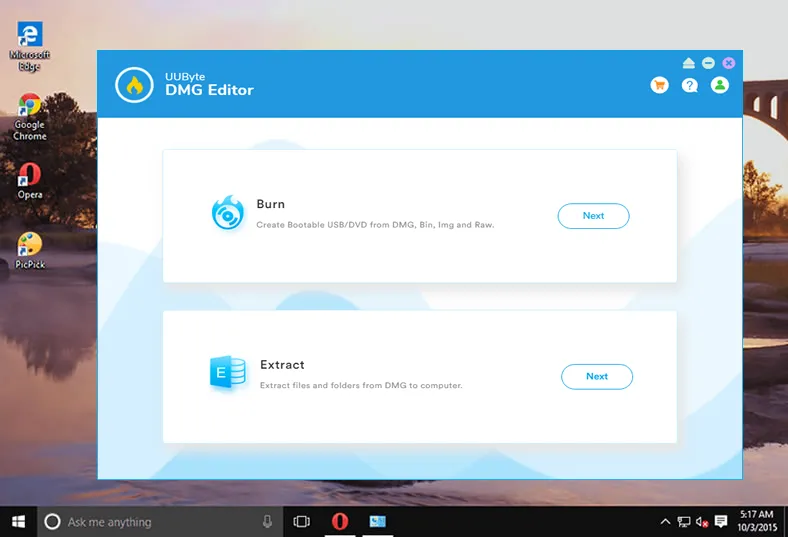
Download and install the software from the official site here. When you launch UUByte DMG Editor, you will see a Burn and an Extract option. Click the Burn option to go to the next page.
Step 2: Attach USB Drive and Import .raw File
Insert your USB drive into an available port on your computer. In the software window, click on Browse and select the .raw file to be burned to USB. Check if your USB drive is detected and displayed in the next field. If not, click Change to select the right one.
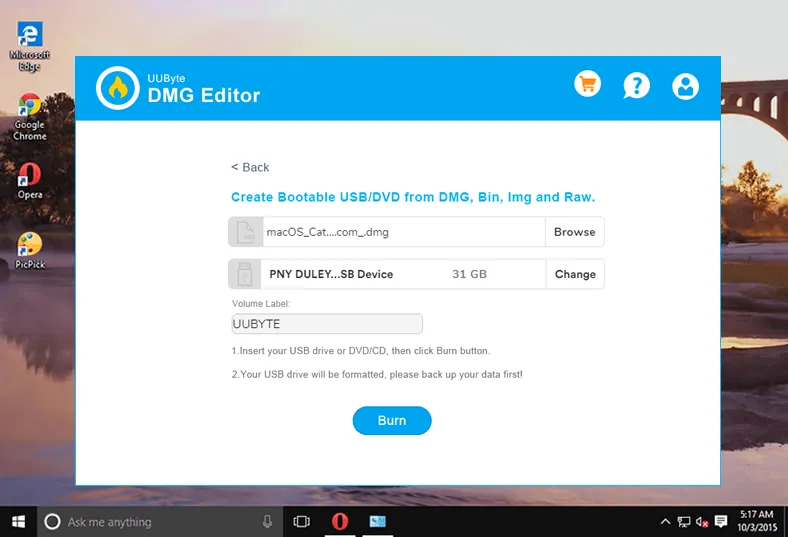
Step 3: Start Burning RAW to USB
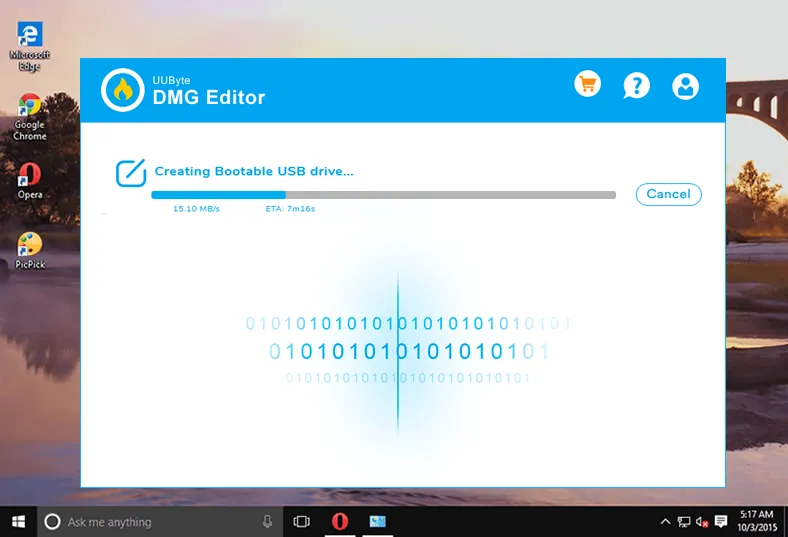
Rename the drive to indicate what it contains and click the Burn button. Wait for your file to be burned to the media storage device.
That’s all you need to do. As you can see, the software is designed to be easy for first-time users, but powerful enough to appeal to experts who regularly work with disk image files. UUByte currently supports more than 10 different disk image formats and has a very high burn success rate. It also supports a wide range of OS images for multiple platforms. You can also use the software to directly open disk images and extract their content even if the OS doesn’t natively support that particular format. For example, you can open and extract DMG files on Windows, and so on.
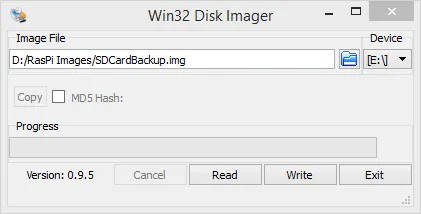
Method 2: Write .raw File to USB via Win32 Disk Imager
Another way to burn a RAW file to USB is with Win32 Disk Imager. This particular utility works both ways: you can burn a disk image file to a portable storage device and also take a backup of a device as a raw image file. It works on Windows 7 to Windows 10 and may also work on Server versions, although it has not been fully tested by the creators of the software. Here are the steps involved in burning a .raw file to USB:
Step 1: Download the software from Source Forge and install it on your PC. Run the .exe file as an administrator and launch the software.
Step 2: Click the folder icon and browse to the folder where your .raw file is located. Click Open to import it into Win32 Disk Imager.
Step 3: Insert your USB and select it under the Device section using the dropdown option.
Step 4: Click on Write and confirm with Yes. Once the USB is ready, you can eject it and use it for whatever purpose you need.
Although Win32 Disk Imager is generally reliable, there are certain cases where you may come across an error. For example, the target device may not be detected, it may not support your Windows Server version, and so on. Since it is a free and open-source product, the only support you will get is from the community of users, which is often a long process.
Method 3: How to Burn RAW File to USB in Linux
The third way to burn a RAW file to a USB drive is to do it on a command-line interface like Terminal in Linux. While the method itself is simple, you may need some experience to handle it when things go wrong. The ‘dd’ command can be used for this purpose, as explained below:
Step 1: Insert your USB drive into the Linux computer and open Terminal. Put your .raw file into a separate folder.
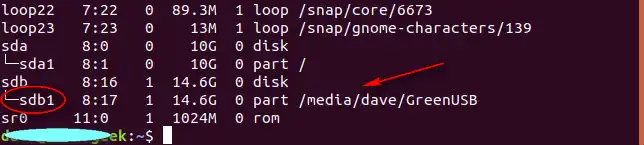
Step 2: Use «lsblk» command (hit Enter after you input the command) to list all available devices. This is to confirm that your device has been detected. In following screenshot, sdb1 is the identifier of inserted USB drive.
Step 3: Next, unmount the USB with the command shown below, once again followed with Enter:
sudo umount /dev/devicename
Step 4: Modify the last part to match your device name as shown after executing Step 2. Finally, burn the file to USB with this command (followed by Enter):
sudo dd if=/path/to/file/downloads of=/dev/devicename
Change ‘downloads’ to the name of the folder containing the .raw file and ‘devicename’ to your USB drive’s name, as explained in Step 3. The only problem with this method is that it is dependent on several factors in order to successfully create a bootable drive. For example, your drive may not be detected, the RAW file itself may be corrupted, the partition type may be wrong, etc.
To avoid all these problems, it is recommended to use UUByte DMG Editor and get the job done in minutes with zero confusion and zero hassle. The product will serve you well across both Windows and macOS ecosystems and you will receive timely security and feature updates so you always have the safest and most current version at your disposal.
Petty is editor in chief at UUByte and writes various topics about Windows and Mac to help people make the most of current technology.
How can I write raw data to a USB device
I’m attempting to write raw data to a USB device connected to my computer. I’m using Kali Linux, and I found the correct filepath: «/dev/usb/003/013» . However, when I try to write data to it I get an error.
root@kali:~/usb# printf "test" > /dev/bus/usb/003/013 bash: printf: write error: Invalid argument root@kali:~/usb# cat test > /dev/bus/usb/003/013 cat: write error: Invalid argument In the previous case the file ‘test’ does exist and have data in it. It seems that the system is unable to write to the file descriptor even though it is there. After researching I’ve come to the conclusion that you either: A. Need a USB driver that will interface with the device. B. Use an SCSI Pass Through to write data directly to the Endpoints on the device. I’m new to USB programming and although I’m game to try, I’ve never written a driver before. Any advice or help would be appreciated. Is it possible to write raw data to the Device like I originally tried? If not, could you explain some options available to me?
I’m not super skilled with shell scripting, but how about trying echo «test» > /dev/bus/usb/003/013 instead of printf ? Also, this might be a related question that could help.
Usb devices are far more complex than simply pipes you read and write. You’ll have to write code to manipulate them. You don’t need to write a kernel driver. See libusb.org libusb.sourceforge.net/api-1.0. This is possibly Linux-specific.
@EdwardFalk if you will make an answer with that included then I will accept it as the solution. Thanks for the tip!
1 Answer 1
Usb devices are far more complex than simply pipes you read and write. You’ll have to write code to manipulate them. You (probably) don’t need to write a kernel driver. See http://libusb.info (née libusb.org) and http://libusb.sourceforge.net/api-1.0. This claims to work with Linux, OSX, Windows, Android, OpenBSD, etc. Under Mac OS X there are user-level functions in I/O Kit that will let you access USB. Under Windows, you may be able to use WinUSB, but it’s complicated.
Here’s a little diagram I drew once to help me understand the architecture of USB:
╭────────────────────────────────────╮ ┌──────┐ │ device ┌─────┐ ┌─────────┐ │ │ Port ├──┐ │ ┌─┤ EP0 ├──┤ control │ │ └──────┘ │ │ ┌────────┐ │ └─────┘ ├─────────┤ │ ├────┤addr = 2├─┤ ┌─────┐ │ │ │ │ │ └────────┘ ├─┤ EP1 ├──┤interface│ │ │ │ │ └─────┘ │ #0 │ │ │ │ │ ┌─────┐ ├─────────┤ │ │ │ ├─┤ EP2 ├──┤ │ │ │ │ │ └─────┘ │interface│ │ │ │ │ ┌─────┐ │ #1 │ │ │ │ └─┤ EP3 ├──┤ │ │ │ │ └─────┘ └─────────┘ │ │ ╰────────────────────────────────────╯ │ │ : Executive summary: every device has an address (assigned by the O/S and subject to change), and up to (I think) 32 endpoints.
Within the device are one or more «interfaces». For example, a web cam might provide a «camera» interface and a «microphone» interface. A multi-function printer would provide several interfaces.
Endpoint 0 is used for control and configuration of the device, and the others are to access the various interfaces. Each interface has zero or more (usually more) endpoints.
Endpoints can be one of several transfer types:
- Control Transfers are used to query and configure the device. Every device is required to support a minimum set of control statements. I believe that control transfers are only used with endpoint 0.
- Bulk Transfers send or receive data at full bandwidth
- Interrupt transfers (I’m not really sure how this is different from bulk transfers; USB doesn’t have interrupts). Examples include keyboard and mouse
- Isochronous transfers send or receive data at full bandwidth with realtime requirements but without reliability. Used for audio/video applications.
Also worth noting: a USB device can have multiple configurations, which control what interfaces are available and so forth. Changing a device configuration is almost like unplugging the device and plugging a different device in its place.
All of this information is laid out in device descriptors, config descriptors, interface descriptors, endpoint descriptors, etc., which can be queried via endpoint zero.
(Internally, data isn’t a stream of bytes, it’s packed into packets whose exact formats are part of the USB specification. For the most part, you don’t need to worry about this as the controllers and drivers will manage this part for you.)
In practice, depending on your API library and operating system, you’ll need to detect the device, read the various descriptors to find out what you’re dealing with, optionally set its configuration (if the OS permits), open the interface, and open the endpoints.
For bulk endpoints, you can read and write raw data to them. For control transfers, the API library will provide function calls. I’ve never used interrupt or isochronous transfers; I’m sure your API library will have the relevant documentation.
More info: «Function» is a collection of interfaces that work together. It’s not originally part of the USB spec, and it’s up to the device driver to know which interfaces should be grouped together. The USB Working Group has defined device classes which support functions. This is done via the Interface Association Descriptor (IAD).