- How to Change a Read-Only File in Linux?
- Type of Permissions in Linux OS
- Read Permission
- Write Permission
- Execute Permission
- Method 1: Changing Read-Only File (Alphabetic Representation)
- For User Rights:
- For Group Rights:
- For Other Rights:
- Method 2: Changing a Read-Only File (Octal Values)
- For User Rights:
- For Group Rights:
- For Other Rights:
- Conclusion
- Make all files under a directory read-only without changing permissions?
- Give read-only access to specific folders?
- 2 Answers 2
- How can I make a folder read-only for just a specific application?
- 2 Answers 2
- Accessing data from another user
- Pretend to modify permissions
How to Change a Read-Only File in Linux?
In Linux operating systems, files and folders have three main permissions, which are read, write, and execute, which determine what actions can be taken on them. If you cannot make changes to a file or execute it, it may be because you do not have the necessary permissions. This is often done for security, as it prevents unauthorized access or modifications to sensitive files or folders.
In this article, we will discuss how to give write and execute permissions to a file or folder that is currently only readable. The content of this article is described below:
Before coming to the main topic, it is important to get a brief knowledge on different permission, which are explained below:
Type of Permissions in Linux OS
There are generally three types of permission which you can allow to any user or remove from them that are as follow
Read Permission
The read permission allows you to give or remove the reading rights of any file directory to the user and in the terminal, it stands for ‘r’
Write Permission
The write permission allows you to give or remove the rights to write anything on the file and make changes and in the terminal, it stands for ‘w’
Execute Permission
The execute permission allows you to give or remove the rights to execute any file, such as app image, and in the terminal, it stands for ‘x’.
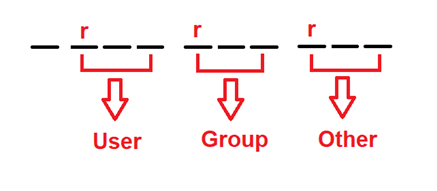
When you see the permission of any file or directory, it will show you in the order as mentioned below:

This means that when you check the permission of any file, it will show you that using 10 dash (-) lines. The first one shows you if it’s a directory or not, so if it’s not a directory, that line will remain empty. Now the next 9 lines are for users, groups, and others, and each can get access to any of these explained permissions.
Method 1: Changing Read-Only File (Alphabetic Representation)
If you want to see the permission of any specific file, then you can do that by typing

By default, the permission of a file can be seen as all users have the same permission to read a file only, so you will have something like that as below:
Now there are two different methods that you can apply to change the read-only file permission which is explained below:
$ chmod a+w testfile.txt # for giving write rights to all users $ chmod a+x testfile.txt # for giving execute rights to all user $ chmod a+wx testfile.txt # for giving both write and execute rights to all users
For example, if you want to give the write and execute rights both to all the users then you need to run the third command which is
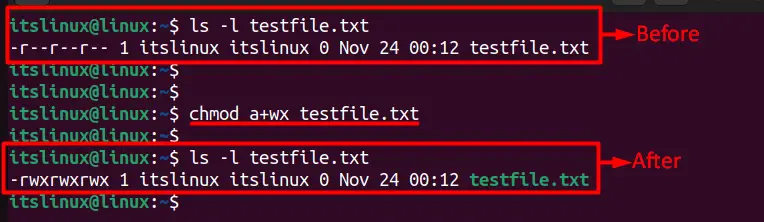
If you execute the first code, then you are giving rights to write anything on a file and modify it. If you execute the second code, you are given the right to execute a file, and then in the third code, you can do both, which are written and executed.
The main drawback is that it gives the same rights to all levels of users so if you want to give any right to a certain user, then you can do that by typing the below commands:
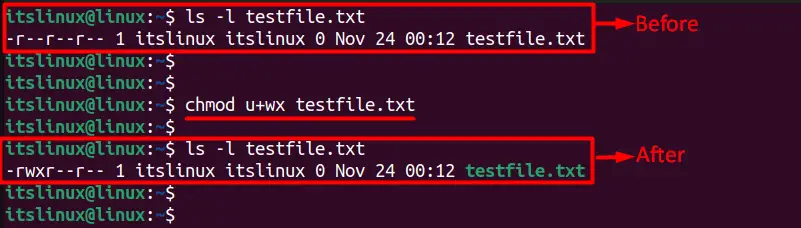
For User Rights:
To give any rights to the main user you need to type the following command mentioned below:
$ chmod u+w testfile.txt # for giving write rights to a user $ chmod u+x testfile.txt # for giving execute rights to a user $ chmod u+wx testfile.txt # for giving both write and execute rights to a user
Suppose you want to give the write and execute right both to the main user then you can do that by typing the third command from above and the result is mentioned below:
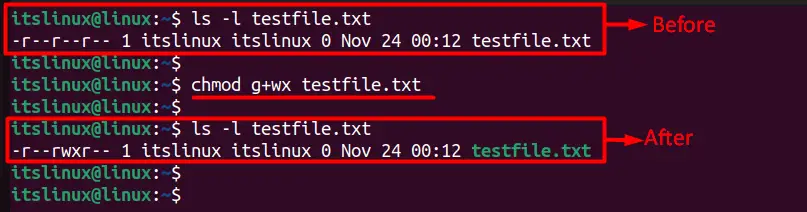
For Group Rights:
To give any rights to the group users you need to type the following command mentioned below:
$ chmod g+w testfile.txt # for giving write rights to group users $ chmod g+x testfile.txt # for giving execute rights to group users $ chmod g+wx testfile.txt # for giving both write and execute rights to groups users
Suppose you want to give write and execute right both to the group user then you can do that by typing the third command from above and the result is mentioned below:
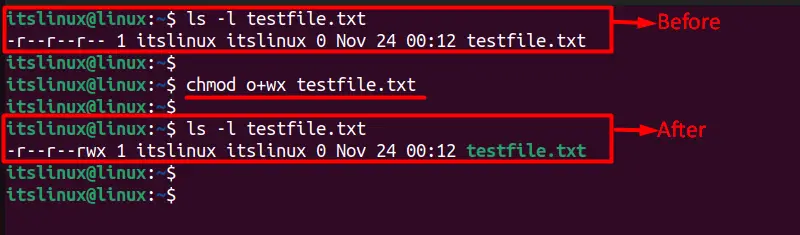
For Other Rights:
To give any rights to the other users you need to type the following command mentioned below:
$ chmod o+w testfile.txt # for giving write rights to other users $ chmod o+x testfile.txt # for giving execute rights to other users $ chmod o+wx testfile.txt # for giving both write and execute rights to other users
Suppose you want to give write and execute right both to the group user then you can do that by typing the third command from above, and the result is mentioned below:
Method 2: Changing a Read-Only File (Octal Values)
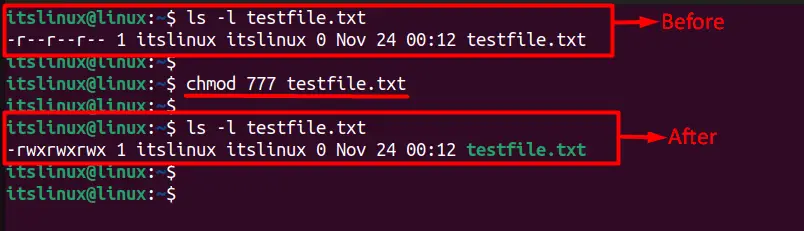
You can use the numeric values (also known as octal values in permissions) as well assigned to the read write and execute to change a read-only file, and their values are mentioned below.
For example, if you want to give read, write, and execute permission to all users; you need to add the corresponding numbers, such as (4 + 2 + 1) = 7. So, if you want to permit every group user, then you need to type the following command:
For User Rights:
To give any rights to the main user, you need to type the following command mentioned below:
$ chmod 644 testfile.txt # for giving read and write rights to a user $ chmod 544 testfile.txt # for giving read and execute rights to a user $ chmod 744 testfile.txt # for giving read, write and execute rights to a user
For Group Rights:
To give any rights to the group users you need to type the following command mentioned below:
$ chmod 464 testfile.txt # for giving read and write rights to group users $ chmod 454 testfile.txt # for giving read and execute rights to group users $ chmod 474 testfile.txt # for giving read, write and execute rights to groups users
For Other Rights:
To give any rights to the other users you need to type the following command mentioned below:
$ chmod 446 testfile.txt # for giving read and write rights to other users $ chmod 445 testfile.txt # for giving read and execute rights to other users $ chmod 447 testfile.txt # for giving read, write and execute rights to other users
That’s how you can change the read-only file’s permission.
Conclusion
In a Linux operating system, every file and folder has a set of permissions that dictate what actions can be taken on them. These permissions include reading, writing, and executing the file or folder. If you cannot make changes to a file or execute it, it may be because you do not have the appropriate permissions. So if you want to change the permissions, we have discussed two different methods for your better understanding.
Make all files under a directory read-only without changing permissions?
Only users in the smbusers group are allowed to access the files and snapshots shares; similarly, only users in the smbprivate group are allowed to access the files in private. Additionally, Linux permissions prohibit users not in the respective groups from accessing the files and private directories, both on the local system and within the snapshots Samba share.
This is great, because it means that we have a fully functional file server with a self-help «restore from backup» option (users can simply access the snapshots share and retrieve the file(s) they want to restore themselves), but so far I lack one key ingredient: Non-root access on the local system to the /var/smb/snapshots directory.
The snapshots must be strictly read-only to all regular users, however of course the file system must be mounted read-write to allow the backup operation to take place. The permissions on these directories are currently:
root@odin:/var/smb# ll total 40 drwxrwxr-x 7 root root 4096 2011-04-11 15:18 ./ drwxr-xr-x 14 root root 4096 2011-04-10 19:07 ../ drwxrwx--- 15 kromey smbusers 4096 2010-12-07 13:09 files/ drwxrwx--- 7 kromey smbprivate 4096 2010-04-07 07:08 private/ drwxrwx--- 3 root root 4096 2011-04-11 15:16 snapshots/ Now, what I want is to provide access to the snapshots directory to non-root users, but in a strictly read-only fashion. I can’t mount /dev/md2 read-only, though, because I have to have it read-write to run backups; I can’t simply re-mount it read-write for a backup and then re-mount it back to read-only, because that provides a window of time when the backups could be written to by another user.
Previously I did this by making my snapshots directory a read-only NFS export (only to localhost) and mounting that locally (the original secured under a directory lacking traversal rights for non-root users), but this feels like a hack and there seems like there should be a better way to accomplish this. I did try the mount —bind option, but it seems to lack the ability to have different access levels (i.e. read-only versus read-write) on the two directories (unless I’m missing something: mount -r —bind dir1 dir2 ).
Any ideas how I can accomplish this without NFS, or is that my best option?
TL;DR: How can I make the contents of a file system available read-write to a select user, but strictly read-only to everyone else, while maintaining original permissions and ownerships on the files backed up to this file system?
Give read-only access to specific folders?
I would like to give read-only access to a user but I want him/her to see only the exact folders I give access. for example he/she shouldn’t travel around all the server and browse to all users folders etc. even if he/she only goes up, up, up I want him/her to go to only these specific folders I allow. So firstly how can I let a specific user have access to a specific folder and then would putting symbolic links to his/her home folder would help? So they can go directly to necessary folders but not up or down?
2 Answers 2
You should set necessary directory permissions. For directories they are:
- read: permitted to view files and sub-directories in that directory
- write: permitted to create files and sub-directories in that directory
- execute: permitted to enter into a directory.
For files the situation is similar, it’s quite obvious, so you can handle it on your own.
Numeric these permissions:
To edit permissions use chmod . Usage: chmod xyz
jack and jack’s group will have read+write access to /home/jack and all it’s sub-directories. The rest will have only read access. -R option here used to recursively set permissions.
will give jack full access to /home/jack/video directory. See also: chown , chgrp for changing owner and owning group.
How can I make a folder read-only for just a specific application?
Past experience has taught me never to test out unfamiliar media players on my existing media library, lest nosy «convenience» functions automatically rearrange, re-tag, sloppily import into, or otherwise alter my carefully-curated data. How can I expose my music to such a player in a read-only fashion?
2 Answers 2
I will show two methods that do not require to alter the files in the media library.
Accessing data from another user
Create a new (non administrative) user otheruser , add it to your group:
sudo gpasswd -a otheruser $USER Modify your home to grant read and execute permissions for the group members (this is required if you have an encrypted home partition):
Then switch to otheruser , that should have now read access to all your data.
I should point out that, if you have an encrypted home partition, the other user could access your data as long as you are logged in. So you should login then switch user without loggin out from the first user.
Pretend to modify permissions
The package bindfs allow to mount a given directory with altered permissions, so the steps could be:
sudo apt-get install bindfs Create a mount point and assign it to your user
sudo mkdir /media/home-altered sudo chown $USER:$USER /media/home-altered Mount the real home to the mount point without write permissions:
sudo bindfs -p a-w $HOME /media/home-altered Now, in /media/home-altered you will see your home directory with altered permissions, and accessing data through that path prevent to modify the data.
Almost the same effect of the second method can be obtained with a bind mount and a read-only remount:
sudo mkdir /media/$USER sudo mount --bind /home/$USER /media/$USER sudo mount -o remount,ro /media/$USER